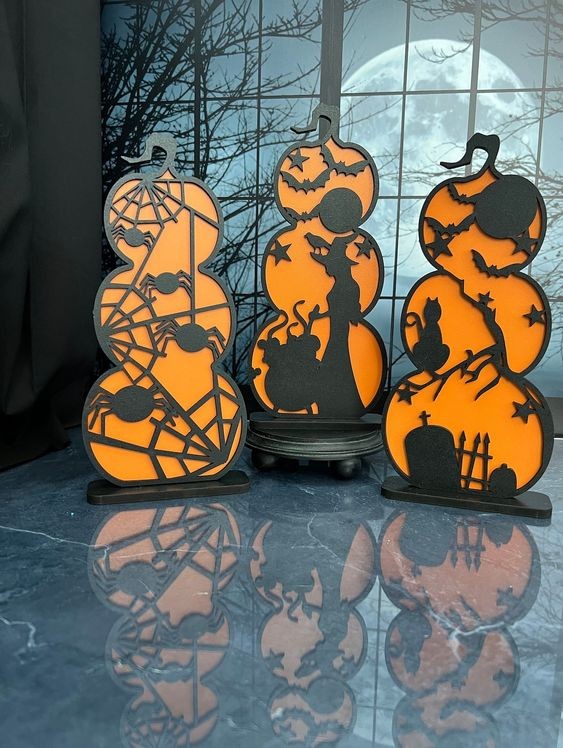


### Stacked Pumpkin Shelf Sitter: Orange with Black Overlay Design for Halloween Decor
As the crisp air of autumn sets in and Halloween approaches, it's time to bring a festive touch to your home decor. One charming way to do this is with a Stacked Pumpkin Shelf Sitter featuring an orange and black overlay design. This whimsical decoration is perfect for adding a splash of seasonal color and a touch of spookiness to any space. Here’s how you can use and style a stacked pumpkin shelf sitter to enhance your Halloween decor.
#### **1. The Appeal of a Stacked Pumpkin Shelf Sitter**
The Stacked Pumpkin Shelf Sitter is a delightful addition to your Halloween decorations for several reasons:
- **Seasonal Charm**: The vibrant orange and black colors capture the essence of Halloween, making it a perfect fit for your autumn and spooky season decor.
- **Versatility**: This piece works well in various settings, including shelves, mantels, and tabletops, offering flexibility in how you decorate your space.
- **Eye-Catching Design**: The stacked design creates visual interest, while the black overlay adds a touch of sophistication and contrast, making it a standout piece.
#### **2. Styling Your Stacked Pumpkin Shelf Sitter**
To make the most of your Stacked Pumpkin Shelf Sitter, consider the following styling tips:
- **Shelf or Mantel Display**: Place the shelf sitter on a prominent shelf or mantel. Position it among other Halloween-themed decorations, such as spooky candles, eerie figurines, or autumnal garlands. This creates a layered look that enhances the overall decor.
- **Tabletop Centerpiece**: Use the pumpkin stack as a centerpiece on a dining or coffee table. Surround it with mini pumpkins, fall leaves, or a table runner in complementary colors to create a festive focal point.
- **Entryway Accent**: Place the shelf sitter on a console table or entryway shelf to greet guests with a warm and spooky welcome. Pair it with a wreath on the door or a doormat with Halloween motifs for a cohesive look.
#### **3. Incorporating Complementary Decor**
To elevate the impact of your Stacked Pumpkin Shelf Sitter, consider these complementary decorations:
- **Pumpkin Patch**: Add a few smaller pumpkins in various sizes around the base of the shelf sitter. Opt for different textures or finishes, such as glitter or matte, to add depth and interest.
- **Spooky Accents**: Incorporate Halloween-themed accents such as faux cobwebs, bats, or ghost figurines. These elements can enhance the festive atmosphere and create a more immersive Halloween display.
- **Autumnal Elements**: Combine the shelf sitter with autumnal decor like dried corn, pinecones, or colorful fall leaves. This adds a seasonal touch and blends well with the orange and black theme.
#### **4. DIY Customization**
If you’re feeling crafty, you can personalize your Stacked Pumpkin Shelf Sitter with some DIY touches:
- **Paint Details**: Add extra designs or patterns to the pumpkins, such as polka dots, stripes, or spooky faces, to make the piece uniquely yours.
- **Embellishments**: Glue on additional decorations like glitter, ribbons, or faux jewels to enhance the visual appeal and match your specific decor style.
#### **5. Caring for Your Shelf Sitter**
To keep your Stacked Pumpkin Shelf Sitter looking its best:
- **Dust Regularly**: Wipe the piece with a dry or slightly damp cloth to remove dust and keep it clean.
- **Avoid Direct Sunlight**: Place it in a location where it’s not exposed to direct sunlight for extended periods to prevent fading.
#### **6. Enjoying the Festive Vibes**
Once your Stacked Pumpkin Shelf Sitter is in place, take a moment to enjoy the festive atmosphere it creates. Whether you’re hosting a Halloween party or simply adding a touch of seasonal charm to your home, this decoration is sure to bring a smile and a touch of Halloween magic to all who see it.
### **Tips for Maximum Impact**
- **Lighting**: Use small LED string lights or battery-operated candles around your display to add a warm glow and enhance the seasonal ambiance.
- **Layering**: Create a dynamic display by layering different heights and textures, combining the shelf sitter with other decorations to create visual interest.
By incorporating a Stacked Pumpkin Shelf Sitter into your Halloween decor, you’ll add a stylish and festive element to your home that perfectly captures the spirit of the season. Enjoy the process of decorating and let this charming piece bring a touch of Halloween joy to your space. 🎃🖤✨

### LED Lights & Glowing Ghost Hats: Spooky Halloween Party Decor
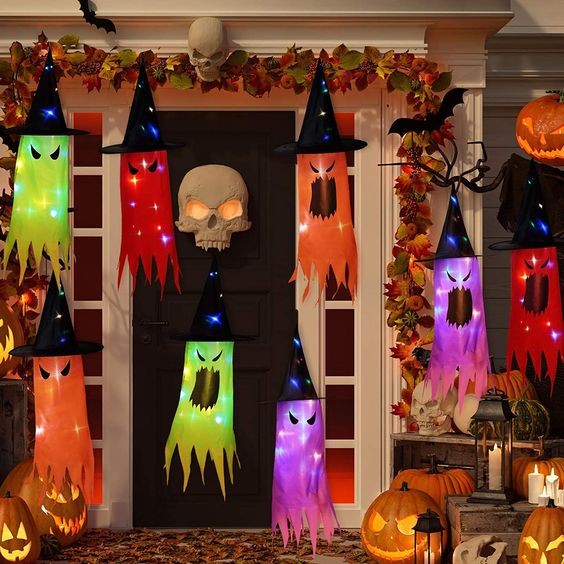
As Halloween approaches, it's time to start planning your party décor to create a spine-chilling and unforgettable atmosphere. One way to achieve this is with LED lights and glowing ghost hats. These two elements not only add a spooky flair but also create a festive and engaging environment that will delight your guests. Here’s how you can use LED lights and glowing ghost hats to transform your Halloween party into a ghoulishly good time.
#### **1. Why Choose LED Lights and Glowing Ghost Hats?**
Combining LED lights with glowing ghost hats offers several advantages:
- **Atmospheric Glow**: LED lights provide a bright, customizable glow that can enhance any Halloween theme. When paired with glowing ghost hats, they create a magical and eerie effect.
- **Versatility**: Both LED lights and ghost hats are versatile and can be used in various ways to decorate indoor and outdoor spaces.
- **Easy Setup**: These decorations are easy to set up and adjust, making them perfect for any level of crafting skill.
#### **2. Setting Up Your LED Lights**
LED lights are a fantastic way to add ambiance to your Halloween party. Here’s how to use them effectively:
- **String Lights**: Hang LED string lights around your party area to create a spooky glow. Drape them along walls, door frames, or across the ceiling. Choose orange, purple, or green lights to match the Halloween theme.
- **Spotlights**: Use LED spotlights to highlight specific areas or decorations. Place them strategically to cast eerie shadows or illuminate your glowing ghost hats.
- **Battery-Powered Options**: For flexibility, opt for battery-powered LED lights. This eliminates the need for nearby electrical outlets and allows you to place lights anywhere you like.
#### **3. Crafting Glowing Ghost Hats**
Glowing ghost hats add a whimsical yet spooky touch to your decor. Here’s how to make and use them:
- **Materials Needed**:
- White or light-colored hats (felt or fabric)
- Glow-in-the-dark paint or LED lights
- Black markers or fabric paint for facial features
- Hot glue gun and glue sticks
- **Creating the Ghost Hats**:
1. **Prepare the Hats**: Start with a white or light-colored hat. If you’re using fabric, cut and shape it to resemble a ghost’s flowing gown.
2. **Add Glow**: Paint the hat with glow-in-the-dark paint or attach small LED lights to the inside. Ensure the lights are securely fastened and not exposed.
3. **Decorate**: Use black markers or fabric paint to add ghostly faces to the hats. Draw spooky eyes, mouths, or other features to give each ghost a unique personality.
4. **Display**: Place the glowing ghost hats on tables, hang them from the ceiling, or position them around your party space for maximum effect.
#### **4. Combining LED Lights with Ghost Hats**
To create a cohesive and enchanting Halloween display, combine LED lights and glowing ghost hats:
- **Hanging Ghosts**: Hang glowing ghost hats from the ceiling or branches of trees outdoors. Wrap LED string lights around them or place spotlights beneath them to enhance their glow.
- **Table Centerpieces**: Use glowing ghost hats as table centerpieces. Place LED lights inside or around the hats, and scatter Halloween-themed confetti or faux cobwebs for added effect.
- **Outdoor Display**: For an outdoor party, set up glowing ghost hats along pathways or in your garden. Use LED lights to illuminate the area, creating a spooky, welcoming entrance for your guests.
#### **5. Enhancing Your Halloween Party**
To complete your Halloween party decor with LED lights and glowing ghost hats, consider the following:
- **Sound Effects**: Play eerie sound effects or Halloween music to complement the spooky atmosphere created by your decorations.
- **Themed Snacks and Drinks**: Serve Halloween-themed treats and drinks to match the festive mood. Use ghost-shaped cookies, “witches’ brew” punch, or spooky cupcakes.
- **Costume Ideas**: Encourage guests to wear Halloween costumes that match the theme of your decor. You can even provide glowing ghost hats as party favors for a fun and memorable touch.
#### **6. Tips for Success**
- **Safety First**: Ensure all LED lights and electrical components are safely connected and not at risk of overheating. Keep lights away from flammable materials.
- **Test Before the Party**: Set up your decorations ahead of time and test all lights and effects to ensure everything works as expected.
- **Creative Placement**: Experiment with different placements and combinations of LED lights and ghost hats to find the most effective and eye-catching arrangement.
By incorporating LED lights and glowing ghost hats into your Halloween party decor, you’ll create a magical and spooky atmosphere that will captivate your guests and make your celebration truly unforgettable. Embrace the creativity of Halloween and let these enchanting decorations set the stage for a frightfully fun party! 👻💡🎃

### Oriental Cherry Halloween: DIY Bubbling Cauldron Set for Spooky Indoor Decor
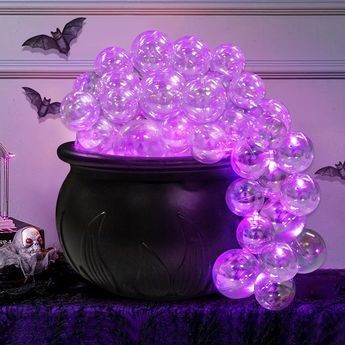
As Halloween draws near, it’s the perfect time to create a magical and eerie atmosphere in your home. One captivating way to achieve this is with the Oriental Cherry DIY Bubbling Cauldron Set. This enchanting project allows you to bring the charm of a bubbling cauldron into your indoor space, adding a touch of whimsy and spookiness to your Halloween festivities. Here’s a step-by-step guide to help you create your own bubbling cauldron that will be the highlight of your Halloween decor.
#### **1. Gather Your Supplies**
To start crafting your bubbling cauldron, you'll need the following materials:
- **Black Cauldron**: A plastic or metal cauldron that will serve as the base.
- **Bubble Machine**: A small, portable bubble machine to create the bubbling effect.
- **Green LED Lights**: For an eerie glow that simulates the cauldron's magical contents.
- **Cotton Batting or Faux Fog**: To simulate bubbling and smoke effects.
- **Glue Gun and Glue Sticks**: For attaching decorations.
- **Halloween Decorations**: Miniature skeletons, faux spiders, plastic eyeballs, and other spooky items.
- **Craft Paint and Brushes**: To add details to the cauldron if desired.
- **Battery-Powered Fan**: To help distribute the faux fog if needed.
- **Black Fabric or Tulle**: For draping around the cauldron to enhance the spooky look.
#### **2. Prepare Your Cauldron**
Start by preparing your cauldron as the centerpiece of your project:
- **Paint and Decorate**: If your cauldron is plain, consider painting it with metallic or glossy black paint to give it a more authentic look. Add details like runes or magical symbols with a paintbrush for extra flair.
- **Add LED Lights**: Place green LED lights inside the cauldron to create an eerie glow. Ensure that the lights are placed in such a way that they are hidden but still provide a spooky illumination.
#### **3. Set Up the Bubbling Effect**
To achieve the bubbling effect, follow these steps:
- **Place the Bubble Machine**: Set up your bubble machine inside the cauldron or close by, ensuring it’s directed towards the center. If placing it inside, make sure it's secure and won’t be damaged by the fog effects.
- **Add Faux Fog**: Arrange cotton batting or faux fog around the base of the cauldron to simulate bubbling and smoke. If using a battery-powered fan, position it to help disperse the fog and enhance the effect.
#### **4. Create a Spooky Scene**
Enhance the cauldron with additional Halloween decorations:
- **Attach Decorations**: Use a glue gun to attach miniature skeletons, faux spiders, plastic eyeballs, and other spooky items around the cauldron. Arrange them in a way that looks organic and adds to the overall eerie effect.
- **Drape Fabric**: Cover the base of the cauldron and the surrounding area with black fabric or tulle. This will help to hide any cords or additional equipment while also enhancing the cauldron’s mysterious allure.
#### **5. Set the Scene**
To complete your spooky indoor setup, consider these additional touches:
- **Lighting**: Position additional Halloween-themed lights or candles around the cauldron to create a more immersive atmosphere. Red or purple lights can add to the eerie glow.
- **Sound Effects**: Play spooky sound effects or Halloween music in the background to complement the bubbling cauldron and enhance the overall ambiance.
#### **6. Enjoy Your Creation**
Once everything is set up, step back and admire your work. Your DIY Bubbling Cauldron Set will serve as a mesmerizing centerpiece for your Halloween decor, creating a magical and spooky atmosphere that will captivate guests and trick-or-treaters alike.
### **Tips for a Successful Cauldron Setup**
- **Safety First**: Ensure that all electrical components are safely connected and that there are no exposed wires.
- **Keep it Dry**: Avoid getting the bubble machine or fog effects too wet to prevent damage.
- **Experiment with Effects**: Don’t be afraid to experiment with different types of fog, lighting, and decorations to achieve the perfect look.
With the Oriental Cherry DIY Bubbling Cauldron Set, you can bring a touch of enchantment and spookiness to your Halloween celebration. This creative project not only adds a fun element to your decor but also serves as a fantastic conversation starter for your Halloween festivities. Enjoy the process of crafting and have a magically spooky Halloween! 🧙♀️🎃✨


