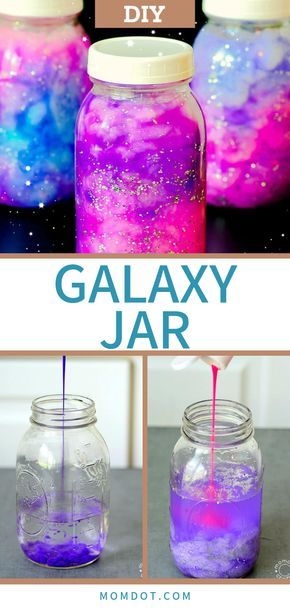
Crafting Your Own Galaxy Jar: A Stellar DIY Project
Looking to add a touch of cosmic wonder to your living space? Galaxy jars, with their mesmerizing swirls of color and twinkling star-like glimmers, offer a perfect blend of creativity and relaxation. Whether you're an avid crafter or just looking for a fun weekend project, creating your own galaxy jar is a delightful way to bring a piece of the universe into your home.
Materials You'll Need:
Glass Jar: Choose a clean, empty glass jar of any size. Mason jars work great due to their classic look, but any transparent container will do.
Acrylic or Spray Paint: Opt for deep blues, purples, and blacks for the base colors. These will form the backdrop of your galaxy.
Cotton Balls or Makeup Sponges: These will be used for blending and creating the galaxy effect.
Glitter: Silver or iridescent glitter adds a starry sparkle to your jar, mimicking the distant stars of a galaxy.
Water: To dilute the paint and create a fluid consistency for blending.
Optional: Glow-in-the-dark paint or powder: For an extra magical touch, consider adding elements that will glow softly in the dark.
Step-by-Step Guide:
Prepare Your Workspace: Lay down newspaper or a plastic sheet to protect your work surface. Ensure good ventilation if using spray paint.
Paint the Base: Start by painting the inside of your jar with a coat of dark acrylic paint. Mix a small amount of paint with water to create a fluid mixture, and swirl it around the inside of the jar until it's fully coated. Let it dry completely.
Create the Galaxy Effect:
Dab a small amount of different colored paints onto a cotton ball or makeup sponge.
Lightly dab the colors onto the inside of the jar, blending them gently with a clean part of the sponge as you go. Aim for a swirling, cloud-like effect.
Layer different shades of blue, purple, and hints of white to mimic the depth and complexity of a galaxy.
Add Glitter: While the paint is still wet, sprinkle a pinch of glitter inside the jar. Gently swirl the jar to disperse the glitter and create a starry effect.
Let It Dry: Allow your galaxy jar to dry completely. This could take a few hours, depending on the type of paint used.
Optional: Enhance with Glow-in-the-dark Elements: If you want your galaxy jar to glow in the dark, mix glow-in-the-dark paint or powder with the acrylic paint before applying it to the jar. Charge it under a light source to activate the glow.
Seal the Jar (Optional): Once the paint is fully dry, you can seal the inside of the jar with a clear varnish or Mod Podge to protect the paint and glitter.
Display and Enjoy:
Once your galaxy jar is dry and sealed (if desired), place it on a shelf, use it as a night light, or give it as a thoughtful handmade gift. These jars not only add a touch of celestial beauty to any room but also serve as a reminder of the vast wonders of the universe.
Conclusion:
Creating a galaxy jar is a delightful DIY project that combines artistic expression with a touch of cosmic inspiration. Whether you're crafting alone or with friends and family, the process of blending colors, adding glitter, and creating a swirling galaxy effect is both relaxing and rewarding. So, gather your materials, unleash your creativity, and let the stars guide your hand as you craft your own miniature galaxy in a jar.