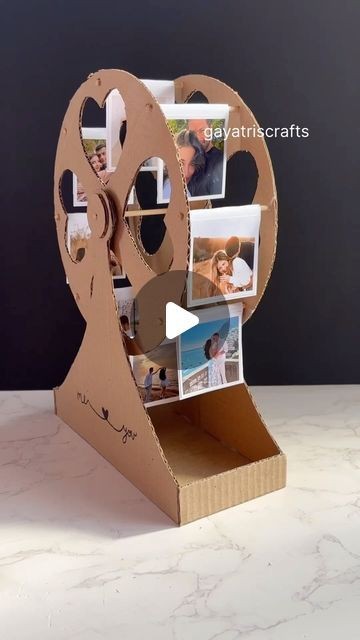
Spin Memories: DIY Photo Ferris Wheel Craft
The Ferris wheel, an iconic symbol of whimsy and nostalgia, takes on a new role in this DIY project: showcasing your cherished memories. Imagine a miniature Ferris wheel adorned with your favorite photos, spinning gently as it brings to life moments of joy, love, and adventure. In this article, we'll guide you through the steps to create your own photo Ferris wheel—a delightful and unique craft that doubles as a sentimental decoration.
Why Choose a Photo Ferris Wheel?
A photo Ferris wheel combines creativity with sentimentality, making it a perfect addition to your home decor or a thoughtful gift for someone special. Here are a few reasons why this DIY craft is worth trying:
- **Personalized Decor* Display your favorite photos in a creative and interactive way.
- **Conversation Starter* A photo Ferris wheel makes for a captivating piece that sparks conversations and memories.
- **DIY Satisfaction* Enjoy the process of crafting something meaningful with your own hands.
- **Versatile Gift* It's a versatile gift idea suitable for birthdays, anniversaries, or any occasion that calls for a heartfelt gesture.
Materials You'll Need
Before you begin, gather these materials:
- Wooden or plastic craft sticks
- Cardboard or foam board for the Ferris wheel base
- Photos printed on cardstock or photo paper
- Glue or adhesive tape
- Scissors or a craft knife
- String or yarn for hanging (optional)
Step-by-Step Instructions
1. **Create the Ferris Wheel Structure**
- **Base* Cut out a circular base from cardboard or foam board. This will serve as the foundation of your Ferris wheel.
- **Supports* Attach craft sticks vertically around the edge of the base to act as supports for the Ferris wheel structure.
- **Spokes and Frame* Use craft sticks to create the wheel's frame and spokes, ensuring they are evenly spaced and secured to the supports.
2. **Attach Photos to the Wheel**
- **Select Photos* Choose photos that hold special memories or tell a story when displayed together.
- **Cut and Secure* Trim your photos into circles or squares slightly smaller than the craft stick spokes. Attach them securely using glue or adhesive tape.
3. **Assemble the Ferris Wheel**
- **Attach the Wheel* Carefully position and secure the Ferris wheel structure onto the base. Ensure it spins freely without wobbling excessively.
- **Add Decorative Touches* Embellish the Ferris wheel with ribbons, stickers, or other decorative elements to enhance its visual appeal.
4. **Display Your Photo Ferris Wheel**
- **Hang or Place* Depending on its size, you can hang your photo Ferris wheel on a wall using string or yarn, or place it on a shelf or table as a charming centerpiece.
- **Rotate and Enjoy* Spin the wheel to admire your photos and reminisce about the moments captured in each one.
Tips for Success
- **Sturdy Construction* Ensure all parts are securely attached to prevent the Ferris wheel from collapsing or tilting.
- **Photo Selection* Choose a mix of photos that vary in size, color, and content to create visual interest.
- **Personal Touch* Consider adding captions or dates to some photos for added sentimental value.
Share Your Creation
Once your photo Ferris wheel is complete, share it on social media to inspire others and showcase your creativity. Use hashtags like #diycrafts, #photoferriswheel, #memorylane, #creativedecor, and #whimsicalcraft to connect with fellow craft enthusiasts and share the joy of crafting meaningful decor.
Conclusion
Creating a DIY photo Ferris wheel is not just about crafting a decorative piece—it's about preserving and celebrating your most treasured memories. Whether you choose to display it in your home or gift it to someone special, this project offers a unique way to weave nostalgia and creativity into everyday life. So gather your materials, embark on this crafting journey, and spin memories into a whimsical Ferris wheel that will delight and inspire.
Happy crafting!