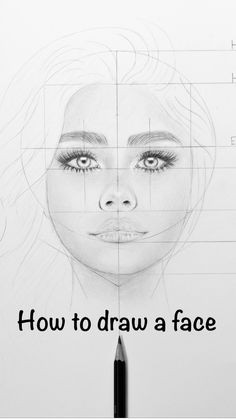
Drawing a face can be a rewarding yet challenging endeavor, whether you’re a beginner or an experienced artist. Capturing the essence of a person’s likeness involves understanding proportions, anatomy, and expression. Here’s a detailed guide on how to draw a face, broken down into manageable steps:
1. Gather Your Materials
Before starting, make sure you have the necessary tools:
Pencils (various grades for shading)
Erasers (kneaded and precision)
Paper (sketching paper or a sketchbook)
Ruler (for measurements, optional)
Reference images (photos or real-life subjects)
2. Understanding Facial Proportions
The human face follows certain proportions that are helpful to understand. A general guideline is:
The face is roughly oval-shaped.
Divide the face into equal sections to find key landmarks:
The hairline to the eyebrows.
The eyebrows to the bottom of the nose.
The bottom of the nose to the chin.
A useful rule of thumb is that the width of the face is about five eyes wide, and the eyes are spaced about one eye width apart.
3. Start with Basic Shapes
Draw an Oval: Begin with an oval to outline the face shape. The oval should be slightly wider at the top and narrower towards the chin.
Add Guidelines: Draw a vertical line down the center of the oval and a horizontal line halfway down. These lines will help you place facial features symmetrically.
4. Place the Facial Features
Eyes: Divide the face vertically into five equal parts. The eyes will be placed in the second section, with the distance between the eyes being roughly the width of one eye. Sketch almond-shaped outlines for the eyes along the horizontal guideline.
Nose: Draw a small, curved line or a slight bump in the middle of the face’s lower half. The base of the nose typically aligns with the bottom of the ears.
Mouth: The mouth is placed about halfway between the nose and chin. Draw a horizontal line for the mouth and add curves to define the lips. The corners of the mouth generally align with the centers of the eyes.
5. Refine the Face Shape
Jawline and Chin: Refine the jawline by adjusting the oval shape to better reflect the person’s face. The jawline can be curved or angular depending on the character of the face you’re drawing.
Hairline and Ears: Sketch the hairline according to the hair style you’re aiming for. The ears are positioned between the eyes and the base of the nose. They should protrude slightly from the sides of the head.
6. Add Details to the Facial Features
Eyes: Draw the irises and pupils within the eye shapes. Add details such as eyelashes and the eyelids to give more depth. Include reflections or highlights to make the eyes appear more lifelike.
Nose: Refine the nose shape with details like nostrils and shading to give it dimension. The nose bridge and nostrils should blend smoothly with the rest of the face.
Mouth: Define the upper and lower lips, adding texture and shadow to convey fullness and expression. Pay attention to the curvature and shape of the lips.
7. Add Shading and Texture
Light Source: Determine the direction of the light source. This will affect where shadows and highlights fall on the face.
Shading: Use varying pencil grades to create shadows. Lightly shade areas such as under the chin, along the sides of the nose, and beneath the eyebrows. Gradually build up the shading to create a smooth transition.
Textures: Add texture to the hair and skin to make the face appear more realistic. Use fine lines for hair and gentle strokes for skin texture.
8. Final Touches
Refine Lines: Clean up any unnecessary lines or guidelines with an eraser.
Adjust Proportions: Make any necessary adjustments to ensure that the features are well-proportioned and harmoniously placed.
Add Details: Enhance small details such as freckles, lines, or expressions to bring personality to the face.
9. Practice and Experiment
Drawing faces is a skill that improves with practice. Try sketching different angles, expressions, and styles to enhance your abilities. Experiment with different techniques, such as cross-hatching for shading or using different tools for texture.
Conclusion
Drawing a face requires patience and practice. By breaking down the process into steps and understanding the basic proportions and features, you can create a lifelike and expressive portrait. Remember to keep practicing and don’t be afraid to make mistakes—each drawing is a step towards improving your artistic skills.


