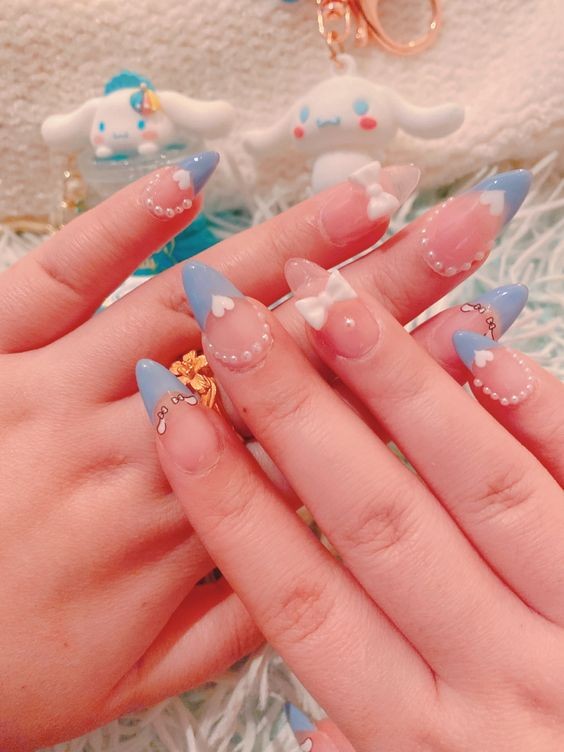
**Cinnamoroll-Inspired Nail Art: Embrace the Whimsy with Cute and Creative Designs**
In the vibrant world of nail art, inspiration can come from anywhere, but few sources are as delightfully charming as Sanrio’s beloved character, Cinnamoroll. With his fluffy white ears, big blue eyes, and sweet demeanor, Cinnamoroll has captured the hearts of fans worldwide, and now his endearing features are making waves in the realm of nail art. **Cinnamoroll-Inspired Nail Art** offers a unique and whimsical way to showcase your love for this cute character, transforming your nails into a canvas of creativity and fun. In this article, we’ll explore why Cinnamoroll is a perfect muse for nail art, provide a step-by-step guide on creating your own designs, and offer tips for achieving a flawless Cinnamoroll manicure.
### The Charm of Cinnamoroll
**Cinnamoroll** is a character from the Sanrio universe, known for his distinctive appearance and sweet personality. Created by Sanrio in 2001, Cinnamoroll is a white puppy with long, curled ears that give him a distinctively fluffy look. His gentle eyes and cheerful smile make him a favorite among fans of all ages. Cinnamoroll's cuteness and friendly demeanor make him an ideal inspiration for nail art, especially for those who love whimsical and playful designs.
### Why Choose Cinnamoroll-Inspired Nail Art?
1. **Endearing Appeal* Cinnamoroll’s adorable features and pastel color palette translate beautifully into nail art, adding a touch of cuteness and charm to any look.
2. **Customization* Cinnamoroll-inspired designs can be tailored to various styles and preferences. Whether you prefer subtle accents or full-on character designs, there’s a way to incorporate Cinnamoroll into your manicure.
3. **Versatility* These designs work well for various occasions, from casual outings to special events. They’re a fun way to express your personality and fandom.
4. **Creativity* Creating Cinnamoroll-inspired nail art allows you to explore different techniques and materials, making the process as enjoyable as the final result.
### How to Create Cinnamoroll-Inspired Nail Art
Creating a Cinnamoroll-inspired manicure involves a combination of techniques and materials to capture the essence of this lovable character. Here’s a step-by-step guide to help you achieve a charming and whimsical Cinnamoroll-themed manicure.
#### **Materials Needed*
- Base coat and top coat
- Nail polishes in white, pastel blue, pastel pink, pastel yellow, and black
- Nail art brushes or dotting tools
- Nail stickers or decals (optional)
- Nail glue (if using decals)
- Nail polish remover and cotton swabs (for cleanup)
#### **Steps to Achieve Cinnamoroll-Inspired Nail Art*
1. **Prepare Your Nails*
- **Clean and Shape* Start by removing any old polish and cleaning your nails. Shape your nails to your desired length and style, and trim and file them as needed.
- **Apply Base Coat* Apply a base coat to protect your nails and create a smooth surface for the polish.
2. **Apply Base Colors*
- **Choose a Base Shade* Apply a coat of white polish as the base color. White provides a neutral backdrop that allows the Cinnamoroll designs to stand out.
- **Allow to Dry* Let the base color dry completely before moving on to the design.
3. **Create Cinnamoroll Designs*
- **Main Character* Use a fine nail art brush or dotting tool to paint Cinnamoroll’s face on one or two accent nails. Start by painting his round face using pastel blue, then add his floppy ears and facial features with black and pastel pink.
- **Add Details* Paint Cinnamoroll’s eyes, nose, and mouth with black polish. You can also use pastel pink for his cheeks and ears.
- **Additional Elements* For a more detailed design, add small pastel-colored hearts, stars, or clouds around the Cinnamoroll design to enhance the whimsical feel.
4. **Use Nail Decals (Optional)*
- **Apply Decals* If you prefer a quicker application, use Cinnamoroll-themed nail stickers or decals. Apply them to your nails after the base color has dried, and seal them with a top coat.
5. **Seal Your Design*
- **Apply Top Coat* Finish with a clear top coat to protect your design and add a glossy finish. This will help your nail art last longer and shine.
6. **Clean Up*
- **Remove Excess Polish* Use nail polish remover and cotton swabs to clean up any mistakes around the edges of your nails.
### Tips for Perfect Cinnamoroll-Inspired Nail Art
1. **Practice First* If you’re new to nail art, practice your designs on a nail wheel or a piece of paper before applying them to your nails.
2. **Use Quality Products* Invest in high-quality nail polishes and tools to ensure a smooth application and vibrant colors.
3. **Take Your Time* Nail art requires patience. Take your time to ensure each layer is dry before applying the next to avoid smudges and ensure a clean design.
4. **Experiment with Techniques* Try different techniques such as gradient effects, nail stamping, or hand-painted designs to create unique variations of Cinnamoroll-inspired nail art.
5. **Maintain Your Manicure* Apply a top coat regularly to keep your nails looking fresh and vibrant, and avoid activities that might chip your polish.
### Final Thoughts
**Cinnamoroll-Inspired Nail Art** is a delightful way to express your love for this adorable Sanrio character while showcasing your creativity. The combination of Cinnamoroll’s charming features and the playful nature of nail art results in a manicure that’s both fun and fashionable. Whether you’re a long-time fan of Sanrio or simply appreciate cute and whimsical designs, Cinnamoroll-inspired nails are sure to brighten up your look and bring a smile to your face. So, gather your supplies, let your imagination run wild, and create a manicure that captures the essence of this beloved character. Enjoy the process and flaunt your Cinnamoroll nails with pride! 🐾💅🎀


