How to Draw a Portrait: A Quick Guide
Drawing portraits can seem daunting, but with some basic techniques and practice, anyone can master this art form. Whether you're aiming to capture the likeness of a loved one or develop your artistic skills, here's a comprehensive yet quick guide to get you started with portrait drawing.
1. Gather Your Materials
Before you start, make sure you have the right tools. You'll need:
Pencil: Preferably a range of hardness (2B, 4B, 6 for different shading.
Eraser: For corrections and highlights.
Paper: Smooth, high-quality paper works best for detailed work.
Reference Photo: A clear image of the person you're drawing.
2. Start with Basic Shapes
Begin by lightly sketching the basic shapes that make up the head. Typically, you'll start with an oval or an egg shape for the head. Divide this shape with a vertical and horizontal line to help place features accurately. This grid-like approach helps maintain proportion and symmetry.
3. Establish Proportions
The human face has specific proportions that can guide you:
Eyes: The eyes are generally located halfway down the head. They are about one eye-width apart.
Nose: The bottom of the nose is usually halfway between the eyes and the chin.
Mouth: The mouth typically sits one-third of the way down from the nose to the chin.
Use these guidelines to sketch the facial features lightly. Adjust as needed to fit the unique characteristics of your subject.
4. Sketch the Features
With the basic proportions in place, begin detailing each feature:
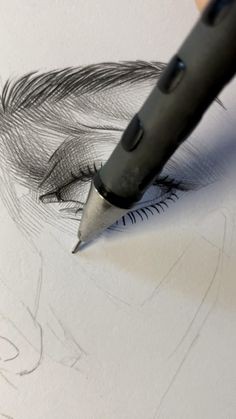
Eyes: Start with the shape of the eyes and the iris. Pay attention to the placement and size, and add details like eyelashes and eyebrows.
Nose: Draw the nostrils and the bridge, considering how the nose shapes the shadows on the face.
Mouth: Sketch the lips, noting their fullness and the subtle curves.
Ears: Place the ears between the eye line and the bottom of the nose.
5. Refine and Add Details
Once the basic features are in place, refine your drawing:
Adjust Proportions: Check and adjust the alignment and size of the features if necessary.
Detail Work: Add more details to the eyes, including the pupils and reflections. Define the contours of the nose and the texture of the lips.
Hair: Sketch the hair, considering the flow and volume. Use quick, directional strokes to simulate texture and depth.
6. Add Shading and Texture
Shading brings your portrait to life. Start with light strokes and build up to darker values:
Identify Light Source: Determine where the light is coming from and shade accordingly. The areas farthest from the light source will be darker.
Create Depth: Use a range of pencils to create a gradient from light to dark. Blend the shading smoothly to avoid harsh lines.
Highlight: Use an eraser to lift graphite and create highlights on areas like the eyes and the bridge of the nose.
7. Final Touches
Review your portrait for any final adjustments:
Clean Up: Erase unnecessary lines and refine edges.
Contrast: Increase contrast where needed to make the features stand out.
Details: Add any final details that enhance realism, like subtle lines or textures.
Practice Makes Perfect
Portrait drawing is a skill that improves with practice. Keep experimenting with different techniques and styles, and don't be discouraged by initial challenges. Each sketch is a step toward mastering the art of capturing human likeness.