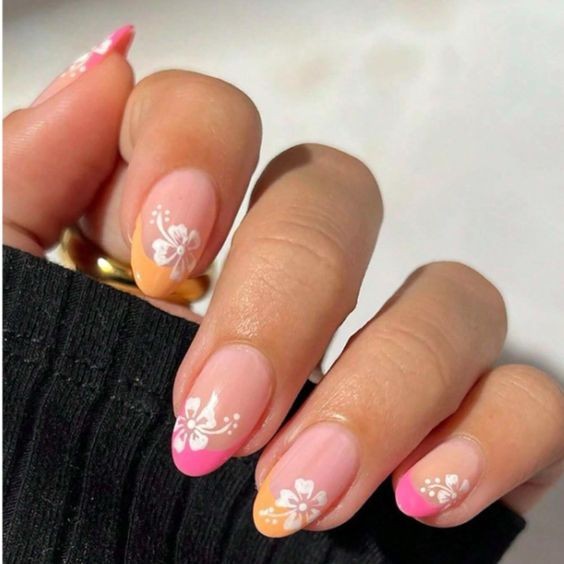
False Nail DIY Makeup | Almond Flower Pink White Nails
Looking to create a chic and elegant nail look at home? Almond-shaped false nails featuring a delicate flower design in pink and white offer a stylish and sophisticated option for any occasion. This guide will help you achieve a beautiful almond flower nail design with ease, allowing you to enjoy salon-quality results without leaving your house.
1. Why Choose Almond-Shaped False Nails?
Why It Works:
Almond-shaped nails are popular for their flattering and elongating effect on the fingers. This shape is versatile and can make any design look elegant and refined. The almond shape also provides a great canvas for detailed nail art, like the delicate pink and white flower design we’re going to create.
How to Style:
Select almond-shaped false nails that fit your natural nails. The shape enhances the overall look of your hands and allows for intricate designs, making it a great choice for DIY nail art.
2. Preparing for Your DIY Nail Art
Why It Works:
Proper preparation is key to ensuring that your false nails adhere well and the design lasts longer. Clean and prep your nails to create a smooth base for your art.
How to Prepare:
Clean Your Natural Nails: Wash your hands and remove any old polish.
Trim and File: Trim and file your natural nails to ensure they’re even and smooth.
Buff the Surface: Lightly buff your natural nails to help the false nails adhere better.
Apply Nail Primer (Optional): A nail primer can help in better adhesion of the false nails.
3. Applying the False Nails
Why It Works:
Correct application ensures that the false nails stay secure and look flawless. False nails come with adhesive tabs or can be applied with nail glue.
How to Apply:
Choose the Right Size: Select false nails that match the size of your natural nails.
Apply Adhesive: If using glue, apply a thin layer to the back of the false nails or your natural nails.
Press and Hold: Place the false nails onto your natural nails and press firmly for a few seconds. If using adhesive tabs, simply press the false nails onto your natural nails until secure.
4. Creating the Almond Flower Design
Why It Works:
The pink and white flower design adds a touch of elegance and femininity to your nails. This design is perfect for those who want a delicate yet striking look.
How to Design:
Base Coat: Apply a base coat in a light pink color. Allow it to dry completely.
Create Flowers: Using a fine brush or nail art tool, paint white flowers onto the pink base. You can use a dotting tool to create the flower petals and a fine brush for details.
Add Details: Once the flowers are dry, add some details like small dots or lines around the flowers to enhance the design.
Top Coat: Apply a clear top coat to seal the design and add shine. This also helps in prolonging the life of your nail art.
5. Maintaining Your DIY Nail Art
Why It Works:
Proper care helps in maintaining the appearance of your DIY nail art and ensures it lasts longer.
How to Maintain:
Avoid Excessive Water Exposure: Limit contact with water to prevent lifting or damage to the false nails.
Be Gentle: Avoid using your nails as tools and handle them carefully.
Touch Up as Needed: If any part of the design starts to chip or peel, touch it up with matching polish.
Conclusion: Achieve Salon-Quality Nails with DIY Almond Flower Design
Creating beautiful almond-shaped false nails with a pink and white flower design is easy and rewarding. This DIY project allows you to enjoy stylish and elegant nails without the expense of a salon visit. By following these steps, you can achieve a flawless look and make your nails the center of attention. Embrace your creativity and enjoy your stunning DIY manicure!
#diynails #falsenails #almondnails #flowernails #pinkwhitenails #nailart #naildesigns #nailinspo #almondshape #nailtutorial