Mastering the Art of Drawing Realistic 3D Water Drops 💧
Drawing realistic water drops can elevate your artwork, adding a touch of realism and dimension. This article will guide you through the essential techniques and tips for creating stunning, lifelike water drops that appear three-dimensional. Whether you’re a beginner or an experienced artist, mastering this skill can enhance your artistic repertoire.
Understanding the Nature of Water Drops
Before you start drawing, it’s crucial to understand the characteristics of water drops. Here are some key features:
Refraction: Water drops bend light, causing objects behind them to appear distorted.
Reflection: Light reflects off the surface of the drop, creating highlights.
Translucency: Water is transparent, allowing some light to pass through while absorbing others.
Surface Tension: Water drops maintain a rounded shape due to surface tension, which creates a smooth and shiny appearance.
Observing Real Water Drops
To effectively draw water drops, spend time observing them in real life. Look for various forms, sizes, and reflections in different lighting conditions. Take note of how they interact with surfaces, how light reflects and refracts through them, and how their shapes can change based on the surrounding environment.
Tools and Materials
To achieve realistic water drops in your drawings, gather the following tools:
Pencils: A range of pencils (H, HB, 2B, 4B, etc.) for different shading techniques.
Erasers: A kneaded eraser for highlights and a regular eraser for mistakes.
Paper: Smooth drawing paper or watercolor paper for better blending.
Blending Tools: Blending stumps, cotton swabs, or your fingers for smooth gradients.
Colored Pencils or Watercolors: For adding color to your drops, if desired.
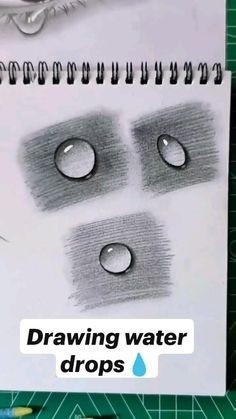
Step-by-Step Guide to Drawing Realistic Water Drops
Step 1: Basic Shapes
Start by sketching the basic shape of the water drop. Use light pencil strokes to create an oval or teardrop shape, depending on the perspective. The drop should be wider at the bottom and taper towards the top.
Step 2: Adding Reflections
Next, consider the source of light in your drawing. Use a white or light-colored pencil to indicate where the light reflects off the drop. This is typically found on the upper part of the drop. Make sure the reflection is curved to follow the shape of the drop.
Step 3: Creating Depth with Shadows
To give your water drop a 3D effect, add shadows on the opposite side of the light source. Use a darker pencil (like 4 to create soft shadows around the edges. Blend the shadow gently into the drop’s body to maintain a smooth surface.
Step 4: Adding Color (Optional)
If you want to add color to your water drop, use colored pencils or watercolors. Lightly apply color around the edges of the drop, and gradually blend it towards the center. Remember, the color should be subtle, as water drops are generally transparent.
Step 5: Enhancing Details
Use a fine-tipped pencil or a white gel pen to add intricate details, such as tiny highlights or reflections from nearby objects. These details can enhance the realism of your water drop and create a sense of depth.
Step 6: Final Touches
Review your drawing and make any necessary adjustments. Darken the shadows or enhance the highlights as needed. This final pass will help unify the drawing and make the water drop appear more lifelike.
Tips for Drawing Realistic Water Drops
Practice Different Sizes: Experiment with various sizes of water drops to understand how reflections and shadows change.
Use Reference Images: Look for photographs of water drops to guide your drawings. Study the details in each image.
Experiment with Light: Practice drawing water drops under different lighting conditions to see how shadows and reflections vary.
Layer Your Work: Build up layers of shading gradually to create a smooth, realistic appearance.
Stay Patient: Realistic drawing takes time and practice. Don’t rush the process—allow yourself to refine your technique over time.
Common Mistakes to Avoid
Overdoing the Highlights: While highlights are essential, too much can make the drop look unnatural. Keep them subtle and well-placed.
Neglecting Shadows: Shadows provide depth and realism. Don’t skip this step; ensure you have a good balance of light and shadow.
Ignoring the Background: Consider how the water drop interacts with its background. A simple blurred background can enhance the drop's prominence.
Rushing the Process: Take your time with each step. Quality over speed is crucial in creating realistic art.
Conclusion
Drawing realistic 3D water drops can be a rewarding endeavor, enhancing your artistic skills and adding depth to your work. By understanding the nature of water drops, using the right tools, and following the step-by-step process, you can create stunning and lifelike representations. Remember, practice is key, so keep experimenting and refining your techniques. With patience and dedication, you’ll master the art of drawing water drops in no time!