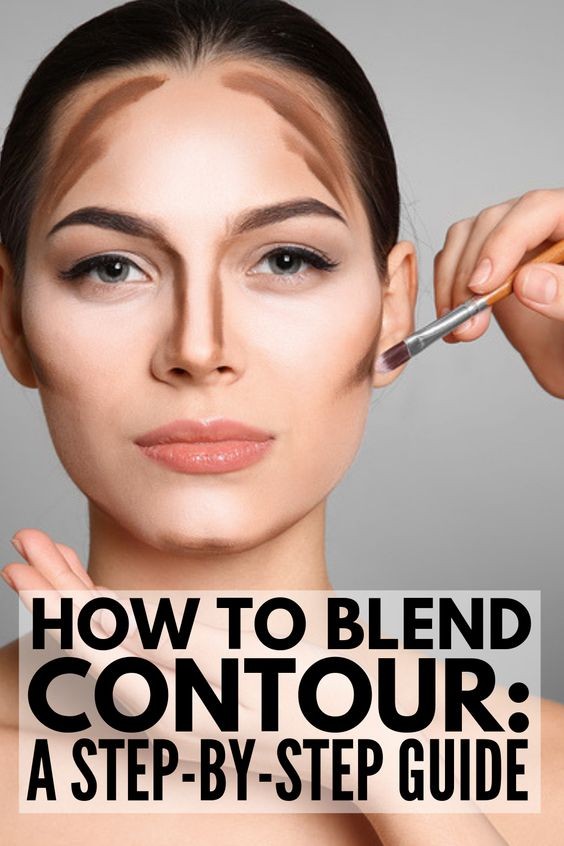
**How to Blend Contour Like a Pro: A Step-by-Step Guide for a Sculpted Look**
Contouring is a powerful makeup technique that can redefine and enhance your facial features, giving you that chiseled, sculpted look often seen on the red carpet. Whether you’re a makeup newbie or looking to refine your skills, mastering contouring can transform your beauty routine. Here’s your ultimate step-by-step guide on how to blend contour like a pro, featuring tips on product selection, application techniques, and achieving a flawless finish.
### **Step 1: Choose Your Products**
The first step to perfect contouring is selecting the right products for your skin type and desired look. You can choose between cream and powder contour products, each offering different benefits.
- **Cream Contour* Ideal for a more blended, natural finish. Creams are great for dry skin and provide a more seamless blend. They are also buildable and can be easier to work with for a subtle look.
- **Powder Contour* Perfect for oily skin and those who prefer a more matte finish. Powders are great for setting makeup and can add a stronger contour effect if desired.
**Recommended Products*
- **Cream Contour* Fenty Beauty Match Stix
- **Powder Contour* Anastasia Beverly Hills Contour Kit
### **Step 2: Prep Your Skin**
A smooth base is crucial for flawless contouring. Start with a clean, moisturized face. Apply a primer to create a smooth canvas and help your makeup last longer. Follow with your foundation, ensuring it’s well-blended and even.
### **Step 3: Map Out Your Contour**
Before applying contour, determine where you want to enhance and define. The basic areas to contour and highlight are:
- **Contour* Cheekbones, jawline, sides of the nose, and along the hairline on the forehead.
- **Highlight* High points of the face such as the cheekbones, bridge of the nose, cupid’s bow, and brow bone.
Use a contour stick or powder a few shades darker than your foundation for contouring, and a highlighter a few shades lighter for highlighting.
### **Step 4: Apply Contour**
1. **Cheekbones* Draw a line from your ear towards the middle of your cheek. Blend upwards towards your temple to enhance your cheekbones.
2. **Jawline* Apply contour along your jawline to create a more defined look. Blend well to avoid harsh lines.
3. **Forehead* Apply contour along your hairline to reduce the appearance of a broad forehead.
4. **Nose* Draw two lines along the sides of your nose, blending them inward for a slimmer appearance.
**Application Tips*
- Use a contour brush or makeup sponge to apply and blend contour. Brushes are great for precise application, while sponges can help blend seamlessly.
- Apply contour in thin layers and build up the intensity gradually.
### **Step 5: Apply Highlight**
1. **Cheekbones* Apply highlighter to the tops of your cheekbones for a radiant glow.
2. **Nose* Highlight the bridge of your nose to make it appear more prominent.
3. **Cupid’s Bow* Apply highlighter to your cupid’s bow for a fuller lip effect.
4. **Brow Bone* Highlight under your brows to lift and open up your eyes.
**Application Tips*
- Use a small, fluffy brush or your fingertip for precise application of highlighter.
- Blend the highlighter into your foundation and contour for a seamless finish.
### **Step 6: Blend, Blend, Blend**
Blending is key to achieving a natural-looking contour. Use a clean makeup sponge or a blending brush to diffuse any harsh lines between the contour and highlight. Blend in circular motions for a seamless transition between colors.
### **Step 7: Set Your Makeup**
To ensure your contouring lasts all day, set your makeup with a translucent setting powder. Apply it lightly to the areas you contoured and highlighted to lock everything in place without adding extra color.
**Recommended Products*
- **Setting Powder* Laura Mercier Translucent Loose Setting Powder
### **Additional Tips for Different Face Shapes**
- **Round Face* Contour along the sides of your face and the jawline to create more definition and elongate the face shape.
- **Oval Face* Apply contour along the sides of the forehead and under the cheekbones for subtle definition.
- **Square Face* Focus contouring on the sides of the forehead, jawline, and along the sides of the face to soften angular features.
- **Heart-Shaped Face* Contour the sides of the forehead and along the jawline to balance the narrow chin.
### **Conclusion**
With these steps and tips, you’re well on your way to mastering contouring and achieving a beautifully sculpted look. Remember, practice makes perfect, so don’t be afraid to experiment with different techniques and products to find what works best for you.
**Ready to sculpt and shine? Follow these steps and transform your contour game today!** 🌟💄
**#howtocontour #contourmakeup #contouringtips #flawlesscontour #makeuptutorial #beautysecrets #sculptedlook**


