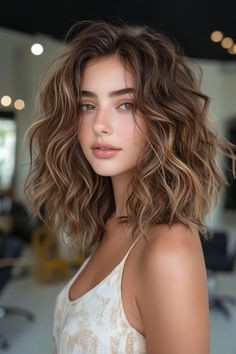


**Thick & Wavy: Haircut Tips for More Volume and Texture**
Achieving thick and wavy hair is a dream for many, but it doesn’t have to remain just a fantasy. With the right haircut and a few styling techniques, you can enhance the natural texture of your hair, create volume, and enjoy lush, full-bodied waves. Whether you’re dealing with flat, fine strands or trying to tame thick, unmanageable locks into soft waves, the right cut makes all the difference. In this article, we’ll explore haircut tips and styling strategies that bring out the best in thick and wavy hair.
---
### Why the Right Haircut Matters
Your haircut forms the foundation for how your hair behaves. A poor cut can weigh hair down, making it look limp or lifeless. On the other hand, a well-designed cut can add movement, reduce bulk in thick hair, or create the illusion of thickness in fine hair. For wavy hair, a balanced cut also helps define the wave pattern, preventing frizz and enhancing texture.
---
### 1. **Opt for Layers to Add Dimension**
Layers are your best friend when it comes to creating volume and movement. By removing some of the weight from your hair, layers help enhance natural wave patterns and prevent hair from falling flat. Here’s how layers help:
* **Short to medium layers* Perfect for fine or medium hair to lift the roots and encourage bounce.
* **Long layers* Ideal for thick or coarse hair to prevent it from becoming too bulky while still maintaining length and fullness.
* **Face-framing layers* These soften the overall look, accentuate facial features, and work beautifully with natural waves.
When getting layers, ask your stylist to consider your face shape and hair density to customize the cut.
---
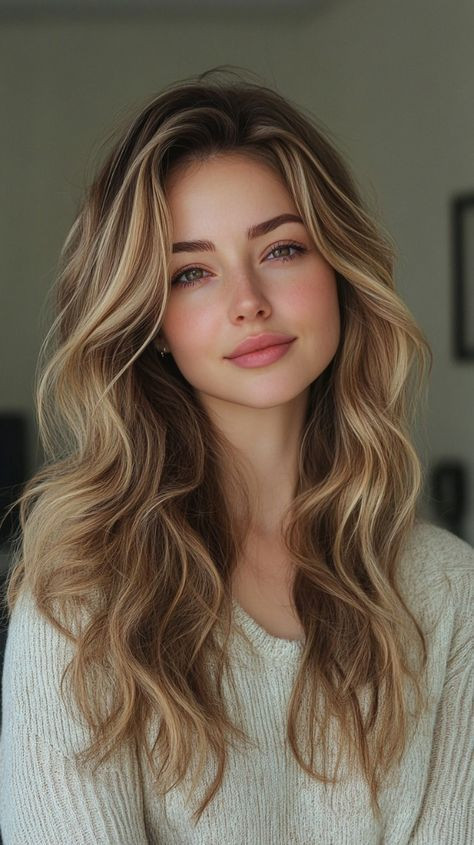
### 2. **Go for a Textured Lob (Long Bob)**
A textured lob is one of the most versatile and flattering cuts for creating thick and wavy styles. This shoulder-length cut offers enough length for styling and curling but is short enough to avoid being weighed down. To make the most of a lob:
* Add **razored or choppy ends** to give a soft, tousled finish.
* Pair with **long side bangs** or curtain bangs for a trendy, lived-in vibe.
* Use a **sea salt spray** to highlight natural texture and achieve that effortless beach wave look.
The lob works well with most face shapes and is easy to style, making it a go-to choice for modern, voluminous hair.
---
### 3. **Try the Shag Cut for Effortless Volume**
The shag haircut, inspired by ‘70s rock and roll, has made a big comeback—and for good reason. It’s tailor-made for wavy hair and provides lots of movement and volume with its choppy layers and feathered ends.
Shag cuts typically include:
* **Shorter layers on top** to boost volume at the crown.
* **Longer layers at the bottom** to maintain thickness without heaviness.
* **Wispy or full bangs** to frame the face and add personality.
It’s low-maintenance and especially flattering for those who love a messy, undone look. With a little mousse or curl cream, you’ll be good to go.
---
### 4. **Curtain Bangs + Waves = Match Made in Heaven**
If you want to switch things up without a drastic change, adding bangs can transform your haircut. Curtain bangs work especially well with wavy hair, adding softness and movement while blending seamlessly into your layers.
Tips for rocking curtain bangs:
* Keep them **longer and parted down the middle** for that signature curtain style.
* Style them with a round brush or flat iron to gently flip them out.
* Let them air-dry with a bit of styling cream for a soft, romantic vibe.
The best part? They grow out beautifully, so you don’t have to worry about frequent trims.
---
### 5. **Blunt Cuts for Fine Hair That Needs Thickness**
If you have fine or thin hair but want the appearance of thicker, fuller locks, a blunt cut might be your solution. By keeping the ends one length, this style creates the illusion of density and volume. It works especially well when combined with soft waves created by a curling wand or braiding.
* **Blunt bob* Chic and classic, ideal for short to medium hair.
* **One-length mid-length cut* Offers fullness at the bottom while still being versatile for styling.
While this style doesn't have much layering, it pairs perfectly with styling tools to give the texture and movement of naturally thick, wavy hair.
---
### 6. **Add Texture with Razor Cutting or Point Cutting**
When visiting your stylist, ask about adding texture with razor or point cutting techniques. These methods help reduce bulk and create a soft, feathered edge to the ends of your hair. They’re particularly helpful if:
* Your hair is **naturally thick and heavy**, and you want to lighten it without sacrificing length.
* You want **soft waves** that don’t look overly polished or stiff.
* You’re going for a **boho, lived-in vibe** that’s perfect for summer or casual styles.
Texturing is a subtle but powerful way to enhance waves and volume, especially when paired with the right hair products.
---
### 7. **Styling Tips for Maximum Volume and Texture**
Once you have the right cut, styling your hair becomes a breeze. Here are some expert tips to maintain and enhance volume and texture in wavy hair:
* **Use volumizing shampoo and conditioner**: Look for lightweight formulas that lift roots and won’t weigh hair down.
* **Air-dry with a diffuser**: Helps define waves and add body without frizz.
* **Apply mousse or styling foam**: Boosts volume at the roots and enhances natural wave patterns.
* **Sleep in loose braids or buns**: Wake up to soft, heatless waves.
* **Use a texturizing spray**: Great for second-day hair and adding a tousled, beachy look.
---
### 8. **Regular Trims for Healthy, Bouncy Hair**
Even the best haircut needs maintenance. Trimming your hair every 6-8 weeks prevents split ends and keeps your style fresh and full of life. Long, neglected hair can start to look flat and heavy, so regular upkeep is key for that thick and wavy look.
---
### Final Thoughts
Thick, wavy hair is one of the most sought-after textures—and with the right haircut and techniques, it’s completely achievable. Whether you’re blessed with natural waves or you’re faking it till you make it, the right cut can enhance texture, boost volume, and bring life back to your locks. From layered lobs to shaggy cuts and curtain bangs, there's a style out there that’s perfect for you.
So next time you’re heading to the salon, bring these tips along and work with your stylist to find a haircut that suits your hair type, face shape, and lifestyle. With just a few snips and a bit of styling know-how, thick and wavy hair can be your new everyday reality.