Good and Bad People Good and Bad People
    #ai #traveltips #business #chatgpt #usa
    اعلی درجے کی تلاش
  • لاگ ان کریں
  • رجسٹر کریں۔

  • نائٹ موڈ
  • © {تاریخ} Good and Bad People
    کے بارے میں • ڈائرکٹری • ہم سے رابطہ کریں۔ • ڈویلپرز • رازداری کی پالیسی • استعمال کی شرائط • واپس کرنا • Referral Terms • Acceptable Use Policy • Community Guidelines • Write for Us

    منتخب کریں۔ زبان

  • Arabic
  • Bengali
  • Chinese
  • Croatian
  • Danish
  • Dutch
  • English
  • Filipino
  • French
  • German
  • Hebrew
  • Hindi
  • Indonesian
  • Italian
  • Japanese
  • Korean
  • Persian
  • Portuguese
  • Russian
  • Spanish
  • Swedish
  • Turkish
  • Urdu
  • Vietnamese

دیکھو

دیکھو ریلز

تقریبات

ایونٹس کو براؤز کریں۔ میرے واقعات

بلاگ

مضامین کو براؤز کریں۔

مارکیٹ

تازہ ترین مصنوعات

صفحات

میرے صفحات پسند کردہ صفحات

مزید

دریافت کریں۔ مقبول پوسٹس نوکریاں پیشکش کرتا ہے۔ فنڈز
ریلز دیکھو تقریبات مارکیٹ بلاگ میرے صفحات تمام دیکھیں

دریافت پوسٹس

Posts

صارفین

صفحات

گروپ

بلاگ

مارکیٹ

تقریبات

نوکریاں

فنڈز

Lunas Luxe Travel
Lunas Luxe Travel
1 Y ·ترجمہ کریں۔

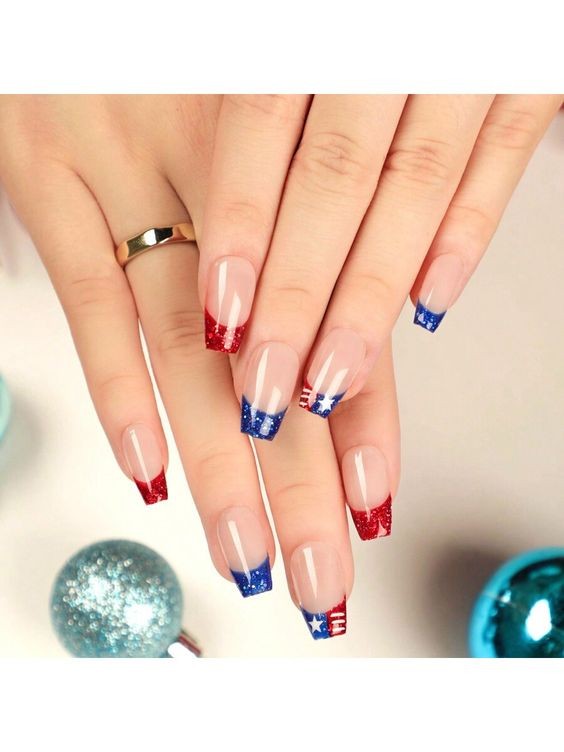
Celebrate in Style: 24-Piece Independence Day Medium Length Press-On Nails

As Independence Day approaches, it's time to prepare for festive celebrations with style and flair. One of the simplest yet impactful ways to showcase your patriotism is through your nails. The 24-piece Independence Day medium-length press-on nails in blue, red, and white offer a convenient and eye-catching solution. Here’s everything you need to know about these patriotic beauties and how they can enhance your holiday look.

Why Choose Independence Day Medium Length Press-On Nails?
1. Convenience and Ease of Use:
Press-on nails are perfect for anyone looking to achieve salon-quality nails at home without the hassle of drying time or salon appointments. They come with adhesive already applied, making them quick and simple to apply.

2. Patriotic Design:
The colors of blue, red, and white are not only iconic but also deeply symbolic of American patriotism. Whether you're attending a Fourth of July barbecue, watching fireworks, or participating in a parade, these nails will complement your outfit and show off your love for the USA.

3. Versatility:
These medium-length nails are suitable for various occasions beyond Independence Day. They can be worn for other patriotic holidays, themed parties, or even daily wear if you want to add a touch of Americana to your look.

How to Apply Independence Day Press-On Nails
1. Prep Your Nails:
Start with clean, dry nails. Push back cuticles and lightly buff the nail surface to ensure a smooth application.

2. Select the Right Size:
Match each press-on nail to the size of your natural nails. If needed, file or trim the press-on nails for a perfect fit.

3. Apply the Press-On Nails:

Peel off the adhesive backing from each press-on nail.
Press firmly onto your natural nail, starting from the cuticle and pressing down to the tip.
Hold in place for a few seconds to ensure a secure bond.
4. Customize and Finish:

If desired, trim or file the press-on nails to your preferred length and shape.
Apply a clear top coat to seal the edges and add extra shine and durability.
Tips for Maintenance and Removal
Care: Avoid exposing your press-on nails to harsh chemicals or excessive water to maintain their appearance.
Removal: To remove, gently lift the press-on nails from the sides using a cuticle stick or nail buffer. Use acetone-based nail polish remover to dissolve any remaining adhesive.
Conclusion
Enhance your Independence Day celebrations with the 24-piece medium-length press-on nails in blue, red, and white. Whether you're dressing up for a festive occasion or simply expressing your patriotism, these nails offer a hassle-free way to achieve a polished and stylish look. Embrace the spirit of freedom and pride with nails that reflect the colors of the American flag.

image
پسند
تبصرہ
بانٹیں
Lunas Luxe Travel
Lunas Luxe Travel
1 Y ·ترجمہ کریں۔

American Flag Design Press-On Nails: Celebrate Patriotism with Style

Showcasing your patriotic spirit has never been easier than with American flag design press-on nails. Whether it's for Independence Day, Memorial Day, or any occasion where you want to display your love for the USA, these nails offer a fun and festive way to accessorize. Here's everything you need to know about these stylish press-on nails and why they make a perfect gift for her.

Why Choose American Flag Design Press-On Nails?
Ease of Application: Press-on nails are simple to apply and require no drying time, making them ideal for anyone who wants a quick and hassle-free manicure.

Customizable: American flag designs come in various styles, from classic stars and stripes to modern interpretations, allowing you to choose a look that suits your taste.

Versatility: These nails can be worn for patriotic holidays, themed parties, or everyday wear, adding a touch of flair to any outfit.

How to Use American Flag Design Press-On Nails
1. Preparation:

Start with clean, dry nails. Push back cuticles and lightly buff the nail surface to ensure a smooth application.
2. Application:

Select the press-on nails that best fit each of your natural nails.
Peel off the adhesive backing and press the nail firmly onto your natural nail, starting from the cuticle and pressing down to the tip.
3. Customization:

Trim or file the nails to your desired length and shape.
Use nail glue or clear polish to secure any loose edges and enhance durability.
4. Maintenance:

Avoid exposing your press-on nails to harsh chemicals or excessive water to maintain their appearance.
Consider applying a top coat to seal and add extra shine.
Tips for Removal
To remove, gently lift the press-on nails from the sides using a cuticle stick or nail buffer.
Use acetone-based nail polish remover to dissolve any remaining adhesive.
Conclusion
American flag design press-on nails are a fun and fashionable way to celebrate patriotism and express your love for the USA. Whether you're gifting them to a friend or treating yourself, these nails offer a festive accessory that's easy to apply and sure to turn heads. Embrace the spirit of freedom and creativity with American flag press-on nails that showcase your pride in style.

image
پسند
تبصرہ
بانٹیں
Lunas Luxe Travel
Lunas Luxe Travel
1 Y ·ترجمہ کریں۔

24-Piece Glitter Nail Art for Independence Day: Celebrate with Sparkling Style

Independence Day is a time for celebration, patriotism, and showing off your festive spirit with flair. What better way to complement your outfit and accessories than with dazzling glitter nail art? Whether you're attending a backyard BBQ, watching fireworks, or enjoying a picnic with loved ones, these 24-piece glitter nail art designs are perfect for adding a touch of sparkle to your holiday look.

Why Choose Glitter Nail Art for Independence Day?
Glitter nail art not only enhances your overall appearance but also reflects the celebratory mood of Independence Day. Here’s why it's a must-have for your patriotic ensemble:

Versatility: Glitter nails can be customized to match any outfit or theme, making them versatile for any Independence Day gathering.

Ease of Application: With press-on nails, you can achieve professional-looking nail art without the need for salon visits or drying time.

Long-Lasting Shine: Glitter nails offer a long-lasting shine that withstands outdoor activities and festive celebrations.

How to Use 24-Piece Glitter Nail Art
1. Choose Your Designs:
Select from a variety of glitter nail designs, ranging from classic red, white, and blue patterns to intricate star and stripe designs.

2. Prep Your Nails:
Clean and trim your nails to ensure a smooth surface for application. Push back cuticles and lightly buff nails for better adhesion.

3. Apply Press-On Nails:

Start by matching each press-on nail to your natural nail size.
Peel off the adhesive backing and press firmly onto each nail, starting from the cuticle and smoothing outwards.
Hold in place for a few seconds to ensure a secure bond.
4. Customize and Accentuate:

Use nail glue or clear polish to secure any loose edges and enhance the durability of your nail art.
Add gems, stickers, or additional glitter accents for a personalized touch.
5. Seal and Shine:

Finish with a top coat to seal in your design and add extra shine.
Allow nails to dry completely before engaging in activities to prevent smudging.
Tips for Maintenance and Removal
Gentle Care: Avoid exposing your glitter nails to harsh chemicals or excessive water to maintain their shine and durability.

Safe Removal: Use acetone-based nail polish remover to gently dissolve adhesive and carefully lift off press-on nails without damaging natural nails.

Conclusion
Celebrate Independence Day in style with 24-piece glitter nail art that adds a festive sparkle to your look. Whether you prefer bold reds, crisp whites, or deep blues, these press-on nails offer a hassle-free way to showcase your patriotic spirit. Embrace the spirit of freedom and creativity with dazzling nails that shine as bright as the fireworks lighting up the night sky.

image
پسند
تبصرہ
بانٹیں
Lunas Luxe Travel
Lunas Luxe Travel
1 Y ·ترجمہ کریں۔

Fourth of July Oreo Cream Cheese Balls Recipe

Celebrate Independence Day with a delightful and festive treat that combines the irresistible flavors of Oreo cookies and creamy cheesecake. These Fourth of July Oreo Cream Cheese Balls are easy to make and perfect for any patriotic gathering. Whether you're hosting a backyard barbecue, attending a picnic, or watching fireworks, these bite-sized delights are sure to be a hit with friends and family.

Ingredients:
1 package (14.3 ounces) Oreo cookies
1 package (8 ounces) cream cheese, softened
1 cup white chocolate chips or candy melts
Red and blue food coloring
Patriotic sprinkles (optional)
Instructions:
1. Crush the Oreo Cookies:

Place the Oreo cookies in a food processor and pulse until finely crushed. Alternatively, you can place them in a large resealable plastic bag and crush them using a rolling pin.
2. Mix with Cream Cheese:

In a mixing bowl, combine the crushed Oreo cookies with softened cream cheese. Use a spoon or your hands to mix until well combined and smooth.
3. Shape into Balls:

Roll the Oreo cream cheese mixture into small balls, about 1 inch in diameter. Place the balls on a baking sheet lined with parchment paper.
4. Chill the Balls:

Place the baking sheet in the refrigerator and chill the Oreo cream cheese balls for at least 30 minutes to firm up.
5. Melt White Chocolate:

In a microwave-safe bowl, melt the white chocolate chips or candy melts according to package instructions until smooth.
6. Dip in Chocolate:

Divide the melted white chocolate into three bowls. Dye one bowl red and another blue using food coloring. Leave the third bowl white.
Using a fork or toothpick, dip each chilled Oreo cream cheese ball into the melted chocolate, tapping off any excess.
Place the dipped balls back on the parchment-lined baking sheet.
7. Decorate:

While the chocolate coating is still wet, sprinkle patriotic sprinkles over the balls or drizzle with contrasting colored chocolate for a festive look.
8. Chill and Serve:

Return the baking sheet to the refrigerator to allow the chocolate coating to set completely, about 15-20 minutes.
Once set, arrange the Fourth of July Oreo Cream Cheese Balls on a serving platter and refrigerate until ready to serve.
Tips for Serving:
Make Ahead: These Oreo cream cheese balls can be made ahead of time and stored in an airtight container in the refrigerator for up to 3-4 days.
Variations: Experiment with different flavors of Oreo cookies or add chopped nuts, coconut flakes, or mini chocolate chips to the cream cheese mixture for added texture.
Patriotic Presentation: Serve the Oreo cream cheese balls on a platter lined with red, white, and blue napkins or decorations to enhance the festive spirit.
Conclusion:
These Fourth of July Oreo Cream Cheese Balls are a fun and delicious way to celebrate America's independence. With their creamy Oreo cheesecake center and colorful chocolate coating, they are sure to be a hit at your holiday gathering. Enjoy these bite-sized treats while watching fireworks or sharing stories with loved ones. Embrace the patriotic spirit with every delectable bite of these festive Oreo cream cheese balls!

image
پسند
تبصرہ
بانٹیں
Lunas Luxe Travel
Lunas Luxe Travel
1 Y ·ترجمہ کریں۔

4th of July Ice Cream Delight! 4th of July Ice Cream Delight: Cool Treats for a Hot Celebration

The Fourth of July is synonymous with fireworks, barbecues, and of course, refreshing desserts to beat the summer heat. One of the most beloved treats for this patriotic holiday is ice cream, which offers a cool and creamy way to celebrate America's independence. Here are some delightful ice cream ideas that will make your 4th of July celebration even sweeter:

Red, White, and Blue Ice Cream Sundae
Ingredients:

Vanilla ice cream
Fresh strawberries, sliced
Fresh blueberries
Whipped cream
Patriotic sprinkles
Instructions:

Scoop vanilla ice cream into bowls or glasses.
Top with sliced strawberries and blueberries.
Add a dollop of whipped cream on top.
Sprinkle with patriotic red, white, and blue sprinkles.
Serve immediately and enjoy!
Berry Swirl Ice Cream
Ingredients:

Vanilla ice cream
Strawberry or raspberry jam
Fresh blueberries
Instructions:

Soften vanilla ice cream slightly.
Swirl in strawberry or raspberry jam to create ribbons of flavor.
Fold in fresh blueberries for added texture and color.
Refreeze until firm.
Scoop into bowls and garnish with more berries if desired.
Patriotic Ice Cream Sandwiches
Ingredients:

Vanilla ice cream
Red and blue food coloring
Chocolate chip cookies or sugar cookies
Instructions:

Divide softened vanilla ice cream into two bowls.
Dye one bowl red and the other blue using food coloring.
Spread the red and blue ice cream onto separate baking sheets lined with parchment paper.
Freeze until firm.
Once frozen, use cookie cutters to cut out shapes (stars, flags, etc.).
Sandwich between two cookies and roll the edges in patriotic sprinkles.
Freeze until ready to serve.
Firecracker Ice Pops
Ingredients:

Coconut milk or yogurt
Red fruit puree (strawberry, raspberry)
Blue fruit puree (blueberry)
Honey or maple syrup (optional for sweetness)
Instructions:

Layer coconut milk or yogurt, red fruit puree, and blue fruit puree into popsicle molds.
Insert sticks and freeze until solid.
Run molds under warm water to release popsicles.
Serve immediately for a refreshing treat.
Tips for Serving Ice Cream:
Keep It Cool: Serve ice cream in insulated bowls or on chilled plates to prevent melting too quickly.
Patriotic Presentation: Use red, white, and blue napkins, plates, and decorations to enhance the festive atmosphere.
Variety is Key: Offer a selection of ice cream flavors and toppings to cater to different tastes.
Conclusion
Celebrate the 4th of July with these delicious ice cream delights that capture the colors and flavors of the holiday. Whether you're hosting a backyard BBQ, attending a picnic, or watching fireworks, these treats are sure to be a hit with everyone. Enjoy the festivities and cool down with these patriotic and refreshing ice cream creations!

پسند
تبصرہ
بانٹیں
Lunas Luxe Travel
Lunas Luxe Travel
1 Y ·ترجمہ کریں۔

Cherry and Blueberry Pie Delight: A Summertime Favorite

When summer rolls around, there's nothing quite as satisfying as a homemade pie bursting with the flavors of ripe cherries and juicy blueberries. This Cherry and Blueberry Pie Delight recipe combines the sweetness of cherries with the tartness of blueberries, creating a perfect balance of flavors that will delight your taste buds and impress your guests. Whether you're hosting a backyard barbecue, a family gathering, or simply craving a delicious dessert, this pie is sure to be a hit.

Ingredients:
Pie Crust:

2 1/2 cups all-purpose flour
1 teaspoon salt
1 cup unsalted butter, cold and cut into cubes
6-8 tablespoons ice water
Filling:

3 cups pitted cherries, fresh or frozen
2 cups blueberries, fresh or frozen
1 cup granulated sugar
1/4 cup cornstarch
1 tablespoon lemon juice
1/2 teaspoon almond extract (optional)
1 tablespoon butter, cut into small pieces
Egg Wash (Optional):

1 egg
1 tablespoon water
Instructions:
1. Prepare the Pie Crust:

In a large bowl, combine the flour and salt. Cut in the cold butter using a pastry blender or two knives until the mixture resembles coarse crumbs.
Gradually add the ice water, 1 tablespoon at a time, mixing with a fork after each addition. Continue adding water until the dough begins to form into a ball.
Divide the dough in half and shape each half into a disk. Wrap each disk in plastic wrap and refrigerate for at least 1 hour.
2. Make the Filling:

In a large bowl, gently toss together the cherries, blueberries, sugar, cornstarch, lemon juice, and almond extract (if using). Let the mixture sit for about 10-15 minutes to allow the flavors to meld.
3. Assemble and Bake the Pie:

Preheat your oven to 375°F (190°C).
On a lightly floured surface, roll out one disk of dough into a circle large enough to line a 9-inch pie dish. Transfer the dough to the pie dish and gently press it into the bottom and sides.
Spoon the cherry-blueberry filling into the pie crust, spreading it evenly.
Dot the filling with pieces of butter.
4. Add the Top Crust:

Roll out the second disk of dough into a circle large enough to cover the pie. Place it over the filling.
Trim any excess dough from the edges, leaving about 1 inch overhang. Fold the overhang under the bottom crust, then crimp the edges to seal.
5. Bake the Pie:

If desired, create vents in the top crust to allow steam to escape while baking.
Optional: In a small bowl, whisk together the egg and water to create an egg wash. Brush the top crust with the egg wash for a golden finish.
Place the pie on a baking sheet (to catch any drips) and bake in the preheated oven for 45-55 minutes, or until the crust is golden brown and the filling is bubbly.
6. Cool and Serve:

Allow the pie to cool on a wire rack for at least 1-2 hours before serving. This helps the filling to set.
Serve slices of Cherry and Blueberry Pie Delight on its own or with a scoop of vanilla ice cream for an extra special treat.
Conclusion:
This Cherry and Blueberry Pie Delight is a wonderful way to celebrate the flavors of summer with friends and family. With its flaky, buttery crust and vibrant, fruity filling, it's sure to become a favorite dessert for any occasion. Whether you enjoy it warm from the oven or chilled the next day, this pie is guaranteed to bring smiles and satisfy cravings. Treat yourself to a slice of summer with this irresistible homemade pie!

image
پسند
تبصرہ
بانٹیں
Mia Fashionable Nomad
1 Y ·ترجمہ کریں۔

### Chic and Trendy Short Summer Nails: Embrace the Latest 2024 Style Trends

Short nails can be just as stylish and versatile as longer ones, especially during the vibrant summer season. Embrace the latest 2024 style trends with chic and trendy short summer nails that are perfect for expressing your personality and staying on-trend. Here's everything you need to know to achieve the perfect manicure:

#### 1. **Minimalist Elegance**

Opt for minimalist designs that highlight the natural beauty of short nails. Consider soft nude shades, sheer pastels, or classic neutrals like taupe and gray. These understated colors create a sophisticated and polished look that complements any outfit and occasion.

#### 2. **Vibrant Pops of Color**

Make a statement with bold and vibrant nail colors that capture the energy of summer. Choose shades like electric blues, vibrant corals, or sunny yellows to add a pop of color to your manicure. Experiment with matte finishes or glossy textures to suit your personal style.

#### 3. **Graphic Designs**

Explore graphic nail art designs that are chic and trendy for 2024. Geometric patterns, abstract lines, and negative space manicures are all popular choices that add a modern twist to short nails. Mix and match different colors and shapes to create a unique and eye-catching look.

#### 4. **Metallic Accents**

Incorporate metallic accents into your short summer nails for a touch of glamour and sophistication. Silver, gold, and rose gold are timeless choices that add a subtle shimmer to your manicure. Use metallic foil, glitter gradients, or metallic nail stickers to create elegant and trendy designs.

#### 5. **French Tip Variations**

Put a contemporary spin on the classic French manicure with creative variations. Try reverse French tips, where the color is applied to the base of the nail instead of the tip, or experiment with different colors and shapes for a modern interpretation. This timeless style can be adapted to suit your personal taste.

#### 6. **Ombre Effects**

Achieve a stylish and gradient effect with ombre nails that transition seamlessly from one color to another. Blend complementary shades like pink and orange, blue and purple, or create a subtle ombre with shades of the same color family. Ombre nails are versatile and perfect for summer.

#### 7. **Floral and Nature-Inspired Designs**

Celebrate the beauty of summer with floral nail art and nature-inspired designs. Delicate flowers, leaves, and tropical motifs are all popular choices that add a whimsical touch to short nails. Experiment with hand-painted designs or nail decals for a charming and feminine manicure.

#### 8. **Application Tips**

- **Prep Your Nails* Start with clean and trimmed nails. Use a gentle nail file to shape your nails to your desired length and style.
- **Base Coat* Apply a base coat to protect your nails and ensure smooth polish application.
- **Color Application* Apply two thin coats of nail polish, allowing each coat to dry completely before applying the next.
- **Top Coat* Finish with a high-quality top coat to seal in the color and add shine. This step helps prolong the wear of your manicure.

#### 9. **Maintenance Tips**

- **Regular Touch-Ups* Schedule regular manicure touch-ups to keep your nails looking fresh and polished.
- **Nail Care* Moisturize your hands and cuticles regularly to maintain healthy nails.
- **Avoid Harsh Chemicals* Wear gloves when using household cleaners or gardening to protect your manicure.

#### Final Thoughts

Chic and trendy short summer nails for 2024 are all about expressing your unique style and staying current with the latest trends. Whether you prefer minimalist elegance, bold pops of color, or intricate nail art designs, there's a short nail style to suit every preference. Embrace creativity and experiment with different colors, textures, and designs to create the perfect manicure that reflects your personality and enhances your summer style.

image
پسند
تبصرہ
بانٹیں
Mia Fashionable Nomad
1 Y ·ترجمہ کریں۔

### Elegant and Stylish Summer Nail Designs for Women Over 40

As women enter their 40s and beyond, their sense of style often evolves towards elegance and sophistication. Your nails can be a beautiful expression of this refinement, especially during the vibrant summer season. Here are some timeless and chic summer nail designs tailored specifically for women over 40:

#### 1. **Classic French Manicure**

The French manicure remains a timeless choice that complements any age. Opt for a traditional white tip or update it with a subtle twist like a soft blush or nude base instead of sheer pink. This clean and sophisticated look pairs well with any outfit and is perfect for both professional and casual settings.

#### 2. **Neutral Elegance**

Choose neutral shades like soft beige, creamy taupe, or subtle gray for a minimalist yet elegant manicure. These hues provide a polished appearance without being overpowering and are versatile enough to match any summer ensemble. Add a touch of shimmer or a matte finish for a modern twist.

#### 3. **Soft Pastels**

Pastel colors like lavender, mint green, or baby blue offer a delicate and feminine look that complements mature skin tones beautifully. These soft hues are perfect for summer and can be enhanced with simple designs such as floral accents or geometric patterns for a touch of sophistication.

#### 4. **Metallic Accents**

Incorporate metallic shades like silver, gold, or bronze into your summer nail designs for a touch of glamour. Metallic nails add a subtle sparkle that elevates your look for evening events or special occasions. Consider using metallic foil, glitter gradients, or geometric accents to create a chic and sophisticated manicure.

#### 5. **Subtle Nail Art**

Opt for understated nail art designs that enhance your nails without being too bold. Consider minimalist stripes, dots, or abstract patterns in complementary colors to add interest to your manicure. Keep the designs subtle and refined to maintain a sophisticated appearance.

#### 6. **Ombre Effects**

Experiment with ombre nail designs using soft gradient transitions between shades of the same color or contrasting hues. Ombre nails create a sophisticated and artistic look that is perfect for summer and can be customized to match your personal style and mood.

#### 7. **Matte Finishes**

Matte nail polish offers a chic and modern alternative to glossy finishes. Choose muted shades like deep burgundy, navy blue, or emerald green in a matte formula for a sophisticated and understated manicure. Matte nails add a touch of elegance and are less prone to visible imperfections.

#### 8. **Nail Care Tips**

Maintaining healthy and beautiful nails is essential for achieving an elegant manicure:
- **Moisturize Regularly* Keep your hands and cuticles hydrated with a nourishing hand cream or cuticle oil.
- **Trim and Shape* Regularly trim and shape your nails to maintain a neat and polished appearance.
- **Protect Your Nails* Wear gloves when doing household chores or gardening to prevent damage and maintain nail health.

#### 9. **Professional Application**

For best results, visit a professional nail technician who specializes in manicures for mature women. They can provide expert advice on nail care, recommend suitable colors and designs, and ensure a flawless application that enhances your natural beauty.

#### Final Thoughts

Elegant and stylish summer nail designs for women over 40 celebrate sophistication and timeless beauty. Whether you prefer classic French manicures, subtle pastels, or chic metallic accents, these nail ideas are designed to complement your mature style and elevate your look with grace and refinement. Embrace your individuality and experiment with different colors and designs to find the perfect summer nails that reflect your personality and enhance your natural elegance.

image
پسند
تبصرہ
بانٹیں
Pennys Pretty Projects
1 Y ·ترجمہ کریں۔

Deliciously Spicy Spaghetti: A Flavorful Recipe for Pasta Lovers

Spaghetti, a timeless favorite in households worldwide, offers endless possibilities for culinary creativity. One particularly tantalizing variation is the Spicy Spaghetti—a dish that combines the comforting warmth of pasta with a fiery kick of spices. Whether you're a spice enthusiast or simply looking to add some zest to your dinner table, this recipe promises to satisfy your taste buds and leave you craving more.

Ingredients:

8 oz spaghetti (or any pasta of your choice)
2 tbsp olive oil
4 cloves garlic, minced
1 small onion, finely chopped
1 red bell pepper, thinly sliced
1 green bell pepper, thinly sliced
1-2 fresh red chilies, finely chopped (adjust according to your spice tolerance)
1 tsp dried oregano
1 tsp dried basil
1/2 tsp crushed red pepper flakes (adjust for more or less heat)
Salt and pepper to taste
1 can (14 oz) diced tomatoes
1/4 cup tomato paste
1/2 cup vegetable broth or water
Freshly grated Parmesan cheese, for serving (optional)
Fresh basil leaves, chopped, for garnish
Instructions:

Cook the Pasta:

Bring a large pot of salted water to a boil. Cook the spaghetti according to package instructions until al dente. Drain and set aside.
Prepare the Sauce:

In a large skillet or pan, heat olive oil over medium heat. Add minced garlic and chopped onion. Sauté until fragrant and onions turn translucent, about 2-3 minutes.
Add Vegetables and Spices:

Add sliced bell peppers and chopped red chilies to the skillet. Sauté for another 3-4 minutes until peppers are slightly softened.
Seasoning:

Stir in dried oregano, dried basil, crushed red pepper flakes, salt, and pepper. Cook for 1 minute until the spices are aromatic.
Tomato Base:

Add diced tomatoes (with juices) and tomato paste to the skillet. Stir well to combine. Let the mixture simmer over medium-low heat for 10-15 minutes, stirring occasionally, until the sauce thickens slightly.
Combine Pasta and Sauce:

Pour the cooked spaghetti into the skillet with the spicy sauce. Toss gently until the pasta is evenly coated with the sauce. If the sauce is too thick, add a splash of vegetable broth or water to reach your desired consistency.
Serve:

Divide the spicy spaghetti among serving plates. Garnish with freshly grated Parmesan cheese (if using) and chopped fresh basil leaves. Serve hot and enjoy the burst of flavors!
Tips for Serving:

For an extra kick, you can add a dash of hot sauce or more crushed red pepper flakes.
Pair with a side salad and garlic bread to complete the meal.
This dish also tastes great with a sprinkle of fresh lemon juice before serving for a citrusy twist.
Conclusion:

Spicy Spaghetti is not just a meal; it's an experience—a fusion of hearty pasta and bold flavors that awaken your senses. Whether shared with loved ones or enjoyed solo, this recipe promises to spice up your dinner routine and leave a lasting impression. Embrace the heat and indulge in the rich flavors of this tantalizing dish—you won't regret it!

image
پسند
تبصرہ
بانٹیں
Lunas Luxe Travel
Lunas Luxe Travel
1 Y ·ترجمہ کریں۔

Fourth of July Cheesecake Delight Recipe!

The Fourth of July is a time of celebration, fireworks, and delicious food. If you're looking to add a patriotic twist to your dessert table this Independence Day, look no further than this Fourth of July cheesecake delight recipe. Creamy, decadent, and bursting with red, white, and blue colors, this dessert is sure to impress your guests and satisfy everyone's sweet tooth.

Ingredients:
Graham Cracker Crust:

1 1/2 cups graham cracker crumbs
1/4 cup granulated sugar
6 tablespoons unsalted butter, melted
Cheesecake Filling:

24 ounces cream cheese, softened
1 cup granulated sugar
1 teaspoon vanilla extract
3 large eggs
1/2 cup sour cream
Red and blue food coloring
Topping:

Fresh strawberries, blueberries, and raspberries
Whipped cream or whipped topping
Instructions:
1. Prepare the Graham Cracker Crust:

Preheat your oven to 325°F (160°C). Grease a 9-inch springform pan.
In a medium bowl, combine graham cracker crumbs, sugar, and melted butter. Mix until well combined.
Press the mixture into the bottom of the prepared pan. Use the back of a spoon or a flat-bottomed glass to pack it firmly.
Bake the crust for 10 minutes. Remove from the oven and let it cool while preparing the filling.
2. Make the Cheesecake Filling:

In a large bowl, beat the cream cheese until smooth and creamy using an electric mixer.
Add granulated sugar and vanilla extract, and beat until well combined.
Add eggs one at a time, beating well after each addition.
Mix in sour cream until smooth and creamy.
Divide the cheesecake batter into three portions. Leave one portion plain, dye one portion red with food coloring, and dye the remaining portion blue with food coloring.
3. Assemble and Bake:

Pour the plain cheesecake batter over the cooled crust, spreading it evenly.
Carefully pour the red cheesecake batter over the plain layer, spreading it gently.
Lastly, pour the blue cheesecake batter over the red layer, spreading it gently.
Tap the pan gently on the counter to remove any air bubbles.
Place the springform pan in a large baking dish and fill the dish with hot water halfway up the sides of the pan (this prevents the cheesecake from cracking).
Bake in the preheated oven for 50-60 minutes, or until the edges are set and the center is slightly jiggly.
Turn off the oven and let the cheesecake cool in the oven with the door slightly open for 1 hour.
Remove the cheesecake from the oven and refrigerate for at least 4 hours or overnight until completely chilled and set.
4. Add Toppings and Serve:

Before serving, carefully remove the cheesecake from the springform pan and place it on a serving platter.
Decorate the top of the cheesecake with fresh strawberries, blueberries, and raspberries in a festive pattern.
Optionally, pipe whipped cream or whipped topping around the edges of the cheesecake for an extra touch of sweetness.
Conclusion:
This Fourth of July cheesecake delight is not only delicious but also a stunning centerpiece for your Independence Day celebration. With its layers of creamy goodness and vibrant red, white, and blue colors, it's sure to impress your guests and capture the patriotic spirit of the holiday. Enjoy a slice of this festive dessert and make your Fourth of July festivities unforgettable!

image
پسند
تبصرہ
بانٹیں
Showing 6653 out of 8647
  • 6649
  • 6650
  • 6651
  • 6652
  • 6653
  • 6654
  • 6655
  • 6656
  • 6657
  • 6658
  • 6659
  • 6660
  • 6661
  • 6662
  • 6663
  • 6664
  • 6665
  • 6666
  • 6667
  • 6668

پیشکش میں ترمیم کریں۔

درجے شامل کریں۔


ایک تصویر منتخب کریں۔
اپنے درجے کو حذف کریں۔
کیا آپ واقعی اس درجے کو حذف کرنا چاہتے ہیں؟

جائزے

اپنے مواد اور پوسٹس کو بیچنے کے لیے، چند پیکجز بنا کر شروع کریں۔ منیٹائزیشن

بٹوے کے ذریعے ادائیگی کریں۔

ادائیگی کا انتباہ

آپ اشیاء خریدنے والے ہیں، کیا آپ آگے بڑھنا چاہتے ہیں؟

رقم کی واپسی کی درخواست کریں۔