پسند
تبصرہ
بانٹیں


Strategies to Enhance the Perception of Space in a Small, Dark Room
Many of us face the challenge of making a small, dark room feel more spacious and inviting. Whether it's a bedroom, home office, or a cozy reading nook, there are several clever strategies you can employ to transform its atmosphere and maximize its potential. Here’s a comprehensive guide on how to enhance the perception of space in such rooms:
**1. ** Optimize Lighting:
Natural Light: Maximize natural light by using sheer curtains or blinds that allow light to filter through. Keep windows clean and unobstructed to let in as much sunlight as possible.
Artificial Lighting: Supplement natural light with strategically placed lamps or overhead lights. Use light fixtures that distribute light evenly to reduce shadows and create a brighter ambiance.
**2. ** Choose the Right Colors:
Lighter Shades: Opt for light-colored paint or wallpaper to make the room feel airy and expansive. Soft pastels, neutrals, or whites can reflect light and visually enlarge the space.
Accent Colors: Introduce pops of color through accessories or accent walls to add interest without overwhelming the space. This can create focal points that draw the eye and distract from the room's size.
**3. ** Mirrors and Reflective Surfaces:
Strategic Placement: Place mirrors opposite windows or in areas that reflect light to amplify the feeling of openness. Mirrored furniture or reflective decor pieces can also bounce light around the room, making it appear larger.
Glass and Lucite: Opt for furniture or decor made from transparent materials like glass or lucite. These pieces create the illusion of more space as they don’t visually clutter the room.
**4. ** Declutter and Organize:
Streamline Furnishings: Choose multi-functional furniture with clean lines and minimalistic designs. Avoid bulky pieces that overwhelm the space.
Storage Solutions: Invest in clever storage solutions like floating shelves or built-in cabinets to keep clutter at bay. A tidy space feels more open and spacious.
**5. ** Vertical Space Utilization:
Floor-to-Ceiling Curtains: Hang curtains closer to the ceiling and let them extend all the way to the floor. This draws the eye upward and creates the illusion of taller ceilings.
Vertical Shelving: Install tall, narrow shelves to draw attention upward and utilize wall space efficiently. Displaying items vertically can also create a sense of height and openness.
**6. ** Create Depth with Décor:
Layered Textures: Incorporate textures through rugs, cushions, and throws to add depth and interest to the room. Textured walls or ceiling treatments can also create visual intrigue.
Strategic Art Placement: Use art and decor items to guide the eye around the room. Large artworks or murals can create a focal point and distract from the room's size limitations.
**7. ** Open Up Sightlines:
Furniture Arrangement: Arrange furniture to create open pathways and maximize floor space. Leave some areas free of furniture to create visual breathing room.
Transparency: Use furniture with exposed legs or open designs to create a sense of openness. This allows light to pass through and makes the room feel less crowded.
By implementing these strategies, you can effectively enhance the perception of space in a small, dark room and create a more comfortable and visually appealing environment. Whether you're looking to redesign a bedroom, office, or any other small space, thoughtful design choices can make a significant difference in how the room is experienced. With creativity and a strategic approach, even the smallest rooms can feel larger and more inviting.

Baked Crunchy Hot Honey Chicken: A Taste Sensation
In the realm of culinary delights, few dishes manage to combine comfort, spice, and sweetness quite like Baked Crunchy Hot Honey Chicken. This dish is a perfect fusion of crispy textures, a kick of heat, and the soothing sweetness of honey, creating a taste experience that satisfies all the senses.
The Crispy Foundation
At its core, Baked Crunchy Hot Honey Chicken starts with the irresistible crunch. The chicken is coated in a seasoned breading that crisps up beautifully in the oven, offering a satisfying bite with every mouthful. This crunch isn't just about texture—it's a promise of the flavor adventure that awaits.
The Spicy Kick
What sets this dish apart is its bold infusion of heat. A blend of spices, possibly including paprika, cayenne pepper, or chili powder, adds a punchy kick to the chicken. This spicy element wakes up the taste buds, ensuring each bite is lively and invigorating. It's not overwhelming but rather enhances the overall flavor profile, making each piece of chicken uniquely delicious.
The Sweet Honey Glaze
Contrasting the spice is the honey glaze, a sticky, golden addition that brings a touch of sweetness to the dish. As the chicken bakes to perfection, the honey caramelizes, creating a glossy coat that balances out the heat with its soothing, sugary notes. This glaze not only enhances the flavor but also gives the chicken a tantalizing appearance that promises a delectable dining experience.
The Baking Process
Baked Crunchy Hot Honey Chicken isn't just about flavor; it's also about ease of preparation. By baking the chicken instead of frying, you achieve a healthier dish without sacrificing any of the crunch or taste. This method ensures that each piece is cooked through evenly, with the breading turning golden brown and crispy, while the chicken remains juicy and tender inside.
Versatile and Crowd-Pleasing
Whether served as a main course, on a game day spread, or at a casual gathering, Baked Crunchy Hot Honey Chicken is a crowd-pleaser. Its combination of textures and flavors appeals to a wide range of palates, making it a go-to dish for family dinners or entertaining friends. Pair it with a side of roasted vegetables, a crisp salad, or even creamy mashed potatoes to create a well-rounded meal that leaves everyone satisfied.
Conclusion
In the realm of comfort food with a twist, Baked Crunchy Hot Honey Chicken stands out as a testament to the harmony of flavors. From its crispy exterior to the spicy heat and sweet honey glaze, every element is crafted to deliver a memorable dining experience. Whether you're a culinary enthusiast or simply someone who appreciates a delicious meal, this dish promises to delight and impress. Try it once, and you'll find yourself returning to its irresistible flavors time and again.

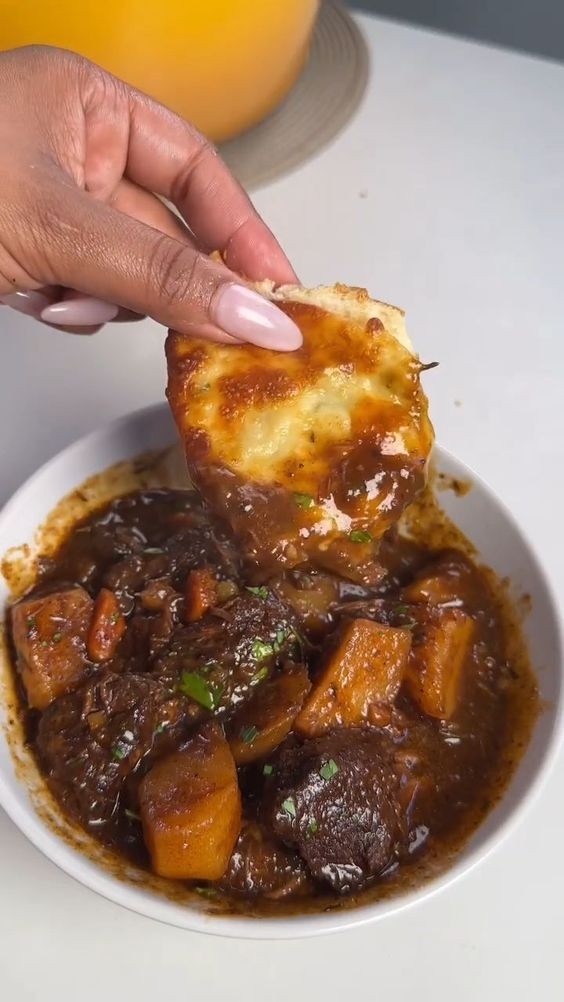
Ultimate Comfort Food: Easy Beef Stew Recipe - Watch Now!
In the realm of culinary delights, few dishes offer the sheer satisfaction and warmth of a hearty beef stew. Whether it's a chilly winter evening or a rainy day craving, beef stew has the remarkable ability to soothe the soul and tantalize the taste buds. Join us as we dive into the realm of ultimate comfort food with an easy-to-follow beef stew recipe that promises to become a staple in your kitchen repertoire.
Ingredients:
1.5 lbs (680g) stewing beef, cut into bite-sized pieces
2 tablespoons olive oil
4 cups beef broth
1 cup red wine (optional)
3 cloves garlic, minced
1 onion, chopped
4 carrots, peeled and sliced
3 potatoes, peeled and diced
2 celery stalks, chopped
1 teaspoon dried thyme
1 bay leaf
Salt and pepper to taste
2 tablespoons tomato paste
2 tablespoons Worcestershire sauce
1 tablespoon cornstarch (optional, for thickening)
Instructions:
Sear the Beef: Heat olive oil in a large pot or Dutch oven over medium-high heat. Add the beef in batches and brown on all sides. This step helps to develop deep flavors in the stew.
Saute Aromatics: Reduce heat to medium. Add garlic and onion to the pot, sautéing until softened and aromatic.
Deglaze the Pot: Pour in the beef broth and red wine (if using), scraping up any browned bits from the bottom of the pot. This adds rich flavor to the stew.
Add Vegetables and Seasonings: Stir in carrots, potatoes, celery, thyme, bay leaf, salt, pepper, tomato paste, and Worcestershire sauce. Bring the mixture to a boil, then reduce heat to low and cover. Simmer for 1.5 to 2 hours, or until the beef is tender and the vegetables are cooked through.
Thicken (if desired): If you prefer a thicker stew, mix cornstarch with a tablespoon of cold water and stir it into the stew during the last 10 minutes of cooking. This will give it a nice, velvety texture.
Serve and Enjoy: Remove the bay leaf before serving. Ladle the warm stew into bowls and garnish with fresh parsley if desired. Serve with crusty bread or over a bed of fluffy mashed potatoes for the ultimate comfort experience.
Why Beef Stew?
Beef stew isn't just about satisfying hunger; it’s about creating a moment of comfort and connection. The slow simmering process allows the flavors to meld together beautifully, resulting in a dish that's greater than the sum of its parts. Each spoonful is a reminder of home-cooked goodness and the simple pleasures of sharing a meal with loved ones.
Watch Now!
For a visual guide to crafting this culinary masterpiece, check out our step-by-step video tutorial [link to video]. Let our chef guide you through each stage, from browning the beef to perfecting the seasoning. With our easy-to-follow instructions, you'll be serving up your own unforgettable beef stew in no time.
Final Thoughts
As we embrace the joy of comfort food, remember that the heart of every great dish lies in the love and care you put into preparing it. Whether you're a seasoned chef or a kitchen novice, our easy beef stew recipe promises to bring warmth and satisfaction to your table. So gather your ingredients, fire up the stove, and let the aroma of simmering stew fill your home with comfort and contentment. Bon appétit!
Remember, the best meals are not just about what you eat, but the memories you create around the table. Cheers to good food and great company!
The Delectable Delight of Greek Chicken Gyros
When it comes to satisfying one's cravings with a burst of Mediterranean flavors, few dishes can rival the allure of Greek Chicken Gyros. These iconic wraps are not just a culinary delight but also a testament to the rich gastronomic heritage of Greece.
A Taste of Tradition
Originating in Greece, the word "gyro" derives from the Greek word for "turn" or "revolution," a nod to the traditional method of cooking. Thinly sliced pieces of marinated chicken are stacked on a vertical rotisserie and slow-cooked to perfection. This method ensures that each bite of gyro delivers tender, juicy chicken infused with a blend of herbs and spices that tantalize the taste buds.
The Perfect Balance of Flavors
What sets Greek Chicken Gyros apart is their harmonious blend of ingredients. The tender chicken, typically marinated in olive oil, garlic, lemon juice, and Mediterranean spices such as oregano and thyme, provides a savory base. This is complemented by the freshness of crisp lettuce, juicy tomatoes, crunchy cucumbers, and tangy red onions. Tying it all together is a creamy tzatziki sauce—a refreshing blend of yogurt, cucumber, garlic, and dill—that adds a cool and tangy element to every bite.
Versatile and Convenient
Greek Chicken Gyros are not just a meal; they're a versatile option suitable for any occasion. Whether enjoyed as a quick lunch on the go or served as the centerpiece of a leisurely dinner, gyros offer a convenient yet flavorful dining experience. Their portable nature makes them a favorite street food in Greece and increasingly popular around the world.
A Global Favorite
Thanks to their irresistible combination of flavors and textures, Greek Chicken Gyros have gained a global following. From bustling food carts in Athens to trendy cafes in New York City, these wraps have transcended cultural boundaries to become a beloved choice for food enthusiasts everywhere.
Making Your Own Gyros
While savoring a gyro from a Greek restaurant is undoubtedly delightful, creating your own at home can be a rewarding culinary adventure. Marinate thinly sliced chicken in olive oil, lemon juice, garlic, and herbs, then grill or roast until tender and golden brown. Warm pita bread, load it with your cooked chicken, fresh vegetables, and a generous dollop of homemade tzatziki sauce. Wrap it all up and indulge in the irresistible flavors of Greece, right in your own kitchen.
Conclusion
Greek Chicken Gyros are more than just a meal—they are a celebration of Mediterranean flavors, culinary craftsmanship, and cultural heritage. Whether you're enjoying one in the heart of Athens or preparing it at home, every bite of gyro promises a delightful journey of taste and tradition. So, the next time you crave a taste of Greece, treat yourself to the savory satisfaction of a Greek Chicken Gyro—you won't be disappointed.

Easy & Juicy Chipotle Chicken: A Flavorful Delight
If you're a fan of bold flavors and crave a dish that's both easy to make and incredibly satisfying, chipotle chicken is a perfect choice. This dish combines the smoky heat of chipotle peppers with tender chicken, creating a harmony of flavors that will leave your taste buds wanting more. Whether you're cooking for yourself, your family, or entertaining guests, this recipe is sure to impress without requiring hours in the kitchen.
Ingredients You'll Need:
Boneless, skinless chicken breasts or thighs (about 4 pieces)
2-3 chipotle peppers in adobo sauce (adjust based on your spice preference)
3 cloves of garlic, minced
1 tablespoon olive oil
1 teaspoon ground cumin
1 teaspoon dried oregano
Juice of 1 lime
Salt and pepper to taste
Chopped fresh cilantro (for garnish, optional)
Instructions:
Prepare the Chipotle Marinade:
In a blender or food processor, combine the chipotle peppers in adobo sauce, minced garlic, olive oil, ground cumin, dried oregano, lime juice, salt, and pepper. Blend until smooth. If you prefer a milder spice level, start with fewer chipotle peppers and adjust to taste.
Marinate the Chicken:
Place the chicken breasts or thighs in a resealable plastic bag or a shallow dish. Pour the chipotle marinade over the chicken, making sure each piece is well coated. Seal the bag or cover the dish and refrigerate for at least 30 minutes to allow the flavors to penetrate the meat. For best results, marinate for 2-4 hours or overnight.
Cooking Options:
Grilling: Preheat your grill to medium-high heat. Grill the chicken for about 6-7 minutes per side, or until the internal temperature reaches 165°F (75°C) and the chicken is no longer pink in the center.
Pan-Seared: Heat a large skillet over medium-high heat. Add a bit of olive oil to the pan. Cook the chicken for 6-7 minutes per side, or until cooked through and golden brown on the outside.
Baking: Preheat your oven to 400°F (200°C). Place the chicken on a baking sheet lined with parchment paper or aluminum foil. Bake for 20-25 minutes, or until the chicken reaches an internal temperature of 165°F (75°C).
Serve and Enjoy:
Once cooked, let the chicken rest for a few minutes before slicing or serving whole. Garnish with chopped fresh cilantro if desired. This chipotle chicken pairs well with rice, quinoa, salad, or grilled vegetables.
Why You'll Love It:
Quick and Easy: With minimal prep and cooking time, this recipe fits into busy schedules.
Flavor Explosion: The combination of smoky chipotle, garlic, and lime creates a mouthwatering flavor profile.
Versatility: Serve chipotle chicken in tacos, wraps, salads, or as a main dish with sides—perfect for any meal occasion.
Whether you're a seasoned chef or new to the kitchen, this easy chipotle chicken recipe is sure to become a favorite. Its simplicity and robust flavors make it a standout dish that will keep everyone coming back for more. Try it once, and you'll see why it's a go-to recipe for those who appreciate delicious, hassle-free cooking.
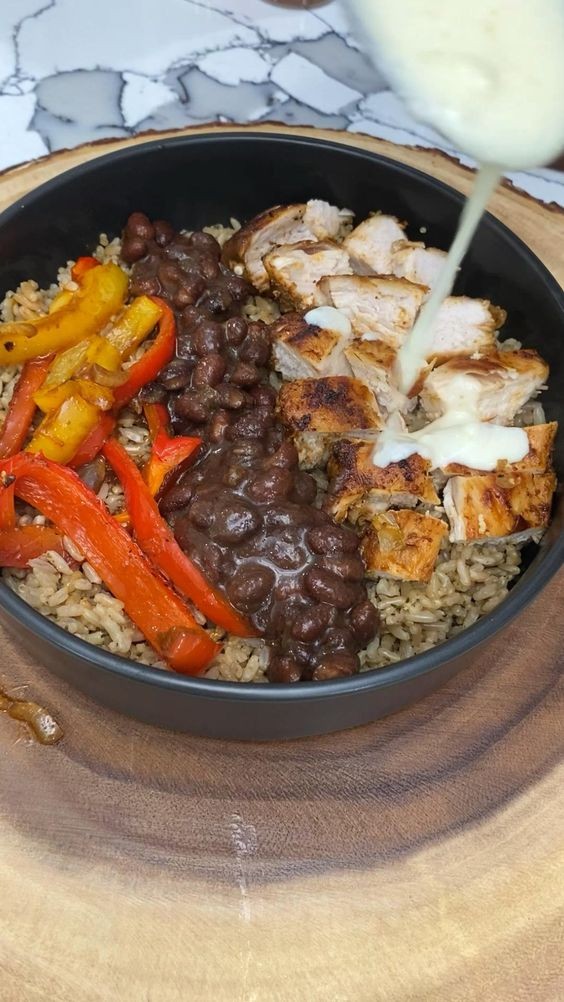
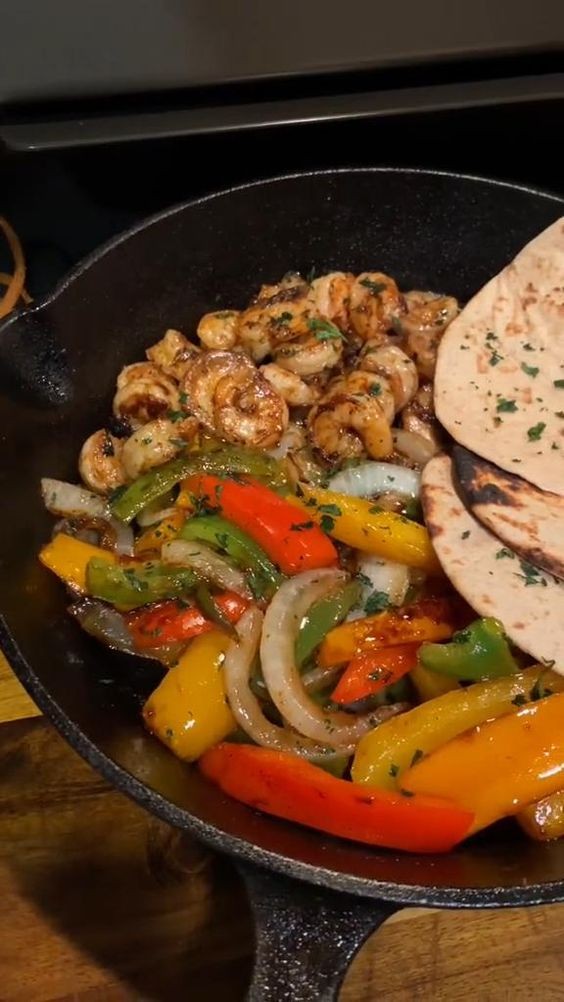
Shrimp Fajitas: An Easy Low-Carb Dinner Recipe for the Whole Family
Shrimp fajitas are a delicious, vibrant, and healthy meal that is perfect for busy weeknights. This easy low-carb dinner is not only quick to prepare but also packed with flavor and nutrients. Let's dive into how you can make this delightful dish that the whole family will love.
Why Shrimp Fajitas?
Shrimp fajitas are an excellent choice for a low carb meal because shrimp is naturally low in carbohydrates and high in protein. Additionally, using fresh vegetables and a few simple seasonings ensures that the dish remains healthy without sacrificing taste. The vibrant colors and flavors make this dish a favorite for both kids and adults.
Ingredients
For this recipe, you'll need the following ingredients:
For the Shrimp:
1 pound of large shrimp, peeled and deveined
1 tablespoon of olive oil
1 teaspoon of chili powder
1 teaspoon of paprika
1 teaspoon of ground cumin
1/2 teaspoon of garlic powder
1/2 teaspoon of onion powder
1/4 teaspoon of cayenne pepper (optional for extra heat)
Salt and pepper to taste
For the Vegetables:
1 red bell pepper, thinly sliced
1 yellow bell pepper, thinly sliced
1 green bell pepper, thinly sliced
1 large onion, thinly sliced
2 tablespoons of olive oil
Salt and pepper to taste
For Serving:
Fresh lime wedges
Fresh cilantro, chopped
Avocado slices
Low carb tortillas or lettuce wraps
Sour cream (optional)
Salsa (optional)
Instructions
Step 1: Prepare the Shrimp
In a large bowl, combine the shrimp with olive oil, chili powder, paprika, ground cumin, garlic powder, onion powder, cayenne pepper (if using), salt, and pepper. Toss well to coat the shrimp evenly with the spices. Set aside to marinate while you prepare the vegetables.
Step 2: Cook the Vegetables
Heat a large skillet or cast-iron pan over medium-high heat. Add the olive oil.
Once the oil is hot, add the sliced bell peppers and onions. Season with salt and pepper.
Cook, stirring occasionally, until the vegetables are tender and slightly charred, about 7-8 minutes. Remove the vegetables from the skillet and set aside.
Step 3: Cook the Shrimp
In the same skillet, add a bit more oil if needed and then add the marinated shrimp.
Cook the shrimp for 2-3 minutes on each side, or until they are pink and opaque. Be careful not to overcook the shrimp as they can become tough.
Step 4: Combine and Serve
Return the cooked vegetables to the skillet with the shrimp. Toss everything together to combine and heat through for another minute.
Serve the shrimp fajita mixture with fresh lime wedges, chopped cilantro, avocado slices, low carb tortillas or lettuce wraps, and optional toppings like sour cream and salsa.
Tips for the Best Shrimp Fajitas
Quality Ingredients: Use fresh shrimp and vegetables for the best flavor.
Marinating: Allowing the shrimp to marinate for at least 15 minutes helps the flavors to penetrate.
High Heat: Cooking the vegetables and shrimp on high heat gives them a nice char and enhances their flavors.
Customize: Adjust the seasonings to your taste. Add more cayenne if you like it spicy or omit it for a milder dish.
Why It's a Great Family Dinner
Shrimp fajitas are incredibly versatile. Each family member can customize their fajita with their favorite toppings, making it a fun and interactive meal. The combination of protein-rich shrimp and colorful vegetables ensures that this dish is both nutritious and satisfying. Plus, it's low in carbs, making it suitable for those following a keto or low-carb diet.
This easy shrimp fajitas recipe is sure to become a family favorite. It's quick to make, healthy, and full of flavor—perfect for any night of the week!
Cashew Chicken: A Delightful Fusion of Flavors
Cashew Chicken is a dish that epitomizes the fusion of diverse culinary traditions, creating a flavorful and satisfying experience for the palate. This popular dish, known for its savory sauce, tender chicken, and crunchy cashews, is a favorite in both Chinese and American cuisine. Let's delve into the origins, ingredients, preparation, and variations of Cashew Chicken to understand why it holds such a special place in global gastronomy.
Origins and Evolution
Cashew Chicken has two main variations with distinct origins. The first is the traditional Chinese version, which hails from the Guangdong province. This version is stir-fried and typically includes chicken, cashews, vegetables, and a light sauce made from soy sauce, oyster sauce, and chicken broth. The dish is a staple in Chinese cuisine, celebrated for its balance of textures and flavors.
The second, more well-known variation in the United States, is the Springfield-style Cashew Chicken. This version was popularized by David Leong, a Chinese immigrant who moved to Springfield, Missouri, in the 1940s. Leong adapted the traditional recipe to cater to American tastes by deep-frying the chicken before combining it with a thick, savory sauce and roasted cashews. His creation quickly became a local favorite and eventually gained national recognition.
Ingredients
Cashew Chicken is relatively simple to prepare, requiring a handful of fresh ingredients. The core components include:
Chicken: Typically, boneless, skinless chicken breasts or thighs are used, cut into bite-sized pieces.
Cashews: Whole cashews are lightly toasted to enhance their natural flavor and provide a satisfying crunch.
Vegetables: Common vegetables include bell peppers, broccoli, carrots, and snow peas, adding color and nutrition to the dish.
Sauce: The sauce varies by recipe but usually includes soy sauce, oyster sauce, chicken broth, garlic, and ginger. For the Springfield version, additional ingredients like hoisin sauce, sugar, and cornstarch might be added for a thicker consistency.
Rice: The dish is often served over steamed white rice or fried rice.
Preparation
The preparation of Cashew Chicken involves several steps, but the process is straightforward. Here is a basic outline for both the traditional and Springfield-style versions:
Marinating the Chicken: In the traditional recipe, chicken pieces are marinated in soy sauce, cornstarch, and a touch of rice wine for a tender and flavorful base.
Stir-Frying: The chicken is quickly stir-fried in a hot wok with a small amount of oil until it's just cooked through. Vegetables are then added and stir-fried until tender-crisp.
Sauce Preparation: The sauce ingredients are mixed together and poured over the chicken and vegetables. The mixture is simmered until it thickens slightly, coating everything evenly.
Toasting Cashews: Whole cashews are toasted in a dry pan until golden brown, enhancing their flavor.
Combining: The toasted cashews are added to the chicken and vegetable mixture just before serving, ensuring they remain crunchy.
Springfield-Style Variation: For the Springfield version, the chicken is battered and deep-fried before being combined with the sauce and vegetables.
Variations
Cashew Chicken is a versatile dish with numerous variations to suit different tastes and dietary preferences. Some popular adaptations include:
Vegetarian Cashew Chicken: Substitute chicken with tofu or tempeh for a vegetarian version. Ensure the sauce is free from oyster sauce by using a vegetarian alternative.
Spicy Cashew Chicken: Add chili peppers or a splash of hot sauce to the dish for a spicy kick.
Healthy Cashew Chicken: Use skinless chicken breast, minimal oil, and increase the proportion of vegetables for a lighter, healthier version.
Conclusion
Cashew Chicken is a beloved dish that seamlessly blends the rich culinary traditions of China and America. Whether enjoyed in its traditional stir-fried form or as the crispy, saucy Springfield variation, Cashew Chicken offers a delightful combination of flavors and textures that continues to captivate diners around the world. Its simplicity, versatility, and deliciousness make it a perfect choice for both weeknight dinners and special occasions.
