Good and Bad People Good and Bad People
    #socialmedia #technology #usa #digitalmarketer #seoservice
    Napredno pretraživanje
  • Prijaviti se
  • Registar

  • Noćni način
  • © 2025 Good and Bad People
    Oko • Imenik • Kontaktirajte nas • Programeri • Politika privatnosti • Uvjeti korištenja • Povrat novca • Referral Terms • Acceptable Use Policy • Community Guidelines • Write for Us

    Odaberi Jezik

  • Arabic
  • Bengali
  • Chinese
  • Croatian
  • Danish
  • Dutch
  • English
  • Filipino
  • French
  • German
  • Hebrew
  • Hindi
  • Indonesian
  • Italian
  • Japanese
  • Korean
  • Persian
  • Portuguese
  • Russian
  • Spanish
  • Swedish
  • Turkish
  • Urdu
  • Vietnamese

Gledati

Gledati Koluti

Događaji

Pregledajte događaje Moji događaji

Blog

Pregledajte članke

Tržište

Najnoviji proizvodi

Stranice

Moje stranice Stranice koje mi se sviđaju

Više

Istražiti popularne objave Poslovi Ponude Sredstva
Koluti Gledati Događaji Tržište Blog Moje stranice Vidi sve

Otkriti postovi

Posts

Korisnici

Stranice

Skupina

Blog

Tržište

Događaji

Poslovi

Sredstva

Charlotte Chic Nomad
1 Y ·Prevedi

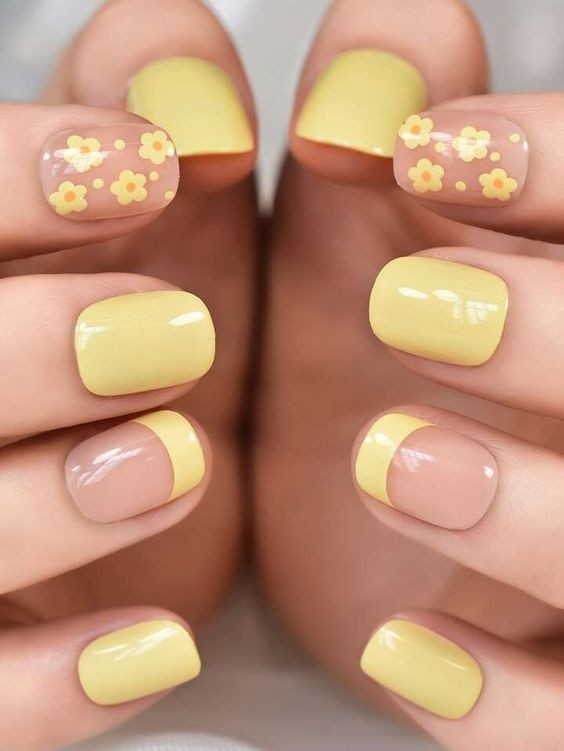
24-Piece Long Coffin Ballerina Press-On Nail Set: Full-Cover French Fake Nails

Elevate your nail game with the 24-piece Long Coffin Ballerina Press-On Nail Set. Designed for effortless style and stunning results, this set features full-cover French fake nails in a sleek long coffin shape. Perfect for anyone looking to achieve a glamorous manicure without the hassle of salon appointments, here’s why this press-on nail set is a must-have for your beauty routine.

Why You'll Love This Press-On Nail Set

1. Sleek Long Coffin Shape

The long coffin (or ballerina) shape is one of the most sought-after nail styles. Its tapered, square-ended design provides a sophisticated and elongated look, making your fingers appear slimmer and more elegant. This shape is perfect for those who love a bold yet refined manicure.

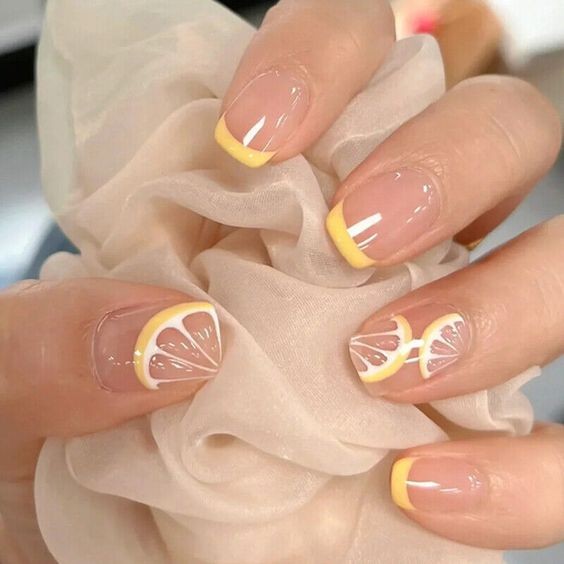
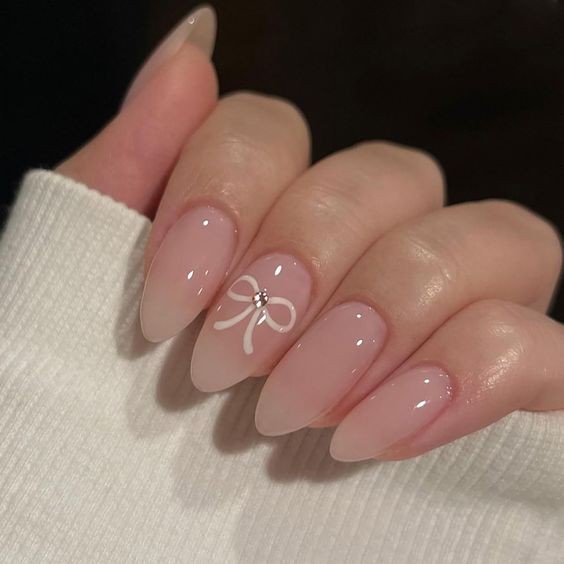
2. Full-Cover French Design

The classic French manicure is given a modern twist with these full-cover press-on nails. The clean, white tips combined with a natural base offer a timeless and chic look that’s perfect for any occasion, from everyday wear to special events.

3. Easy Application

Achieve a professional-quality manicure at home with ease. These press-on nails are designed for quick and simple application. Just peel off the backing and press each nail onto your natural nails. No mess, no fuss—just flawless nails in minutes!

4. Durable and Long-Lasting

Crafted from high-quality materials, these press-on nails are built to last. They offer a strong, secure fit that withstands daily wear and tear, ensuring your manicure remains pristine and beautiful for days.

5. Versatile Style

Whether you’re preparing for a formal event, a night out, or simply want to add a touch of elegance to your everyday look, these nails provide the perfect solution. Their versatile French design complements a wide range of outfits and styles.

6. Complete Set

This set includes 24 press-on nails in various sizes, ensuring a perfect fit for every nail. The variety of sizes allows for customization, so you can find the ideal nail for each finger, ensuring a seamless and natural look.

How to Apply Your Press-On Nails

Prep Your Natural Nails: Start with clean, dry nails. Remove any old polish and ensure your nails are free from oils or residue. For best results, lightly buff your natural nails to create a smooth surface.

Select the Right Size: Choose the press-on nails that best fit your natural nails. The set includes multiple sizes to ensure a perfect fit.

Apply the Press-On Nails: Peel off the backing from each press-on nail and press it firmly onto your natural nail. Hold in place for a few seconds to ensure a secure bond.

Finishing Touches: Once applied, check for any adjustments needed. Your nails are now ready to shine!

Removal: When it’s time for a new look, gently peel off the press-on nails. If necessary, use a nail remover to ensure no residue is left behind.

Final Thoughts

The 24-piece Long Coffin Ballerina Press-On Nail Set offers a perfect blend of style, convenience, and durability. With its elegant coffin shape and classic French design, this set provides an effortless way to achieve a sophisticated and polished manicure at home. Whether for a special occasion or everyday elegance, these press-on nails are designed to enhance your style with minimal effort. Embrace the ease of press-on nails and enjoy a flawless, salon-quality look that’s always ready to impress.

image
Kao
Komentar
Udio
Charlotte Chic Nomad
1 Y ·Prevedi

Light Pink Short Almond Press-On Nails with White Bows: A Chic Nail Art Revolution

If you're looking for a stylish and effortless way to enhance your nail game, the Light Pink Short Almond Press-On Nails with White Bows are your perfect solution. This 24-piece set combines elegance and convenience, providing a glamorous manicure in minutes. Here’s why these press-on nails are a must-have for your nail art collection.

Why You'll Love These Press-On Nails

1. Elegant Light Pink Shade

The soft, light pink color of these press-on nails offers a timeless and versatile look. This subtle hue is perfect for any occasion, whether you’re going for a casual day out or attending a formal event. It complements various outfits and enhances your overall style with a touch of sophistication.

2. Adorable White Bow Accents

Adding a playful and feminine touch to your manicure, the white bows on each nail bring a charming detail that stands out. These delicate bows are perfect for adding a bit of flair to your look without being overly bold, making them ideal for both everyday wear and special occasions.

3. Short Almond Shape

The short almond shape provides a flattering and practical design that suits a variety of nail beds. This shape is perfect for those who prefer a classic and elegant look without the commitment of longer nails. It offers a chic and streamlined appearance that's easy to maintain.

4. Glossy Full-Cover Finish

Achieve a sleek, polished look with the glossy full-cover finish of these press-on nails. The high-shine surface adds a professional touch to your manicure, giving your nails a salon-quality appearance with minimal effort.

5. Easy Application

One of the biggest advantages of press-on nails is their ease of application. These nails come with an adhesive backing that ensures a secure fit without the need for messy glue. Simply press them onto your natural nails, and you’re good to go. This makes them perfect for busy individuals who want a quick and flawless manicure.

6. Durable and Long-Lasting

Crafted from high-quality materials, these press-on nails are designed to stay in place and look beautiful for days. With proper care, you can enjoy a stunning manicure that withstands daily activities and retains its polished appearance.

7. Versatile Use

Whether you’re a nail art enthusiast or a newcomer to press-ons, this set is versatile and user-friendly. It's suitable for both women and girls, offering a stylish and polished look for any age. Perfect for those who want to quickly change up their look or add a touch of elegance to their everyday style.

How to Apply Your Press-On Nails

Prepare Your Natural Nails: Start with clean, dry nails. Remove any old polish and ensure your nails are free from oils and residue. For best results, lightly buff your natural nails to create a smooth surface.

Select the Right Size: Choose the press-on nails that best fit your natural nails. The set comes with various sizes to ensure a perfect fit for every nail.

Apply the Press-On Nails: Simply peel off the backing from each press-on nail and press it firmly onto your natural nail. Hold for a few seconds to ensure a secure bond. Repeat for all nails.

Finishing Touches: Once applied, check for any gaps or adjustments needed. Your nails are now ready to shine!

Remove with Care: When you're ready to change your look, gently peel off the press-on nails. If necessary, use a nail remover to ensure no residue is left behind.

Final Thoughts

The Light Pink Short Almond Press-On Nails with White Bows offer a perfect blend of elegance, style, and convenience. This 24-piece set is ideal for anyone looking to achieve a polished, chic look effortlessly. With their gorgeous light pink color, adorable white bow accents, and glossy finish, these nails are a fantastic addition to your beauty routine. Embrace the ease and sophistication of press-on nails and enjoy a flawless manicure that enhances your style in minutes.

image
Kao
Komentar
Udio
Charlotte Chic Nomad
1 Y ·Prevedi

32 Gorgeous Autumn 2022 Nail Trends to Try: Sage Green French Tips and More

Autumn is the perfect time to refresh your nail style with rich, seasonal hues and sophisticated designs. This fall, nail trends are all about embracing warm, earthy tones and unique accents that capture the essence of the season. Among the hottest trends for Autumn 2022, sage green French tips are making a major splash. But that’s not all—there’s a whole array of stunning nail ideas to explore. Here’s a roundup of 32 fabulous autumn nail trends you’ll want to try this season.

1. Sage Green French Tips

Start your fall manicure journey with the chicest twist on the classic French manicure—sage green French tips. This muted, earthy green adds a modern touch to the timeless design, offering a fresh and sophisticated look that’s perfect for autumn.

2. Deep Burgundy

Embrace the richness of autumn with deep burgundy nails. This bold, wine-inspired shade is perfect for adding a touch of elegance and warmth to your look, making it a staple for fall.

3. Mustard Yellow

Add a pop of warmth to your fall style with mustard yellow nails. This vibrant, golden hue pairs beautifully with autumn’s natural palette, offering a cheerful contrast to the cooler tones of the season.

4. Olive Green

Olive green nails are a must-try for a chic, understated look. This versatile color complements a range of autumnal outfits and adds a touch of sophistication to your nail game.

5. Chocolate Brown

For a rich and decadent look, opt for chocolate brown nails. This deep, neutral shade is perfect for fall and pairs well with cozy sweaters and earthy tones.

6. Copper Metallic

Shine bright with copper metallic nails. The reflective, warm tones add a touch of glamour and can be used to create stunning accent nails or full-on metallic manicures.

7. Terracotta

Capture the essence of fall with terracotta nails. This warm, reddish-brown shade is perfect for adding a natural, earthy vibe to your autumn style.

8. Forest Green

Channel the beauty of the autumn forest with forest green nails. This deep, rich color offers a dramatic and sophisticated look that’s perfect for the season.

9. Pumpkin Spice

Get into the fall spirit with pumpkin spice nails. This warm, orange hue is reminiscent of autumn’s favorite flavor and adds a fun, festive touch to your manicure.

10. Matte Finishes

Embrace the trend of matte finishes with your autumn nails. Matte topcoats offer a chic, sophisticated look that pairs beautifully with fall colors and designs.

11. Rust Orange

Opt for rust orange nails to bring a warm, cozy feel to your fall manicure. This rich, earthy hue is perfect for complementing your autumn wardrobe.

12. Plaid Patterns

Add a touch of autumn fashion with plaid nail patterns. Use a mix of fall colors to create plaid designs that evoke the classic checkered patterns of cozy fall scarves and blankets.

13. Marble Effect

Create a sophisticated look with marble effect nails. The swirling, natural patterns in shades of gray, brown, and white evoke the elegance of fall.

14. Gold Accents

Add a touch of luxury to your fall nails with gold accents. Use gold foil or glitter to create elegant designs that catch the light and add a bit of sparkle to your manicure.

15. Berry Tones

Berry-toned nails offer a rich, vibrant option for fall. Shades like raspberry, plum, and cranberry provide a pop of color that’s both bold and elegant.

16. Navy Blue

Deep navy blue nails are a sophisticated choice for fall. This dark, cool shade provides a perfect contrast to autumn’s warm palette and adds a touch of elegance to your style.

17. Creamy Beige

Opt for creamy beige nails for a subtle, sophisticated look. This neutral shade complements a range of fall outfits and provides a classic, polished finish.

18. Dark Teal

Dark teal nails offer a unique twist on traditional fall colors. This deep, greenish-blue hue is perfect for adding a touch of mystery and sophistication to your manicure.

19. Charcoal Gray

For a chic, modern look, try charcoal gray nails. This dark, versatile shade pairs well with both casual and formal fall outfits.

20. Burgundy with Gold Leaf

Combine burgundy with gold leaf accents for a luxurious and festive look. The contrast between the deep red and shimmering gold creates a stunning and eye-catching manicure.

21. Holographic Glitter

Shimmer and shine with holographic glitter nails. The multi-dimensional sparkle adds a touch of magic to your fall style, perfect for special occasions or nights out.

22. Eggplant Purple

Eggplant purple nails offer a rich, deep color that’s perfect for autumn. This sophisticated shade adds a touch of drama and elegance to your fall manicure.

23. Smoky Quartz

Embrace the elegance of smoky quartz with nails in shades of gray and brown. This muted, sophisticated color adds a chic touch to your fall look.

24. Soft Taupe

Opt for soft taupe nails for a subtle and elegant manicure. This neutral shade complements a variety of fall colors and adds a refined touch to your style.

25. Olive and Gold Combo

Combine olive green with gold accents for a chic, luxurious look. The rich green paired with warm gold creates a stunning contrast that’s perfect for autumn.

26. Textured Designs

Add interest to your fall nails with textured designs. Incorporate elements like velvet, suede, or textured polish for a unique and stylish touch.

27. Autumn Leaves

Celebrate the season with autumn leaves nail art. Use fall colors to create delicate leaf designs that capture the beauty of falling foliage.

28. Brick Red

Brick red nails offer a warm, earthy option for fall. This versatile shade pairs well with both casual and formal outfits and adds a cozy touch to your manicure.

29. Black and Gold

For a bold and sophisticated look, try black and gold nails. The dramatic contrast between these two colors creates a striking and elegant manicure.

30. Cinnamon Brown

Opt for cinnamon brown nails for a warm and spicy touch. This rich, reddish-brown hue adds a cozy feel to your fall style.

31. Muted Mauve

Muted mauve nails provide a soft and elegant option for fall. This subtle shade adds a touch of sophistication to your manicure.

32. Copper and Green Combo

Combine copper with green for a striking and unique fall manicure. The warm copper and cool green create a beautiful contrast that’s perfect for the season.

How to Achieve These Fall Nail Trends

Prepare Your Nails: Start with clean, trimmed nails. Remove any old polish and ensure your nails are free from oils and residue.

Choose Your Design: Select the fall nail trend that best suits your style and gather your nail art tools.

Apply the Base Color: Apply your chosen base color evenly and allow it to dry completely before adding any additional details.

Create the Design: Use your nail art tools to create the desired design. Take your time to ensure precision and achieve the perfect look.

Seal with a Topcoat: Finish with a clear topcoat to protect your design and add shine. This step helps to prolong the life of your manicure.

Final Thoughts

Autumn 2022 is all about embracing rich, warm hues and sophisticated designs. From sage green French tips to deep burgundy and gold accents, these 32 fall nail trends offer something for everyone. Whether you prefer classic colors or trendy patterns, these ideas will help you achieve a stylish and seasonal manicure. So, get creative and let your nails reflect the beauty and elegance of autumn!

image
Kao
Komentar
Udio
Scarletts Style Journey
1 Y ·Prevedi

**40+ Stylish and Budget-Friendly Dorm Room Ideas – DIY with My Guy**

Transforming your dorm room into a stylish and cozy haven doesn’t have to cost a fortune. With a little creativity and some DIY spirit, you can create a space that’s both functional and aesthetically pleasing. Here’s a roundup of 40+ budget-friendly dorm room ideas to help you make the most of your space while staying on budget.

**1. Wall Art Gallery**

Create a chic gallery wall using inexpensive frames and prints. Mix and match art, photos, and inspirational quotes to personalize your space. You can even print your own artwork or use free printables.

**2. DIY Tapestry**

Make a statement with a DIY tapestry. Use a drop cloth or an old sheet and add paint, fabric markers, or tie-dye for a custom look. Hang it with adhesive hooks or a decorative rod.

**3. Floating Shelves**

Maximize wall space with floating shelves. They’re perfect for displaying books, plants, and decorative items. Install them with brackets or adhesive strips for a simple upgrade.

**4. Cozy Throw Pillows**

Add comfort and style with DIY throw pillows. Use fabric scraps or old clothes to sew or glue pillow covers. Personalize them with fun patterns or quotes.

**5. Under-Bed Storage**

Utilize the space under your bed with storage bins or drawers. They’re ideal for keeping your room tidy and organized. Choose clear bins to easily find what you need.

**6. DIY Desk Organizer**

Keep your study area clutter-free with a DIY desk organizer. Use cardboard or recycled containers to create compartments for pens, papers, and other supplies.

**7. Personalized Mug Rack**

Turn a simple mug rack into a statement piece by painting or decorating it. Hang mugs, keys, or even small plants for a functional and stylish display.

**8. String Lights**

Add a cozy ambiance with string lights. Drape them around your bed frame, along the wall, or across your ceiling for a warm and inviting glow.

**9. Photo Wall Collage**

Create a photo wall collage with your favorite memories. Use washi tape or decorative clips to hang photos, postcards, or artwork on a large board or directly on the wall.

**10. DIY Bulletin Board**

Make a custom bulletin board with cork tiles or a wooden frame. Cover it with fabric or decorative paper, and use it to pin up important notes and photos.

**11. Accent Rug**

Add color and texture to your floor with an accent rug. Choose a pattern or color that complements your room’s decor, and look for budget-friendly options at discount stores.

**12. Repurposed Furniture**

Give old furniture a new life with a fresh coat of paint or new hardware. An old dresser or chair can be transformed into a stylish and functional piece.

**13. DIY Bed Canopy**

Create a dreamy bed canopy using sheer fabric or a lightweight curtain. Hang it from the ceiling with adhesive hooks or a decorative rod for a touch of elegance.

**14. Custom Lampshade**

Update your lamp with a custom lampshade. Use fabric or paint to create a design that matches your room’s theme. It’s an easy way to add a personal touch.

**15. DIY Planters**

Bring some greenery into your dorm with DIY planters. Use mason jars, tin cans, or even old cups to create charming containers for your favorite plants.

**16. Personalized Doormat**

Welcome guests with a personalized doormat. Use stencils or paint to add your name or a fun design to a basic doormat for a unique touch.

**17. Desk Lamp Revamp**

Refresh an old desk lamp with a new shade or a coat of paint. Add decorative elements like washi tape or fabric for a custom look.

**18. Decorative Storage Bins**

Keep your room organized with decorative storage bins. Choose patterns and colors that match your decor, and use them to store everything from clothes to school supplies.

**19. DIY Bedside Caddy**

Create a bedside caddy to keep your essentials within reach. Use fabric and a few sewing skills to make pockets for your phone, books, and other items.

**20. Customized Wall Decals**

Add some flair to your walls with custom wall decals. Use removable vinyl or contact paper to create shapes, quotes, or patterns that can be easily changed.

**21. DIY Jewelry Organizer**

Keep your jewelry organized with a DIY organizer. Use a wooden board or picture frame, and add hooks or pegs to display your necklaces, bracelets, and earrings.

**22. Fabric Wall Panels**

Cover large wall areas with fabric panels for a stylish and soft look. Attach the fabric to the wall with adhesive or thumbtacks for a budget-friendly solution.

**23. DIY Vanity Mirror**

Update your mirror with a DIY frame. Use decorative paper, paint, or washi tape to add a custom touch to a plain mirror.

**24. Upcycled Curtain Rods**

Turn old curtain rods into a stylish storage solution. Use them to hang scarves, hats, or even plants, and add a decorative touch to your room.

**25. DIY Chalkboard Wall**

Create a chalkboard wall with chalkboard paint. It’s perfect for jotting down reminders, to-do lists, or even drawing fun designs.

**26. Colorful Bedspread**

Refresh your bed with a colorful bedspread or duvet cover. Look for budget-friendly options at discount stores or thrift shops.

**27. DIY Fabric Wall Art**

Make fabric wall art by framing pieces of patterned fabric. It’s an easy way to add color and texture to your walls without breaking the bank.

**28. Repurposed Shoe Racks**

Use repurposed shoe racks to organize small items or create additional storage space. Hang them on the back of your door or in your closet.

**29. DIY Drawer Pulls**

Update your dresser or desk with custom drawer pulls. Use paint, washi tape, or decorative knobs to give your furniture a fresh look.

**30. Handmade Bunting**

Add a festive touch with handmade bunting. Use fabric or paper triangles, and string them together to hang across your room or above your bed.

**31. Painted Wooden Crates**

Turn wooden crates into stylish storage solutions with a coat of paint. Use them to store books, shoes, or other items in an organized and attractive way.

**32. DIY Magnetic Board**

Create a magnetic board using a metal sheet or old frame. Paint it with a fun color or pattern, and use magnets to display photos, notes, or artwork.

**33. DIY Paper Lanterns**

Brighten up your space with DIY paper lanterns. Use colorful paper or tissue paper to create lanterns that can be hung from the ceiling or placed on your desk.

**34. Personalized Bedside Table**

Make your bedside table unique with DIY decor. Add decorative elements like a lamp, a small plant, or a framed photo to create a personalized space.

**35. DIY Bookends**

Create custom bookends using items like bricks, painted cans, or decorative boxes. They’ll keep your books organized while adding a touch of style.

**36. Customized Pillowcases**

Update your pillowcases with custom designs. Use fabric paint or iron-on transfers to add patterns or quotes that reflect your personality.

**37. DIY Pegboard Organizer**

Use a pegboard to create a versatile organizer for your desk or wall. Hang hooks, baskets, or shelves to keep your items neatly arranged.

**38. Decorative Wall Hooks**

Add decorative wall hooks for both function and style. Use them to hang bags, hats, or scarves, and choose designs that match your room’s decor.

**39. DIY Desk Accessories**

Make your desk area more functional and stylish with DIY accessories. Create pen holders, drawer organizers, or mouse pads with materials you already have.

**40. Seasonal Decor Swaps**

Keep your room fresh and exciting by swapping out seasonal decor. Use budget-friendly items to change the look of your space throughout the year.

These 40+ budget-friendly dorm room ideas will help you create a stylish and cozy space without breaking the bank. With a little creativity and some DIY magic, you can turn your dorm room into a personalized haven that reflects your unique style.

🛏️🎨 #dormroomdecor #budgetfriendlydiy #stylishspaces #diywithmyguy

image
Kao
Komentar
Udio
Scarletts Style Journey
1 Y ·Prevedi

**Autumn Delight: Quick One-Hour Crafts for DIY Home Decor**

Embrace the cozy charm of autumn with these quick and easy DIY crafts that you can complete in just one hour. Perfect for adding a seasonal touch to your home, these projects are designed to be simple yet stunning, transforming your space into a fall haven with minimal time and effort. Here’s a collection of delightful crafts to make your autumn decor pop:

**1. Pumpkin Centerpieces**

Create charming pumpkin centerpieces using small pumpkins, a bit of paint, and some autumn leaves. Simply paint the pumpkins in your favorite fall colors, then arrange them with fresh or faux leaves in a decorative bowl or basket for an eye-catching centerpiece.

**2. Autumn Wreath**

Craft a festive fall wreath by decorating a foam or wire wreath base with faux leaves, berries, and ribbon. Use hot glue to secure the elements, and hang it on your front door for a warm welcome.

**3. Mason Jar Vases**

Turn mason jars into rustic fall vases by wrapping them with burlap or twine and adding autumn-themed embellishments like mini pumpkins or acorns. Fill them with fresh flowers or dried wheat for a seasonal touch.

**4. Leaf Garland**

Make a beautiful leaf garland by cutting out leaf shapes from colorful construction paper or felt. String them together with twine or ribbon, and drape them across your mantel or window for a festive fall display.

**5. Cozy Candle Holders**

Transform plain glass candle holders into cozy autumn decorations by painting them with fall colors or adding a touch of glitter. Place a scented candle inside to fill your space with the aroma of the season.

**6. Fall-Themed Table Runner**

Create a simple fall-themed table runner using a piece of burlap or fabric. Decorate it with stenciled pumpkins, leaves, or other autumn motifs using fabric paint for an easy way to dress up your dining table.

**7. Pumpkin Garland**

String together mini faux pumpkins to create a festive garland. Hang it across your fireplace, staircase, or mantel to add a touch of autumn charm to your space.

**8. Autumn Leaf Coasters**

Craft custom coasters using fall leaves and a clear acrylic coating. Press the leaves between two pieces of clear contact paper or mod podge them onto cork coasters for a functional and decorative touch.

**9. Rustic Fall Sign**

Create a rustic fall sign using a piece of wood or a canvas. Paint a simple autumn message like “Welcome Fall” or “Harvest Time” and decorate with leaves or small pumpkins for a personalized touch.

**10. DIY Acorn Decorations**

Turn acorns into charming fall decorations by painting them in metallic colors or wrapping them with twine. Use them as table scatter or attach them to a wreath for added texture.

These one-hour crafts are perfect for getting into the autumn spirit and adding a cozy, seasonal touch to your home. With just a few materials and a bit of creativity, you can create beautiful fall decor that will make your space feel warm and inviting.

🍁🎨 #autumncrafts #quickdiy #homedecor #fallprojects #cozyhome

image
Kao
Komentar
Udio
Scarletts Style Journey
1 Y ·Prevedi

**34 Spooky Halloween Crafts That Are Surprisingly Simple to Create**

Get ready to add a dose of frightful fun to your Halloween celebrations with these 34 easy and eerie crafts! Perfect for crafters of all skill levels, these DIY projects will help you transform your home into a haunted haven with minimal effort. Whether you're decorating for a party or just looking to embrace the Halloween spirit, these crafts are sure to inspire.

**1. Ghostly Garlands**

Create a spooky garland by cutting out ghost shapes from white paper or fabric. String them together with twine or ribbon to hang across your mantel or porch for an instantly eerie effect.

**2. Creepy Candle Holders**

Turn simple glass jars into chilling candle holders. Wrap them in black lace or paint them with glow-in-the-dark paint. Add a battery-operated tea light inside to cast a spooky glow.

**3. Pumpkin Balloons**

Decorate your space with festive pumpkin balloons. Draw jack-o’-lantern faces on orange balloons and scatter them around for a playful touch.

**4. Haunted House Wreath**

Craft a Halloween-themed wreath using a foam ring, fake cobwebs, and mini plastic spiders. Add a spooky sign for a front door that makes a frightening first impression.

**5. Mummy Jars**

Wrap empty jars in white gauze or fabric strips to create mummy jars. Add googly eyes for a fun and creepy effect, perfect for holding treats or candles.

**6. Spider Web Tablecloth**

Transform a plain tablecloth into a spider web with black and white yarn or cotton batting. Top it with plastic spiders for a ghoulishly good table setting.

**7. Bat Silhouettes**

Cut out bat shapes from black construction paper or foam sheets. Stick them to your walls or windows to create a flying bat effect that adds to the Halloween ambiance.

**8. DIY Tombstones**

Craft your own spooky tombstones using foam board or cardboard. Paint them gray and write eerie messages or names to set up a mini graveyard in your yard.

**9. Ghost Lanterns**

Make ghostly lanterns by decorating empty milk jugs or jars with ghostly faces. Place a battery-operated light inside for an eerie glow that illuminates the night.

**10. Scarecrow Stickers**

Use scarecrow-themed stickers to decorate your front door or windows. Pair them with hay bales for a charming Halloween display.

**11. Witch’s Broomstick**

Create a witch’s broomstick by bundling sticks or dowels together with twine. Add a spooky sign or decoration to the handle for a whimsical touch.

**12. Spooky String Lights**

Add Halloween flair to your string lights by attaching themed cutouts like bats or ghosts. Use clips or tape to secure them for a festive and fun display.

**13. Ghoulish Planters**

Turn small pumpkins into planters by cutting off the tops and scooping out the insides. Fill them with autumn flowers or succulents for a seasonal touch.

**14. Floating Ghosts**

Create floating ghosts by hanging white balloons or fabric in a ghostly shape. Use string or clear fishing line to suspend them in your yard or porch area.

**15. Spooky Window Clings**

Apply Halloween-themed window clings to your windows for a quick and easy spooky touch. They’re removable and repositionable, making them perfect for seasonal decorating.

**16. Sinister Silhouettes**

Cut out silhouettes of witches, ghosts, or skeletons from black poster board. Tape them to windows or walls to create haunting shadows.

**17. Pumpkin Centerpieces**

Make festive centerpieces by decorating small pumpkins with paint, glitter, or stickers. Arrange them in bowls or baskets for a charming display.

**18. Spider Web Wreath**

Craft a spider web wreath by wrapping a foam ring in black yarn. Add plastic spiders and a spooky bow to complete the look.

**19. Creepy Cups**

Decorate plastic cups with Halloween-themed stickers or paint to create creepy drinking cups for your party.

**20. Haunted Lanterns**

Turn old jars into haunted lanterns by painting them with spooky designs and adding battery-operated candles inside.

**21. Mummy Wrapping**

Wrap empty boxes or containers in white gauze to create mummies. Add eyes or spooky faces for a fun and simple decoration.

**22. Eerie Shadows**

Use black construction paper to cut out Halloween shapes. Place them against a light source to cast eerie shadows on your walls.

**23. Monster Wreath**

Make a monster-themed wreath by adding googly eyes, colorful yarn, and foam shapes to a foam ring. Hang it on your door for a playful welcome.

**24. Ghost Balloons**

Create ghost balloons by drawing spooky faces on white balloons. Inflate them and hang them around your home for a fun and festive touch.

**25. Pumpkin Jars**

Decorate jars with pumpkin faces using orange paint and black markers. Use them to store Halloween candy or as spooky lanterns.

**26. Witch Hats**

Craft witch hats using black construction paper. Decorate them with glitter or spooky embellishments and place them around your home.

**27. Spooky Centerpieces**

Create centerpieces for your table by combining Halloween-themed items like plastic spiders, faux cobwebs, and small pumpkins in a decorative bowl.

**28. Scary Signs**

Make your own Halloween signs using foam board or cardboard. Paint them with spooky messages and place them around your yard or porch.

**29. Monster Eyes**

Create monster eyes using plastic cups, paint, and googly eyes. Place them around your yard to create a creepy effect.

**30. Ghost Lanterns**

Decorate white lanterns with spooky ghost faces using markers or paint. Add LED candles inside for a ghostly glow.

**31. Spooky Garland**

Craft a garland by stringing together Halloween-themed shapes cut from felt or paper. Hang it across your mantel or along your porch.

**32. Mummy Pumpkins**

Wrap pumpkins in white gauze or strips of fabric to create mummies. Add googly eyes for a fun and spooky decoration.

**33. Haunted Mirror**

Turn an old mirror into a haunted decoration by adding spooky decals or paint. Use it to create a chilling focal point in your home.

**34. Pumpkin Stencils**

Use pumpkin stencils to carve or paint festive designs on pumpkins. Place them around your home for a classic Halloween touch.

These 34 easy and spooky Halloween crafts are perfect for adding festive flair to your home without breaking the bank. With just a few materials and a little creativity, you can create a hauntingly beautiful Halloween display that will delight guests and trick-or-treaters alike.

🎃👻 #halloweencrafts #easydiy #spookydecor #craftyhalloween #simplecrafts

image
Kao
Komentar
Udio
Scarletts Style Journey
1 Y ·Prevedi

**15 Simple DIY Halloween Decorations Using Dollar Store Finds**

Transform your home into a Halloween haven with minimal effort and cost! Dollar stores are a goldmine for creative and budget-friendly Halloween decorations. With just a few inexpensive items, you can craft spooky and fun decorations that will impress guests and trick-or-treaters alike. Here are 15 easy DIY Halloween decorations using dollar store finds:

**1. Spooky Candle Holders**

Turn simple glass jars into eerie candle holders. Wrap them in black lace or paint them with glow-in-the-dark paint. Add a tea light or LED candle inside to create a spooky glow.

**2. Haunted House Wreath**

Create a Halloween-themed wreath using a foam ring, fake cobwebs, and mini plastic spiders or bats. Decorate with dollar store ribbon and a spooky sign for a festive front door display.

**3. Ghost Lanterns**

Fill empty milk jugs with water and place a battery-operated tea light inside. Paint ghostly faces on the jugs and let them glow in the dark for a chilling effect.

**4. Creepy Window Clings**

Apply Halloween-themed window clings to your windows for an instant spooky touch. They’re easy to remove and reposition, making them perfect for a quick makeover.

**5. Pumpkin Planters**

Transform small pumpkins into adorable planters. Cut off the top and scoop out the insides, then plant autumn flowers or succulents for a seasonal touch.

**6. Mummy Jars**

Wrap empty jars in white gauze or fabric strips to create mummy jars. Add googly eyes for a fun and creepy effect. These can be used as candle holders or spooky storage containers.

**7. Scarecrow Stickers**

Use scarecrow-themed stickers to decorate your front door or windows. Pair them with some hay bales for a charming and festive look.

**8. Spider Web Tablecloth**

Turn a plain tablecloth into a spider web by adding black and white yarn or cotton batting. Top it off with plastic spiders for a creepy-crawly effect.

**9. Halloween Garland**

Make a festive garland using dollar store felt or paper shapes like pumpkins, ghosts, and bats. String them together with yarn or twine to hang across your mantel or porch.

**10. Bat Decorations**

Cut out bat shapes from black construction paper or foam sheets. Hang them from the ceiling or attach them to walls for a hauntingly dramatic effect.

**11. Ghoulish Lanterns**

Use empty cans or jars and wrap them in cheesecloth or gauze to create ghostly lanterns. Add LED lights or glow sticks inside for a spooky glow.

**12. Pumpkin Balloons**

Create festive pumpkin balloons by drawing jack-o’-lantern faces on orange balloons. Scatter them around your yard or use them as part of a Halloween balloon bouquet.

**13. DIY Tombstones**

Craft tombstones from foam board or cardboard. Cut them into shapes, paint them gray, and write spooky messages or names for a mini graveyard effect.

**14. Witch’s Broomstick**

Craft a witch’s broomstick using a bundle of sticks or dowels tied together with twine. Add a spooky sign or decoration to complete the look.

**15. Spooky String Lights**

Decorate your string lights with Halloween-themed cutouts like bats or ghosts. Simply attach them to the lights using clips or tape for a festive touch.

These simple and inexpensive DIY decorations from the dollar store are perfect for adding a spooky touch to your Halloween celebrations. With just a little creativity, you can achieve a hauntingly festive look that will delight your guests and trick-or-treaters!

🎃🕸️ #dollarstorediy #halloweencrafts #spookydecor #easyhalloween #diydecor

image
Kao
Komentar
Udio
Charlotte Chic Nomad
1 Y ·Prevedi

Elevate Your Style with the 24-Piece Short Square Yellow French Floral Fake Nail Set

Are you looking to upgrade your nail game with a touch of elegance and convenience? Look no further than the 24-piece short square yellow French floral fake nail set. This comprehensive kit provides everything you need for a stunning manicure that effortlessly combines style and practicality. Here’s why this set is your new go-to for achieving a flawless look in no time.

Why Choose the 24-Piece Nail Set?

**1. Stunning Design

The centerpiece of this set is the vibrant yellow short square nails adorned with delicate French floral patterns. The yellow hue offers a fresh and cheerful look, perfect for adding a pop of color to your everyday style or brightening up any special occasion. The floral accents add a touch of sophistication, making your nails stand out with elegance and charm.

**2. Complete Kit

This nail set is designed with convenience in mind. It includes:

24 Fake Nails: Each nail features a short square shape and a beautiful French floral design, ensuring a chic and modern look.

1 Nail File: Achieve the perfect nail shape with the included file, essential for smoothing edges and customizing the fit of your fake nails.

1 Glue Stick: Easy-to-use glue for secure adhesion, ensuring that your nails stay in place and look flawless.

1 Glue Sticker Sheet: For an alternative application method, these glue stickers offer a mess-free way to apply your fake nails without the need for traditional glue.

**3. Easy Application

Whether you’re a nail art novice or a seasoned pro, this kit makes application simple and hassle-free. The press-on nails are designed for quick and easy use, so you can achieve a professional-looking manicure in just minutes. The included nail file allows you to customize the shape and fit of each nail, while the glue stickers and glue stick offer versatile application options to suit your preference.

**4. Durable and Long-Lasting

The high-quality materials used in these fake nails ensure durability and longevity. With proper application and care, your nails will stay intact and look beautiful for days, making this set perfect for both short-term and long-term wear.

**5. Versatile Use

Whether you're preparing for a special event, a holiday celebration, or simply want to add a touch of elegance to your everyday look, this nail set is versatile enough to suit any occasion. The charming floral design and vibrant yellow color make it a perfect choice for a wide range of styles and outfits.

How to Apply Your Fake Nails

Prepare Your Natural Nails: Start with clean, trimmed nails. Remove any existing nail polish and ensure your nails are free from oils and residue.

File and Shape: Use the provided nail file to shape your natural nails and smooth the edges. This will help the fake nails adhere better.

Select the Right Size: Choose the fake nails that best fit your natural nails. Each fake nail is designed to fit a range of nail sizes, but it’s important to select the one that fits most comfortably.

Apply Glue or Stickers: If you’re using glue, apply a thin layer to the back of the fake nail and your natural nail. For glue stickers, peel off the backing and place the sticker on your natural nail before pressing on the fake nail.

Press and Hold: Press the fake nail onto your natural nail, holding it firmly for a few seconds to ensure a strong bond. If you’re using glue, be sure to let it dry fully.

Finishing Touches: Once applied, you can use the nail file to refine the shape and ensure a perfect fit. Apply a top coat if desired to add extra shine and protection.

Final Thoughts

The 24-piece short square yellow French floral fake nail set is a stylish and practical solution for anyone looking to elevate their nail game with minimal effort. With its stunning design, complete kit, and easy application, this set offers everything you need to achieve a chic and elegant manicure in no time. Whether you're preparing for a special occasion or simply want to refresh your look, this nail set is your perfect choice for a fabulous finish. Transform your style and enjoy beautiful, hassle-free nails with this must-have nail kit!

image
Kao
Komentar
Udio
Scarletts Style Journey
1 Y ·Prevedi

**Effortless and Fast DIY Halloween Decorations for Your Front Yard**

Transforming your front yard for Halloween doesn’t have to be complicated or time-consuming. With a few simple DIY ideas, you can create a festive and spooky atmosphere that will impress trick-or-treaters and neighbors alike. Here are some quick and easy DIY Halloween decorations to give your front yard a hauntingly delightful makeover:

**1. Ghostly Garlands**

Create a spooky garland by cutting out ghost shapes from white fabric or plastic tablecloths. Hang them along your porch or fence for an eerie effect. Add some glow-in-the-dark paint to make them stand out at night.

**2. Spooky Lawn Signs**

Craft your own Halloween-themed lawn signs using foam board or cardboard. Paint them with creepy messages like “Boo!” or “Enter if You Dare” and stake them into the ground for a simple yet effective decoration.

**3. Pumpkin Planters**

Turn small pumpkins into charming planters by cutting out the top and scooping out the insides. Fill them with autumn flowers or seasonal plants to add a touch of Halloween cheer to your front yard.

**4. Bat Silhouettes**

Make bat silhouettes using black construction paper or cardboard. Cut out different sizes and attach them to your windows or walls with tape or suction cups to create a flying bat effect.

**5. DIY Tombstones**

Create spooky tombstones using foam insulation boards. Cut them into tombstone shapes and use a craft knife to add eerie inscriptions. Paint them gray or black, and place them around your yard for a graveyard feel.

**6. Spider Webs**

Stretch out cotton batting or white yarn to create spider webs in your bushes or on your porch. Add a few plastic spiders for a creepy, crawly touch.

**7. Lanterns and Lights**

Repurpose old jars or containers into Halloween lanterns by painting them with spooky faces and adding tea lights or LED candles inside. Line your walkway with these glowing decorations to guide trick-or-treaters.

**8. Scary Silhouettes**

Cut out spooky shapes like witches, ghosts, or skeletons from black poster board. Tape them to your windows or garage door to create haunting silhouettes that come to life at night.

**9. Mummy Decorations**

Wrap old plastic bottles or jars in white gauze or fabric strips to create mummy decorations. Add googly eyes to the front for a fun and creepy touch. Place them around your yard or on your porch.

**10. Witch’s Broomstick**

Create a simple witch’s broomstick by tying together sticks or bamboo poles with twine. Add a spooky sign or a pumpkin to the handle and lean it against your front door or porch for a whimsical Halloween touch.

These DIY decorations are perfect for getting your front yard into the Halloween spirit quickly and easily. With a little creativity and effort, you can achieve a spook-tacular look that will delight visitors and make your home stand out this Halloween.

#diyhalloweendecor

image
Kao
Komentar
Udio
Scarletts Style Journey
1 Y ·Prevedi

**Spookify Your Front Yard: 14 Halloween Decorations That Will Wow Your Neighbors**

As Halloween approaches, it’s time to turn your front yard into a chillingly delightful spectacle that captures the essence of the season. Whether you're aiming for eerie elegance or all-out fright fest, these 14 Halloween decorations will help you create a front yard that’s both memorable and mischievous. Get ready to impress trick-or-treaters and passersby alike with these spine-tingling ideas!

**1. Glowing Jack-o’-Lanterns**

No Halloween display is complete without the classic pumpkin. Elevate your jack-o’-lantern game by using LED lights for a glowing effect that lasts all night. Arrange them in clusters or create a pumpkin patch to set a spooky scene.

**2. Eerie Gravestones**

Create a mini graveyard with faux gravestones. Choose from humorous or haunting inscriptions to suit your style. Adding some fog machines or spooky sound effects will enhance the eerie atmosphere.

**3. Ghostly Figures**

Hang ghost decorations from trees or place them in your front yard. These can be made from cheesecloth or white fabric and can be illuminated from within for a ghostly glow.

**4. Scary Skeletons**

Position life-sized skeletons in various poses around your yard. Have them “crawling” out of the ground or engaging in spooky activities to add a touch of macabre humor.

**5. Spooky Spider Webs**

Cover your bushes and trees with large, fake spider webs. Add some plastic spiders to complete the look. This simple decoration can make a big impact, especially when illuminated with a black light.

**6. Animated Props**

Surprise your guests with motion-activated decorations. From cackling witches to rising skeletons, these props add an interactive element that will delight and frighten.

**7. Creepy Clowns**

For a touch of eerie fun, include creepy clown decorations. Whether they’re inflatable or static, clowns can add a whimsical yet unsettling vibe to your Halloween display.

**8. Haunted Doorway**

Transform your front door into a haunted entrance with a spooky wreath, hanging bats, or a creepy door cover. Welcome guests with a frightfully festive first impression.

**9. Scary Sound Effects**

Enhance the spooky ambiance with a sound machine that plays eerie noises like howling wolves, creaking doors, or ghostly whispers. Position speakers discreetly for maximum impact.

**10. Bewitched Pathway**

Line your walkway with Halloween-themed lights or lanterns to guide trick-or-treaters to your door. Pumpkin or skull-shaped lights add a festive touch while illuminating the path.

**11. Sinister Scarecrows**

Craft a scarecrow with a Halloween twist. Dress it in tattered clothes and a spooky mask, and place it in your yard to keep watch over your Halloween festivities.

**12. Floating Bats**

Create the illusion of bats flying through the air by hanging them from trees or overhangs. Use lightweight materials and clear fishing line for a floating effect.

**13. Wicked Witch’s Cauldron**

Set up a witch’s cauldron on your porch or in your yard. Fill it with dry ice and water for a foggy, bubbling effect, and add some witchy props for extra flair.

**14. Pumpkin Topiary**

For a unique twist, create a pumpkin topiary by stacking decorative pumpkins in a tiered arrangement. This eye-catching decoration is sure to stand out in any front yard.

**Get Inspired and Get Decorating**

Ready to bring these spooky ideas to life? Click over to GoodandBad to explore more Halloween decoration inspiration and find everything you need to make your front yard the spookiest on the block. Dive into the ultimate Halloween transformation and start decorating today!

🎃👻 #halloweenyarddecor #spookyfrontyard #getyourspookon

image
Kao
Komentar
Udio
Showing 7526 out of 10986
  • 7522
  • 7523
  • 7524
  • 7525
  • 7526
  • 7527
  • 7528
  • 7529
  • 7530
  • 7531
  • 7532
  • 7533
  • 7534
  • 7535
  • 7536
  • 7537
  • 7538
  • 7539
  • 7540
  • 7541

Uredi ponudu

Dodajte razinu


Odaberite sliku
Izbrišite svoju razinu
Jeste li sigurni da želite izbrisati ovu razinu?

Recenzije

Kako biste prodali svoj sadržaj i postove, počnite s stvaranjem nekoliko paketa. Monetizacija

Plaćanje novčanikom

Upozorenje o plaćanju

Spremate se kupiti artikle, želite li nastaviti?

Zatražite povrat novca