Good and Bad People Good and Bad People
    #socialmedia #technology #usa #digitalmarketer #seoservice
    tìm kiếm nâng cao
  • Đăng nhập
  • Đăng ký

  • Chế độ ban ngày
  • © 2025 Good and Bad People
    Về • Danh mục • Liên hệ chúng tôi • Nhà phát triển • Chính sách bảo mật • Điều khoản sử dụng • Đền bù • Referral Terms • Acceptable Use Policy • Community Guidelines • Write for Us

    Lựa chọn Ngôn ngữ

  • Arabic
  • Bengali
  • Chinese
  • Croatian
  • Danish
  • Dutch
  • English
  • Filipino
  • French
  • German
  • Hebrew
  • Hindi
  • Indonesian
  • Italian
  • Japanese
  • Korean
  • Persian
  • Portuguese
  • Russian
  • Spanish
  • Swedish
  • Turkish
  • Urdu
  • Vietnamese

Đồng hồ

Đồng hồ cuộn phim

Sự kiện

Duyệt qua các sự kiện Sự kiện của tôi

Blog

Duyệt các bài báo

Thị trường

Sản phẩm mới nhất

Các trang

Trang của tôi Các trang được yêu thích

Hơn

Khám phá Bài viết phổ biến Việc làm Ưu đãi Kinh phí
cuộn phim Đồng hồ Sự kiện Thị trường Blog Trang của tôi Nhìn thấy tất cả

Phát hiện bài viết

Posts

Người dùng

Các trang

Tập đoàn

Blog

Thị trường

Sự kiện

Việc làm

Kinh phí

Madison's Creative Pins
1 Y ·Dịch

### The Ultimate Guide to Ear Piercings

Ear piercings have been a popular form of body art and self-expression for centuries. From the simple lobe piercing to the more intricate cartilage designs, there's a world of options to explore. In this ultimate guide, we’ll cover everything you need to know about ear piercings, including types, aftercare, and tips for choosing the right piercing for your style.

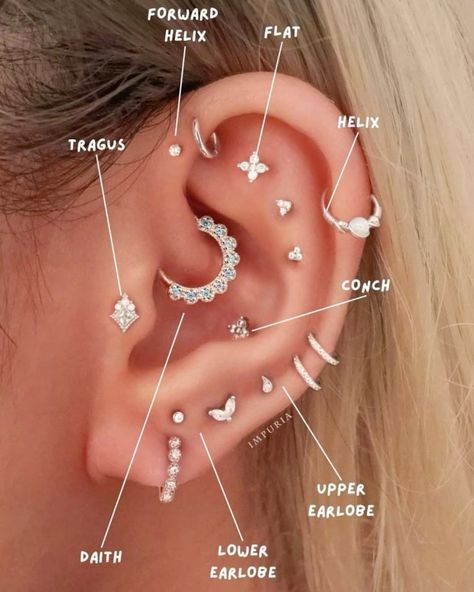
#### 1. **Types of Ear Piercings**

Ear piercings come in a variety of styles, each offering a unique look. Here are some of the most popular types:

- **Lobe Piercing**: The most common and versatile ear piercing. It's perfect for studs, hoops, and dangly earrings.

- **Helix Piercing**: Located on the upper ear cartilage, the helix piercing adds an edgy touch to any look.

- **Industrial Piercing**: A bold choice, this piercing connects two helix piercings with a single barbell.

- **Tragus Piercing**: This piercing is placed on the small cartilage flap in front of the ear canal, offering a subtle yet stylish option.

- **Daith Piercing**: Positioned on the innermost cartilage fold, it's known not just for its look but also for its rumored benefits in relieving migraines.

- **Rook Piercing**: A more intricate piercing located above the tragus, within the anti-helix.

- **Conch Piercing**: Done on the inner part of the ear, the conch can be adorned with a hoop or a stud.

- **Orbital Piercing**: Involves two piercings connected by a single ring, often done on the lobe or helix.

#### 2. **Choosing the Right Piercing**

When choosing an ear piercing, consider your personal style, pain tolerance, and healing time. Some piercings, like the lobe, heal quickly and are less painful, while others, like the industrial, take longer to heal and may cause more discomfort. It's also essential to think about how the piercing will fit with your existing jewelry and ear anatomy.

#### 3. **Aftercare Tips**

Proper aftercare is crucial to ensure your piercing heals correctly and avoids infection. Here’s a basic aftercare routine:

- **Clean Daily**: Use a saline solution or a gentle, alcohol-free antiseptic to clean your piercing twice a day.

- **Avoid Touching**: Refrain from touching your piercing with unwashed hands to prevent introducing bacteria.

- **Sleep Carefully**: Try not to sleep on the side with the fresh piercing to avoid irritation.

- **Be Patient**: Healing times vary, but most piercings take between 6-12 weeks to heal fully. Cartilage piercings may take longer.

#### 4. **Common Piercing Myths Debunked**

There are several myths surrounding ear piercings. Let’s clear up a few:

- **Myth 1**: "Cartilage piercings don’t hurt."

- **Truth**: Cartilage piercings can be more painful than lobe piercings due to the thickness of the tissue.


- **Myth 2**: "Piercings can close overnight."

- **Truth**: While new piercings can close quickly if jewelry is removed, older, well-healed piercings are less likely to close.

- **Myth 3**: "You can twist the jewelry to prevent it from sticking."

- **Truth**: Twisting jewelry in a fresh piercing can irritate the skin and delay healing.

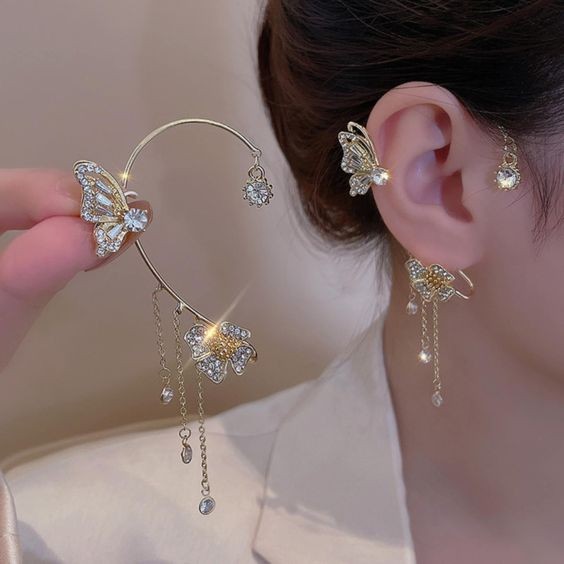
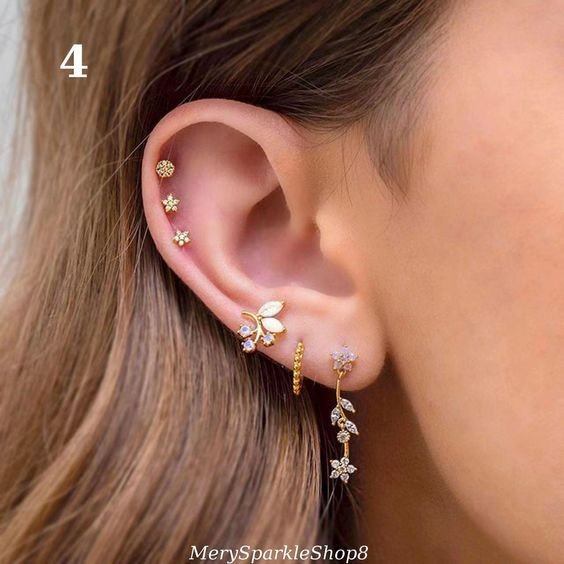
#### 5. **Jewelry Options for Piercings**

Once your piercing is healed, you can experiment with different types of jewelry. Here are a few popular options:

- **Studs**: Classic and versatile, available in various materials and designs.

- **Hoops**: From small huggies to larger hoops, these add a chic look.

- **Barbells**: Ideal for industrial and helix piercings, offering a bold statement.

- **Cuffs and Climbers**: Perfect for creating a stacked or layered look without needing multiple piercings.

#### 6. **When to See a Professional**

If you notice signs of infection, such as redness, swelling, or discharge, it’s essential to see a professional piercer or healthcare provider. They can assess the situation and recommend treatment.

#### 7. **Final Thoughts**

Ear piercings are a fantastic way to express your style and individuality. Whether you’re considering your first piercing or looking to add more to your collection, this guide will help you make informed choices and enjoy your new adornments.

**#earpiercing #jewelrytrends #piercingguide #bodyart #styleinspiration**

---

This article provides a comprehensive overview of ear piercings, from types and aftercare to common myths. You can adjust the content based on your audience's specific needs or preferences.

image
Giống
Bình luận
Đăng lại
Seren's Urban Elegance
1 Y ·Dịch

Gorgeous Pedicure Ideas for Perfectly Polished Toes ?✨ Gorgeous Pedicure Ideas for Perfectly Polished Toes 🦶✨

Note: For a daily dose of sophisticated style and modern elegance, be sure to follow Pinterest page https://pin.it/7JkS7l3i3 Discover the latest in chic trends and curated looks that perfectly blend urban edge with refined grace. 🌟👗✨

Your pedicure is not just a beauty routine; it’s an opportunity to showcase your style and pamper yourself. With the right techniques and trends, you can achieve perfectly polished toes that will make a statement wherever you go. From classic elegance to bold creativity, here are some stunning pedicure ideas to inspire your next salon visit or DIY session.

1. Classic French Pedicure

The timeless French pedicure is a go-to choice for those who appreciate understated elegance. It features a clean, natural base color with white tips, giving your toenails a polished and sophisticated look. Here’s how to achieve it:

Base Color: Apply a soft pink or nude polish as the base coat.

White Tips: Once the base is dry, use a white polish or a French tip pen to create a clean line at the tip of each toenail.

Top Coat: Finish with a clear top coat to add shine and extend the life of your pedicure.

2. Vibrant Neon Colors

For a bold and energetic look, vibrant neon colors are perfect for summer or any time you want to make a statement. Bright pinks, greens, and blues can add a fun pop of color to your toes.

Choose a Shade: Pick a neon color that complements your outfit or mood.

Apply in Layers: Neon colors often require multiple coats to achieve full opacity. Apply two to three thin layers for the best results.

Add a Top Coat: Seal with a glossy top coat to enhance the vibrancy and longevity.

3. Metallic Accents

Metallic pedicures are ideal for adding a touch of glamour to your toes. Gold, silver, or rose gold can make your nails sparkle and shine.

Base Color: Start with a metallic polish as the base color or use it for accents.

Design Options: Consider adding metallic stripes, dots, or a glittery gradient for extra flair.

Top Coat: A top coat will enhance the metallic sheen and protect the design from chipping.

4. Floral Designs

Floral patterns are a charming choice for a more intricate pedicure. Whether you prefer delicate daisies or bold tropical blooms, floral designs can add a touch of whimsy and romance.

Base Color: Apply a base color that contrasts with your floral design.

Design Application: Use nail art brushes or stickers to create or apply floral patterns.

Finish with a Top Coat: Seal the design with a clear top coat to keep the flowers looking fresh and vibrant.

5. Ombre Effect

An ombre pedicure creates a stunning gradient effect that blends different shades seamlessly. This look can be subtle or dramatic, depending on the colors you choose.

Choose Colors: Select two or more complementary shades.

Blend: Use a sponge to dab and blend the colors from dark to light, or vice versa, for a smooth gradient.

Seal the Look: Apply a top coat to blend the colors and add shine.

6. Glitter and Sparkle

For a touch of sparkle, consider incorporating glitter into your pedicure. Glitter can be used as an accent or as a full coverage polish for a dazzling effect.

Choose Your Glitter: Select a glitter polish that matches your style, whether it’s chunky, fine, or a mix of both.

Application: Apply a layer of glitter polish over your base color, or use it as an accent on one or two nails.

Top Coat: A top coat will help secure the glitter and add a glossy finish.

7. Geometric Patterns

Geometric patterns are modern and chic, offering a contemporary twist to traditional pedicure designs. Stripes, triangles, and chevrons can create a bold, graphic look.

Base Color: Apply a solid base color for contrast.

Pattern Application: Use nail tape or a fine brush to create geometric shapes and patterns.

Seal the Design: Finish with a top coat to protect your geometric design and add a glossy finish.

8. Tropical and Beach-Inspired Themes

Embrace the summer vibes with tropical or beach-themed pedicures. Think palm trees, sunsets, and ocean waves for a playful and vibrant look.

Base and Design Colors: Use bright and bold colors to represent tropical elements.

Apply Designs: Use nail art tools to paint or apply stickers of tropical motifs like palm trees or sunsets.

Protect with a Top Coat: Seal the design to keep it looking fresh and glossy.

Tips for a Long-Lasting Pedicure

Prepping Your Nails: Ensure your toenails are clean, dry, and well-shaped before applying polish.

Hydration: Moisturize your feet and cuticles regularly to keep them healthy and soft.

Avoid Excessive Moisture: Try to keep your toes dry for a few hours after applying polish to allow it to fully set.

Gentle Handling: Avoid using your toenails as tools to prevent chipping and damage.

Final Thoughts

A gorgeous pedicure is a perfect way to express your personal style and pamper yourself. From classic French tips to vibrant neons and intricate designs, there’s a pedicure idea for every occasion and mood. Whether you prefer a minimalist approach or a bold statement, these stunning pedicure ideas will help you achieve perfectly polished toes that will turn heads and make you feel fabulous. So, get ready to show off your beautiful feet and enjoy a fresh, stylish look!

Giống
Bình luận
Đăng lại
Violet Creative Pins
1 Y ·Dịch

19 Cozy Earthy Modern Bedroom Ideas for the Ultimate Retreat

In today's fast-paced world, creating a serene and inviting bedroom is essential for rest and relaxation. Earthy modern bedroom designs combine the warmth of natural elements with the sleekness of modern decor, resulting in a space that is both tranquil and stylish. If you’re looking to transform your bedroom into a cozy retreat, these 19 ideas will inspire you to bring the beauty of the outdoors inside, all while maintaining a modern aesthetic.

1. Embrace Natural Materials

Incorporating natural materials like wood, stone, and linen into your bedroom design instantly adds warmth and a connection to the outdoors. Opt for wooden furniture, stone accents, and linen bedding to create a calming atmosphere.

2. Neutral Color Palette

A neutral color palette is the foundation of an earthy modern bedroom. Shades of beige, taupe, soft whites, and muted greens mimic the colors found in nature and create a soothing environment.

3. Layered Textures

Mixing textures is key to achieving a cozy feel. Combine soft wool throws, textured rugs, and woven baskets to add depth and interest to your space. The more tactile variety, the more inviting the room becomes.

4. Bring in Greenery

Plants are an easy way to bring life into your bedroom. Not only do they purify the air, but they also add a pop of green that ties in with the earthy theme. Consider low-maintenance plants like snake plants, pothos, or fiddle leaf figs.

5. Rustic Wood Accents

Incorporating rustic wood elements, such as a reclaimed wood headboard or wooden nightstands, adds a touch of nature to your modern bedroom. The juxtaposition of raw wood with sleek, modern lines creates a balanced and visually appealing space.

6. Organic Bedding

Choose bedding made from organic materials like cotton, linen, or bamboo. These materials are not only eco-friendly but also incredibly soft and breathable, ensuring a comfortable night’s sleep.

7. Minimalist Furniture

Keep your furniture choices simple and functional. Opt for clean lines and minimalistic designs that highlight the natural beauty of the materials. This approach ensures that your bedroom remains uncluttered and peaceful.

8. Warm Lighting

The right lighting can make all the difference in creating a cozy atmosphere. Use warm, ambient lighting through bedside lamps, pendant lights, or wall sconces. Dimmer switches are a great addition to control the light intensity.

9. Earth-Toned Decor

Incorporate decor items in earth tones, such as terracotta vases, clay pottery, or bronze sculptures. These accessories add warmth and connect the space to nature.

10. Statement Wall Art

Choose artwork that reflects the earthy theme. Landscape paintings, botanical prints, or abstract pieces in neutral tones can serve as focal points in your bedroom.

11. Layered Rugs

Layering rugs is a great way to add texture and warmth to your bedroom. Start with a large neutral base rug and layer a smaller, textured rug on top for a cozy, grounded feel.

12. Natural Fiber Window Treatments

Opt for window treatments made from natural fibers like jute, bamboo, or linen. These materials allow natural light to filter through while maintaining privacy and adding to the earthy aesthetic.

13. Eco-Friendly Decor

Choose eco-friendly decor items like recycled wood frames, sustainably sourced furniture, and organic textiles. This not only supports the environment but also adds to the overall earthy vibe of the room.

14. Accent with Earthy Hues

Add pops of earthy hues such as deep greens, rich browns, and burnt oranges through accent pillows, throws, or wall art. These colors add warmth and vibrancy to the neutral base palette.

15. Simple, Streamlined Storage

Keep clutter at bay with simple, streamlined storage solutions. Opt for built-in wardrobes, under-bed storage, or minimalist dressers that blend seamlessly with your bedroom design.

16. Cozy Reading Nook

Create a cozy reading nook by placing a comfortable chair in a corner of the room. Add a soft throw, a small side table, and a reading lamp to create the perfect spot for relaxation.

17. Natural Stone Accents

Incorporate natural stone into your bedroom design with a stone accent wall, marble side tables, or stone candle holders. These elements add a touch of luxury while maintaining an earthy feel.

18. Earthy Modern Headboard

A statement headboard made from natural materials, such as rattan, reclaimed wood, or upholstered in a neutral fabric, can instantly elevate your bedroom. It serves as the focal point and ties the whole room together.

19. Personal Touches

Finally, add personal touches that reflect your personality and style. Whether it’s a collection of travel souvenirs, family photos, or your favorite books, these items will make your bedroom feel uniquely yours.

Conclusion

Transforming your bedroom into a cozy, earthy modern retreat is all about balancing natural elements with sleek, contemporary design. By incorporating these 19 ideas, you can create a serene space that not only looks beautiful but also feels like a true escape from the outside world. So, start your bedroom makeover today and enjoy the peace and tranquility that comes with a well-designed, earthy modern sanctuary.

image
Giống
Bình luận
Đăng lại
Madison's Creative Pins
1 Y ·Dịch

**2024 Sparkling Rhinestone Butterfly Ear Cuffs for Women – No Piercing Required, Tessel Style Zircon**

Discover the perfect blend of elegance and innovation with the 2024 Sparkling Rhinestone Butterfly Ear Cuffs. Designed for those who love to stand out without the commitment of traditional piercings, these ear cuffs offer a stunning alternative to conventional earrings.

The intricate butterfly design is adorned with dazzling rhinestones, creating a sparkling effect that catches the light from every angle. The tessel style zircon stones add a touch of contemporary charm, making these ear cuffs a versatile accessory that complements both casual and formal outfits.

What sets these ear cuffs apart is their no-piercing requirement. Simply slide them onto your ear for an instant style upgrade without the need for piercings. Ideal for fashion enthusiasts who appreciate both beauty and convenience, these ear cuffs are perfect for any occasion.

Elevate your accessory game with the 2024 Sparkling Rhinestone Butterfly Ear Cuffs and enjoy a chic, hassle-free look.

#earcuffs #butterflyearrings #nopiercing #fashionjewelry #2024trends #sparklingjewelry #zirconearrings

image
Giống
Bình luận
Đăng lại
Seren's Urban Elegance
1 Y ·Dịch

Nail Paint: The Ultimate Guide to Choosing and Applying the Perfect Nail Color for Every Occasion Note: For a daily dose of sophisticated style and modern elegance, be sure to follow Pinterest page https://pin.it/7JkS7l3i3 Discover the latest in chic trends and curated looks that perfectly blend urban edge with refined grace. 🌟👗✨

Nail paint, or nail polish, is more than just a beauty accessory—it’s a powerful way to express your personality and complete your look. Whether you’re gearing up for a casual day out, a special event, or just want to make a statement, choosing the right nail color and mastering the application process is key to achieving a polished and sophisticated appearance. In this ultimate guide, we’ll explore everything you need to know about selecting and applying nail paint to ensure your nails always look their best for any occasion.

Choosing the Perfect Nail Color

Selecting the right nail color can transform your entire look. Here’s how to choose the perfect shade for every occasion:

1. Assess Your Skin Tone

Your skin tone plays a crucial role in how a nail color appears on your nails. Here’s a quick guide:

Fair Skin: Light pinks, corals, and pastels complement fair skin. Bold reds and deep blues also look striking.

Medium Skin: Rich tones like berry, mauve, and classic red enhance medium skin tones. Warm shades like peach and gold also work well.

Dark Skin: Vibrant colors like turquoise, emerald green, and rich purples make a stunning contrast. Metallics and bold colors like royal blue also stand out beautifully.

2. Consider the Season

Seasonal colors can help you stay on-trend:

Spring: Soft pastels, light pinks, and mint greens reflect the fresh, blooming nature of spring.

Summer: Bright neons, corals, and vibrant blues are perfect for the sunny, lively spirit of summer.

Fall: Deep reds, burgundies, and warm browns align with the cozy, earthy tones of autumn.

Winter: Classic reds, deep blues, and sparkling metallics add a touch of elegance to the colder months.

3. Match the Occasion

Different occasions call for different nail colors:

Work: Opt for classic shades like nude, soft pink, or a clear gloss. These colors are professional and polished without being too flashy.

Casual Outings: Feel free to experiment with trendy shades or playful colors. Bright reds, fun neons, or even subtle glitters can add a pop of personality.

Formal Events: Elegant and sophisticated colors like deep reds, burgundies, or rich metallics are ideal for formal occasions. They exude class and refinement.

Special Occasions: For weddings, parties, or festive gatherings, consider glitters, sparkles, or bold colors that add a touch of glamour and excitement.

Applying Nail Paint: Step-by-Step Guide

Achieving a flawless manicure involves more than just choosing the right color. Follow these steps for a perfect application:

1. Prepare Your Nails

Clean and Shape: Start with clean, dry nails. Remove any old polish and trim your nails to the desired length. Shape them using a nail file for a smooth edge.

Push Back Cuticles: Gently push back your cuticles with a cuticle pusher or orange stick. Avoid cutting cuticles to prevent damage.

2. Apply a Base Coat

Protect and Prime: Apply a base coat to protect your natural nails and create a smooth surface for the polish. This also helps prevent staining and improves the longevity of your nail color.

3. Apply the Nail Paint

Start with a Thin Layer: Apply the nail paint in thin, even layers. Begin with a stroke in the center of the nail and then work your way to the edges. This ensures a smooth, streak-free application.

Use Two Coats: For a more vibrant color, apply a second coat of nail paint after the first one has dried completely. This adds depth and ensures full coverage.

4. Apply a Top Coat

Seal and Shine: Finish with a top coat to seal in the color and add shine. This also helps prevent chipping and extends the wear of your manicure.

5. Clean Up

Remove Excess Polish: Use a small brush or cotton swab dipped in nail polish remover to clean up any mistakes around the edges of your nails.

Tips for a Long-Lasting Manicure

Avoid Water: Try to keep your nails dry for at least a couple of hours after application to allow the polish to fully set.

Avoid Using Nails as Tools: Be gentle with your nails to prevent chipping and damage.

Touch Up as Needed: Carry a small bottle of your nail color for quick touch-ups and to fix any minor chips or scratches.

Final Thoughts

Nail paint is a fantastic way to express your style and enhance your overall look. By choosing the right color for your skin tone, the season, and the occasion, and by mastering the art of application, you can achieve a beautiful and lasting manicure. Whether you’re going for a classic look or something more adventurous, this ultimate guide ensures you’re always prepared to flaunt your perfectly polished nails with confidence. Embrace the world of nail color and let your fingertips make a stylish statement wherever you go!

Giống
Bình luận
Đăng lại
Amelia's Stylish Spaces
1 Y ·Dịch

Crispy Chicken Popcorn **Crispy Chicken Popcorn: The Ultimate Crunchy Snack**

When it comes to satisfying snack cravings, few things compare to the crispy, savory delight of popcorn chicken. Imagine that irresistible crunch of popcorn chicken, but taken to the next level with a flavor-packed, bite-sized twist. Enter Crispy Chicken Popcorn—bite-sized nuggets of juicy chicken, perfectly seasoned, and coated in a crispy, golden batter. This article will guide you through creating this delectable snack, exploring why it’s a crowd-pleaser, and offering tips and variations to make it your own.

### The Allure of Crispy Chicken Popcorn

Crispy Chicken Popcorn combines the best aspects of fried chicken and popcorn. It offers a fun, snackable format that’s perfect for parties, game days, or simply as a tasty treat for yourself. Each piece is a perfect morsel of chicken, coated in a flavorful, crunchy exterior. The bite-sized nature of this snack makes it ideal for dipping, sharing, and snacking on the go. Whether you're entertaining guests or looking for a delicious meal option, Crispy Chicken Popcorn is sure to be a hit.

### Ingredients

To prepare Crispy Chicken Popcorn, you’ll need the following ingredients:

#### For the Chicken:

- 1 lb boneless, skinless chicken breasts or thighs, cut into bite-sized pieces

- 1 cup buttermilk

- 1 large egg

- 1 cup all-purpose flour

- 1 cup panko breadcrumbs

- 1/2 cup grated Parmesan cheese

- 1 tsp garlic powder

- 1 tsp onion powder

- 1/2 tsp smoked paprika

- 1/2 tsp cayenne pepper (optional, for heat)

- Salt and pepper to taste

#### For Frying:

- Vegetable oil (for frying)

#### For Dipping Sauce (Optional):

- 1/2 cup mayonnaise

- 2 tbsp sriracha or hot sauce

- 1 tbsp honey

- 1 tbsp lime juice

### Instructions

#### 1. Prepare the Chicken

1. **Marinate the Chicken* In a bowl, combine the buttermilk and egg. Add the chicken pieces and mix to coat. Cover and refrigerate for at least 30 minutes, or up to 4 hours. This helps tenderize the chicken and ensures a moist interior.

#### 2. Prepare the Breading

1. **Mix Dry Ingredients* In a separate bowl, combine flour, panko breadcrumbs, grated Parmesan cheese, garlic powder, onion powder, smoked paprika, cayenne pepper (if using), salt, and pepper.

2. **Coat the Chicken* Remove the chicken pieces from the buttermilk marinade, letting excess liquid drip off. Dredge each piece in the breadcrumb mixture, pressing lightly to ensure an even coating.

#### 3. Fry the Chicken

1. **Heat the Oil* In a large skillet or deep fryer, heat enough vegetable oil to cover the chicken pieces about halfway (approximately 1-2 inches deep) to 350°F (175°C). Use a thermometer to monitor the oil temperature for best results.

2. **Fry the Chicken* Working in batches, carefully add the breaded chicken pieces to the hot oil. Fry for 3-4 minutes per side, or until golden brown and cooked through (internal temperature should reach 165°F or 74°C). Remove with a slotted spoon and drain on paper towels.

#### 4. Prepare the Dipping Sauce (Optional)

1. **Mix Ingredients* In a small bowl, combine mayonnaise, sriracha or hot sauce, honey, and lime juice. Stir until smooth. Adjust the seasoning to taste.

#### 5. Serve and Enjoy

1. **Garnish and Serve* Arrange the Crispy Chicken Popcorn on a serving platter. Serve with the dipping sauce on the side if desired. Garnish with fresh parsley or chives for a pop of color.

### Tips for Perfect Crispy Chicken Popcorn

1. **Marinate for Moisture* Marinating the chicken in buttermilk and egg ensures a tender and juicy interior. Don’t skip this step for the best results.

2. **Coat Evenly* For an extra-crispy coating, make sure the chicken pieces are evenly coated with the breadcrumb mixture. Press the breadcrumbs onto the chicken to help them stick.

3. **Maintain Oil Temperature* Keeping the oil at the right temperature is crucial for achieving a crispy exterior without an overly greasy texture. Use a thermometer to monitor the oil temperature.

4. **Don’t Overcrowd the Pan* Fry the chicken in batches to avoid overcrowding the pan, which can lower the oil temperature and result in soggy chicken.

### Variations and Add-Ons

1. **Spicy Crispy Chicken Popcorn* Add extra cayenne pepper or a dash of hot sauce to the breadcrumb mixture for a spicier kick.

2. **Herb-Infused* Mix fresh or dried herbs like thyme, rosemary, or dill into the breadcrumb mixture for added flavor.

3. **Cheesy Bites* Incorporate additional grated cheese into the breadcrumb mixture for an even cheesier coating.

4. **Sweet and Savory* Try a honey mustard glaze or a sweet BBQ sauce for a different flavor profile.

### Serving Suggestions

- **Party Appetizer* Serve Crispy Chicken Popcorn as a fun and shareable appetizer at parties or gatherings. Pair with a variety of dipping sauces for a delicious spread.

- **Game Day Snack* This snack is perfect for game days or movie nights. Serve with your favorite sides, like potato wedges or veggie sticks.

- **Lunch or Dinner* Enjoy Crispy Chicken Popcorn as part of a meal, paired with a fresh salad or as a topping for a rice bowl.

### Conclusion

Crispy Chicken Popcorn is a delightful twist on traditional fried chicken, offering a snackable, bite-sized alternative that’s perfect for any occasion. With its golden, crunchy exterior and juicy, tender interior, this recipe is sure to become a favorite. Whether you’re hosting a gathering, looking for a game-day treat, or simply want to indulge in a delicious snack, Crispy Chicken Popcorn delivers on flavor and satisfaction. By following the steps and tips provided, you’ll create a snack that’s both irresistible and crowd-pleasing. Enjoy every crunchy, savory bite! 🍗🌟

#easyrecipeidea

Giống
Bình luận
Đăng lại
Madison's Creative Pins
1 Y ·Dịch

**Titanium Crystal Flat Back Single Climber Earring: A Modern Jewelry Essential**

The Titanium Crystal Flat Back Single Climber Earring is a standout piece in contemporary jewelry. Its sleek design and high-quality titanium construction make it a must-have for anyone looking to add a touch of elegance to their accessory collection.

Crafted from durable titanium, this earring offers both strength and lightweight comfort. The flat back design ensures a secure fit, while the sparkling crystal adds a touch of sophistication. This single climber earring is perfect for both casual and formal occasions, providing versatility and style in one elegant piece.

Whether you're dressing up for a special event or simply looking to elevate your everyday look, the Titanium Crystal Flat Back Single Climber Earring delivers a modern edge with a hint of glamour. Its minimalist design pairs effortlessly with other pieces, making it a versatile addition to any jewelry collection.

Embrace the fusion of durability and style with this exquisite earring and let your accessories shine.

#jewelry #climberearring #titaniumjewelry #fashion #style #crystalearrings #modernaccessories

image
Giống
Bình luận
Đăng lại
Seren's Urban Elegance
1 Y ·Dịch

Embrace Your Inner Cat with Stunning Cat Eye Nails! Embrace Your Inner Cat with Stunning Cat Eye Nails!

Note: For a daily dose of sophisticated style and modern elegance, be sure to follow Pinterest page https://pin.it/7JkS7l3i3 Discover the latest in chic trends and curated looks that perfectly blend urban edge with refined grace. 🌟👗✨

If you're looking to add a touch of mystique and elegance to your manicure, look no further than cat eye nails. This captivating trend combines the allure of feline grace with the glamour of chic nail art, resulting in a stunning effect that's hard to ignore. Whether you’re preparing for a special occasion or simply want to elevate your everyday style, cat eye nails are the perfect choice. Here’s everything you need to know to embrace your inner cat with this fabulous nail trend.

What Are Cat Eye Nails?

Cat eye nails are named for their mesmerizing effect that resembles the reflective, slit-like pupils of a cat’s eye. This unique look is achieved using a special magnetic polish that contains iron particles. When a magnet is used over the wet polish, it draws the particles to the surface, creating a dramatic, shifting shimmer that changes with the light. The result is a stunning, multi-dimensional effect that gives your nails a mysterious and sophisticated edge.

Why Cat Eye Nails Are a Must-Try

Captivating and Unique: The striking visual of cat eye nails makes them stand out in any crowd. The magnetic effect creates a mesmerizing play of light that’s bound to catch eyes and start conversations.

Versatile Design: Cat eye nails come in a variety of colors and finishes, from deep, sultry blues and purples to vibrant, eye-catching greens and reds. This versatility allows you to match your nails to any outfit or occasion.

Long-Lasting Glamour: The magnetic polish used for cat eye nails is durable and resistant to chipping, ensuring that your stunning look lasts longer. This makes them a great choice for special events or everyday wear.

Easy to Achieve: Despite their high-impact appearance, cat eye nails are relatively easy to create at home with the right tools. With a bit of practice, you can achieve salon-quality results in the comfort of your own space.

How to Achieve the Perfect Cat Eye Nails

Prepare Your Nails: Start with clean, filed nails. Apply a base coat to protect your natural nails and ensure that your cat eye polish adheres properly.

Apply the Magnetic Polish: Choose your favorite cat eye polish color and apply a thin layer to each nail. Be sure to apply it evenly to avoid streaks and ensure a smooth finish.

Use the Magnet: While the polish is still wet, hold the magnet close to the nail’s surface, without touching it. Move the magnet around to achieve the desired effect. The iron particles will shift, creating the cat eye effect.

Seal the Look: Finish with a top coat to add shine and protect your design. This will help to lock in the magnetic effect and extend the life of your manicure.

Clean Up: If any polish has gotten onto your skin, use a nail brush or cotton swab dipped in nail polish remover to clean up any mess.

Styling Your Cat Eye Nails

Cat eye nails can be styled in various ways to complement your look:

Classic Elegance: Opt for deep, rich colors like navy blue, burgundy, or forest green for a sophisticated, timeless look.

Bold and Bright: Choose vibrant shades such as turquoise, hot pink, or gold to make a statement and add a pop of color to your style.

Glamorous Accents: Add a touch of glitter or combine with other nail art techniques, like ombre or marble, for a more elaborate design.

Care Tips for Cat Eye Nails

Avoid Harsh Chemicals: Try to keep your nails away from harsh cleaning agents or chemicals to prevent dulling the shine.

Regular Moisturizing: Keep your hands and cuticles hydrated to maintain healthy nails and extend the life of your manicure.

Gentle Handling: Be careful not to chip or scratch your nails. Use gloves when doing tasks that might damage your polish.

Final Thoughts

Cat eye nails offer a captivating blend of elegance and edge, making them a standout choice for anyone looking to add a touch of feline allure to their style. With their mesmerizing effect and versatile design options, cat eye nails are perfect for any occasion, whether you're heading to a glamorous event or just want to add a bit of intrigue to your daily look. So why not embrace your inner cat and give your nails a stunning makeover that’s sure to turn heads? Try cat eye nails today and let your manicure shine with captivating charm!

Giống
Bình luận
Đăng lại
Madison's Creative Pins
1 Y ·Dịch

**Gold Star and Flower Earring Set: Elegance Redefined**

Discover the allure of the Gold Star and Flower Earring Set, a stunning collection that combines timeless elegance with modern sophistication. This versatile set features three distinct pieces: diamond dangle earrings, classic stud earrings, and a chic huggie ring, each crafted to enhance your style with a touch of luxury.

**Diamond Dangle Earrings**

The centerpiece of this set is the diamond dangle earrings. These exquisite pieces showcase brilliant diamonds that catch the light with every movement. The delicate design of the dangles adds a graceful flow, making them perfect for both formal events and casual outings.

**Classic Stud Earrings**

Complementing the dangle earrings are the classic stud earrings. Simple yet elegant, these studs are perfect for everyday wear. They offer a subtle sparkle that adds a refined touch to any look, making them a versatile addition to your jewelry collection.

**Chic Huggie Ring**

The set also includes a chic huggie ring. This trendy piece wraps snugly around the finger, featuring a sleek design that pairs beautifully with the earrings. Whether worn alone or stacked with other rings, the huggie ring adds a contemporary flair to your ensemble.

This Gold Star and Flower Earring Set is a perfect choice for those who appreciate both classic and modern styles. Ideal for gifting or as a treat for yourself, this set promises to elevate any outfit with its blend of elegance and sophistication.

#goldearrings #jewelryset #diamondearrings #fashionjewelry #elegantaccessories #chicstyle

image
Giống
Bình luận
Đăng lại
Seren's Urban Elegance
1 Y ·Dịch

Red French Tip Press-On Toenails with Rhinestones: Glossy Full-Cover Acrylic Set for Women, 24PCS

Note: For a daily dose of sophisticated style and modern elegance, be sure to follow Pinterest page https://pin.it/7JkS7l3i3 Discover the latest in chic trends and curated looks that perfectly blend urban edge with refined grace. 🌟👗✨

If you’re looking to give your toes a quick and glamorous makeover, the Red French Tip Press-On Toenails with Rhinestones are your ultimate go-to solution. This 24-piece glossy acrylic set is designed to provide a chic and stylish look effortlessly. Whether you’re gearing up for a special event or simply want to add a touch of sophistication to your everyday style, these press-on toenails are the perfect choice. Here’s why this set is a must-have for anyone who loves to keep their toes looking fabulous.

Glamorous Design

The Red French Tip Press-On Toenails feature a classic French tip design with a modern twist. The rich red base combined with the crisp white tips offers a timeless look that is both elegant and eye-catching. But it’s the addition of rhinestones that really sets this set apart. The sparkling accents add a touch of glamour and bling, making your toenails stand out in any crowd. This design strikes the perfect balance between classic beauty and contemporary flair.

Glossy Full-Cover Finish

Each toenail in this set provides a full-cover finish, ensuring that your entire nail is covered with a sleek, glossy surface. The high-shine finish enhances the overall look, making your toes look polished and well-maintained. The acrylic material used in these press-on toenails not only provides a beautiful shine but also ensures durability, so your stylish new look lasts longer.

Easy Application

One of the biggest advantages of press-on toenails is their ease of application. This set is designed for hassle-free use, so you can achieve a salon-quality manicure at home in no time. Simply select the correct size for each toe, apply the adhesive, and press the nail into place. There’s no need for messy glue or complicated tools—just quick and easy application for instant results.

Comfort and Fit

The Red French Tip Press-On Toenails are crafted to offer a comfortable fit for most toe shapes and sizes. The flexible acrylic material adjusts slightly to the contours of your toenails, ensuring a snug fit that stays in place. You won’t have to worry about these nails shifting or coming loose, allowing you to enjoy your stylish new look with confidence.

Versatile Style

This set’s versatile design makes it suitable for a wide range of occasions. Whether you’re heading to a wedding, a party, or just want to elevate your everyday style, these toenails are the perfect accessory. The vibrant red and sparkling rhinestones add a touch of glamour that complements any outfit, making your toes a standout feature.

Care Tips

To keep your press-on toenails looking their best, follow these simple care tips:

Avoid Excessive Moisture: Try to keep your toenails dry as much as possible to prolong the wear time.

Avoid Harsh Chemicals: Stay away from harsh chemicals that could affect the adhesive or the finish of the nails.

Gentle Removal: When it’s time to remove the toenails, do so gently to avoid damaging your natural nails.

Final Thoughts

The Red French Tip Press-On Toenails with Rhinestones offer an easy and stylish way to enhance the look of your toes. With their glossy full-cover finish, glamorous design, and easy application, they are perfect for anyone looking to add a touch of elegance and sparkle to their pedicure. This 24-piece set ensures you have plenty of options to achieve the perfect fit and style for your toes. So why wait? Step into style and let your toes shine with these stunning press-on toenails!

image
Giống
Bình luận
Đăng lại
Showing 7670 out of 10994
  • 7666
  • 7667
  • 7668
  • 7669
  • 7670
  • 7671
  • 7672
  • 7673
  • 7674
  • 7675
  • 7676
  • 7677
  • 7678
  • 7679
  • 7680
  • 7681
  • 7682
  • 7683
  • 7684
  • 7685

Chỉnh sửa phiếu mua hàng

Thêm bậc


Chọn một hình ảnh
Xóa bậc của bạn
Bạn có chắc chắn muốn xóa tầng này không?

Nhận xét

Để bán nội dung và bài đăng của bạn, hãy bắt đầu bằng cách tạo một vài gói. Kiếm tiền

Thanh toán bằng ví

Thông báo Thanh toán

Bạn sắp mua các mặt hàng, bạn có muốn tiếp tục không?

Yêu cầu hoàn lại