Bathroom Design: Clear and Professional Ideas for Every Home
Designing a bathroom is about far more than choosing tiles or fixtures. It’s about creating a space that is functional, aesthetically pleasing, and tailored to your lifestyle. A well-designed bathroom blends efficiency, comfort, and beauty, turning a purely practical space into a retreat. Whether you’re remodeling an existing bathroom or planning a new build, understanding the fundamentals of bathroom design can save time, money, and stress while ensuring lasting results.
In this guide, we’ll explore clear and professional bathroom design principles, covering layout, lighting, materials, storage, and style. By the end, you’ll have the knowledge to approach your bathroom project with confidence.
Why Bathroom Design Matters
Bathrooms may be smaller than other rooms in the house, but they hold tremendous importance. They are used multiple times a day by everyone in the household, and their condition directly impacts comfort and property value. A well-designed bathroom:
Improves Functionality: Smart layouts ensure easy movement and accessibility.
Adds Value: Professionally designed bathrooms increase a home’s resale appeal.
Enhances Well-being: A beautiful bathroom can serve as a relaxing, spa-like retreat.
Maximizes Space: Clever storage and design tricks make even small bathrooms feel larger.
Step One: Planning the Layout
The layout is the backbone of bathroom design. Before selecting finishes, consider how the space will be used and by whom.
Common Layout Types
Single-Wall Layout
Best for smaller spaces or powder rooms.
Sink, toilet, and shower/tub are arranged along one wall.
Galley Layout
Fixtures are placed on two opposite walls.
Works well for narrow bathrooms.
Three-Quarter Bath
Includes a toilet, sink, and shower.
Ideal for guest bathrooms or small homes.
Full Bath
Features a toilet, sink, shower, and bathtub.
Can be arranged in multiple configurations depending on space.
Master Bath or Ensuite
Luxurious, larger layouts often featuring double sinks, a walk-in shower, and a separate tub.
Can also include a dressing area or built-in storage.
Professional Tip: Always account for building codes, clearances, and accessibility. For example, toilets typically need at least 30 inches of space width, while showers require a minimum of 32 inches by 32 inches.
Step Two: Choosing Fixtures and Fittings
Fixtures—sinks, toilets, bathtubs, and showers—are the core functional elements. Professional bathroom design pays close attention to their quality and placement.
Sinks: Vessel sinks create a striking focal point, while under-mount sinks offer a sleek, easy-to-clean surface. Consider double sinks for shared bathrooms.
Toilets: Wall-mounted toilets save space and look modern, while traditional floor-mounted styles remain cost-effective.
Bathtubs: Freestanding tubs add luxury, while alcove tubs maximize small spaces.
Showers: Frameless glass showers feel open and modern, while tiled showers allow for more design customization.
Professional Tip: Opt for water-saving fixtures. They reduce utility bills and align with sustainable design principles.
Step Three: Lighting Design
Lighting is often underestimated, but it can make or break a bathroom’s atmosphere.
Ambient Lighting: Provides overall illumination. Ceiling-mounted fixtures or recessed lights are common choices.
Task Lighting: Essential for grooming tasks. Place sconces at eye level on either side of the mirror to avoid shadows.
Accent Lighting: Adds drama and highlights design features, such as LED strips under vanities or around niches.
Natural Light: Skylights and windows brighten the space and reduce electricity use.
Professional Tip: Install dimmers for maximum flexibility. Bright light is useful in the morning, while soft, warm light creates a spa-like mood in the evening.
Step Four: Selecting Materials and Finishes
Materials should be both practical and visually appealing. Bathrooms are high-moisture environments, so durability and maintenance are critical.
Flooring: Porcelain and ceramic tiles are popular for their water resistance and variety. Vinyl is budget-friendly, while natural stone adds luxury but requires sealing.
Walls: Tile is a common choice, but painted drywall with moisture-resistant finishes can work well outside wet zones.
Countertops: Quartz and granite are durable and stylish. Laminate and solid surface options offer affordability with modern looks.
Cabinetry: Look for water-resistant finishes and hardware that can withstand humidity. Floating vanities are sleek and create a sense of openness.
Professional Tip: Choose a cohesive palette. Neutral tones with pops of color in accessories ensure timelessness while allowing easy updates.
Step Five: Storage Solutions
Clutter can quickly undermine a well-designed bathroom. Professional designers focus on smart storage that blends seamlessly into the design.
Vanities with Drawers: Offer better organization than cabinets alone.
Recessed Niches: Perfect for showers, eliminating the need for bulky caddies.
Wall-Mounted Cabinets: Maximize vertical space.
Open Shelving: Adds style but works best for neatly stored items like towels.
Hidden Storage: Mirrors with medicine cabinets or under-bench storage keep essentials out of sight.
Professional Tip: Always plan storage with daily routines in mind. Ask yourself: Where will toiletries, towels, and cleaning products go?
Step Six: Style and Aesthetics
Your bathroom’s style should reflect the overall character of your home while suiting personal taste.
Popular Styles
Modern Minimalist
Clean lines, neutral colors, and frameless glass.
Floating vanities and sleek hardware.
Traditional Elegance
Ornate fixtures, rich materials, and classic tiles.
Freestanding tubs with claw feet.
Scandinavian Simplicity
Light wood, white tiles, and plenty of natural light.
Focus on function and warmth.
Industrial Chic
Exposed pipes, concrete floors, and matte black fixtures.
Works well in loft-style homes.
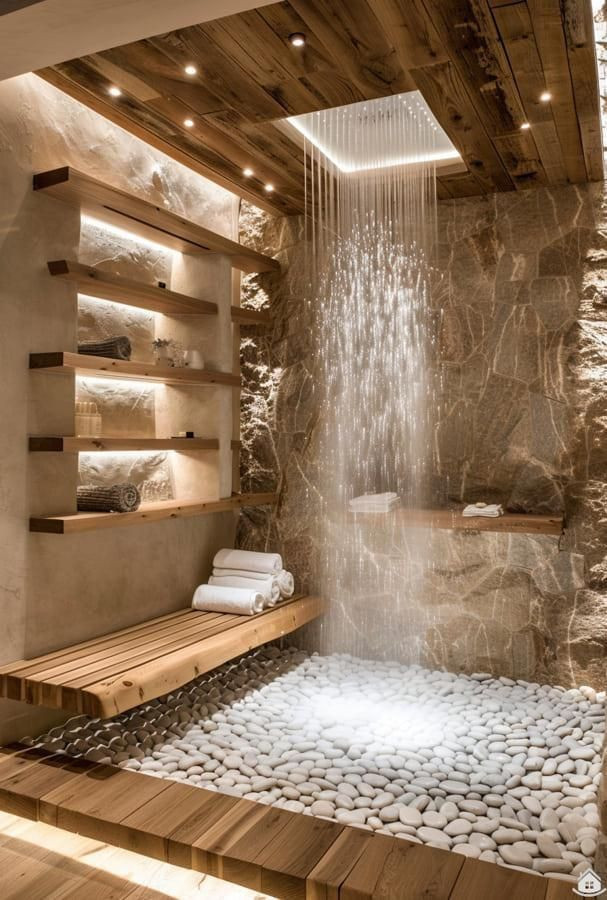
Spa-Inspired
Natural stone, soft lighting, and calming tones.
Emphasizes relaxation and luxury.
Professional Tip: Trends come and go, but timeless styles ensure long-term satisfaction. Blend trendy elements through accessories, not permanent fixtures.
Step Seven: Accessibility and Universal Design
Professional bathroom design also considers accessibility. Even if you don’t need it now, planning ahead ensures the bathroom remains functional as needs change.
Wider Doorways: Accommodate mobility aids.
Walk-in Showers: Safer and easier to access than tubs.
Grab Bars: Can be stylishly integrated for support.
Comfort-Height Toilets: Easier on joints and mobility.
Step Eight: Budgeting and Professional Help
Bathroom renovations vary widely in cost depending on size, materials, and scope. A clear budget prevents overspending.
Low Budget ($3,000–$7,00: Cosmetic upgrades like paint, fixtures, and lighting.
Mid-Range ($8,000–$20,00: New cabinetry, tile, and partial layout changes.
High-End ($20,000+): Luxury finishes, custom layouts, and professional-grade fixtures.
Hiring professionals—designers, plumbers, electricians—ensures safety and quality. While DIY can work for small updates, complex renovations benefit greatly from expert input.
Conclusion: Designing with Clarity and Professionalism
Bathroom design is a careful balance of practicality and beauty. A professional approach focuses first on layout and functionality, then layers in thoughtful material choices, lighting, and style. By considering storage, accessibility, and budget, you can create a bathroom that not only looks stunning but also works seamlessly for your daily life.
Whether you prefer modern minimalism, timeless tradition, or spa-like serenity, the key is clarity: knowing what you need, what you value, and how to bring it together in a cohesive design. With these principles in mind, your bathroom can transform from a purely functional room into one of the most enjoyable spaces in your home.