#travel
#women
#adventure
#ai
#chatgpt
https://azcleard.com/tin-tuc/c....ach-de-khu-mui-hoi-t

Like
Comment
Share
#travel
#women
#adventure
#ai
#chatgpt
https://azcleard.com/tin-tuc/c....ach-de-khu-mui-hoi-t


5 Points for Warning sign some-ones Depression
Warning signs of depression in someone can be crucial for providing support and assistance. Here are five key warning signs:
Foolow Us-: https://www.instagram.com/p/C6....Vf_W9LoYM/?utm_sourc
Sector 29 - https://maps.app.goo.gl/BTxW7L9GGW11AiKq7
Contact us - https://psykart.com/ or 7428729797
#aloneindarkness #solitarysuffering #lonelydepression #isolatedfeelings #alonenessanxiety #depressedandisolated #solitudepain #lonelyjourney
Soi kèo Augsburg vs Stuttgart lúc 1h30 ngày 11/5/2024
Xem thêm: https://massivehealth.com/soi-....keo-duc/soi-keo-augs
Hashtag: #haquangvan #bongdainfo #tysotructuyen #soikeo #nhandinhbongda

Budget-Friendly Travel: Tips for Hitting the Road Light and Easy
Traveling is often seen as a luxury reserved for those with deep pockets, but the truth is, you don't need to break the bank to explore the world. With a little bit of planning and creativity, you can embark on budget-friendly adventures that won't leave you scrambling for cash. In this article, we'll explore some practical tips for hitting the road light and easy, no matter your budget.
**1. Pack Light*
One of the easiest ways to save money and travel more efficiently is by packing light. Opt for versatile clothing items that can be mixed and matched to create multiple outfits, and leave behind any unnecessary gadgets or accessories. Not only will packing light save you money on baggage fees, but it will also make it easier to navigate airports, train stations, and city streets.
**2. Be Flexible with Your Travel Dates*
If your travel dates are flexible, you can often find significant savings by avoiding peak travel times. Consider traveling during the off-season or mid-week when flights and accommodations tend to be cheaper. Additionally, be open to booking last-minute deals or taking advantage of flash sales for even greater savings.
**3. Embrace Public Transportation*
Instead of relying on expensive taxis or rental cars, embrace public transportation as a cost-effective way to get around. Many cities offer affordable and efficient public transportation options such as buses, trains, and subways, allowing you to explore the area without breaking the bank. Plus, traveling like a local can provide a more authentic and immersive experience.
**4. Choose Budget-Friendly Accommodations*
Look beyond traditional hotels and consider alternative accommodations such as hostels, guesthouses, or vacation rentals. These options are often more budget-friendly and can provide unique opportunities to connect with locals and fellow travelers. Additionally, consider booking accommodations with shared amenities, such as kitchens or laundry facilities, to further save on expenses.
**5. Eat Like a Local*
One of the best parts of traveling is experiencing new cuisines and flavors, but dining out at restaurants can quickly add up. Instead, opt for budget-friendly dining options such as street food stalls, local markets, and grocery stores. Not only will you save money, but you'll also have the chance to sample authentic dishes and connect with the local culture.
**6. Take Advantage of Free Activities*
Explore your destination without spending a dime by seeking out free activities and attractions. Many cities offer free walking tours, museums with complimentary admission days, and outdoor parks and gardens to enjoy at no cost. Additionally, take advantage of nature's offerings by hiking, swimming, or simply soaking up the scenery without spending a penny.
**7. Be Mindful of Your Spending*
Finally, be mindful of your spending habits and prioritize experiences over material possessions. Set a daily budget for yourself and track your expenses to ensure you're staying on track. Consider using cash instead of credit cards to avoid overspending, and look for ways to save money, such as using discount cards or seeking out deals and promotions.
With these tips in mind, you can hit the road light and easy without draining your bank account. By packing light, being flexible with your travel plans, and making smart choices along the way, you can embark on budget-friendly adventures that are as enriching as they are affordable. So pack your bags, embrace the journey, and get ready to explore the world on a budget!

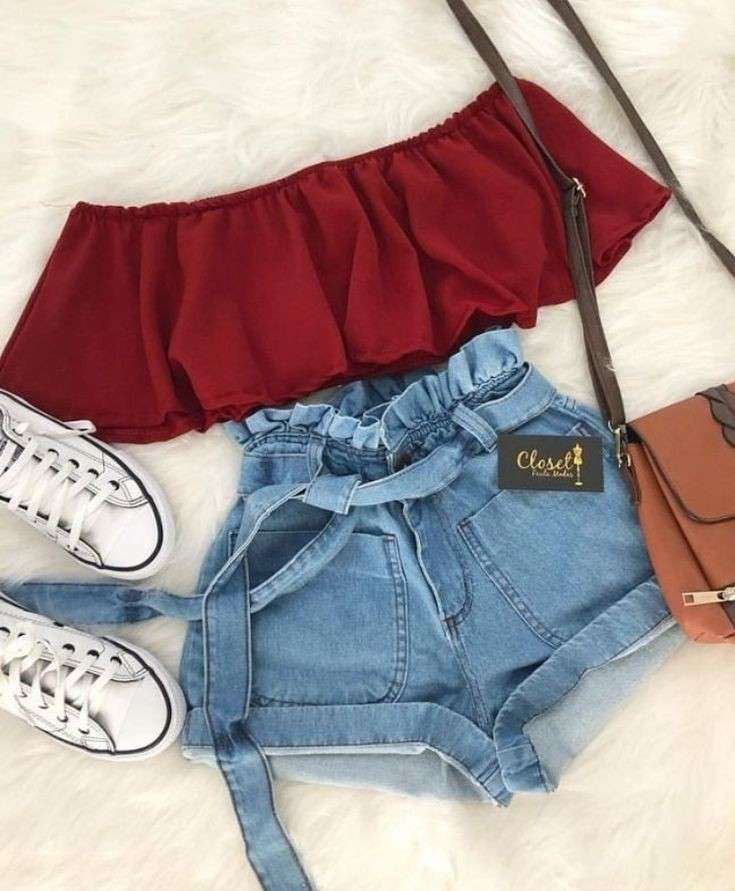
Stunning Styles: Elevate Your Look with Our Chic Outfits for Girls!
In a world where fashion is constantly evolving, finding the perfect outfit that makes you feel confident and stylish can be a game-changer. That's why we've curated a collection of stunning outfits for girls that are sure to elevate your look and turn heads wherever you go. From casual chic to glam night-out ensembles, we've got you covered with the latest trends and timeless classics.
**1. Casual Cool*
For those laid-back days when comfort is key, our collection of casual chic outfits has you covered. Pair distressed jeans with a graphic tee and a denim jacket for an effortlessly cool vibe, or opt for a cozy sweater dress and ankle boots for a relaxed yet stylish look. Complete the ensemble with oversized sunglasses and a crossbody bag for a touch of flair.
**2. Boho Babe*
Channel your inner free spirit with our bohemian-inspired outfits that exude effortless charm and whimsy. Flowy maxi dresses adorned with floral prints and embroidery are perfect for sunny days spent wandering through flower fields or attending outdoor music festivals. Pair with suede ankle boots and layered jewelry for a boho-chic look that's both feminine and eclectic.
**3. Office Elegance*
Make a statement in the boardroom with our sophisticated office attire that combines professionalism with style. Tailored blazers paired with slim-fit trousers or pencil skirts create a polished silhouette that commands attention. Add a pop of color with a vibrant blouse or opt for classic neutrals for a timeless look. Complete the ensemble with sleek pumps and a structured tote bag for a chic finishing touch.
**4. Glam Night Out*
Turn heads and steal the spotlight with our collection of glamorous night-out ensembles that are perfect for special occasions and evening soirées. Slip into a sleek bodycon dress with statement heels and a clutch for a show-stopping look that's sure to make you the center of attention. Or opt for a sequined mini dress paired with strappy sandals for a touch of sparkle and sophistication.
**5. Weekend Warrior*
Whether you're brunching with friends or exploring the city, our weekend warrior outfits are designed to keep you looking stylish and comfortable from sunrise to sunset. Embrace athleisure chic with leggings and a cropped hoodie for a sporty yet trendy look, or opt for a denim skirt paired with a cozy knit sweater for a casual yet put-together ensemble. Finish off the look with sneakers or ankle boots for added versatility.
With our curated collection of stunning outfits for girls, you can effortlessly elevate your look and express your unique sense of style. From casual cool to glamorous chic, there's something for every occasion and every fashion preference. So go ahead, explore our selection and discover the perfect ensemble that will make you feel confident, stylish, and utterly fabulous!
Homegrown Sweetness: Growing Your Own Sugar Cane for Sweet Treats!
If you're a fan of sweet treats and enjoy getting your hands dirty in the garden, why not combine the two by growing your own sugar cane? Not only is sugar cane cultivation a rewarding and fascinating endeavor, but it also allows you to indulge in the ultimate natural sweetener straight from your backyard. In this article, we'll explore the joys of growing sugar cane and how you can enjoy the fruits of your labor in delicious homemade treats.
**Getting Started*
To begin your sugar cane growing journey, you'll need to acquire sugar cane stalks or cuttings from a reputable source. Look for healthy, disease-free stalks with visible nodes, as these are the parts of the plant that will produce new growth. Choose a sunny spot in your garden with well-draining soil, as sugar cane thrives in warm, tropical climates.
**Planting and Care*
Plant your sugar cane cuttings in rows or clusters, spacing them about 12-18 inches apart to allow room for growth. Plant each cutting horizontally in the soil, burying it to a depth of 2-4 inches and ensuring that the nodes are covered. Water the newly planted cuttings thoroughly and keep the soil consistently moist, but not waterlogged, throughout the growing season.
As your sugar cane plants grow, they will benefit from regular fertilization with a balanced fertilizer to promote healthy growth and abundant yields. Keep an eye out for pests and diseases, such as aphids or rust, and take appropriate measures to control them if necessary.
**Harvesting and Enjoying*
After approximately 10-12 months of growth, your sugar cane plants will be ready for harvest. Look for mature stalks with a diameter of 1-2 inches and a deep green color. Using a sharp knife or machete, cut the stalks at ground level and remove any leaves or debris.
Once harvested, sugar cane can be enjoyed in a variety of ways. One of the simplest and most delicious ways to enjoy sugar cane is by extracting its juice. Simply peel away the tough outer layer of the stalk, then use a sugar cane juicer or blender to extract the sweet, refreshing juice. You can enjoy the juice as is or use it to sweeten beverages, desserts, and even savory dishes.
Alternatively, you can use sugar cane as a natural sweetener in your cooking and baking. From homemade candies and confections to baked goods and sauces, sugar cane adds a unique depth of flavor and sweetness to any recipe.
**Conclusion*
Growing your own sugar cane is not only a fun and rewarding gardening project, but it also allows you to enjoy the unparalleled sweetness of this tropical plant straight from your own backyard. With a little bit of patience and care, you can harvest your own supply of sugar cane and indulge in a wide range of delicious homemade treats. So why wait? Start growing your own sugar cane today and experience the joy of homegrown sweetness!

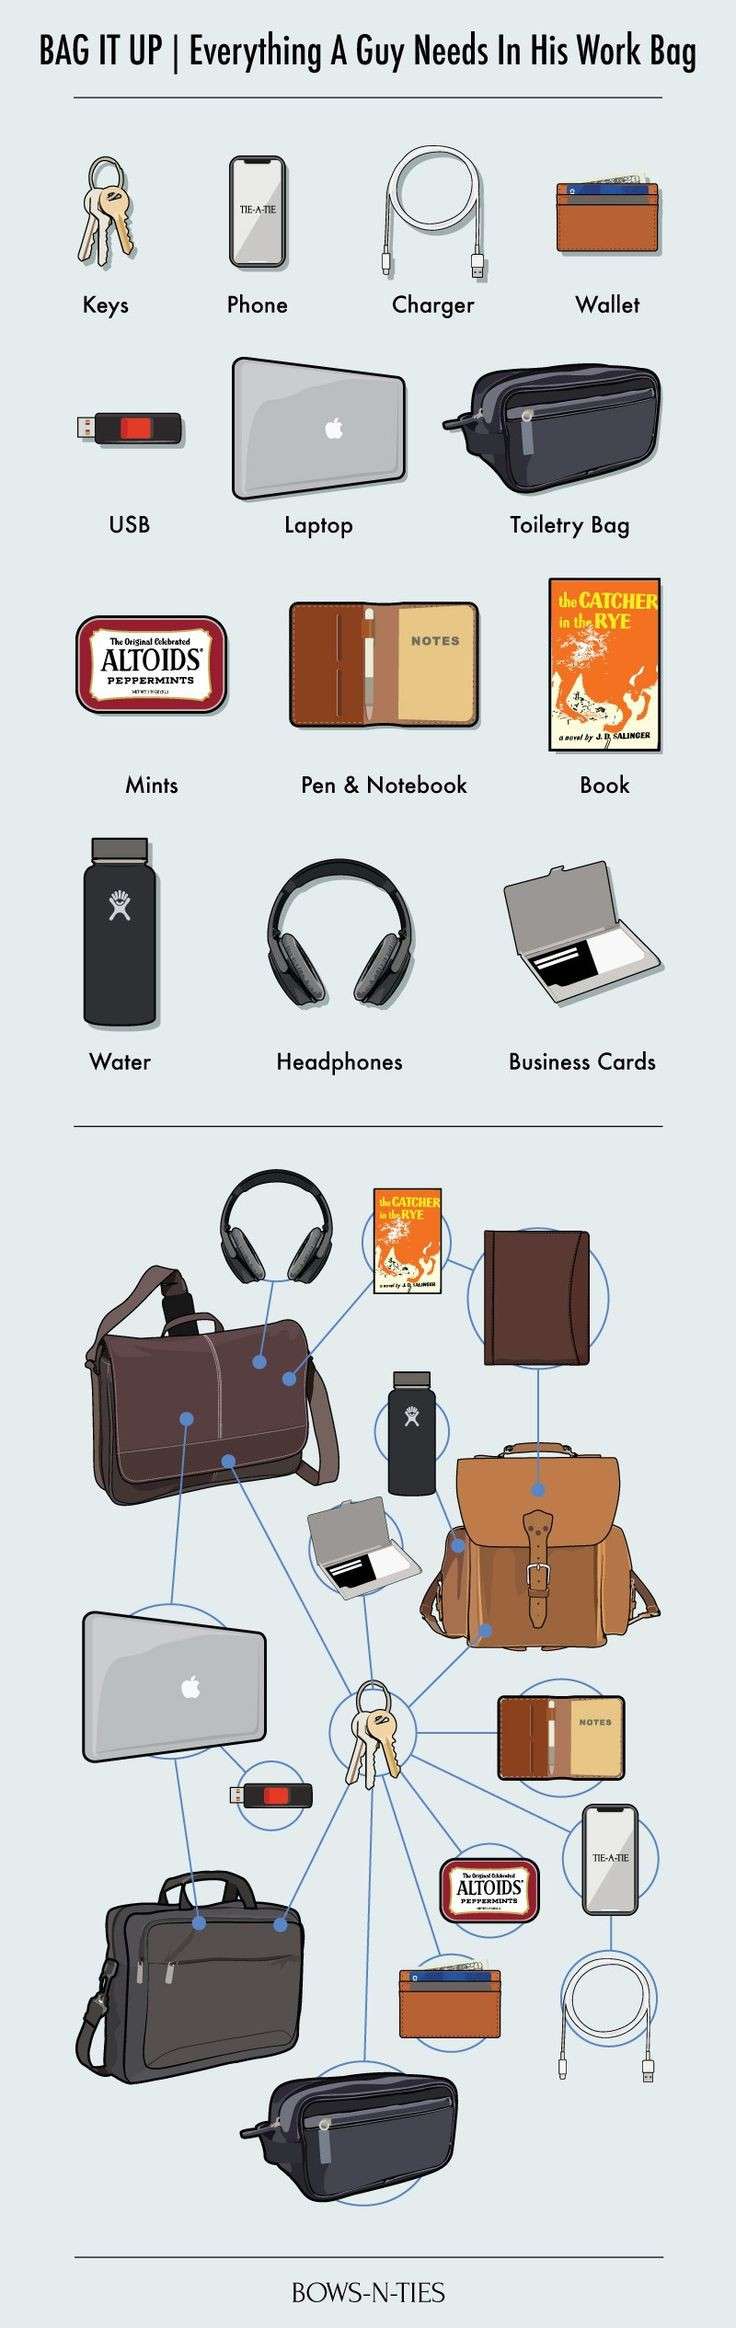
Effortless Organization: Charting Accessories Placement in Backpacks and Laptop Bags
In today's fast-paced world, staying organized is key to maximizing productivity and minimizing stress, especially when it comes to our trusty backpacks and laptop bags. To help you conquer clutter and streamline your daily routine, we've created a comprehensive guide outlining the optimal placement of accessories in these essential carryalls. Say goodbye to rummaging through endless pockets and compartments – with our handy chart, everything will have its designated spot for easy access and maximum efficiency.
1. **Main Compartment*
- Laptop or tablet: Place in a padded sleeve or designated compartment to protect it from bumps and scratches.
- Notebooks and folders: Stack vertically to save space and prevent creasing.
- Portable charger: Keep in an accessible pocket for quick access when your devices need a boost.
- Water bottle: Use a designated side pocket to prevent spills and keep your other items dry.
2. **Front Compartment*
- Pens and pencils: Store in a pen holder or small pouch to prevent them from rolling around.
- USB drives and memory cards: Keep in a zippered pocket or small pouch to prevent loss.
- Earphones or headphones: Coil neatly and store in a small case or pocket to prevent tangling.
3. **Organizer Pocket*
- Keys: Attach to a key clip or place in a designated pocket to prevent them from getting lost.
- Wallet or purse: Keep in a secure zippered pocket for added peace of mind.
- Sunglasses: Store in a soft, protective case to prevent scratches and damage.
4. **Side Pockets*
- Snacks: Keep small snacks like granola bars or trail mix in a side pocket for easy access on the go.
- Hand sanitizer and tissues: Store in a small pouch or pocket for quick and convenient use.
- Umbrella: Use a designated side pocket with a waterproof lining to keep it separate from other items.
With this carefully curated organization system, you'll never waste time searching for misplaced items in your backpack or laptop bag again. Plus, by keeping everything neatly arranged and easily accessible, you'll be able to tackle your day with confidence and efficiency. So go ahead, use our chart to optimize the storage space in your carryall, and experience the joys of effortless organization wherever your adventures take you.
Pumpkin Pie Oreo Balls: A No-Bake Delight!
Indulge your taste buds in the perfect blend of autumn flavors and irresistible sweetness with our easy-to-make Pumpkin Pie Oreo Balls recipe. These delectable treats combine the creamy richness of pumpkin pie with the delightful crunch of Oreo cookies, creating a dessert that's both satisfying and utterly delicious. Best of all, you won't even need to turn on the oven to enjoy these mouthwatering delights!
Ingredients:
- 1 package of Oreo cookies (regular or pumpkin spice flavor)
- 1 cup of pumpkin puree
- 4 ounces of cream cheese, softened
- 1 teaspoon of pumpkin pie spice
- 1/2 cup of powdered sugar
- 1 package of white chocolate melting wafers
- Optional: crushed graham crackers or cinnamon sugar for coating
Instructions:
1. In a food processor, crush the Oreo cookies into fine crumbs. If using pumpkin spice flavored Oreos, you'll enhance the pumpkin pie flavor even more!
2. In a mixing bowl, combine the Oreo crumbs with the pumpkin puree, softened cream cheese, pumpkin pie spice, and powdered sugar. Mix until well combined and smooth.
3. Roll the mixture into small balls, about 1 inch in diameter, and place them on a baking sheet lined with parchment paper.
4. Place the Oreo balls in the refrigerator to chill for about 30 minutes, or until firm.
5. While the Oreo balls are chilling, melt the white chocolate melting wafers according to the package instructions.
6. Using a fork or dipping tool, dip each chilled Oreo ball into the melted white chocolate, coating it evenly. Allow any excess chocolate to drip off before placing the coated balls back on the parchment-lined baking sheet.
7. Optional: Immediately sprinkle the coated Oreo balls with crushed graham crackers or cinnamon sugar for added flavor and decoration.
8. Once all the Oreo balls are coated, return them to the refrigerator to set for another 15-20 minutes, or until the chocolate hardens.
9. Serve and enjoy these irresistible Pumpkin Pie Oreo Balls as a sweet treat for any occasion!
With their creamy pumpkin pie filling and crunchy Oreo exterior, these no-bake delights are sure to become a favorite among family and friends. Whether you're looking for a festive dessert for Thanksgiving or simply craving a taste of fall, these Pumpkin Pie Oreo Balls are guaranteed to satisfy your sweet tooth. Plus, with their simple preparation and no-bake method, they're perfect for busy days when you need a quick and delicious treat. Try making a batch today and experience the irresistible flavor of autumn in every bite!