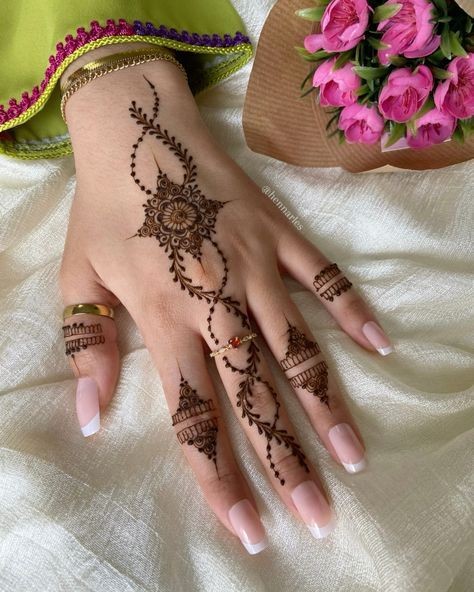
Elegant Simplicity: Beautiful Simple Henna Designs
Henna, also known as mehndi, is a beautiful and ancient form of body art that uses a paste made from the leaves of the henna plant to create intricate designs on the skin. While elaborate henna patterns are stunning, there's a unique charm in the simplicity of minimalist designs. Simple henna designs are perfect for beginners, those who prefer a more understated look, or anyone who wants to enjoy the elegance of henna without spending hours applying it. In this article, we’ll explore various simple henna designs, tips for application, and ideas to inspire your next henna project.
#### The Beauty of Simple Henna Designs
**1. Why Choose Simple Henna Designs?**
Simple henna designs offer a range of benefits:
- **Ease of Application* They are easier and quicker to apply, making them perfect for beginners.
- **Versatility* Simple designs can be worn for any occasion, from casual outings to special events.
- **Elegance* Minimalist designs have a refined, elegant appeal that can complement any outfit.
**2. Popular Simple Henna Patterns**
Simple henna designs often focus on clean lines and basic shapes, creating a look that is both sophisticated and accessible. Here are some popular patterns to consider:
**a. Floral Patterns**
**The Look*
Floral patterns are a classic choice for henna designs. Simple flowers with a few petals, vines, and leaves can create a delicate and feminine look.
**Design Ideas*
- **Single Flower* A single, large flower on the back of the hand or wrist.
- **Daisy Chain* A chain of small daisies wrapping around the wrist or fingers.
- **Vine with Leaves* A flowing vine with leaves trailing across the hand or foot.
**How to Achieve It*
1. Start with a central flower or leaf.
2. Add petals or additional leaves around the central design.
3. Connect the elements with simple lines or vines.
**Pro Tip*
Use a fine-tipped applicator for precise lines and details.
**b. Geometric Patterns**
**The Look*
Geometric patterns offer a modern and clean look. They involve shapes like triangles, squares, and lines, arranged in a balanced and symmetrical manner.
**Design Ideas*
- **Triangle Patterns* Triangles arranged in a repeating pattern.
- **Checkerboard* Small squares in a checkerboard pattern.
- **Lines and Dots* Simple lines with dots for accent.
**How to Achieve It*
1. Plan your design on paper to ensure symmetry.
2. Start with the basic shapes and add details as needed.
3. Keep the lines clean and straight for a polished look.
**Pro Tip*
Geometric designs look best when the shapes are evenly spaced and symmetrical.
**c. Abstract Designs**
**The Look*
Abstract designs are perfect for those who want to experiment with henna. These designs don't follow a specific pattern and allow for creative expression.
**Design Ideas*
- **Swirls and Curls* Freeform swirls and curls across the hand or foot.
- **Dots and Lines* Random placement of dots and lines to create an abstract look.
- **Mix and Match* Combine elements from various designs for a unique creation.
**How to Achieve It*
1. Start with a few basic elements like lines or dots.
2. Add swirls, curls, or other shapes as you go.
3. Let your creativity guide you and don't worry about perfection.
**Pro Tip*
Abstract designs are great for practicing your henna skills and experimenting with new ideas.
**d. Traditional Motifs**
**The Look*
Traditional motifs like paisleys and mandalas can be simplified for an elegant look. These designs maintain the cultural essence of henna while being easy to apply.
**Design Ideas*
- **Simple Paisley* A small paisley with minimal detailing.
- **Mini Mandala* A small mandala on the back of the hand or wrist.
- **Traditional Symbols* Basic shapes inspired by traditional henna art.
**How to Achieve It*
1. Start with the central motif, like a paisley or mandala.
2. Add basic details around the central shape.
3. Keep the design balanced and symmetrical.
**Pro Tip*
Traditional motifs often have deep cultural significance, making them a meaningful choice for your henna design.
#### Tips for Applying Simple Henna Designs
**1. Prepare Your Skin**
Clean and dry the area where you will apply the henna. Avoid applying lotion or oils, as they can prevent the henna from adhering properly.
**2. Use Quality Henna Paste**
Use fresh, natural henna paste for the best results. Store the paste in a cool, dry place and keep it tightly sealed to maintain its potency.
**3. Practice Makes Perfect**
If you're new to henna, practice your design on paper first. This will help you get a feel for the flow and placement of the design.
**4. Keep It Steady**
Use a fine-tipped applicator for precise lines and details. Keep your hand steady to ensure clean lines and a polished look.
**5. Allow Proper Drying Time**
Let the henna paste dry completely before touching or washing the area. This will help the design set and achieve a darker stain.
**6. Enhance the Stain**
For a darker stain, leave the henna paste on for several hours or overnight. You can also apply a mixture of lemon juice and sugar to the dried henna to keep it moist and enhance the color.
#### Conclusion
Simple henna designs offer a beautiful way to enjoy the art of mehndi without the complexity of intricate patterns. Whether you prefer floral motifs, geometric shapes, abstract art, or traditional symbols, there's a simple henna design to suit your style and occasion. By following these tips and exploring different design ideas, you can create elegant and stunning henna patterns that highlight the beauty of simplicity.
---
### Related Articles:
- **Top Henna Trends for 2024: What’s In and What’s Out**
- **DIY Henna: How to Create Your Own Designs at Home**
- **The Cultural Significance of Henna Around the World**
---
### Stay Connected!
Subscribe to our newsletter for more beauty tips, henna inspirations, and exclusive content on the latest trends in body art and fashion.


