Cute Spring Nail Designs: Adorable and Fresh Manicure Ideas
Spring is a season of renewal and freshness, and what better way to embrace it than with a cute and vibrant manicure? From delicate pastels to playful patterns, spring nail designs offer endless possibilities for adding a touch of charm to your look. Here are some adorable and fresh manicure ideas to inspire your next nail appointment or DIY session.
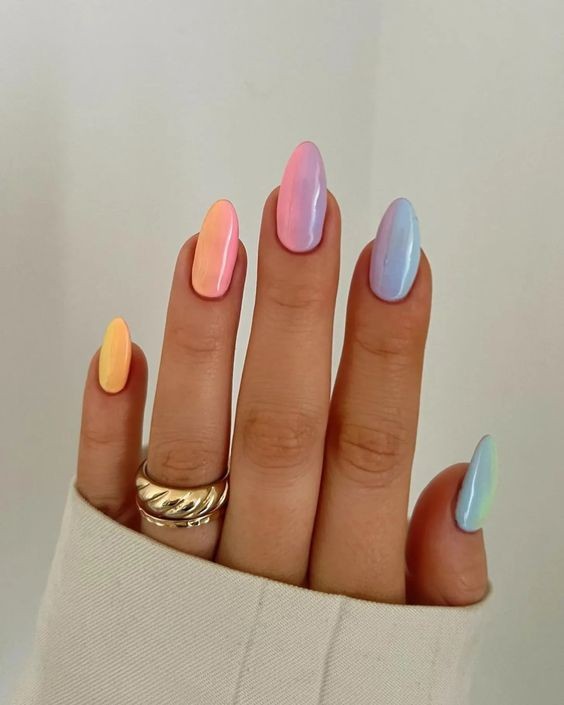
#### 1. **Pastel Rainbow Nails**
**Design**:
A pastel rainbow manicure features soft, delicate colors in a gradient effect. Each nail can be painted a different pastel shade—think mint green, baby blue, lavender, soft pink, and pale yellow.
**How to Achieve It**:
1. **Base Coat**: Apply a base coat to protect your nails and ensure the polish adheres well.
2. **Apply Pastel Colors**: Paint each nail a different pastel color or create a gradient effect on each nail by blending colors from one end to the other.
3. **Top Coat**: Finish with a clear top coat for a glossy finish and to prolong the manicure.
**Why It’s Cute**:
Pastel rainbow nails are fresh, fun, and perfect for spring. They bring a playful yet elegant touch to your overall look.
#### 2. **Floral Nail Art**
**Design**:
Floral nail art is a classic springtime design. Small, delicate flowers in various colors can be painted across the nails, or you can choose a more detailed design with intricate blooms.
**How to Achieve It**:
1. **Base Color**: Start with a neutral or pastel base color.
2. **Paint Flowers**: Use a fine nail brush or dotting tool to create small flowers. You can choose from simple daisies to more complex roses.
3. **Add Details**: Add leaves or additional details to enhance the floral design.
4. **Top Coat**: Apply a top coat to seal the design and add shine.
**Why It’s Cute**:
Floral nails capture the essence of spring and add a touch of nature to your fingertips. They are versatile and can be customized to suit any style or occasion.
#### 3. **Polka Dot Nails**
**Design**:
Polka dot nails are charming and playful, perfect for a fun spring look. You can choose contrasting colors or stick with a monochromatic scheme for a more subtle effect.
**How to Achieve It**:
1. **Base Color**: Apply a base color of your choice.
2. **Create Dots**: Use a dotting tool or a toothpick to place dots of a contrasting color on each nail. You can create a pattern or scatter the dots randomly.
3. **Top Coat**: Finish with a top coat to smooth out the design and add shine.
**Why It’s Cute**:
Polka dots are timeless and easy to achieve, making them a great choice for a spring manicure. They add a playful element to your nails without being too overwhelming.
#### 4. **Striped Nails**
**Design**:
Striped nails can be as simple or complex as you like. Think of thin, colorful stripes or bold, contrasting bands.
**How to Achieve It**:
1. **Base Coat**: Apply a base coat to protect your nails.
2. **Add Stripes**: Use striping tape or a thin brush to create stripes in various colors. You can go for vertical, horizontal, or diagonal stripes depending on your preference.
3. **Finish with a Top Coat**: Seal the design with a top coat for a smooth and glossy finish.
**Why It’s Cute**:
Striped nails are chic and can be customized with various color combinations to suit your style. They offer a clean, modern look that’s perfect for spring.
#### 5. **Butterfly Nail Art**
**Design**:
Butterfly nail art adds a whimsical touch to your spring manicure. You can create butterflies using various colors and patterns, or even opt for a more minimalistic design.
**How to Achieve It**:
1. **Base Color**: Start with a light or neutral base color.
2. **Paint Butterflies**: Use a fine brush to paint small butterfly designs on each nail. You can use bright colors for a vibrant look or soft pastels for a more delicate effect.
3. **Top Coat**: Apply a top coat to protect the design and add shine.
**Why It’s Cute**:
Butterflies symbolize transformation and beauty, making them a perfect choice for spring. They add a whimsical and artistic touch to your manicure.
#### 6. **Fruit-Inspired Nails**
**Design**:
Fruit-inspired nails are colorful and playful, featuring designs like strawberries, lemons, or watermelons.
**How to Achieve It**:
1. **Base Color**: Choose a base color that complements the fruit you want to design.
2. **Paint Fruit Details**: Use a fine brush to paint the fruit designs. For example, you can paint strawberries with green leaves and red seeds, or create lemon slices with bright yellow and green accents.
3. **Top Coat**: Finish with a top coat to protect the artwork and add shine.
**Why It’s Cute**:
Fruit-inspired nails are fun and vibrant, perfect for adding a touch of whimsy to your spring look. They’re ideal for anyone who loves colorful and unique nail designs.
#### 7. **Geometric Patterns**
**Design**:
Geometric patterns can range from simple shapes like triangles and squares to more intricate designs. Use contrasting colors to make the patterns pop.
**How to Achieve It**:
1. **Base Color**: Apply a base color for your nails.
2. **Create Patterns**: Use striping tape or a fine brush to create geometric patterns. Experiment with different shapes and color combinations.
3. **Top Coat**: Seal the design with a top coat for a smooth finish.
**Why It’s Cute**:
Geometric patterns offer a modern and stylish look that can be customized to suit your preferences. They’re perfect for adding a contemporary twist to your spring manicure.
#### 8. **Glitter Accents**
**Design**:
Glitter accents can be added to any manicure for a touch of sparkle. You can choose to add glitter to just a few nails or create a full glittery look.
**How to Achieve It**:
1. **Base Color**: Apply a base color of your choice.
2. **Add Glitter**: Apply glitter polish to the tips of your nails, or use it to create a gradient effect.
3. **Finish with a Top Coat**: Apply a top coat to seal the glitter and add shine.
**Why It’s Cute**:
Glitter adds a fun and festive touch to any manicure. It’s perfect for those who love a bit of sparkle and shine in their nail designs.
#### Tips for Achieving the Perfect Spring Manicure:
- **Use a Base Coat**: A base coat protects your nails and helps the polish adhere better.
- **Apply Thin Coats**: Apply nail polish in thin coats to prevent smudging and ensure a smooth finish.
- **Let Each Layer Dry**: Allow each layer of polish to dry before applying the next to avoid smudges.
- **Finish with a Top Coat**: A top coat adds shine and helps prolong the life of your manicure.
#### Conclusion
Spring is the perfect time to experiment with cute and fresh nail designs that reflect the season's vibrant energy. From pastel rainbows and floral patterns to playful polka dots and sparkling glitter, these manicure ideas offer a variety of ways to celebrate spring. Whether you visit a salon or opt for a DIY approach, these adorable nail designs are sure to brighten up your look and add a touch of seasonal charm to your style.