Watch This Swedish Woman’s Jaw-Dropping Braided Hairstyles and Learn How to Recreate Them Yourself
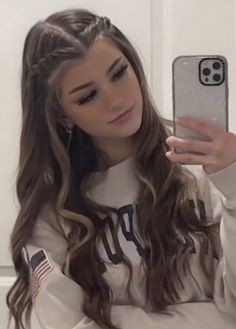
Braided hairstyles are a timeless way to elevate your look, offering both sophistication and versatility. Recently, a Swedish woman has taken the braiding world by storm with her jaw-dropping, intricate braid designs that have captivated audiences worldwide. In this article, we’ll dive into her stunning braided hairstyles and provide step-by-step instructions on how you can recreate these looks yourself. Prepare to be inspired and take your braiding skills to the next level!
---
## **1. The Elegant Crown Braid**
### **Description*
The Elegant Crown Braid is a regal, circular braid that wraps around the head like a halo. This style is perfect for formal events or when you want to feel like royalty.
### **How to Recreate*
1. **Prep Your Hair* Start with clean, dry hair. Add a texturizing spray to give your hair some grip.
2. **Create Two Braids* Part your hair down the middle and braid each side into a simple three-strand braid. Secure with hair ties.
3. **Pin the Braids* Position the braids around your head, crossing them at the back to form a crown. Secure with bobby pins.
4. **Finish the Look* Tuck any loose ends and use a light hairspray to hold everything in place.
## **2. The Fishtail Braid Updo**
### **Description*
The Fishtail Braid Updo combines the intricate texture of fishtail braids with an elegant updo, creating a sophisticated yet playful hairstyle.
### **How to Recreate*
1. **Start with a High Ponytail* Gather your hair into a high ponytail and secure it with an elastic band.
2. **Create a Fishtail Braid* Divide the ponytail into two sections and start the fishtail braid by crossing small sections from each side over the middle. Braid all the way down and secure with a small elastic.
3. **Form the Updo* Twist the braided ponytail into a bun and pin it in place. Use bobby pins to secure any loose strands.
4. **Add Texture* Gently tug on the braid to create a fuller, more textured appearance. Finish with hairspray.
## **3. The Dutch Braid Ponytail**
### **Description*
The Dutch Braid Ponytail features a striking braid that sits on top of the hair, blending seamlessly into a sleek ponytail.
### **How to Recreate*
1. **Part and Braid* Start by parting your hair on one side. Create a Dutch braid (braiding under rather than over) starting from the front and working towards the back of your head.
2. **Secure the Braid* Once you reach the nape of your neck, gather the remaining hair into a ponytail and secure with an elastic.
3. **Blend and Finish* Gently pull on the sides of the braid to add volume and integrate it into the ponytail. Wrap a small section of hair around the elastic to conceal it and finish with hairspray.
## **4. The Waterfall Braid**
### **Description*
The Waterfall Braid is a romantic and flowing style where sections of hair cascade freely while the braid is being formed.
### **How to Recreate*
1. **Section Your Hair* Create a loose side part and separate a small section of hair from the front.
2. **Start Braiding* Begin a simple three-strand braid, but let one section of hair drop each time you cross it over. Incorporate new sections of hair as you continue.
3. **Secure the Braid* As you reach the back of your head, secure the braid with a bobby pin and let the remaining hair fall naturally.
4. **Add Volume* Gently pull on the braid to enhance the waterfall effect and finish with a light hairspray.
## **5. The Double Dutch Braids**
### **Description*
Double Dutch Braids are a fun and youthful style that involves two symmetrical braids that stand out due to their three-dimensional appearance.
### **How to Recreate*
1. **Part Your Hair* Divide your hair down the middle into two equal sections.
2. **Braid Each Side* Create a Dutch braid on each side by braiding under rather than over. Begin near the hairline and work your way back.
3. **Secure the Braids* Once the braids reach the nape of your neck, secure them with elastics.
4. **Finish and Style* Adjust the braids as needed to ensure they’re even and secure. You can also add accessories like beads or colorful elastics for a playful touch.
## **6. The Braided Bun**
### **Description*
The Braided Bun combines braids and a bun for a sophisticated and elegant updo that’s perfect for any special occasion.
### **How to Recreate*
1. **Create a Braid* Start by braiding a section of hair from the top of your head to the ends. Secure the braid with an elastic.
2. **Form the Bun* Twist the braid around itself to create a bun shape. Secure the bun with bobby pins.
3. **Pin the Braid* If you have additional braids or sections, pin them around the bun to create a fuller look.
4. **Finish with Hairspray* Use hairspray to keep everything in place and add a touch of shine.
## **7. The Halo Braid with Loose Waves**
### **Description*
The Halo Braid with Loose Waves offers a dreamy, bohemian look by combining a braided crown with soft, wavy hair.
### **How to Recreate*
1. **Create the Braid* Begin by braiding a section of hair around your head to form a halo. Secure with bobby pins.
2. **Add Loose Waves* Use a curling iron to create soft waves in the remaining hair. Make sure the waves are loose and relaxed.
3. **Combine the Styles* Let the waves fall freely around the braided halo for a romantic look.
4. **Finish with Texturizing Spray* Use a texturizing spray to enhance the waves and add volume.
## **8. The Side-Swept Braid**
### **Description*
The Side-Swept Braid is a sleek and stylish option where the braid is draped over one shoulder for an elegant and casual look.
### **How to Recreate*
1. **Part Your Hair* Create a deep side part and gather the larger section of hair to start braiding.
2. **Braid to the Side* Begin a simple three-strand braid and sweep it over your shoulder. Continue braiding until you reach the ends and secure with an elastic.
3. **Adjust and Pin* Tuck any loose sections of hair behind your ear and pin them in place.
4. **Finish with Hairspray* Use a light hairspray to keep the braid in place and smooth any flyaways.
## **9. The Braided Mohawk**
### **Description*
The Braided Mohawk is an edgy style featuring a braid that runs down the center of the head, with the sides slicked back.
### **How to Recreate*
1. **Create the Mohawk Braid* Start by braiding a section of hair from the front of your head to the back, creating a central braid.
2. **Slick Back the Sides* Use a comb and gel to slick the sides of your hair back, creating a clean, dramatic contrast.
3. **Pin the Braid* Secure the braid in place with bobby pins or small elastics.
4. **Finish with Hairspray* Apply hairspray to keep the sides sleek and the braid secure.
## **10. The Braided Half-Up Bun**
### **Description*
The Braided Half-Up Bun combines the elegance of a braided top section with the casual charm of a half-up bun.
### **How to Recreate*
1. **Create the Braid* Braid the top section of your hair from ear to ear and secure it with an elastic.
2. **Form the Bun* Gather the remaining hair into a half-up bun and secure it with bobby pins.
3. **Combine the Styles* Pin the braided section over the bun to hide the elastic and create a seamless look.
4. **Finish with Texturizing Spray* Use a texturizing spray to add volume and hold.
---
### **Conclusion**
These jaw-dropping braided hairstyles from the Swedish woman offer a range of stunning looks that are perfect for any occasion. Whether you’re preparing for a special event or just want to enhance your everyday style, these braids provide a sophisticated and creative way to express yourself. Follow these step-by-step instructions to recreate these styles and unlock your best hair yet. Embrace the artistry of braiding and prepare to turn heads with your beautiful, intricately styled hair!
