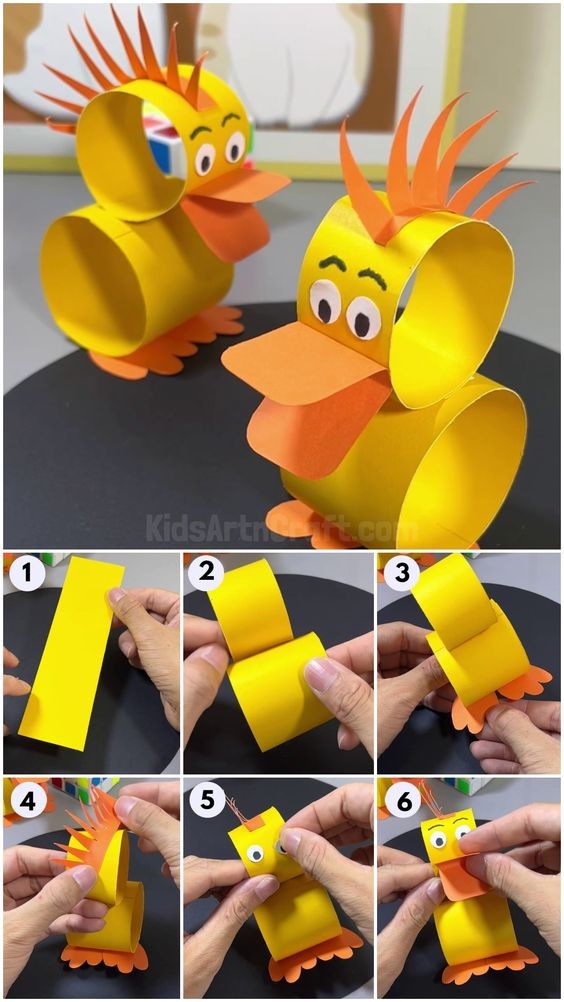
How to Craft an Adorable Paper Duck Toy: Easy Step-by-Step Guide
Creating a paper duck toy is a fun and simple craft project that’s perfect for kids and adults alike. This adorable paper duck can be made using basic materials and easy techniques, making it a great way to spend time together and create a charming toy. Follow this easy step-by-step guide to craft your very own paper duck toy!
#### **Materials Needed**
- Colored construction paper (yellow for the duck, orange for the beak and feet)
- Scissors
- Glue stick or liquid glue
- Black marker or crayon
- Pencil
- Ruler (optional)
#### **Step 1: Prepare the Paper**
Start by selecting your colored construction paper. You’ll need yellow paper for the body of the duck, orange paper for the beak and feet, and black paper if you want to add a detail like eyes. If you don’t have black paper, a black marker will work just fine.
1. **Cut a Yellow Circle**: Use the yellow construction paper to cut out a large circle. This will be the body of the duck. Aim for a circle that's about 6 inches in diameter.
2. **Cut an Orange Triangle**: Cut a small triangle from the orange paper. This will become the duck's beak.
3. **Cut Orange Feet**: Cut out two small ovals or heart shapes from the orange paper for the duck's feet.
#### **Step 2: Assemble the Duck’s Face**
1. **Glue on the Beak**: Position the orange triangle in the center of the yellow circle and glue it in place. The pointy end should be facing downward to create the duck’s beak.
2. **Add Eyes**: If using black paper, cut out two small circles and glue them above the beak to make the eyes. If you don’t have black paper, use a black marker to draw the eyes directly on the yellow circle.
#### **Step 3: Create the Duck’s Wings**
1. **Cut Wing Shapes**: From the yellow paper, cut out two wing shapes. These can be simple ovals or teardrop shapes.
2. **Attach the Wings**: Glue the wings to each side of the yellow circle. Place them slightly below the top edge of the circle so that they stick out a bit.
#### **Step 4: Add the Feet**
1. **Attach the Feet**: Glue the orange feet to the bottom of the yellow circle. Position them so that they’re evenly spaced and sticking out slightly to give the duck a balanced look.
#### **Step 5: Final Touches**
1. **Add Details**: Use the black marker or crayon to add any additional details you like, such as lines on the wings or a small smile on the beak.
2. **Let Dry**: Allow the glue to dry completely before handling your paper duck toy.
#### **Tips for Success**
- **Paper Choices**: If you don’t have colored construction paper, you can use any colored paper and color it yourself.
- **Add Texture**: For a more textured look, use different types of paper such as patterned paper or add extra details like feathers made from tissue paper.
- **Personalize**: Encourage kids to get creative by adding accessories like little hats or bows.
#### **Conclusion**
Crafting a paper duck toy is a delightful and straightforward activity that can bring out the creativity in both kids and adults. By following this easy step-by-step guide, you can create a charming and fun paper duck that’s perfect for playtime or as a cute decoration. Gather your materials, get crafting, and enjoy making your adorable paper duck toy!
**Hashtags**: #paperduckcraft #easydiy #kidscrafts #funwithpaper #creativeprojects #craftingfun #papertoys #stepbystepguide #diyforkids #handmadetoys


