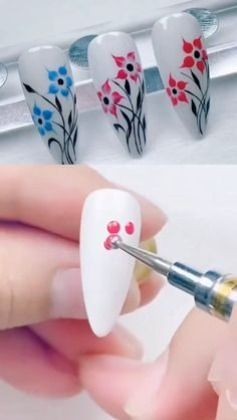
Bloomy Nail Design for a Fresh and Vibrant Look
Bloomy nail designs are perfect for adding a touch of freshness and vibrancy to your manicure. This design features lively floral patterns that brighten up your nails and are ideal for any season. Whether you’re preparing for a special occasion or just want to revamp your everyday look, a bloom-inspired manicure can bring a burst of color and cheer. Here’s how you can achieve this fresh and vibrant look at home, along with some inspiring design ideas.
#### **Materials Needed**
- Base coat
- Nail polishes in bright and pastel colors
- Thin nail art brush or dotting tool
- Nail tape (optional)
- Top coat
- Nail polish remover and cotton swabs (for clean-up)
#### **1. Classic Bloomy Floral Design**
**Instructions**:
1. **Prepare Your Nails**: Start with a clean, trimmed nail surface. Apply a base coat to protect your nails and enhance polish longevity.
2. **Apply Base Color**: Choose a light or neutral base color (such as pale pink or soft beige) and apply two coats. Allow it to dry completely.
3. **Create Bloomy Flowers**: Use a thin nail art brush or dotting tool to paint small flowers in vibrant colors (e.g., bright pink, sunny yellow, or coral). Arrange the flowers randomly across your nails or in a specific pattern.
4. **Finish with Top Coat**: Apply a top coat to seal your design and add a glossy finish.
#### **2. Bloomy Gradient Nail Design**
**Instructions**:
1. **Base Coat**: Apply a base coat and choose a light pastel color for your nails.
2. **Create Gradient Effect**: Use a makeup sponge to blend two or more colors (e.g., soft pink fading into a vibrant orange) for a gradient effect. Apply the gradient from the base of the nail to the tip.
3. **Add Floral Accents**: Once the gradient is dry, paint small, delicate flowers in contrasting colors over the gradient.
4. **Seal Your Design**: Apply a top coat to protect and shine.
#### **3. Bloomy French Tips**
**Instructions**:
1. **Base Color**: Paint your nails with a neutral or light pink base coat.
2. **Add Bloomy Tips**: Use nail tape to outline the tips of your nails. Paint the tips with a bright, floral color (e.g., bold red or magenta).
3. **Add Flower Details**: Once the tips are dry, use a thin brush to add small flowers or leaves along the tips.
4. **Top Coat**: Apply a top coat to protect your design and add a glossy finish.
#### **4. Bloomy Patterned Nails**
**Instructions**:
1. **Base Coat**: Start with a base coat and apply a light or pastel color as your base.
2. **Create Patterns**: Use nail art tools to create various flower patterns (e.g., daisies, roses) in different colors across your nails.
3. **Add Details**: Incorporate small dots, leaves, or accents to enhance the floral patterns.
4. **Seal with Top Coat**: Apply a top coat to ensure your design lasts and shines.
#### **5. Bloomy Water Marble**
**Instructions**:
1. **Prepare Base**: Apply a base coat and paint your nails with a light color.
2. **Create Water Marble**: Drop various nail polish colors into a cup of water and use a toothpick to swirl the colors. Dip your nails into the water to transfer the marble pattern.
3. **Add Floral Details**: Once the marble design is dry, use a thin brush to paint small flowers or add accents.
4. **Top Coat**: Finish with a top coat to protect the design and add shine.
#### **6. Bloomy Stamping Nails**
**Instructions**:
1. **Base Color**: Apply a base coat and paint your nails with a neutral or pastel color.
2. **Use Stamping Plate**: Select a floral stamping plate and apply a contrasting color (e.g., white or metallic) to the design. Use a stamping tool to transfer the floral pattern onto your nails.
3. **Finish**: Apply a top coat to protect and enhance the stamped design.
#### **7. Bloomy 3D Nail Art**
**Instructions**:
1. **Base Color**: Apply a base coat and paint your nails with a light color.
2. **Create 3D Flowers**: Use nail art clay or 3D nail stickers to add raised floral elements to your nails.
3. **Add Accents**: Incorporate small gems or glitter for extra sparkle.
4. **Seal with Top Coat**: Apply a top coat to ensure your 3D elements stay in place and to give a polished finish.
#### **Conclusion**
Bloomy nail designs are a fantastic way to infuse freshness and vibrancy into your manicure. From classic floral patterns to vibrant gradients and intricate 3D art, there are endless possibilities to explore. Experiment with different colors, techniques, and patterns to create a bloom-inspired look that’s uniquely yours. Enjoy the cheerful and stylish effect of your fresh and vibrant bloomy nails!
**Hashtags**: #bloomynaildesign #floralnailart #naildesignideas #freshnails #vibrantnailart #diynailart #nailarttrends #manicuredesign #nailinspiration #flowernails


