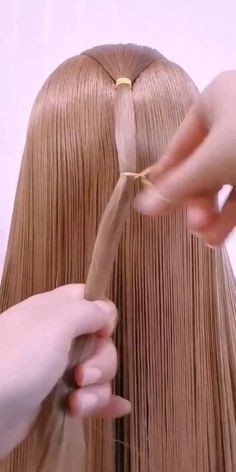
Braided Hairstyles for Long Hair: A Step-by-Step Tutorial
Long hair offers endless possibilities when it comes to braiding. From intricate designs to simple yet elegant styles, braids can transform your look for any occasion. Whether you’re preparing for a special event or just want to change up your daily routine, braided hairstyles are versatile and stylish. This step-by-step guide will walk you through some popular braided hairstyles, ensuring you master these techniques with ease.
1. Classic Three-Strand Braid
What You’ll Need:
Brush or comb
Hair tie
Optional: texturizing spray
Instructions:
Prep Your Hair: Start with clean, dry hair. Brush through to remove any tangles. For added texture, you can use a texturizing spray.
Divide Your Hair: Gather all your hair into a loose ponytail. Split it into three equal sections.
Begin Braiding: Cross the right section over the middle section. Then cross the left section over the new middle section. Continue this pattern, alternating sides.
Secure the End: Once you reach the end of your hair, secure the braid with a hair tie.
Adjust: Gently pull on the sides of the braid to loosen it if you prefer a more relaxed look.
2. Fishtail Braid
What You’ll Need:
Brush or comb
Hair tie
Instructions:
Prep Your Hair: Brush your hair to ensure it’s smooth and free of knots.
Divide Your Hair: Split your hair into two equal sections.
Start Braiding: Take a small piece of hair from the outer edge of the left section and cross it over to the right section. Repeat this process on the right side, crossing a small piece of hair over to the left section.
Continue: Keep alternating small sections from each side until you reach the end of your hair.
Secure the End: Use a hair tie to secure the braid.
Finishing Touch: Gently pull at the braid to make it fuller and more voluminous.
3. Dutch Braid
What You’ll Need:
Brush or comb
Hair tie
Instructions:
Prep Your Hair: Start with brushed hair.
Divide Your Hair: Take a section of hair from the top of your head and divide it into three equal parts.
Begin Braiding: Cross the right section under the middle section. Then cross the left section under the new middle section. Continue this pattern, adding more hair from the sides as you braid.
Secure the End: When you reach the end, secure with a hair tie.
Adjust: Gently tug on the braid to make it stand out more.
4. French Braid
What You’ll Need:
Brush or comb
Hair tie
Instructions:
Prep Your Hair: Brush your hair thoroughly.
Divide Your Hair: Start with a small section of hair at the top center of your head, dividing it into three equal parts.
Start Braiding: Cross the right section over the middle section. Then cross the left section over the new middle section.
Add More Hair: As you braid, add small sections of hair from the sides into the braid. Continue this pattern until you reach the end of your hair.
Secure the End: Use a hair tie to hold the braid in place.
Adjust: For a fuller look, gently pull at the braid.
5. Waterfall Braid
What You’ll Need:
Brush or comb
Hair tie (optional)
Instructions:
Prep Your Hair: Brush your hair to remove any tangles.
Start Braiding: Begin by taking a small section of hair from one side of your head and divide it into three parts.
Begin the Braid: Start a traditional braid but drop the bottom strand instead of crossing it over. Replace it with a new section of hair from above.
Continue: Keep dropping the bottom section and adding new hair as you braid down the length of your hair.
Finish: Secure the end with a hair tie or bobby pins if necessary.
6. Crown Braid
What You’ll Need:
Brush or comb
Hair tie
Bobby pins
Instructions:
Prep Your Hair: Brush your hair to make it smooth.
Divide Your Hair: Create a part down the middle of your head.
Start Braiding: Begin with a small section of hair near one ear and start a Dutch braid. Continue braiding along your hairline towards the back of your head.
Continue to the Other Side: When you reach the middle, continue braiding on the other side, creating a halo effect.
Secure the Braid: Use bobby pins to secure the ends of the braid underneath your hair, ensuring a seamless look.
7. Boxer Braids
What You’ll Need:
Brush or comb
Hair ties
Instructions:
Prep Your Hair: Brush your hair to remove tangles.
Divide Your Hair: Part your hair down the middle into two equal sections.
Start Braiding: Begin a Dutch braid on one side, adding sections of hair as you braid. Secure the end with a hair tie.
Repeat on the Other Side: Create a similar braid on the opposite side.
Adjust: For a more relaxed look, gently tug on the braids to make them fuller.
Conclusion
Braided hairstyles are a fantastic way to showcase your creativity and style. From classic braids to intricate designs like the crown braid, there’s a braid for every occasion. With practice, these braiding techniques will become second nature, allowing you to experiment with different looks and find your personal favorite. Don’t be afraid to add accessories like flowers or jewels to enhance your braids further. Happy braiding!