Mastering the Art of Different Hairstyles: A Comprehensive Drawing Tutorial
Drawing hairstyles can be both a fun and challenging aspect of creating portraits. Whether you're sketching characters for a comic, designing avatars, or just honing your artistic skills, understanding how to depict various hairstyles can greatly enhance your artwork. This tutorial will guide you through different hairstyles and provide techniques to draw them effectively. Let’s dive into the world of hair and unleash your creativity!
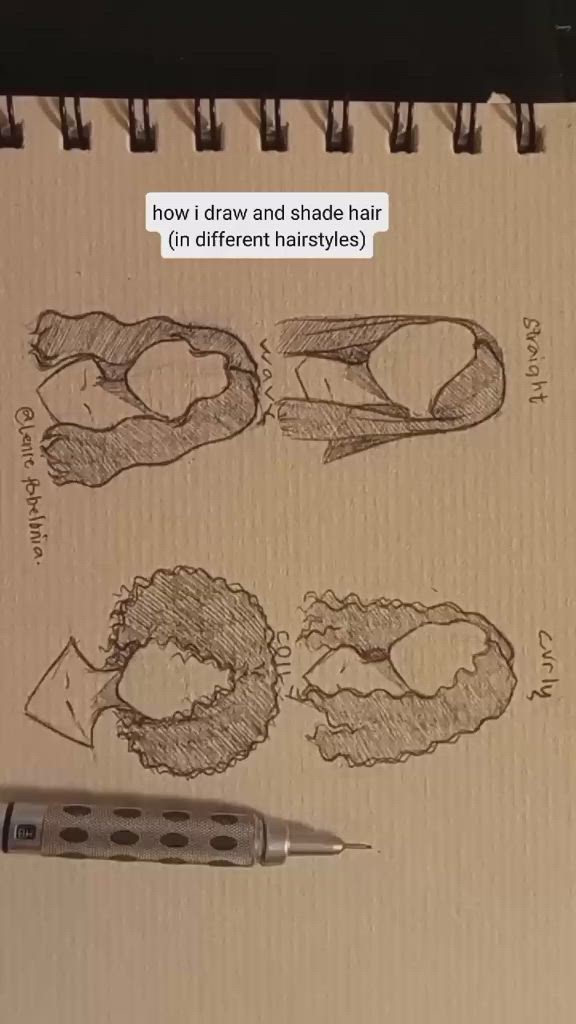
Understanding Hair Structure
Before diving into specific hairstyles, it's essential to understand the basic structure of hair. Hair is not just a mass of strands but has its own flow, volume, and texture. Here’s a quick breakdown:
Hair Follicles and Growth: Hair grows from follicles on the scalp, and its natural flow depends on these growth patterns.
Hair Strands: Each strand has thickness and can vary from fine to coarse.
Volume and Shape: Hair can be straight, wavy, curly, or coiled, and it often has natural volume and bounce.
Basic Drawing Techniques
Outline the Shape: Start by sketching the general shape of the hairstyle. This includes the overall volume and flow.
Add Hair Strands: Draw individual strands or clumps of hair following the natural direction and growth patterns.
Use Layers: Build up layers of hair to create depth and dimension. This approach helps in achieving a realistic look.
Shading and Highlights: Add shading to give hair texture and volume. Highlights can be used to show light reflecting off the hair.
Drawing Different Hairstyles
1. Straight Hair
Straight hair typically has a smooth and sleek appearance. Here's how to draw it:
Step 1: Draw a smooth outline that follows the natural flow of straight hair.
Step 2: Add vertical lines to indicate individual strands.
Step 3: Shade lightly to give the hair a glossy finish.
2. Wavy Hair
Wavy hair has a more dynamic flow with gentle curves. To draw wavy hair:
Step 1: Sketch the basic shape with flowing curves.
Step 2: Use S-shaped lines to create the waves.
Step 3: Add layers and shadows to emphasize the movement and texture.
3. Curly Hair
Curly hair has tight, bouncy curls. Follow these steps:
Step 1: Draw the overall shape with lots of volume.
Step 2: Create small, spiral shapes to represent the curls.
Step 3: Use shading to give the curls depth and dimension.
4. Braids
Braids can add intricate detail to your drawings. Here’s a simple method:
Step 1: Draw the basic shape of the braid, usually a central section with interwoven strands.
Step 2: Sketch the braid pattern by drawing overlapping sections.
Step 3: Add shading to show the braided texture.
5. Updos
Updos can vary greatly, from buns to twists. For a classic bun:
Step 1: Sketch the general shape of the bun, usually a rounded form.
Step 2: Add strands or twists around the bun to show texture.
Step 3: Shade to give the bun depth and highlight its round shape.
Tips for Improving Your Hair Drawings
Study Real Hair: Observe real hairstyles to understand their natural flow and texture.
Practice Different Textures: Experiment with various hair types to improve your versatility.
Use References: Look at photographs or drawings for inspiration and accuracy.
Experiment with Styles: Don’t be afraid to try new hairstyles and techniques.
Conclusion
Drawing different hairstyles can be a rewarding challenge that adds a new dimension to your artwork. By understanding hair structure, practicing different techniques, and experimenting with various styles, you can enhance your artistic skills and bring your characters to life. Keep practicing, stay inspired, and have fun with your hair illustrations!