## Twist and Shine: Achieve Effortless Elegance with These Stunning Bun Ideas!
The bun is a timeless hairstyle known for its versatility and elegance. Whether you’re preparing for a special occasion or simply want to elevate your everyday look, a well-crafted bun can make all the difference. With a variety of techniques and styles to choose from, achieving an effortlessly elegant bun has never been easier. In this comprehensive guide, we’ll explore various bun ideas, tips for perfecting your twist, and how to achieve that radiant shine. Prepare to be inspired and discover how to master these stunning bun hairstyles!
### **1. The Classic High Bun**
The high bun is a sophisticated choice that works for any occasion, from formal events to casual outings. This style is perfect for showcasing your face and neck while adding a touch of polish.
**How to Create the Classic High Bun*
1. **Start with Clean, Dry Hair* Brush your hair to remove any tangles. For added volume, you can use a texturizing spray or dry shampoo.
2. **Gather Your Hair* Pull your hair up into a high ponytail at the top of your head. Secure it with an elastic band.
3. **Create the Bun* Twist the ponytail around the base and secure it with bobby pins. You can also use a hair donut for a fuller, more structured bun.
4. **Smooth and Secure* Use a smoothing brush or comb to neaten any loose strands. Finish with a strong-hold hairspray to keep your bun in place.
**Tips* For a sleek finish, use a hair gel or pomade before twisting. If you prefer a softer look, allow a few wisps to fall around your face.
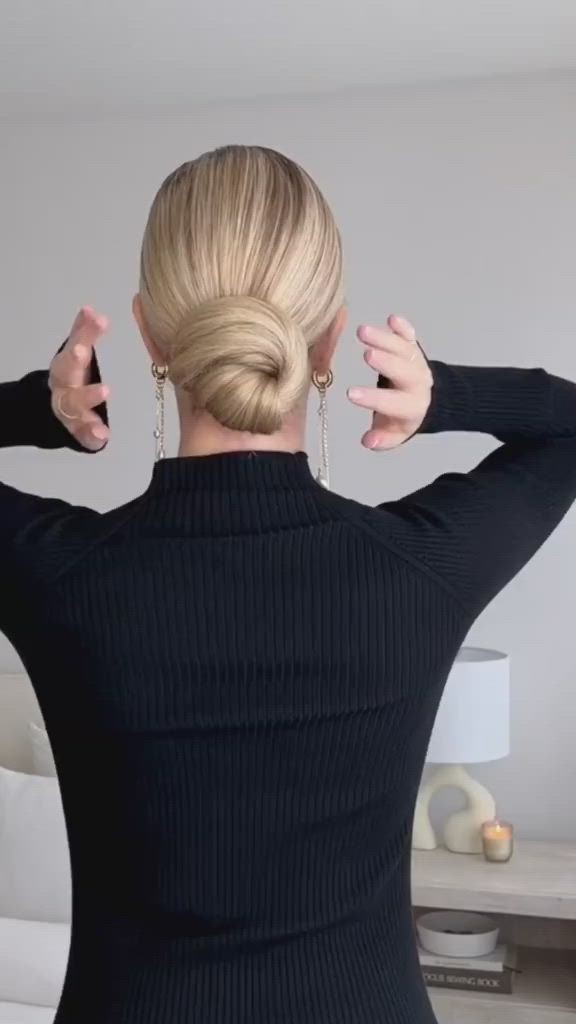
### **2. The Low Chignon**
The low chignon is an elegant, understated style that’s perfect for formal events or everyday wear. It exudes classic sophistication and works well with various hair textures.
**How to Create the Low Chignon*
1. **Prepare Your Hair* Start with slightly damp hair or use a texturizing spray for grip. Brush your hair back and create a low ponytail at the nape of your neck.
2. **Form the Chignon* Twist the ponytail into a coil and tuck it under itself, securing it with bobby pins. For added volume, gently pull at the edges of the bun to create a fuller appearance.
3. **Smooth and Finish* Use a comb to smooth down any flyaways. Apply a light-hold hairspray to keep your chignon secure.
**Tips* Add a decorative hairpin or comb for a touch of glamour. This style is also great for showcasing statement earrings.
### **3. The Messy Bun**
The messy bun is ideal for a relaxed, casual look. It’s perfect for days when you want a stylish yet effortless appearance.
**How to Create the Messy Bun*
1. **Prep Your Hair* For added texture, use a texturizing spray or dry shampoo. Create a loose ponytail and secure it with an elastic band.
2. **Form the Bun* Twist the ponytail loosely and wrap it around the base. Secure with bobby pins, allowing some strands to fall naturally.
3. **Adjust for Volume* Gently pull apart sections of the bun to achieve a messy, relaxed look. Finish with a light-hold hairspray.
**Tips* For a more defined messy bun, create loose waves in your hair before styling. This adds texture and volume.
### **4. The Twisted Bun**
The twisted bun adds a touch of sophistication with its elegant twists and turns. It’s a great choice for special occasions or when you want to stand out.
**How to Create the Twisted Bun*
1. **Start with a Ponytail* Gather your hair into a ponytail at your desired height. Secure with an elastic band.
2. **Twist and Wrap* Divide the ponytail into two sections. Twist each section and wrap them around each other. Continue wrapping around the base to form the bun.
3. **Secure and Smooth* Use bobby pins to secure the twisted bun in place. Smooth any loose strands with a comb and finish with hairspray.
**Tips* Add a decorative accessory, such as a jeweled hairpin or a ribbon, to enhance the elegance of your twisted bun.
### **5. The Braided Bun**
The braided bun combines intricate braiding with a classic bun for a stunning, elegant look. This style works well for both casual and formal occasions.
**How to Create the Braided Bun*
1. **Braid Your Hair* Start by creating a braid from your ponytail or from sections of your hair. Secure the end of the braid with an elastic band.
2. **Form the Bun* Wrap the braid around the base of your ponytail or bun. Secure with bobby pins, tucking the end of the braid underneath.
3. **Smooth and Finish* Adjust the bun for evenness and smooth down any stray hairs with a comb. Apply hairspray for hold.
**Tips* Experiment with different types of braids (e.g., fishtail, Dutch) for unique variations. Adding small hair accessories can also enhance the look.
### **6. The Faux Bob**
The faux bob is a chic way to achieve the look of a bob without cutting your hair. It’s a perfect choice for a sophisticated, vintage-inspired look.
**How to Create the Faux Bob*
1. **Curl Your Hair* For added volume, curl your hair with a curling iron or hot rollers.
2. **Create the Faux Bob* Roll up the bottom sections of your hair and secure them with bobby pins. Tuck the ends under and pin them in place, creating the illusion of a shorter bob.
3. **Smooth and Secure* Use a comb to smooth the top layers and finish with a light-hold hairspray.
**Tips* For a more polished look, use a flat iron to smooth out the curls and ensure the faux bob is even and seamless.
### **7. The Top Knot**
The top knot is a trendy, stylish option that’s perfect for both casual and dressy occasions. It’s easy to create and looks effortlessly chic.
**How to Create the Top Knot*
1. **Gather Your Hair* Pull your hair into a high ponytail. Secure with an elastic band.
2. **Form the Knot* Twist the ponytail and wrap it around the base to form a knot. Secure with bobby pins, adjusting the knot to your desired fullness.
3. **Smooth and Finish* Smooth any loose strands and finish with hairspray.
**Tips* For added texture, use a sea salt spray before styling. This enhances the look of the top knot and adds a relaxed, beachy vibe.
### **8. The Side Bun**
The side bun offers a romantic and elegant twist on the traditional bun, positioned low and to the side. It’s perfect for a graceful, sophisticated appearance.
**How to Create the Side Bun*
1. **Create a Side Ponytail* Gather your hair to one side and secure with an elastic band.
2. **Form the Bun* Twist the ponytail into a bun and secure with bobby pins. Adjust the bun to your desired fullness and position.
3. **Smooth and Finish* Smooth any flyaways with a comb and finish with hairspray.
**Tips* Add a decorative comb or clip for a touch of glamour. This style works well with soft waves or curls for a romantic look.
### **Tips for Perfecting Your Bun**
- **Use Quality Hair Products* Invest in good-quality hair products to keep your hair healthy and shiny. Shampoos, conditioners, and styling products that suit your hair type are essential.
- **Practice and Patience* Achieving the perfect bun may take some practice. Be patient and experiment with different techniques to find what works best for you.
- **Regular Hair Care* Maintain healthy hair with regular trims, deep conditioning treatments, and a balanced diet to ensure your buns always look their best.
### **Conclusion**
Mastering the art of the bun is about more than just the technique—it’s about finding the style that makes you feel confident and elegant. From classic high buns to intricate braided styles, the options are endless. With the right tools, techniques, and a little practice, you can achieve a stunning bun that adds a touch of sophistication to any look. Embrace the twist and shine of these beautiful bun ideas and enjoy the effortless elegance they bring to your daily routine.