Heat tape is a cost-effective and timesaving way to protect PEX pipe from freezing in winter and any potential leaks, making it a popular choice among mobile homeowners as it protects against potential freeze-thaw damage and possible leakage.
Homeowners frequently ask if it's safe to use heat tape on plastic water lines. While the answer is yes, proper installation methods must be followed to minimize potential damages.
Installing heat tape can protect PEX pipes from freezing in cold weather and bursting, potentially leading to costly property damage and energy savings. Plus, heat tape offers great energy cost-cutting potential.
Correct installation is crucial to avoiding water damage. This article will walk you through the steps involved in setting up self-regulating heat tape on PEX pipes.
Moreover, if you use PEX piping, freezing may be a source of concern during winter months. One way to mitigate this issue is with heat tape installation.
Though it is possible to install heat tape yourself, professional help should always be sought to ensure proper installation of heat tape on a PEX pipe. Follow these steps to install heat tape:
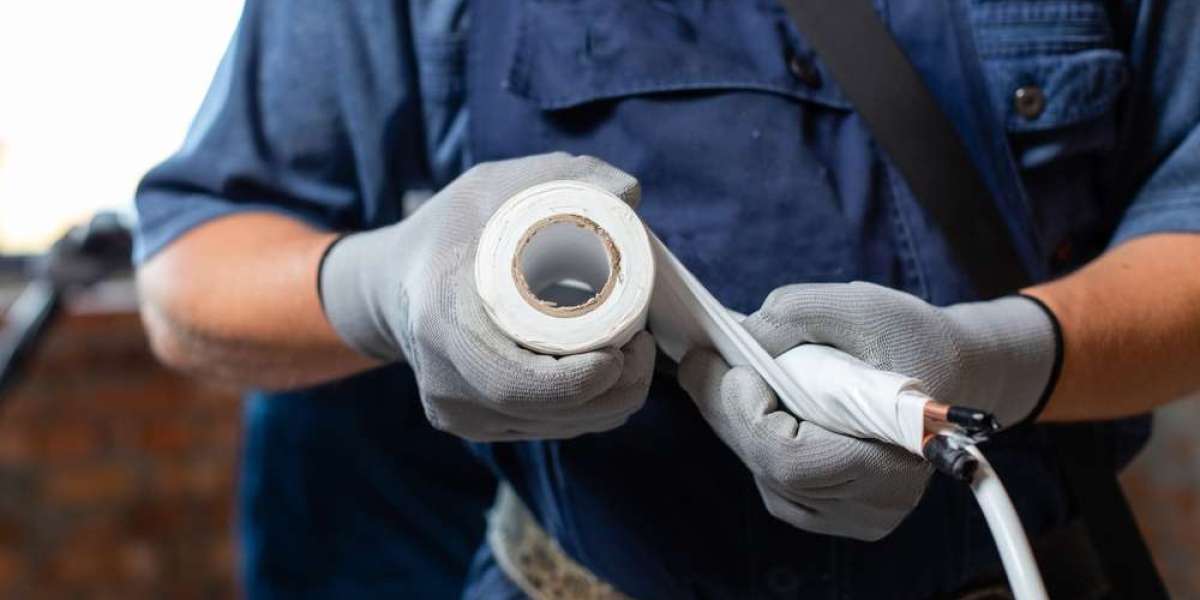
Choose The Right Tape
There are various kinds of tape available on the market, each designed for specific tasks or situations. Selecting an inappropriate variety could cause significant problems and become an unsafe situation; the use of inappropriate tape can even leave hard-to-remove residue behind on surfaces.
First and foremost, in selecting an ideal tape understand what your project requires of it - such as what purpose the tape will serve and any environmental considerations it must withstand. For instance, painter's tape was specifically created to adhere to surfaces while masking off painting jobs and providing clean edges; using it in other projects would be like wearing dress shoes for running outside!
Duct tape stands out as one of the more versatile products among tape products, offering powerful permanent bonding properties and being oil-resistant, waterproof, and oil-proof - making it an excellent solution for emergency repairs and watertight seals. However, its lack of electrical insulation properties disqualifies it for electrical applications.
Other considerations when selecting the appropriate tape include adhesion, tensile strength, and surface material. Adhesion refers to how well the tape adheres to a surface; tensile strength measures its ability to withstand stress before breaking.
Surface material matters because not all tapes adhere to all materials equally well - some designs work better on rougher surfaces while others provide smooth adhesive that adheres well on flat surfaces.
Prepare The Pipe
Installing heat tape on pex pipe can save both time and money when winter-proofing your home or professional plumbing business; clogs can be avoided, leakage reduced and the integrity of water pipes maintained if installed properly; however, selecting the appropriate heat tape and installing it correctly could result in serious plumbing damage to either home or business.
Before installing pex pipe heat tape, first ensure it is clean and dry. Dirt or moisture may prevent the tape from adhering properly to the pipe. Also, ensure the location for heat tape installation does not overlap any buried electrical wiring or appliances.
After measuring and cutting to length, use a sharp knife or scissors to secure any heat tape necessary for use on pipes that will require them. Allow for overlap by adding extra inches. Upon completion of your task, be sure to dispose of any leftover tape according to local laws and regulations.
To install the tape, start from one end of the pipe and work your way around, overlapping each layer by half an inch. Beware not to cross back over itself as this could create a fire hazard; additionally, it's wise not to touch the tape with any metal objects as this could damage both insulation and wires underneath it.
Once your tape is in place, plug it into an electrical outlet or power strip and it will immediately begin warming your pipe and helping prevent freezing during winter months. Be sure to inspect it regularly throughout winter months for wear-and-tear issues such as cuts, charring, animal chew marks, or fraying wires before replacing them if any appear.
Mobile and manufactured homes require extra consideration when selecting heat tapes, as many utilize older rigid plastic pipes that are thinner and less capable of withstanding low temperatures than more modern PEX pipes. To make sure that your heat tape works as intended, be sure to purchase one specially tailored to this type of plumbing.
Homeowners commonly worry about freezing pipes in their homes. Frozen pipes can cause extensive damage that's costly to repair; to reduce this risk proper insulation must be utilized; an effective method is installing heat tape to wrap around vulnerable pipes that use electricity as its power source to generate heat to keep it from freezing over.
Cut The Tape to Length
Heat tape for pipes provides an easy and cost-effective solution against freezing weather that could damage underground insulated pipe systems and lead to costly repairs. By using just basic tools and supplies, installing heat tape on pex pipe for protection in even the coldest climates is quick and straightforward.
Before beginning, be sure to thoroughly clean and dry the pipe so it can hold heat tape securely. In particular, make sure the section where you plan on applying the tape is clean and dry as this could affect its ability to wick heat effectively.
Self-regulating heat tapes are ideal as their output adjusts automatically with ambient temperature - they're safer than their constant-wattage alternatives, thus minimizing risks such as fire hazards and other problems.
Once your pipe has been properly prepared, measure out a length of heat tape that extends at least 4 inches past each end of it and cut it using either utility knives or scissors. It's best to leave an extra strip at either end to accommodate for any overlaps that may arise during installation.
Once your tape is cut to length and plugged into an electrical outlet, wait for it to start warming up the pipe by feeling for warmth before applying any necessary reapplying of any parts of the tape that aren't heating up.
Every few days afterward, be sure to inspect and test your tape regularly so it continues to work efficiently; if any parts don't heat up on the first try then check loose connections or kinks immediately and resolve them as quickly as possible; should any signs of damage or failure emerge, consult a plumber immediately to avoid further complications down the road.
Heat tape requirements vary based on the size and insulation level of your pipes, with manufacturers' guidelines guiding as to how much to purchase and cut to length for appropriate usage. Some types of tape run along or around pipes while others wrap them. Your consumption also depends on whether you opt for constant-wattage or variable-wattage tape; constant-wattage options provide consistent heat but may cost more over time.
Most often, excess tape can be cut away easily using a utility knife without damaging the pipe. Just be sure that any area around or adjacent to pipes remains free from sharp edges or materials that might catch fire, as well as being protected from rainwater or weather elements during this process.
Sometimes it can be helpful to consult a professional plumber for guidance. These experts can offer tailored assistance and address any potential issues during the process.
Apply The Tape
No matter, if you are an amateur DIY homeowner or a professional plumber, installing heat tape on PEX pipes, can keep your plumbing safe in cold temperatures. But be careful to choose and apply it correctly to avoid leakage and potential damages caused by incorrect application.
Start by making sure the pipe is clean and dry, before measuring its length to determine where you require heat tape coverage and cutting accordingly. It's also essential that all sections of tape don't overlap or leave gaps as this could reduce its effectiveness and compromise its effectiveness.
Once plugged in, carefully wrap the tape around a pipe using electrical tape and make sure it is tightly secured without touching any bare wires. The next step should be testing your tape - plug it back in an electrical outlet and check around your pipe for warmth - if none can be felt this may indicate that it's no longer functioning as intended and needs to be replaced.
If you need some assistance or prefer having it handled professionally, make an appointment with your local plumbing company. They'll ensure the tape is installed safely and correctly so your pipes are protected this winter, as well as provide solutions tailored specifically to meet the needs and budget of your home.
Some homeowners choose self-regulating heat tape, which adjusts its output according to pipe and ambient air temperatures. Others may prefer constant-wattage heat tape which provides constant warmth. Carefully consider both options before selecting one based on your individual needs, budget, and safety concerns.
Be sure to read and verify the label on your heat tape to ensure it can safely be used with PEX tubing. Some manufacturers display maximum temperature limits directly on the tape itself while others include them in accompanying documentation.
Those unsure whether their PEX pipes can tolerate heat tape should reach out to a local plumbing expert for personalized advice on finding an appropriate solution that protects against freezing pipes and damage in their home environment. An expert can offer help finding just the right option that will keep their systems from freezing while also protecting against freezing-related damage to avoid major inconvenience.
Installing heat tape on PEX pipes can be an efficient and effective way to prevent your home's water lines from freezing during periods of low temperatures. However, all manufacturer instructions and safety precautions must be abided by when applying this heat protection - any deviation could lead to expensive repairs and other damages in addition to possible safety risks.
Test The Tape
Installing heat tape on your Pex pipes can protect them from freezing and bursting, which can result in serious water damage. Furthermore, heat tape helps you save on energy costs by keeping the pipe warmer for longer without needing as much energy to maintain that warmth.
Before beginning to wrap the pipe with heat tape, be sure that it is free from dirt or debris, inspect for cracks or leaks that need repairing, and select an appropriate type of heat tape for your home or business. Different varieties have different temperature limits; certain options may work better in colder climates than others.
Size and insulation thickness will also determine what kind of heat tape you require, with plug-in, hardwired, self-regulating, and constant wattage options all being possible choices. If unsure which one best suits your home needs, get advice from a professional plumber.
Once the heat tape has been installed, it must be thoroughly tested before winter's arrival. Connect it to an outlet and touch it lightly to feel for warmth. If none exists, there could be an issue with either its wiring or tape; should this occur contact the manufacturer as soon as possible so they can help resolve it.
Checking the tape periodically during winter can also be beneficial; any signs of cuts, cracks, charring, or animal chew marks should be replaced immediately. In addition, thermostats should be regularly inspected to make sure they're still operating as intended.
Test the tape by running water through a faucet connected to it. If the tap becomes cold after some time, that indicates there may be a leak somewhere and should be addressed as soon as possible. In such cases, locate its source and repair accordingly.
If you want to protect your pex piping from freezing, the self-regulating heating tape could be the perfect solution. This tape features an insulating core at normal temperatures that is heated via resistive current when temperatures dip, keeping your pipe from overheating while keeping you warmer than would be possible with non-thermoplastic water lines.
Before installing heat tape in your mobile home, be sure to follow all manufacturer's instructions precisely and choose products approved for mobile home lab tests and approval. When plugging it in, only use GFCI-protected outlets; extension cords could cause overheated tape or fire! It is also advisable to inspect it periodically after three years have elapsed if it has already been in place.
Heating tape installation on PEX pipes can help safeguard them against freezing and bursting in cold winter conditions, saving both homeowners and professional plumbers alike from significant water damage caused by frozen pipes. However, to ensure it's installed correctly (to avoid serious injury or fire risks) certain steps must be followed for this protection to work as intended.
Installing heat tape on PEX pipes is an economical and straightforward solution to protecting them against freezing temperatures this winter. Simply follow these three easy steps in this blog post, and your PEX pipes should remain safe from being damaged by freezing temperatures.
Maintain The Tape
If you want to protect your pipes from cold weather, wrap them in heat tape. This process is relatively straightforward and can help protect costly water damage from occurring; but always ensure the tape is working as it should - particularly in harsh climates with freezing temperatures - by regularly feeling for warmth on the pipe; if none can be felt then unplug and check for loose connections or plug-in wires that might need unplugging.
To ensure the tape works as intended, it is also important to consider the lowest temperatures that your pipes will experience. Some heat tapes are designed for extreme cold environments while others may work best in milder climates.
You also must decide between self-regulating or constant wattage heat tape; self-regulating models automatically adjust their output according to pipe temperatures while constant wattage models provide a fixed amount of warmth.
When installing the tape, begin from one end and wrap it tightly around until reaching the other. Plug it in to start the heating process; if unsure whether the tape is working try feeling for warmth or plug in a thermometer to test.
If you are uncertain if heat tape will suit the climate in which you reside, it might be beneficial to consult a professional before beginning your project. They can give an accurate assessment of the temperature range and help select an ideal type of tape for use on your venture.
Check The Tape Regularly
Installing heat tape on a pex pipe is an excellent way to protect it against freezing in low temperatures and prevent leaks, but you must make sure you choose and install the right type of tape properly; failure could result in serious damage and costly repairs; however, the installation process itself is relatively straightforward and only requires minimal materials and tools.
Before beginning, read and follow all manufacturer instructions to ensure your heat tape will work on your pipe safely. It would also be wise to consult with a plumber to gain more information and address any queries or concerns that arise during this process.
Once you've cut your heat tape to its proper length, wrap it securely around your pipe from one end to the other, pressing it tightly against its surface. Plug the tape into an electrical outlet or power strip so it can begin heating your pipe immediately.
Make sure your heat tape is working optimally this winter by inspecting it periodically throughout the season. Be on the lookout for cuts or cracks, charring, animal chew marks, loose ends, or bare wires; any time any of these issues arise it's time for replacement tape!