Half-Up Hair Bow: Perfect for Your Next Holiday Event!
Title: Half-Up Hair Bow: Perfect for Your Next Holiday Event!
Introduction
Looking to elevate your holiday hairstyle with a touch of elegance and charm? The half-up hair bow is the perfect choice for your next festive occasion. This eye-catching and stylish look combines the classic appeal of a bow with the versatility of a half-updo, making it a standout choice for any holiday event. In this article, we’ll guide you through the steps to create this beautiful hairstyle and offer tips to make sure you shine at your next celebration.
1. Gather Your Supplies
Before you start, make sure you have these essentials:
Hairbrush or comb
Hair ties
Bobby pins
Optional: Hair donut or padding for extra volume
Light-hold hairspray
2. Step-by-Step Guide to the Half-Up Hair Bow
Step 1: Prep Your Hair
Begin with clean, dry hair. Brush through to remove any tangles. For added volume, you can use a volumizing spray or mousse. If you have naturally straight hair, you might want to add a few loose curls for a bit of texture.
Step 2: Create a Half-Up Section
Part your hair as desired. Take the top section of your hair, starting from just above your ears and going to the crown of your head. Secure this section with a hair tie or clip to keep it out of the way.
Step 3: Form the Bow
Divide the half-up section into two equal parts. Create a loop with each part, pinching the base where it meets the hair tie. Secure the loops with bobby pins at the base of the loops to form the shape of a bow. For added volume and shape, you can use a hair donut or padding underneath the loops.
Step 4: Secure the Bow
Adjust the loops of the bow to ensure they’re even and symmetrical. Tuck any loose ends underneath the bow and secure them with bobby pins. Make sure the bow is firmly in place and looks polished.
Step 5: Finish with Hairspray
Lightly spritz your hairstyle with hairspray to hold everything in place and ensure your bow stays perfect throughout the event.
3. Tips for a Perfect Half-Up Hair Bow
Volume Boost: Use a hair donut or padding to give your bow extra volume and a fuller appearance.
Accessorize: Add a decorative hairpin or small accessory to the center of the bow for a touch of sparkle.
Smooth Finish: Ensure your hair is smooth and free of flyaways by using a comb or brush to smooth out the top section before forming the bow.
4. Variations and Customization
Classic Bow: Stick with the traditional bow shape for a timeless and elegant look.
Double Bow: For a playful twist, create a double bow by forming two smaller bows on top of each other.
Textured Bow: Incorporate curls or waves into the half-up section for a more relaxed and textured look.
5. Maintenance and Care
To keep your hair looking its best:
Avoid Over-Styling: Minimize heat styling to prevent damage. Use heat protectant products if you do style with heat tools.
Regular Trims: Keep your hair healthy and split-end free with regular trims.
Hydration: Use moisturizing products to keep your hair soft and shiny, especially if you’re using styling products.
Conclusion
The half-up hair bow is a delightful and sophisticated choice for your next holiday event. With its elegant design and relatively simple execution, this hairstyle is sure to make you stand out at any celebration. Follow these steps to create your perfect half-up hair bow and enjoy a festive, stylish look that will turn heads and spread holiday cheer!
Feel free to share your own variations and experiences with the half-up hair bow. We’d love to hear how you made this charming style your own!
Matuklasan mga post


Charming Hairstyle Tutorial: Step-by-Step Guide to a Cute and Effortless Look
Title: Charming Hairstyle Tutorial: Step-by-Step Guide to a Cute and Effortless Look
Introduction
Looking for a hairstyle that’s both charming and easy to achieve? Whether you're heading to a casual brunch or a fun night out, this step-by-step tutorial will guide you through creating a cute and effortless look that’s perfect for any occasion. With just a few simple techniques, you can transform your hair into a stylish masterpiece.
1. Gather Your Supplies
Before you begin, make sure you have the following items on hand:
Hairbrush or comb
Hair ties
Bobby pins
Light-hold hairspray
Optional: Decorative hair clips or headbands
2. Step-by-Step Tutorial
Step 1: Prep Your Hair
Start with clean, dry hair. Brush through to remove any tangles and add a bit of volume by using a texturizing spray or mousse if desired.
Step 2: Create Soft Waves
For a relaxed, charming look, add some soft waves to your hair. Use a curling iron or a flat iron to curl your hair in sections, holding the iron vertically for looser waves. Run your fingers through your curls to loosen them up and create a more natural look.
Step 3: Divide Your Hair
Part your hair in the middle or slightly off-center, depending on your preference. For a more polished look, create a clean part using a comb.
Step 4: Form a Half-Up Twist
Take a small section of hair from each side of your head, just above the ears. Twist these sections back and secure them with a hair tie or bobby pins at the back of your head. This creates a cute, half-up style that adds volume and structure.
Step 5: Create a Low Bun
Gather the remaining hair into a low ponytail at the nape of your neck. Twist the ponytail into a loose bun and secure it with bobby pins. For a more relaxed vibe, let a few strands fall out to frame your face.
Step 6: Add Finishing Touches
Spritz your hairstyle with a light-hold hairspray to ensure it stays in place throughout the day. For a touch of charm, add decorative hair clips or a headband to enhance the look.
3. Tips for Personalizing Your Look
Accessorize: Play with different hair accessories to match your outfit or mood. Cute clips, headbands, or even a delicate flower can add a personal touch.
Volume Boost: If you prefer more volume, tease the crown of your hair gently before forming the bun.
Texture Variations: Experiment with different curl sizes or straightening techniques to customize the look to your liking.
4. Maintenance and Care
To keep your hairstyle looking fresh:
Avoid Over-Brushing: This can lead to frizz and breakage. Use a wide-tooth comb for gentle detangling.
Regular Trims: Maintain healthy ends with regular haircuts to prevent split ends and keep your style looking polished.
Hydration: Use nourishing hair products to keep your hair soft and shiny.
Conclusion
This charming hairstyle tutorial offers a straightforward way to achieve a cute and effortless look that works for any occasion. With just a few easy steps, you can create a stylish and polished appearance that’s sure to turn heads. Give it a try and discover how simple it can be to look effortlessly chic!
Share your results and any variations you’ve tried with this tutorial. We’d love to hear how you’ve personalized your charming new look!
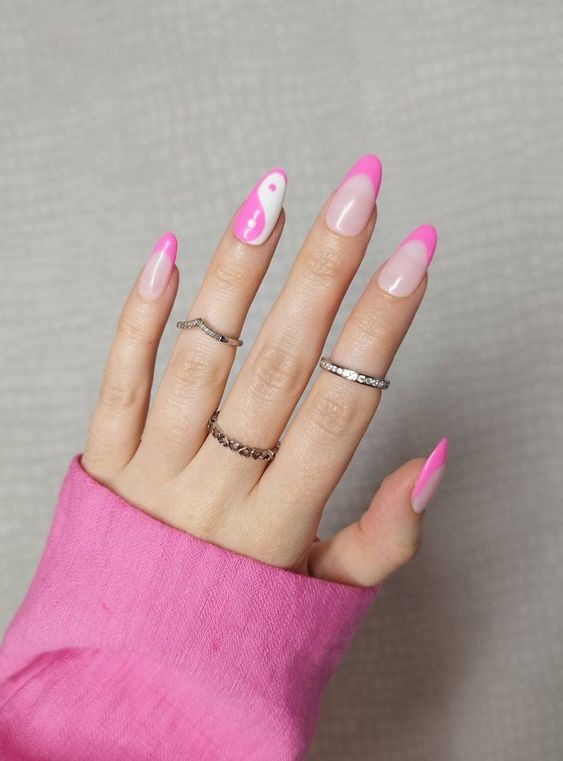
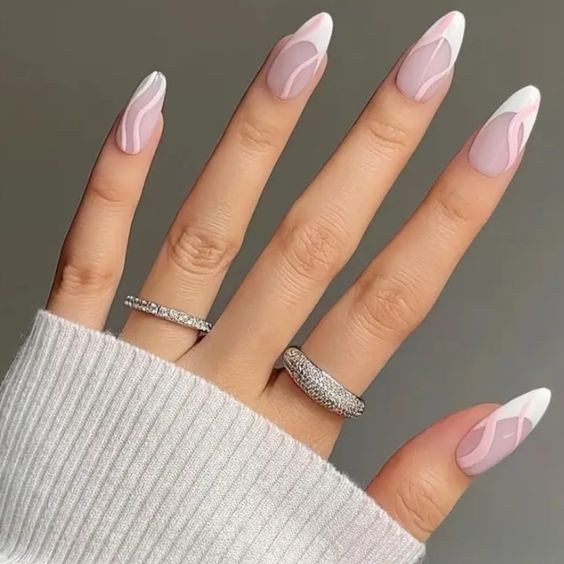
Pastel Blue & White Press-On Nails – Yin Yang Almond, Coffin, Stiletto, and Square Styles.
Discover a new level of nail elegance with the “Pastel Blue & White Press-On Nails – Yin Yang Almond, Coffin, Stiletto, and Square Styles”! This stunning collection features a blend of calming pastel blue and crisp white hues, offering a range of sophisticated designs and nail shapes that cater to every style preference. From the unique Yin Yang patterns to classic nail shapes, these press-on nails are perfect for achieving a flawless and fashionable manicure with ease.
Why Choose These Press-On Nails?
Press-on nails have become a popular choice for those looking to achieve a salon-quality look without the hassle of lengthy appointments. This set stands out with its elegant color palette and diverse range of styles, making it easy to express your personal style while enjoying the convenience of press-on nails.
Key Features of Pastel Blue & White Press-On Nails
Chic Color Combination – The pastel blue and white hues provide a soft, stylish look that’s both modern and timeless. This color combo is perfect for any season and complements a wide range of outfits.
Unique Yin Yang Design – The inclusion of Yin Yang patterns adds a touch of artistic flair and balance to your manicure. This design element brings a unique and eye-catching detail to your nails.
Versatile Nail Shapes – Choose from a variety of nail shapes including almond, coffin, stiletto, and square. Each shape offers a different aesthetic, allowing you to customize your look based on your mood or occasion.
Easy Application – These press-on nails are designed for quick and easy application, providing you with a salon-quality manicure in minutes. Perfect for busy lifestyles or last-minute touch-ups.
Comfort and Durability – Enjoy a comfortable fit with nails designed to stay in place without discomfort. The durable material ensures your manicure lasts, maintaining its elegance throughout your day.
How to Apply Your Press-On Nails
Prepare Your Natural Nails – Begin by cleaning and filing your natural nails. Push back cuticles and make sure your nails are dry and free of any oils or residues.
Select the Right Size – Choose the press-on nails that best fit your natural nails. Each set is designed to accommodate various sizes for a customized fit.
Apply Adhesive – Apply a thin layer of adhesive to the back of each press-on nail. Use just enough glue to ensure a secure application without excess.
Press and Hold – Align each press-on nail with your natural nail and press firmly. Hold in place for a few seconds to ensure a strong and lasting bond.
Finishing Touches – Once all nails are applied, use a file to smooth any edges if needed, ensuring a seamless and polished finish.
Conclusion
The “Pastel Blue & White Press-On Nails – Yin Yang Almond, Coffin, Stiletto, and Square Styles” offer a chic and versatile solution for achieving a beautiful manicure with minimal effort. With their elegant color palette, unique designs, and easy application, these press-on nails are perfect for adding a touch of style to any occasion. Embrace the convenience and glamour of press-on nails and enjoy a flawless look that complements your personal style!
#pressonnails #pastelnails #yinyangnails #nailart #naildesign #almondnails #coffinnails #stilettonails #squarenails #diynails #nailtrends #manicureinspiration
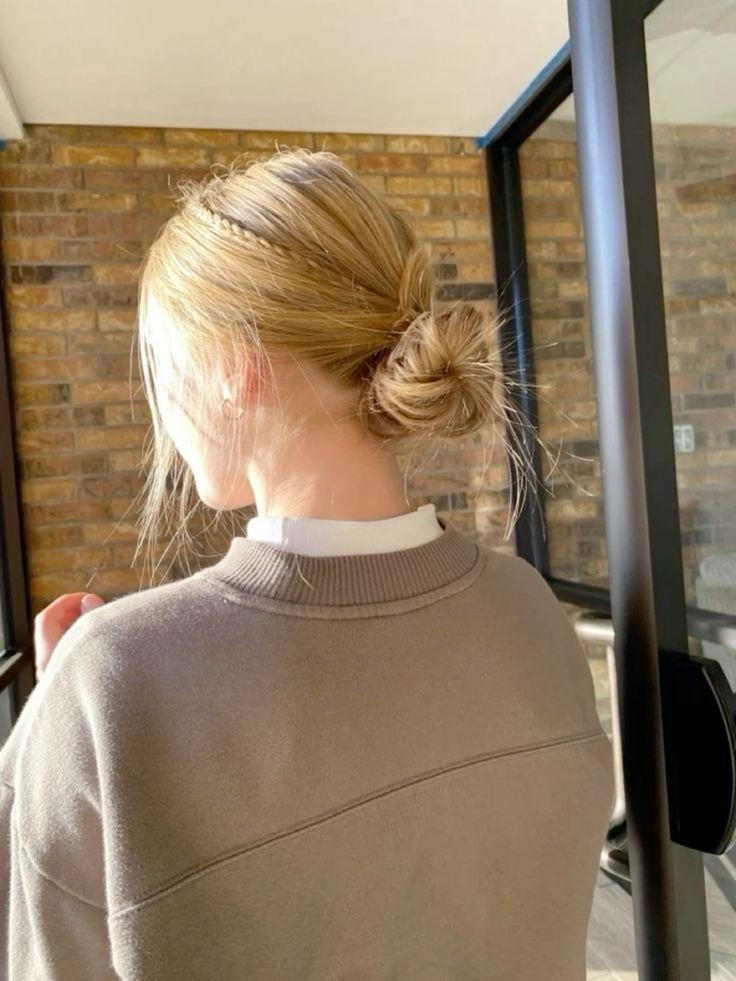
Easy Bun Hack ? Worth Trying or Not? Find Out!
Title: Easy Bun Hack 🌸 Worth Trying or Not? Find Out!
Introduction
Looking for a simple yet stylish way to elevate your everyday look? The Easy Bun Hack has been making waves, promising to simplify your hair routine while delivering stunning results. But is it really as effective and effortless as it claims? In this article, we’ll dive into the details of this popular hack, explore its benefits, and help you decide if it’s worth incorporating into your routine.
1. What is the Easy Bun Hack?
The Easy Bun Hack is a method designed to create a chic, polished bun with minimal effort. It often involves using everyday items like hair ties, bobby pins, or even a simple hair donut to achieve a flawless look without the fuss. The core idea is to streamline the bun-making process, making it accessible for anyone, regardless of their hair styling skills.
2. How to Use the Easy Bun Hack
Here's a step-by-step guide to try the Easy Bun Hack for yourself:
Step 1: Gather Your Supplies
You'll need a hair tie, bobby pins, and a few optional accessories like a hair donut or mesh bun maker.
Step 2: Create a Ponytail
Start by pulling your hair into a high or low ponytail, depending on your preferred bun placement. Secure it with a hair tie.
Step 3: Use the Hack Tool
If using a hair donut or bun maker, slide it onto the ponytail and spread your hair evenly around it. If not using a tool, simply gather the ponytail and start twisting it around the base.
Step 4: Secure the Bun
Tuck the ends of your hair under the bun and secure it with bobby pins. Adjust as needed to make sure everything is in place.
Step 5: Finishing Touches
Lightly spritz with hairspray to hold the style. For a more polished look, use a comb to smooth out any flyaways.
3. Benefits of the Easy Bun Hack
Time-Saving
This hack significantly reduces the time spent styling your hair, making it perfect for busy mornings or last-minute plans.
Versatility
The Easy Bun Hack can be adapted for various occasions, from casual outings to formal events. You can create a sleek bun for work or a relaxed, tousled bun for a weekend brunch.
Minimal Effort
It simplifies the bun-making process, requiring less skill and effort compared to traditional methods.
4. Potential Drawbacks
Not for All Hair Types
Those with very fine or short hair may find it challenging to achieve a full-looking bun. In such cases, additional products or techniques might be necessary.
Durability Issues
Depending on your hair type and the quality of the tools used, the bun may not hold as well throughout the day. Adjustments or touch-ups might be needed.
5. Alternatives and Variations
If the Easy Bun Hack doesn’t quite work for you, consider these alternatives:
Sock Bun: Similar to the hair donut, a sock can be used to create a voluminous bun.
Braided Bun: Add a touch of intricacy by braiding your hair before forming the bun.
Messy Bun: For a more relaxed look, skip the hair donut and simply gather and twist your hair into a messy bun.
Conclusion
The Easy Bun Hack offers a straightforward solution for achieving a stylish bun with minimal effort. While it might not be perfect for everyone, it’s worth trying if you’re looking for a time-saving, versatile hairstyle. Give it a go and see if it fits your hair routine. You might just find that it’s the perfect addition to your styling arsenal!
Let us know your thoughts and experiences with this hack. Is it a game-changer for you, or do you prefer other styling methods? Happy bun-making! 🌸✨
Title: Unlock Your Best Look Yet with This Awesome Hairstyle: The Ultimate Guide
Introduction
Looking for a fresh, eye-catching hairstyle that will make heads turn? You're in the right place! In this article, we’re diving deep into the details of an awesome hairstyle that combines both trendiness and versatility. Whether you’re preparing for a special event or just want to add a bit of flair to your everyday look, this hairstyle has got you covered.
1. The Trendy Appeal
This hairstyle is not just another passing trend; it’s a statement. Known for its modern twist on classic elements, it offers a chic and sophisticated appearance that works for virtually any occasion. Its versatility allows it to seamlessly transition from a casual day out to a glamorous evening event.
2. How to Achieve the Look
Achieving this hairstyle is easier than you might think. Here’s a step-by-step guide to get you started:
Step 1: Prep Your Hair
Begin with clean, damp hair. Apply a heat protectant to shield your strands from damage.
Step 2: Create Volume
Use a volumizing mousse or spray to add body to your hair. Blow-dry your hair with a round brush to achieve the desired volume.
Step 3: Style with Precision
Depending on the specific look you're going for, use a curling iron, flat iron, or styling tools to shape your hair. For a sleek, polished finish, straighten your hair and add a bit of shine serum.
Step 4: Add the Finishing Touches
Use a hairspray or texturizing spray to hold the style in place. If you’re going for a more relaxed look, lightly tousle your hair with your fingers.
3. Tips for Different Hair Types
Straight Hair: Focus on creating volume and texture. Soft waves or gentle curls can add a dynamic element to straight hair.
Curly Hair: Embrace your natural curls or use a diffuser to enhance them. A layered cut can help manage volume and shape.
Wavy Hair: Enhance your waves with a curling iron or sea salt spray for a beachy, effortless look.
4. Accessories to Elevate Your Style
Accessories can take your hairstyle to the next level. Consider adding:
Hairpins or Clips: Stylish pins can add a touch of glamour or a subtle twist to your look.
Headbands: Perfect for a more polished or bohemian vibe.
Decorative Combs: Ideal for adding a bit of sparkle to an evening hairstyle.
5. Maintenance and Care
To keep your hairstyle looking its best, regular maintenance is key. Use high-quality hair products to nourish and protect your hair. Regular trims will keep your style fresh and prevent split ends.
Conclusion
This awesome hairstyle is the perfect way to revamp your look and embrace your inner style icon. With a few simple steps and the right products, you can achieve a head-turning look that will boost your confidence and keep you looking fabulous. So why wait? Give this hairstyle a try and experience the transformation for yourself!
Feel free to share your results and any additional tips you’ve discovered along the way. Happy styling!
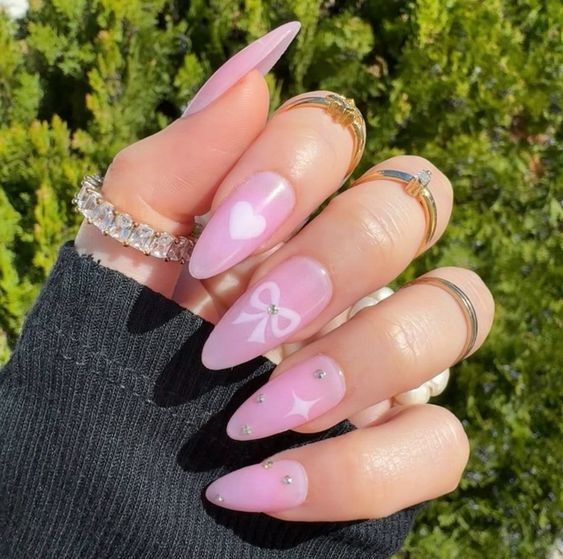
Little Coquette Press-On Nails – Elegant and Chic Designs.
Discover the perfect blend of sophistication and style with “Little Coquette Press-On Nails – Elegant and Chic Designs!” These press-on nails are crafted to bring a touch of refined elegance to your fingertips with minimal effort. Whether you're gearing up for a special occasion or simply want to elevate your everyday look, these chic press-on nails offer an effortless way to achieve a polished, salon-quality manicure at home.
Why Choose Little Coquette Press-On Nails?
Press-on nails have revolutionized the way we achieve beautiful manicures. They combine convenience with high-end style, allowing you to enjoy a flawless nail look without the need for lengthy salon visits. The “Little Coquette” collection stands out with its elegant and chic designs, perfect for those who appreciate a touch of classic glamour.
Key Features of Little Coquette Press-On Nails
Elegant Designs – The “Little Coquette” collection features designs that exude sophistication. From understated patterns to classic chic looks, these press-on nails are perfect for adding a refined touch to any outfit.
Chic and Stylish – Each set includes carefully curated designs that enhance your natural beauty with a fashionable twist. These nails offer a timeless style that complements any occasion, whether it’s a formal event or a casual day out.
Effortless Application – Applying these press-on nails is quick and easy, providing you with a salon-quality manicure in minutes. No professional tools are required, making it ideal for anyone looking for a hassle-free beauty solution.
Versatile and Durable – Designed to fit various nail sizes and shapes, these press-on nails offer a comfortable and secure fit. They are durable enough to withstand daily wear while maintaining their elegant appearance.
Affordable Luxury – Enjoy the luxury of a polished manicure without breaking the bank. The “Little Coquette” press-on nails offer a stylish and budget-friendly option for achieving a high-end look.
How to Apply Your Press-On Nails
Prepare Your Natural Nails – Begin by cleaning and filing your natural nails. Push back your cuticles and ensure that your nails are free from oils and residues.
Choose the Right Size – Select the press-on nails that best fit your natural nails. Each set is designed to accommodate various sizes for a customized and comfortable fit.
Apply Adhesive – Apply a thin layer of adhesive to the back of each press-on nail. Be sure to use just enough glue to ensure a secure application without excess.
Press and Hold – Align each press-on nail with your natural nail and press firmly. Hold in place for a few seconds to ensure a strong and lasting bond.
Finishing Touches – Once all nails are applied, use a file to smooth any edges if needed. This will help ensure a seamless and polished finish.
Conclusion
“Little Coquette Press-On Nails – Elegant and Chic Designs” offer a perfect solution for anyone looking to enhance their manicure with ease. Combining sophisticated designs with effortless application, these press-on nails provide a high-quality and stylish look suitable for any occasion. Enjoy the convenience of press-on nails and embrace the elegance and chicness they bring to your everyday style!
#pressonnails #elegantnails #chicnails #nailart #naildesign #manicureinspiration #diynails #nailtrends #glamnails #nailstyle
Stylish Press-On Nails – Effortless Glam for Every Occasion.
Elevate your look with “Stylish Press-On Nails – Effortless Glam for Every Occasion”! These press-on nails are designed to provide a chic, polished manicure with minimal effort, making them the perfect choice for anyone who wants to achieve stunning nails without the hassle of traditional salon visits. Whether you’re preparing for a special event or simply want to add a touch of glam to your everyday style, these press-on nails offer a stylish and convenient solution.
Why Choose Press-On Nails?
Press-on nails have become a go-to option for achieving a flawless manicure quickly and affordably. They offer the perfect blend of style and convenience, making them ideal for those with busy lifestyles or anyone looking to enhance their nail game with ease. The variety of designs available ensures there’s a perfect set for every occasion.
Key Features of Stylish Press-On Nails
Effortless Application – Applying press-on nails is a breeze. With simple adhesive application, you can achieve a salon-quality look in minutes. No need for professional tools or lengthy appointments.
Versatile Designs – From classic French tips to trendy patterns and vibrant colors, press-on nails come in a wide range of designs to suit any style or occasion. Whether you’re dressing up for a formal event or adding a touch of glam to your daily wear, there’s a set for you.
Long-Lasting Wear – Enjoy a flawless manicure that lasts for days without chipping or fading. Press-on nails provide a durable and secure fit, ensuring your look stays perfect throughout the day.
Affordability – Achieve a high-quality manicure at a fraction of the cost of traditional salon services. Press-on nails offer a stylish and budget-friendly option for those who love to keep their nails looking fabulous.
Customizable Fit – Press-on nails come in various sizes to fit different nail shapes and sizes. You can easily select the perfect size for a comfortable and natural fit.
How to Apply Your Press-On Nails
Prepare Your Natural Nails – Start by cleaning and filing your natural nails. Push back your cuticles and ensure your nails are dry and free of oils or residues.
Select the Right Size – Choose the press-on nails that best fit your natural nails. Each set is designed to accommodate various sizes for a customized fit.
Apply Adhesive – Apply a thin layer of adhesive to the back of each press-on nail. Be cautious not to use too much glue to ensure a secure and comfortable fit.
Press and Hold – Align each press-on nail with your natural nail and press firmly. Hold in place for a few seconds to ensure a strong bond.
Final Touches – Once all nails are applied, use a file to smooth any edges if needed, ensuring a seamless and polished finish.
Conclusion
“Stylish Press-On Nails – Effortless Glam for Every Occasion” are the perfect choice for anyone looking to achieve a flawless and fashionable manicure with ease. With their easy application, versatile designs, and long-lasting wear, these press-on nails offer a stylish and affordable solution for enhancing your look. Enjoy the convenience of press-on nails and embrace effortless glam that complements any occasion!
#pressonnails #nailart #naildesign #effortlessglam #manicureinspiration #diynails #nailtrends #chicnails #nailstyle #glamnails
15 French Tip Press-On Nails with Pink Stripe – 24 Count in Pink/White.
Step up your manicure game with the “15 French Tip Press-On Nails with Pink Stripe – 24 Count in Pink/White”! This stylish set combines the timeless elegance of French tips with a playful pink stripe, creating a chic and modern look that’s perfect for any occasion. With 24 press-on nails included, achieving a flawless and fashionable manicure has never been easier.
Why Choose French Tip Press-On Nails?
Press-on nails are a fantastic option for those who want a salon-quality manicure without the hassle of traditional nail appointments. They offer a quick, convenient, and affordable way to achieve a polished look at home. The classic French tip design is always in style, while the addition of a pink stripe adds a trendy twist.
Key Features of This Press-On Nail Set
Elegant French Tips – The French tip design provides a clean and sophisticated look that never goes out of style. It’s perfect for adding a touch of class to any outfit.
Playful Pink Stripe – The pink stripe adds a pop of color and a modern twist to the classic French tip, making your manicure stand out with a hint of fun.
Versatile Use – These press-on nails are ideal for any occasion, whether it’s a casual day out, a special event, or a professional setting. They offer a versatile and stylish option for every look.
Convenient Application – With 24 nails in the set, you have plenty of options to ensure a perfect fit. The press-on design makes application quick and easy, giving you a flawless manicure without the need for professional tools.
Affordable Elegance – Priced at just 3/$15, this set offers an affordable way to achieve a high-quality, elegant manicure. It’s a great value for those who love to keep their nails looking chic and stylish.
How to Apply Your Press-On Nails
Prepare Your Natural Nails – Start by cleaning and filing your natural nails. Push back your cuticles and make sure your nails are dry and free of any oils.
Select the Right Size – Choose the press-on nails that best fit your natural nails. Each set is designed to accommodate various sizes for a perfect fit.
Apply Adhesive – Apply a thin layer of adhesive to the back of each press-on nail. Be careful not to use too much glue to ensure a secure and comfortable fit.
Press and Hold – Align each press-on nail with your natural nail and press firmly. Hold in place for a few seconds to ensure a strong bond.
Final Touches – Once all nails are applied, use a file to smooth any edges if needed, ensuring a seamless and polished finish.
Conclusion
The “15 French Tip Press-On Nails with Pink Stripe – 24 Count in Pink/White” offer a stylish and convenient solution for achieving a chic manicure at home. With their elegant French tip design, playful pink stripe, and easy application, these press-on nails are perfect for anyone looking to enhance their look with minimal effort. Enjoy a sophisticated and modern manicure that complements any outfit and occasion!
#pressonnails #frenchtips #pinkstripenails #nailart #naildesign #manicureinspiration #diynails #nailtrends #glamnails #nailstyle
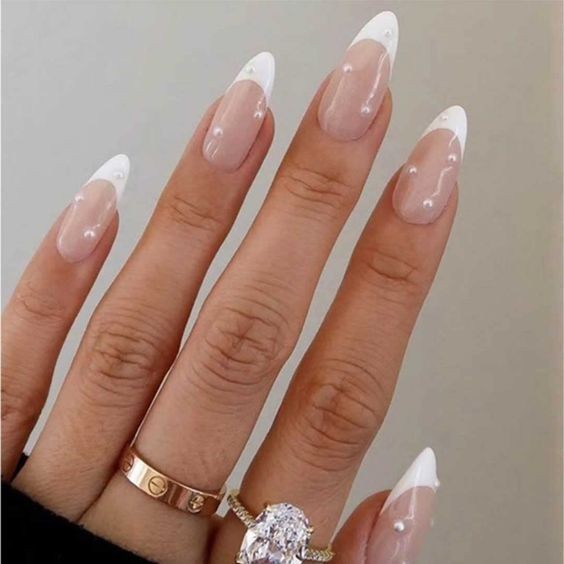
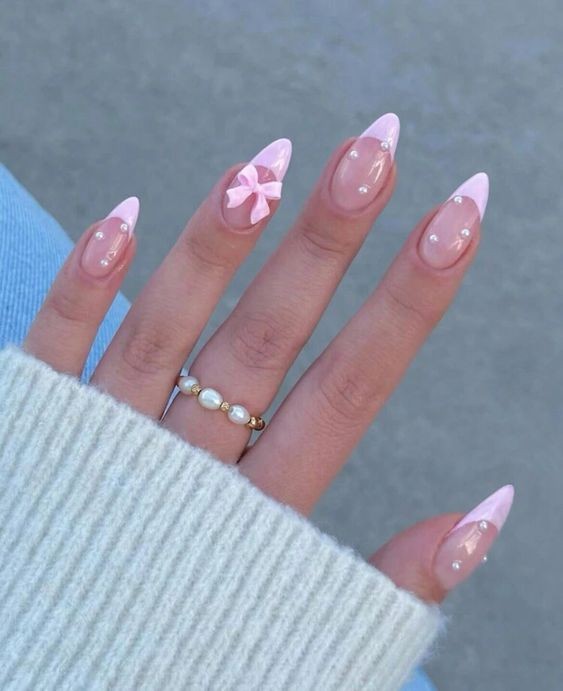
24 Pcs White Pearl Almond Press-On Nails – Glossy French Tips for Daily Wear,
Elevate your manicure routine with the “24 Pcs White Pearl Almond Press-On Nails – Glossy French Tips for Daily Wear!” These press-on nails are designed to offer a sophisticated and stylish look with ease. Featuring a chic almond shape, glossy French tips, and elegant white pearl accents, these nails are perfect for adding a touch of glamour to your everyday style.
Why Choose White Pearl Almond Press-On Nails?
Press-on nails are a fantastic choice for anyone looking to achieve a polished, salon-quality manicure without the time and expense of traditional nail appointments. The almond shape is both flattering and modern, while the glossy French tips and white pearl details offer a classic yet contemporary appeal.
Key Features of These Press-On Nails
Elegant Almond Shape – The almond shape creates a refined and elongated look, complementing various hand shapes and adding a touch of sophistication to your hands.
Glossy French Tips – The timeless French tip design is updated with a glossy finish, offering a clean and polished appearance that’s versatile enough for any occasion.
White Pearl Accents – The addition of white pearl details adds a touch of luxury and elegance, catching the light and providing a subtle yet striking detail.
Daily Wear Friendly – These press-on nails are designed for everyday use, making them perfect for adding a touch of elegance to your daily routine without sacrificing comfort.
Easy Application – With straightforward application and removal, these press-on nails are perfect for anyone looking to achieve a flawless manicure quickly and effortlessly.
How to Apply Your Press-On Nails
Prep Your Natural Nails – Start by cleaning and filing your natural nails. Push back your cuticles and ensure that your nails are free of any oils or residues.
Select the Correct Size – Choose the press-on nails that best fit your natural nails. Each set is designed to accommodate various sizes for a perfect fit.
Apply Adhesive – Use the provided adhesive to apply a thin layer to the back of each press-on nail. Avoid using too much glue to ensure a secure and comfortable fit.
Press and Hold – Align each press-on nail with your natural nail and press firmly. Hold in place for a few seconds to ensure a strong bond.
Final Adjustments – Once all nails are applied, use a file to shape any edges if necessary, ensuring a seamless and polished finish.
Conclusion
The “24 Pcs White Pearl Almond Press-On Nails – Glossy French Tips for Daily Wear” offer a stylish and convenient solution for achieving a sophisticated manicure at home. With their elegant design, easy application, and daily wear suitability, these press-on nails are perfect for anyone looking to enhance their look with minimal effort. Enjoy a flawless, salon-quality manicure that complements any outfit and occasion!
#pressonnails #whitepearlnails #frenchtips #almondnails #nailart #glossynails #manicureinspiration #dailywearnails #naildesign #diynails #nailtrends
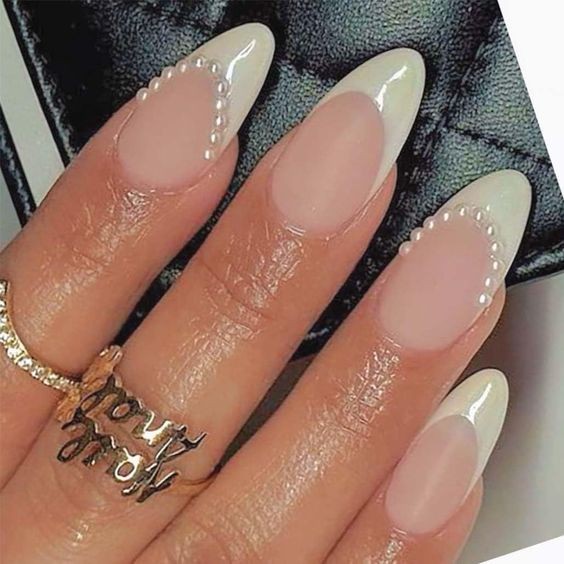
Chic Almond French Tip Press-On Nails with Pearls – Elegant White Design.
Transform your manicure routine with the “Chic Almond French Tip Press-On Nails with Pearls – Elegant White Design!” These press-on nails are the epitome of sophistication, combining classic French tips with the elegance of pearly accents for a flawless, polished look. Ideal for any occasion, these nails offer a chic and timeless style that enhances your natural beauty effortlessly.
Why Choose Almond French Tip Press-On Nails?
Press-on nails have become a favorite for those seeking an easy yet glamorous nail solution. The chic almond shape and French tip design offer a sleek, elongated look that complements any outfit. Adding pearls to the mix elevates the design, making it perfect for formal events or simply adding a touch of elegance to your daily routine.
Key Features of These Press-On Nails
Elegant Almond Shape – The almond shape is not only flattering but also elongates the appearance of your fingers, creating a graceful and refined look.
Classic French Tips – Enjoy the timeless appeal of French tips, which offer a clean and sophisticated edge. The understated design is versatile enough to suit any style or occasion.
Pearly Accents – Delicate pearls are strategically placed to add a touch of luxury and refinement. These accents catch the light and provide a subtle yet striking detail.
Effortless Application – These press-on nails come with easy-to-use adhesive, allowing you to achieve a salon-quality manicure in the comfort of your own home. No need for professional tools or lengthy appointments.
Versatile Style – Whether you’re preparing for a special event, a day at the office, or just want to enhance your everyday look, these nails offer a sophisticated and polished appearance that works for any occasion.
How to Apply Your Press-On Nails
Prep Your Natural Nails – Begin by cleaning and filing your natural nails. Push back your cuticles and ensure your nails are dry and free of oils or residues.
Select the Right Size – Choose the press-on nails that best fit your natural nails. Each set is designed to accommodate various sizes for a perfect fit.
Apply Adhesive – Use the provided adhesive to apply a thin layer to the back of each press-on nail. Be cautious not to use too much glue to avoid an uneven application.
Press and Hold – Align each press-on nail with your natural nail and press firmly. Hold in place for a few seconds to ensure a secure bond.
Final Touches – Once all nails are applied, use a file to shape any edges if needed. This will ensure a seamless and comfortable fit.
Conclusion
The “Chic Almond French Tip Press-On Nails with Pearls – Elegant White Design!” are your go-to solution for a stylish, elegant manicure. Combining the classic beauty of French tips with the luxurious touch of pearls, these nails offer a sophisticated and polished look that’s perfect for any occasion. Enjoy the convenience of press-on nails with a design that exudes grace and refinement, and give your hands the flawless finish they deserve!
#pressonnails #frenchtips #elegantnails #chicnails #nailart #pearlynails #manicureinspiration #naildesign #diynails #nailtrends