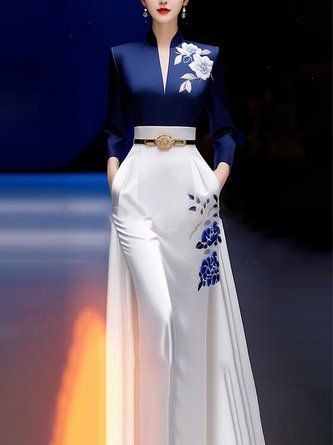
Good and Bad People Good and Bad People
    #homedecor #fashiontrends #love #fashiongoals #homeimprovement
    Erweiterte Suche
  • Anmelden
  • Registrieren

  • Nacht-Modus
  • © 2025 Good and Bad People
    Über Uns • Verzeichnis • Kontaktiere uns • Entwickler • Datenschutz • Nutzungsbedingungen • Rückerstattung • Referral Terms • Acceptable Use Policy • Community Guidelines • Write for Us

    Wählen Sprache

  • Arabic
  • Bengali
  • Chinese
  • Croatian
  • Danish
  • Dutch
  • English
  • Filipino
  • French
  • German
  • Hebrew
  • Hindi
  • Indonesian
  • Italian
  • Japanese
  • Korean
  • Persian
  • Portuguese
  • Russian
  • Spanish
  • Swedish
  • Turkish
  • Urdu
  • Vietnamese

Betrachten

Betrachten Rollen

Veranstaltungen

Events durchsuchen Meine ereignisse

Blog

Artikel durchsuchen

Markt

Neueste Produkte

Seiten

Meine Seiten Gefallene Seiten

mehr

Erforschen Beliebte Beiträge Arbeitsplätze Bietet an Förderungen
Rollen Betrachten Veranstaltungen Markt Blog Meine Seiten Alles sehen

Entdecken Beiträge

Posts

Benutzer

Seiten

Gruppe

Blog

Markt

Veranstaltungen

Arbeitsplätze

Förderungen

Daisys Trend Vibes
Daisys Trend Vibes
50 w ·übersetzen

Transform Your Look with This Stunning Red Lipstick Application

Are you ready to add a pop of glamour to your everyday routine? There’s no better way to elevate your beauty than with the perfect red lipstick. Whether you’re gearing up for a special occasion or just want to feel fabulous, a bold red lip can make all the difference. Here’s how you can transform your look with this stunning red lipstick application, straight from the pros!

Step 1: Prep Your Lips

Before you even think about applying that vibrant red lipstick, it’s essential to start with a clean, smooth canvas. Exfoliate your lips gently with a lip scrub or a soft toothbrush to remove any dry, flaky skin. Follow up with a hydrating lip balm to ensure your lips are soft and supple.

Step 2: Perfect Your Base

To make your red lipstick pop and last longer, begin with a primer. Applying a primer to your lips can help smooth out the surface and enhance the color's vibrancy. If you don’t have a lip primer, a thin layer of concealer or foundation can work as a great alternative.

Step 3: Define with Lip Liner

A precise lip liner is key to achieving a flawless red lip. Choose a lip liner that matches your lipstick shade or is slightly darker for a more defined look. Outline your lips carefully, starting from the center and moving outwards. This step helps prevent feathering and bleeding, ensuring that your lipstick stays put.

Step 4: Apply the Lipstick

Time for the star of the show—your red lipstick! For the most accurate application, use a lip brush. Begin applying the lipstick from the center of your lips, working your way outwards. Make sure to fill in any gaps and achieve an even, smooth layer. If you’re aiming for a more intense color payoff, apply a second coat once the first layer has set.

Step 5: Clean Up and Perfect

To ensure your red lipstick looks impeccable, use a small brush or a cotton swab dipped in concealer to clean up any edges and correct mistakes. This step will give your lips a sharp, defined look and make them stand out even more.

Step 6: Set and Shine

For an extra touch of glamour, apply a clear gloss over your lipstick. This not only adds a beautiful shine but also helps your lipstick stay in place throughout the day. Alternatively, if you prefer a matte finish, set your lipstick with a translucent powder for a sophisticated look.

Final Touches

Voila! You’ve successfully transformed your look with a stunning red lipstick application. Pair your bold lip with minimal eye makeup to keep the focus on your lips or go all out with a glamorous eye look for a truly head-turning appearance.

Feel confident and beautiful as you flaunt your red lipstick and let it work its magic!

---

#redlipstick #makeupmagic #beautytips #glamour #makeupartist #lipsticklove #makeuptransformation #beautyroutine #boldlips

image
Gefällt mir
Kommentar
Teilen
Mia Fashionable Nomad
50 w ·übersetzen

### Trendy Short Hair Updos for Summer 2024: Best Styles to Try

Summer 2024 is here, and it’s the perfect time to experiment with stylish and trendy updos for short hair. Whether you’re heading to a beach party, a wedding, or just enjoying a sunny day out, these updos are designed to keep you looking chic and feeling cool. Here’s a roundup of the best short hair updos to try this summer.

#### 1. **Textured Mini Bun**

The textured mini bun is a playful and practical choice for short hair. It’s perfect for those days when you want a quick and easy style that still looks put-together.

**How to Achieve It*
- **Step 1* Apply a texturizing spray to your hair for added volume.
- **Step 2* Gather your hair at the back of your head and twist it into a small, loose bun.
- **Step 3* Secure with bobby pins and fluff it slightly for a textured look.

**Tip* This style works great with natural waves or curls and is perfect for a casual, yet chic appearance.

#### 2. **Braided Crown**

The braided crown adds an elegant touch to short hair and is ideal for summer events or a sophisticated everyday look.

**How to Achieve It*
- **Step 1* Create a deep side part and section off a small amount of hair from the front.
- **Step 2* Braid the section and secure it with a small elastic band.
- **Step 3* Wrap the braid around the crown of your head and pin it in place.

**Tip* For added volume, gently pull on the braid to loosen it before pinning.

#### 3. **Half-Up Twists**

Half-up twists are perfect for adding a bit of flair to your short hair while keeping it off your face.

**How to Achieve It*
- **Step 1* Take a small section of hair from each side of your head.
- **Step 2* Twist the sections back and secure them with bobby pins at the back of your head.
- **Step 3* Let the rest of your hair fall naturally for a relaxed look.

**Tip* This style works well for both wavy and straight hair and is great for casual outings or more polished events.

#### 4. **Pin-Up Curls**

Pin-up curls are a retro-inspired choice that adds a touch of vintage glamour to short hair.

**How to Achieve It*
- **Step 1* Use a curling iron to create defined curls in your hair.
- **Step 2* Pin each curl in place with bobby pins to form a classic pin-up style.
- **Step 3* Once the curls are set, gently release them and adjust as needed.

**Tip* Finish with a light hairspray to keep your curls in place throughout the day.

#### 5. **Sleek Low Ponytail**

The sleek low ponytail is a modern and minimalist option that’s both stylish and easy to create.

**How to Achieve It*
- **Step 1* Smooth your hair with a straightener or brush to remove any frizz.
- **Step 2* Gather your hair into a low ponytail at the nape of your neck and secure with an elastic band.
- **Step 3* Wrap a small section of hair around the base of the ponytail for a polished finish.

**Tip* Use a shine serum to add a glossy finish to your sleek ponytail.

#### 6. **Double Knots**

Double knots are a trendy and playful way to style short hair, perfect for summer fun.

**How to Achieve It*
- **Step 1* Create two high ponytails on either side of your head.
- **Step 2* Twist each ponytail into a knot and secure with bobby pins.
- **Step 3* Adjust the knots to your desired look and make sure they’re secure.

**Tip* This style is great for adding a bit of fun and flair to your summer wardrobe.

#### 7. **Side-Swept Twist**

The side-swept twist is a chic and elegant option that works well for both casual and formal occasions.

**How to Achieve It*
- **Step 1* Create a deep side part and take a small section of hair from the front.
- **Step 2* Twist the section back and secure it with a bobby pin at the back of your head.
- **Step 3* Let the rest of your hair fall naturally or add some soft curls for extra style.

**Tip* This style is ideal for adding a bit of sophistication to your look.

### Tips for Styling Short Hair in Summer

- **Use Lightweight Products* Opt for lightweight styling products to avoid weighing down your hair and keep your styles looking fresh.
- **Protect from Heat* Use heat protectant sprays before using styling tools to prevent damage and keep your hair healthy.
- **Refresh with Dry Shampoo* Keep your hair looking clean and voluminous with a quick spritz of dry shampoo between washes.

### Final Thoughts

Summer 2024 is the perfect time to experiment with trendy updos for short hair. From textured mini buns to elegant braided crowns, these styles will keep you looking chic and feeling comfortable all season long. Try these updos and embrace the best of summer style with your short hair! #shorthairupdos #summertrends #effortlessstyle

image
Gefällt mir
Kommentar
Teilen
Mia Fashionable Nomad
50 w ·übersetzen

### Effortlessly Chic Travel Hairstyles 2024: Simple and Stylish Hair Ideas for Comfort

Traveling can be an exciting adventure, but managing your hair while on the go doesn’t have to be a hassle. In 2024, streamline your travel routine with these effortlessly chic hairstyles that are as stylish as they are comfortable. Whether you're hopping on a plane, exploring new cities, or relaxing on the beach, these simple and stylish hair ideas will keep you looking fabulous without the fuss.

#### 1. **The Low Messy Bun**

The low messy bun is perfect for travel, offering a relaxed yet polished look that’s easy to maintain.

**How to Achieve It*
- **Step 1* Start with dry or slightly damp hair. Gather it into a low ponytail at the nape of your neck.
- **Step 2* Twist the ponytail into a loose bun and secure with a hair tie or bobby pins.
- **Step 3* Gently pull at the bun to create a relaxed, messy effect. Let a few strands fall naturally for a casual touch.

**Why It’s Great for Travel* This hairstyle keeps hair off your neck and can be quickly adjusted for a casual or slightly more polished look.

#### 2. **Half-Up Top Knot**

The half-up top knot combines convenience with style, keeping hair out of your face while showcasing your natural texture.

**How to Achieve It*
- **Step 1* Section off the top half of your hair and gather it into a high ponytail.
- **Step 2* Twist the ponytail into a knot and secure with bobby pins.
- **Step 3* Leave the bottom half of your hair loose or lightly tousled for a relaxed finish.

**Why It’s Great for Travel* This hairstyle keeps the top section of your hair off your face while allowing the bottom half to stay relaxed and manageable.

#### 3. **The Side Braid**

A side braid is both practical and stylish, making it ideal for travel days and adventures.

**How to Achieve It*
- **Step 1* Create a deep side part and gather a section of hair from the front.
- **Step 2* Braid the section loosely and secure the end with a small elastic band.
- **Step 3* Tuck the braid behind your ear and pin it in place if needed.

**Why It’s Great for Travel* The side braid keeps hair secure and out of the way, plus it’s easy to refresh or adjust as needed.

#### 4. **Beachy Waves**

For a relaxed, effortless look that’s perfect for any travel destination, beachy waves are a go-to style.

**How to Achieve It*
- **Step 1* Use a texturizing spray or sea salt spray on damp hair.
- **Step 2* Scrunch your hair with your hands and let it air dry or use a diffuser on low heat.
- **Step 3* For added definition, use a curling wand on random sections of your hair.

**Why It’s Great for Travel* Beachy waves are low-maintenance and work well with various hair types, making them ideal for easy styling on the go.

#### 5. **Sleek Ponytail**

The sleek ponytail is a classic choice that combines elegance with ease.

**How to Achieve It*
- **Step 1* Brush your hair and gather it into a high ponytail.
- **Step 2* Smooth down any flyaways with a bit of hairspray or styling gel.
- **Step 3* Wrap a small section of hair around the base of the ponytail to conceal the elastic band and secure with a bobby pin.

**Why It’s Great for Travel* This hairstyle is quick to do and keeps hair neatly controlled, making it perfect for any travel itinerary.

#### 6. **Faux Bob**

The faux bob offers a chic and polished look without the commitment of a haircut.

**How to Achieve It*
- **Step 1* Curl or smooth your hair as desired.
- **Step 2* Pin the ends of your hair under to create the appearance of a shorter bob.
- **Step 3* Secure with bobby pins and adjust for the desired length and shape.

**Why It’s Great for Travel* The faux bob can be a stylish alternative to traditional hairstyles and is easy to create and undo.

#### 7. **Headband Twist**

Using a headband can transform your look instantly while keeping your hair in place.

**How to Achieve It*
- **Step 1* Place a headband over your hair, positioning it where you want it to sit.
- **Step 2* Twist sections of hair around the headband and pin them in place.
- **Step 3* Let the rest of your hair fall naturally or smooth it out with a brush.

**Why It’s Great for Travel* The headband twist is quick and versatile, allowing you to style your hair while adding a fashionable accessory.

### Tips for Travel-Friendly Hair Care

- **Pack Smart* Bring essential hair products and tools, but avoid overpacking. Travel-sized products and multi-use items are your best friends.
- **Stay Hydrated* Keep your hair hydrated with leave-in conditioners or oils to prevent dryness during travel.
- **Protect Your Hair* Use scarves or hats to protect your hair from sun exposure and environmental factors.

### Final Thoughts

Traveling doesn’t mean you have to sacrifice style for comfort. These effortlessly chic hairstyles are designed to keep your hair looking fabulous while making your travel experience easier. From low-maintenance buns to stylish braids, find the perfect look for every adventure and enjoy your travels with confidence and flair. #travelhair #effortlessstyle #chiconthemove

image
Gefällt mir
Kommentar
Teilen
Mia Fashionable Nomad
50 w ·übersetzen

### Top 27 Cute and Fun Summer Hairstyles for Curly Hair in 2024

Summer is the perfect time to embrace your curls and experiment with fun and stylish hairstyles. With the heat and humidity, keeping your curly hair looking cute and manageable can be a challenge, but these 27 summer hairstyles will help you stay cool, chic, and fabulous all season long.

#### 1. **Messy Pineapple**

The messy pineapple is a playful and practical way to keep your curls off your neck while showcasing their natural volume.

**How to Achieve It*
- Gather your curls at the top of your head and secure with a loose elastic band.
- Let some curls fall naturally around your face for a relaxed look.

#### 2. **Half-Up Curly Bun**

This hairstyle combines the elegance of a bun with the fun of curls.

**How to Achieve It*
- Section the top half of your hair and twist it into a loose bun.
- Leave the bottom half of your curls free to frame your face.

#### 3. **Braided Crown**

The braided crown is perfect for keeping your curls out of your face while adding a touch of romance.

**How to Achieve It*
- Braid sections of hair on each side and pin them across the top of your head.
- Let your curls cascade freely from underneath.

#### 4. **High Puff**

A high puff is a bold and stylish way to show off your natural curl pattern.

**How to Achieve It*
- Gather your curls at the top of your head and secure them with a puff-creating band.
- Fluff and shape to your desired volume.

#### 5. **Side-Swept Curls**

This classic look works beautifully with curls and adds a touch of glamour.

**How to Achieve It*
- Create a deep side part and let your curls fall over one shoulder.
- Pin the section behind your ear for a polished finish.

#### 6. **Bubble Ponytail**

The bubble ponytail adds a fun and playful twist to your typical ponytail.

**How to Achieve It*
- Gather your curls into a high ponytail, securing with hair ties at intervals to create bubble effects.
- Gently pull at the sections to enhance the bubble look.

#### 7. **Faux Hawk**

The faux hawk is a daring and edgy style that works well with curls.

**How to Achieve It*
- Create a middle part and pin sections of your curls upwards and towards the center of your head.
- Allow the sides to remain loose for a balanced look.

#### 8. **Curly Headband**

Add a headband to keep your curls in check while adding a stylish accessory.

**How to Achieve It*
- Place a headband over your curls and push it back slightly.
- Let your curls flow freely or tuck them slightly behind the headband.

#### 9. **Double Buns**

Double buns are playful and perfect for keeping your curls off your neck.

**How to Achieve It*
- Create two high ponytails on either side of your head.
- Twist and pin them into buns.

#### 10. **Twist-Out**

The twist-out is ideal for defined curls with minimal effort.

**How to Achieve It*
- Twist small sections of your damp hair and let them dry.
- Unravel the twists for defined, voluminous curls.

#### 11. **Crown Braid**

A crown braid keeps your curls stylishly out of your face.

**How to Achieve It*
- Braid a section of hair around your head like a crown, pinning it in place.
- Allow the rest of your curls to fall naturally.

#### 12. **Pinned-Back Curls**

A simple way to keep your curls under control while looking polished.

**How to Achieve It*
- Pin back small sections of your curls on either side of your head.
- Let the rest of your curls fall freely.

#### 13. **Curly Top Knot**

The curly top knot is a great way to keep your curls off your neck and look effortlessly stylish.

**How to Achieve It*
- Gather your curls into a high ponytail and twist into a knot.
- Secure with bobby pins.

#### 14. **Space Buns**

Space buns add a fun and youthful touch to your curly hair.

**How to Achieve It*
- Create two high ponytails on either side of your head and twist them into buns.
- Secure with bobby pins and let some curls fall loose for a relaxed look.

#### 15. **Loose Side Braid**

A loose side braid is a casual and easy way to manage your curls.

**How to Achieve It*
- Gather a section of your curls to one side and braid loosely.
- Secure the end with a hair tie and let some curls frame your face.

#### 16. **Curly Faux Bob**

The faux bob is a chic way to shorten your curls temporarily.

**How to Achieve It*
- Pin the ends of your curls under to create the appearance of a bob.
- Secure with bobby pins and adjust to your desired length.

#### 17. **Side Part with Defined Curls**

A deep side part adds drama and highlights the natural shape of your curls.

**How to Achieve It*
- Create a deep side part and define your curls with styling cream.
- Let your curls fall naturally over one shoulder.

#### 18. **Curly Ponytail with Wrap**

A wrap around your ponytail adds a polished finish.

**How to Achieve It*
- Gather your curls into a ponytail and wrap a section of hair around the base.
- Secure with bobby pins and let your curls flow freely.

#### 19. **Half-Up Twist**

The half-up twist adds an elegant touch to your curly hair.

**How to Achieve It*
- Twist a section of hair from the top half of your head and pin it back.
- Let the rest of your curls fall naturally.

#### 20. **Curly Faux Hawk with Accessories**

Enhance the faux hawk with accessories for a trendy look.

**How to Achieve It*
- Style your curls into a faux hawk and add hair accessories like clips or pins.
- Secure with bobby pins and hairspray.

#### 21. **Half-Up Bouffant**

The half-up bouffant adds volume and keeps your curls in place.

**How to Achieve It*
- Create a bouffant with the top section of your hair and pin it in place.
- Let the bottom half of your curls fall naturally.

#### 22. **Curly Pigtails**

Curly pigtails are cute and functional for summer fun.

**How to Achieve It*
- Create two high ponytails on either side of your head.
- Twist and secure with hair ties, allowing curls to frame your face.

#### 23. **Pinned-Up Curly Updo**

A pinned-up curly updo is perfect for more formal summer events.

**How to Achieve It*
- Gather your curls and pin them up into a loose bun or updo.
- Secure with bobby pins and hairspray.

#### 24. **Curly Side Ponytail**

A side ponytail with curls adds a playful touch to your summer look.

**How to Achieve It*
- Gather your curls to one side and secure with an elastic band.
- Let some curls fall naturally for a relaxed appearance.

#### 25. **Curly Halo**

The curly halo is a charming and ethereal look.

**How to Achieve It*
- Create a braid or twist around your hairline, pinning it in place.
- Let your curls fall naturally around your face.

#### 26. **Half-Up Braid**

A half-up braid adds texture and style to your curls.

**How to Achieve It*
- Braid the top half of your hair and secure with a hair tie.
- Let the bottom half of your curls fall naturally.

#### 27. **Curly Low Bun**

The curly low bun is a sophisticated option for any summer occasion.

**How to Achieve It*
- Gather your curls into a low bun at the nape of your neck.
- Secure with bobby pins and let some curls fall loosely for a soft finish.

### Tips for Summer Curly Hair

- **Hydrate* Use moisturizing products to keep your curls hydrated and defined.
- **Protect* Wear a hat or use UV-protectant sprays to protect your curls from sun damage.
- **Refresh* Keep a curl refresher spray handy to revive your curls throughout the day.

### Final Thoughts

Embrace your curls this summer with these cute and fun hairstyles. Whether you’re heading to the beach, a summer party, or just enjoying a sunny day, these styles will keep you looking chic and feeling cool. Experiment with these looks and find your new go-to summer hairstyle. #curlyhair #summerstyles #hairinspo

image
Gefällt mir
Kommentar
Teilen
Isla's Inspo Haven
Isla's Inspo Haven
50 w ·übersetzen

Must-Try Fall Outfit Ideas That Will Make You Look Fabulous and Feel Cozy! 🍂✨

As the leaves turn and the air gets crisp, it’s the perfect time to refresh your wardrobe with stylish fall outfits that keep you warm and chic. From cozy knits to versatile layers, here are some must-try fall outfit ideas that blend comfort with flair:

1. Cozy Knit Sweater and Jeans

Embrace autumn with a chunky knit sweater paired with high-waisted jeans. Add ankle boots and a statement scarf to complete your look.

2. Layered Flannel and Turtleneck

Stay warm and stylish by layering a plaid flannel shirt over a fitted turtleneck. Combine with skinny jeans and knee-high boots for a classic fall outfit.

3. Chic Sweater Dress

Opt for a sweater dress in rich fall hues like burgundy or olive. Pair it with tights, knee-high boots, and a wide-brim hat for an elegant touch.

4. Casual Denim Jacket Over Hoodie

For a relaxed vibe, wear a cozy hoodie with a denim jacket on top. Match with joggers and sneakers for effortless comfort.

5. Elegant Midi Skirt and Sweater

Combine a flowy midi skirt with a fitted sweater. Add ankle boots and a crossbody bag for a sophisticated yet cozy look.

6. Classic Trench Coat Over a Sweater

Throw on a classic trench coat over a cozy sweater and skinny jeans. Finish with loafers and a structured handbag for a polished outfit.

7. Boho-Chic Layering

Layer a flowy blouse with a vest and high-waisted jeans. Complete the look with booties and a floppy hat for a bohemian flair.

8. Casual Utility Jacket with Leggings

Wear a utility jacket over a simple tee and leggings. Add sneakers and a beanie for a laid-back, stylish appearance.

9. Knitted Vest and Button-Down Shirt

Combine a knitted vest with a button-down shirt and tailored pants. Finish with loafers and a messenger bag for a refined look.

10. Statement Cardigan and Skinnies

Choose a statement cardigan in a bold pattern or color and pair with skinny jeans. Add ankle boots and a sleek backpack to complete the outfit.

11. Chunky Sweater and Plaid Skirt

Wear a chunky sweater with a plaid mini skirt for a preppy fall look. Finish with tights and knee-high boots.

12. Comfy Puffer Vest and Jeans

Layer a puffer vest over a long-sleeve tee and jeans. Add sneakers and a cozy beanie for a sporty, casual ensemble.

13. Cowl Neck Sweater and Corduroy Pants

Opt for a cowl neck sweater paired with corduroy pants. Complete with ankle boots and a crossbody bag for a stylish yet comfortable outfit.

These fall outfit ideas will help you stay warm, comfortable, and stylish as you embrace the season. Mix and match to find your perfect fall look and enjoy the cooler weather with confidence!

image
Gefällt mir
Kommentar
Teilen
Mia Fashionable Nomad
50 w ·übersetzen

### 3 Clever Hairstyles to Conceal Your Bangs Whether you’re growing out your bangs or simply want a change, there are plenty of stylish ways to hide them without compromising on your look. Here are three clever hairstyles that will help you conceal your bangs while keeping you looking fabulous.

#### 1. The Sleek Side Sweep

The sleek side sweep is a chic and elegant way to hide your bangs while maintaining a polished appearance.

**How to Achieve It*
- **Step 1* Start by straightening your hair or smoothing it with a flat iron for a sleek finish.
- **Step 2* Part your hair deeply to one side. Use a comb to create a clean, side part.
- **Step 3* Sweep your bangs over to the opposite side of the part. Use bobby pins to secure them in place, tucking them behind the rest of your hair.
- **Step 4* For extra hold, apply a light hairspray to keep everything in place.

**Tip* If your bangs are longer, you may need to use a bit of styling gel or mousse to help them stay tucked and smooth.

#### 2. The Braided Crown

The braided crown is a charming and practical way to hide your bangs while adding a touch of elegance to your hairstyle.

**How to Achieve It*
- **Step 1* Start by creating a loose side part.
- **Step 2* Take a small section of hair from the front and braid it loosely. Repeat on the other side, creating two braids.
- **Step 3* Cross the braids over the top of your head, pinning them in place at the back. This will help cover your bangs and create a beautiful, crown-like effect.
- **Step 4* Adjust any loose strands and secure with bobby pins or a light hairspray.

**Tip* For a more relaxed look, gently pull on the braids to loosen them slightly before pinning.

#### 3. The Faux Bob

The faux bob is a sophisticated and versatile hairstyle that conceals bangs while giving you a classic, elegant look.

**How to Achieve It*
- **Step 1* Begin by curling or smoothing your hair to your desired texture.
- **Step 2* Create a low ponytail at the nape of your neck, securing it with an elastic band.
- **Step 3* Roll the ponytail up and tuck it under, securing it with bobby pins to create a faux bob effect.
- **Step 4* Use bobby pins to secure any loose sections and adjust your hairstyle as needed to hide your bangs.

**Tip* For added volume, gently tease your hair at the roots before creating the faux bob.

### Tips for Concealing Your Bangs

- **Use Accessories* Hair clips, headbands, and decorative pins can also help in concealing bangs and adding an extra touch to your hairstyle.
- **Experiment with Styles* Don’t be afraid to try different hairstyles to find what works best for you. Your hair’s texture and length can affect how well the style hides your bangs.
- **Keep Hair Healthy* Regular trims and conditioning will keep your hair in good shape, making it easier to style and manage.

### Final Thoughts

Hiding your bangs doesn’t have to be a hassle. With these clever hairstyles, you can easily conceal them while still looking stylish and put-together. Whether you prefer a sleek side sweep, a charming braided crown, or a sophisticated faux bob, there’s a solution to fit every occasion and hair type. #hideyourbangs #hairstylehacks #chichair

Gefällt mir
Kommentar
Teilen
KO66 Truong Minh
KO66 Truong Minh  hat sein Titelbild geändert
50 w

image
Gefällt mir
Kommentar
Teilen
Mia Fashionable Nomad
50 w ·übersetzen

### Revamp Your Style in 2 Minutes: Quick Hairstyles for All Hair Types!

In today’s fast-paced world, who has time for elaborate hairstyles? Luckily, you don’t need hours to achieve a polished look. With these quick and easy hairstyles, you can transform your style in just two minutes—no matter your hair type. Here’s how to get chic, stylish looks in no time!

#### 1. The Sleek Ponytail

A sleek ponytail is a classic choice that works for every hair type and can be done in under two minutes.

**How to Achieve It*
- **Straight Hair* Brush your hair to remove any tangles. Gather it into a high or low ponytail and secure with an elastic band. For added shine, apply a bit of hair serum before tying.
- **Wavy Hair* Smooth out your waves with a brush or fingers, then gather into a ponytail. Use a bit of styling gel to tame any frizz.
- **Curly/Coily Hair* Use a leave-in conditioner or anti-frizz serum, then gather your curls into a ponytail. Secure with an elastic band and use bobby pins to keep any stray curls in place.

#### 2. The Messy Bun

A messy bun is perfect for a laid-back, effortless look that can be achieved in a flash.

**How to Achieve It*
- **Straight Hair* Gather your hair into a loose ponytail, twist it into a bun, and secure with a hair tie or bobby pins. Pull out a few strands to frame your face for a relaxed look.
- **Wavy Hair* Gather your waves into a loose ponytail, then twist into a messy bun. Let some waves fall naturally for a casual style.
- **Curly/Coily Hair* Stretch your curls slightly and gather them into a loose, messy bun. Secure with bobby pins, allowing some curls to fall freely.

#### 3. The Half-Up, Half-Down

The half-up, half-down style is a great way to keep hair out of your face while showcasing your natural texture.

**How to Achieve It*
- **Straight Hair* Section off the top half of your hair and secure it with a hair tie or clip. Leave the bottom half loose and smooth for a sleek look.
- **Wavy Hair* Take the top section of your waves and secure it with a hair tie or clip. Let the rest of your waves flow naturally for a relaxed look.
- **Curly/Coily Hair* Gather the top section of your curls and secure with a clip or hair tie. Let the bottom half of your curls remain loose and natural.

#### 4. The Headband Twist

Using a headband can instantly elevate your look with minimal effort.

**How to Achieve It*
- **Straight Hair* Place a headband over your hair, then twist the front sections of your hair and tuck them under the headband. This adds a polished touch to straight hair.
- **Wavy Hair* Add a headband and twist sections of your hair around it. The waves will give your style a chic, effortless vibe.
- **Curly/Coily Hair* Place a headband over your curls and twist sections around it. This will add a stylish twist to your natural curls.

#### 5. The Side Braid

A side braid is a quick and stylish option that adds a touch of sophistication.

**How to Achieve It*
- **Straight Hair* Sweep a section of hair to one side and braid it. Secure the end with a small elastic band. This simple braid adds a chic detail to straight hair.
- **Wavy Hair* Gather a side section of your waves and braid it loosely. Secure with an elastic band for a relaxed, bohemian look.
- **Curly/Coily Hair* Braid a side section of your curls loosely, letting some curls frame your face. Secure with an elastic band and use bobby pins if needed.

### Tips for Speedy Styling

- **Prep Ahead* Keeping your hair tangle-free with regular brushing or combing makes these quick styles easier to achieve.
- **Use Minimal Products* A light application of styling products can help manage frizz and keep your hair in place without weighing it down.
- **Keep Tools Handy* Having your hair ties, bobby pins, and headbands readily available will save you time when styling.
- **Practice Makes Perfect* The more you practice these quick styles, the faster and more efficient you’ll become at executing them.

### Final Thoughts

Revamping your look doesn’t have to be time-consuming. With these quick and easy hairstyles, you can achieve a polished appearance in just two minutes, no matter your hair type. Whether you’re heading to work, school, or a casual outing, these styles are perfect for keeping you looking chic and stylish with minimal effort. #quickhairstyles #easyhairtricks #styleinminutes

image
Gefällt mir
Kommentar
Teilen
Ivys Glow Pins
Ivys Glow Pins
50 w ·übersetzen

117 Mind-Blowing Nail Art Ideas That Will Turn Your Nails Into Tiny Masterpieces**

Nail art is more than just a beauty trend—it's an exciting way to express your personality, creativity, and style. Whether you're preparing for a special event, looking to elevate your everyday look, or simply want to try something new, transforming your nails into tiny masterpieces is easier than ever. With 117 mind-blowing nail art ideas at your fingertips, you can turn your nails into stunning canvases that capture attention and spark conversations. Here’s a guide to some of the most incredible nail art ideas to inspire your next manicure.

### **1. Minimalist Magic**

For a chic and understated look, embrace minimalist designs. Think sleek lines, geometric shapes, and subtle accents. Minimalist nail art is perfect for those who appreciate elegance and simplicity.

### **2. Bold and Bright**

Inject a burst of color into your routine with vibrant hues and eye-catching patterns. Neon shades, rainbow gradients, and bold color-blocking are sure to make a statement.

### **3. Floral Fantasies**

Bring the beauty of nature to your fingertips with intricate floral designs. From delicate daisies to bold roses, floral nail art adds a touch of femininity and charm to any look.

### **4. Classic French Twist**

Put a modern spin on the classic French manicure with unique colors and patterns. Try metallic tips, ombré effects, or add a subtle glittery touch to elevate this timeless style.

### **5. Glitter Galore**

Nothing says glamour like glitter! Incorporate shimmering glitter into your nail art for a dazzling effect. Whether you opt for a full-glitter manicure or just a sparkling accent nail, glitter adds a festive flair.

### **6. Abstract Art**

Unleash your inner artist with abstract nail art. Experiment with bold brushstrokes, splatters, and asymmetrical designs to create a truly unique and personalized look.

### **7. Animal Prints**

From leopard spots to zebra stripes, animal prints are a fun and fashionable way to showcase your wild side. Choose classic prints or experiment with trendy variations to add a touch of fierceness.

### **8. Metallic Marvels**

Shiny metallics are perfect for adding a futuristic edge to your nails. Try gold, silver, or copper hues for a sleek and modern look that’s sure to stand out.

### **9. Seasonal Styles**

Celebrate the seasons with themed nail art. From autumn leaves and winter snowflakes to spring blossoms and summer sunsets, seasonal designs help you stay on trend year-round.

### **10. Textured Touches**

Add dimension to your nails with textured elements. Think velvet, matte finishes, or 3D embellishments like studs and gems for a tactile experience that goes beyond traditional polish.

### **11. Ombre Effects**

Create a stunning gradient with ombre nail art. Blend colors seamlessly for a smooth transition that adds depth and sophistication to your manicure.

### **12. Geometric Glam**

Geometric patterns offer a modern and edgy aesthetic. Experiment with triangles, diamonds, and lines in various colors and finishes to achieve a striking geometric look.

### **13. Artistic Illustrations**

Turn your nails into tiny canvases with hand-painted illustrations. From whimsical doodles to intricate designs, artistic illustrations allow for endless creative possibilities.

### **14. Elegant Marble**

Marble nails mimic the elegance of natural stone with swirling patterns and soft hues. This sophisticated look adds a touch of luxury to your nail art collection.

### **15. Personalized Patterns**

Show off your personal style with custom patterns and monograms. Whether it’s your initials or a design that reflects your interests, personalized nail art adds a unique and meaningful touch.

### **16. Tropical Vibes**

Bring a splash of paradise to your nails with tropical designs. Think palm trees, flamingos, and vibrant floral prints that transport you to a sun-soaked beach.

### **17. Pop Culture**

Celebrate your favorite movies, TV shows, or characters with pop culture-inspired nail art. From superheroes to iconic symbols, these designs make a fun and playful statement.

### **18. Retro Revival**

Dive into nostalgia with retro-inspired nail art. Vintage patterns, pastel colors, and classic motifs bring a charming, old-school vibe to your fingertips.

### **19. Celestial Creations**

Embrace the magic of the cosmos with celestial nail art. Incorporate stars, moons, and galaxies for a dreamy and otherworldly look that’s truly captivating.

### **20. Striking Stripes**

Stripes are a classic design that never goes out of style. Experiment with different widths, colors, and orientations to create a sleek and stylish striped manicure.

### **21. Whimsical Watercolors**

Achieve a soft and artistic effect with watercolor nail art. Blend colors in a fluid and painterly way for a look that’s as delicate as it is unique.

### **22. Festive Flair**

Celebrate special occasions with festive nail art. From holiday themes to party-ready designs, festive flair adds a joyful touch to any celebration.

### **23. Elegant Accents**

Add a touch of luxury with elegant accent nails. Think delicate gold foil, fine lines, or subtle embellishments that enhance your overall look without overpowering it.

### **24. Colorful Confetti**

Sprinkle some fun into your manicure with colorful confetti designs. This playful approach adds a lively and cheerful vibe to your nails.

### **25. Gradient Glitz**

Combine gradients with glitter for a dazzling effect. This combination creates a shimmering transition of colors that’s perfect for special events and nights out.

#nailart

image
Gefällt mir
Kommentar
Teilen
KO66 Truong Minh
KO66 Truong Minh
50 w

image
Gefällt mir
Kommentar
Teilen
Showing 5055 out of 7426
  • 5051
  • 5052
  • 5053
  • 5054
  • 5055
  • 5056
  • 5057
  • 5058
  • 5059
  • 5060
  • 5061
  • 5062
  • 5063
  • 5064
  • 5065
  • 5066
  • 5067
  • 5068
  • 5069
  • 5070

Angebot bearbeiten

Tier hinzufügen


Wählen Sie ein Bild aus
Löschen Sie Ihren Tier
Bist du sicher, dass du diesen Tier löschen willst?

Bewertungen

Um Ihre Inhalte und Beiträge zu verkaufen, erstellen Sie zunächst einige Pakete. Monetarisierung

Bezahlen von Brieftasche

Zahlungsalarm

Sie können die Artikel kaufen, möchten Sie fortfahren?

Eine Rückerstattung anfordern