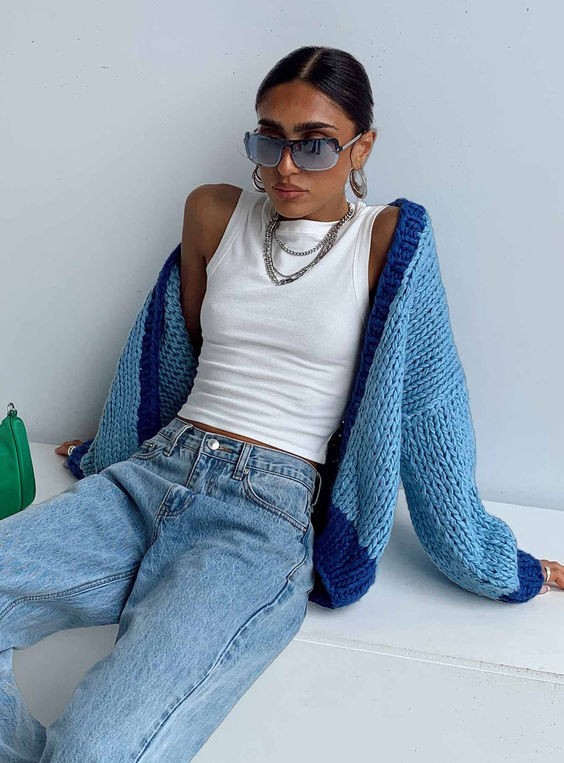
Good and Bad People Good and Bad People
    #ai #traveltips #chatgpt #digitalmarketing #trading
    חיפוש מתקדם
  • התחברות
  • הירשם

  • מצב יום
  • © 2025 Good and Bad People
    על אודות • מַדרִיך • צור קשר • מפתחים • מדיניות פרטיות • תנאי שימוש • הֶחזֵר • Referral Terms • Acceptable Use Policy • Community Guidelines • Write for Us

    בחר שפה

  • Arabic
  • Bengali
  • Chinese
  • Croatian
  • Danish
  • Dutch
  • English
  • Filipino
  • French
  • German
  • Hebrew
  • Hindi
  • Indonesian
  • Italian
  • Japanese
  • Korean
  • Persian
  • Portuguese
  • Russian
  • Spanish
  • Swedish
  • Turkish
  • Urdu
  • Vietnamese

שעון

שעון סלילים

אירועים

עיין באירועים האירועים שלי

בלוג

עיין במאמרים

שׁוּק

המוצרים החדישים

דפים

הדפים שלי דפי לייק

יותר

לַחקוֹר פוסטים פופולריים מקומות תעסוקה הצעות מימון
סלילים שעון אירועים שׁוּק בלוג הדפים שלי ראה הכל

לְגַלוֹת פוסטים

Posts

משתמשים

דפים

קְבוּצָה

בלוג

שׁוּק

אירועים

מקומות תעסוקה

מימון

Vera Johnson
Vera Johnson
1 י ·תרגם

Dragon Monarchy: Regal Sleeve Tattoo

Dragons have long been revered as symbols of power, strength, and wisdom in various cultures around the world. From the majestic dragons of Chinese mythology to the fire-breathing beasts of European folklore, these mythical creatures have captivated the imagination of people for centuries. In the realm of tattoo art, dragon sleeve tattoos reign supreme, commanding attention with their intricate designs and powerful symbolism.

Symbolism of Dragon Tattoos:

1. Power and Strength: Dragons are often depicted as powerful and formidable creatures, capable of immense strength and resilience. In tattoo symbolism, dragons represent the inner strength and power that lies within each individual, serving as a reminder of one's ability to overcome challenges and obstacles.

2. Wisdom and Knowledge: Dragons are also associated with wisdom and knowledge, often portrayed as ancient beings with unparalleled insight and understanding. A dragon tattoo can symbolize the pursuit of wisdom and the quest for enlightenment, inspiring the wearer to seek knowledge and grow intellectually.

3. Protection and Guardianship: In many cultures, dragons are revered as protectors and guardians, watching over sacred places and guiding travelers on their journeys. A dragon tattoo can serve as a talisman of protection, warding off negative energy and providing a sense of security to the wearer.

Design Possibilities:

1. Eastern Dragon Sleeve Tattoos: Inspired by Chinese and Japanese mythology, Eastern dragon sleeve tattoos feature long, serpentine dragons adorned with intricate scales and flowing mane. These tattoos often incorporate elements of traditional Asian art, such as cherry blossoms, clouds, and water motifs, creating a harmonious and balanced composition.

2. Western Dragon Sleeve Tattoos: Western dragon sleeve tattoos draw inspiration from European folklore and medieval imagery, featuring fierce dragons with wings, claws, and fiery breath. These tattoos often depict dragons in battle scenes or perched atop castles, symbolizing strength, courage, and resilience.

3. Elemental Dragon Sleeve Tattoos: Elemental dragon sleeve tattoos combine the power of dragons with the forces of nature, incorporating elements such as fire, water, earth, and air into the design. These tattoos evoke a sense of elemental mastery and connection to the natural world, highlighting the symbiotic relationship between dragons and the elements.

4. Tribal Dragon Sleeve Tattoos: Tribal dragon sleeve tattoos feature stylized dragon designs inspired by indigenous tribal art forms. These tattoos often incorporate bold lines, geometric patterns, and intricate knotwork, creating a visually striking and culturally rich composition.

5. Celestial Dragon Sleeve Tattoos: Celestial dragon sleeve tattoos merge the celestial realm with the world of dragons, depicting dragons as celestial beings adorned with stars, moons, and galaxies. These tattoos symbolize the eternal nature of dragons and their connection to the cosmos, inspiring awe and wonder in those who behold them.

Whether you choose to adorn your sleeve with an Eastern dragon, a Western dragon, or a fusion of both, a dragon sleeve tattoo is sure to make a powerful and regal statement. With its rich symbolism, intricate design possibilities, and timeless appeal, a dragon sleeve tattoo is the epitome of majesty and magnificence in the world of tattoo art.

image
כמו
תגובה
לַחֲלוֹק
Vera Johnson
Vera Johnson
1 י ·תרגם

Twilight Majesty: Intricate Bat Tattoo

Bats have long been shrouded in mystery and symbolism, making them a captivating subject for tattoos. With their association with the night, darkness, and the supernatural, bat tattoos evoke a sense of intrigue and mystique. In this article, we delve into the allure of bat tattoos, exploring their symbolism, design possibilities, and the mesmerizing beauty of these nocturnal creatures.

Symbolism of Bat Tattoos:

1. Mystery and Intrigue: Bats are often associated with mystery and the unknown, as they are creatures of the night that dwell in darkness. A bat tattoo can symbolize the allure of the unknown and the desire to explore the hidden depths of the subconscious mind.

2. Transformation and Rebirth: Bats are also associated with transformation and rebirth, as they undergo a metamorphosis from pupa to adult. In tattoo symbolism, bats can represent the process of shedding old habits and embracing new beginnings.

3. Guardians of the Night: Bats are often seen as guardians of the night, watching over the world as it sleeps. A bat tattoo can symbolize protection and guidance during times of darkness or uncertainty.

Design Possibilities:

1. Realistic Bat Tattoos: Realistic bat tattoos capture the intricate details of these fascinating creatures, from the delicate texture of their wings to the sharp contours of their faces. These tattoos are often rendered in grayscale or full color to enhance their lifelike appearance.

2. Neo-Traditional Bat Tattoos: Neo-traditional bat tattoos combine traditional tattoo elements with contemporary design techniques, resulting in bold and vibrant designs. These tattoos often feature stylized bats surrounded by decorative elements such as flowers, filigree, or geometric shapes.

3. Bat Silhouette Tattoos: Silhouette tattoos feature the outline of a bat in bold black ink, creating a striking and minimalist design. These tattoos are perfect for those who prefer a more subtle and understated look.

4. Bat and Moon Tattoos: Bat and moon tattoos combine the imagery of bats with the celestial beauty of the moon, creating a captivating composition. These tattoos often feature bats in flight against the backdrop of a full moon, symbolizing the mystical connection between the nocturnal creatures and the night sky.

5. Bat Colony Tattoos: Bat colony tattoos depict groups of bats in flight, swirling and swooping in a mesmerizing display. These tattoos capture the dynamic movement and energy of a bat colony in motion, creating a visually stunning and dynamic design.

Whether you're drawn to the symbolism of bats or simply appreciate their beauty, a bat tattoo is a timeless and captivating choice. With its rich symbolism and endless design possibilities, a bat tattoo is sure to make a bold and striking statement, embodying the twilight majesty of these enigmatic creatures.

image
כמו
תגובה
לַחֲלוֹק
Vera Johnson
Vera Johnson
1 י ·תרגם

Ink Elegance: Stunning Arm Tattoo Styles

Tattoos have long been a form of self-expression, and adorning one's arms with intricate designs has become increasingly popular in recent years. From minimalist linework to vibrant watercolor pieces, arm tattoos offer a canvas for endless creativity and personalization. Here, we explore some stunning arm tattoo styles that exude elegance and charm.

1. Minimalist Line Art: Clean lines and simple geometric shapes create an understated yet sophisticated look. These minimalist designs often feature delicate patterns or symbols that hold personal significance to the wearer.

2. Floral Bouquets: Flowers are a timeless symbol of beauty and femininity, making them a popular choice for arm tattoos. From intricate roses to whimsical wildflowers, floral bouquets can be customized to suit any style or preference.

3. Nature Inspired: Bring the beauty of the outdoors to your arm with nature-inspired tattoos. From majestic mountains to serene landscapes, these designs celebrate the wonders of the natural world and evoke a sense of adventure and wanderlust.

4. Watercolor Masterpieces: Add a pop of color to your arm with watercolor tattoos. These vibrant designs feature soft washes of color that mimic the look of watercolor paintings, creating a dreamy and ethereal effect.

5. Blackwork: Bold and striking, blackwork tattoos make a statement with their intricate patterns and solid black ink. From intricate mandalas to tribal-inspired designs, blackwork tattoos are perfect for those who want to make a bold and powerful statement.

6. Celestial Symbols: Channel the cosmos with celestial-themed tattoos. From delicate moons to sparkling stars, these celestial symbols are perfect for those who are drawn to the mysteries of the universe and want to carry a piece of it with them wherever they go.

7. Abstract Art: Embrace your creative side with abstract arm tattoos. These avant-garde designs feature bold shapes, dynamic lines, and unexpected patterns, creating a unique and eye-catching look.

Whether you're looking for something subtle and understated or bold and dramatic, there's an arm tattoo style to suit every taste and personality. So, unleash your inner artist and adorn your arms with ink elegance that reflects your unique style and story.

image
כמו
תגובה
לַחֲלוֹק
Donna Valentine
Donna Valentine  
1 י ·תרגם

\Divine Delight: Almond Raspberry Tart - A Gluten-Free Vegan Treat!\ Indulge in the divine flavors of this Almond Raspberry Tart – a delightful gluten-free and vegan treat that's sure to please your taste buds! With just seven simple ingredients, this dessert is not only delicious but also easy to make.

The combination of almonds and raspberries creates a harmonious blend of nutty and fruity flavors that are both satisfying and indulgent. The almond crust provides a crunchy base, while the raspberry filling adds a burst of sweet and tangy goodness.

To make this tantalizing tart, start by preparing the almond crust using ground almonds, coconut oil, and a touch of sweetener. Press the mixture into a tart pan and bake until golden brown and fragrant.

Next, whip up the raspberry filling by blending fresh or frozen raspberries with a bit of sweetener until smooth. Spread the raspberry mixture evenly over the baked almond crust and let it set in the refrigerator.

Once the tart is chilled and set, slice it into portions and serve with a dollop of coconut whipped cream or a sprinkle of sliced almonds for an extra touch of decadence.

This Almond Raspberry Tart is perfect for any occasion – whether you're hosting a dinner party, celebrating a special occasion, or simply treating yourself to a delicious dessert. Plus, it's gluten-free and vegan, making it suitable for those with dietary restrictions or preferences.

So, whip up this easy and elegant dessert and delight your friends and family with the irresistible flavors of almonds and raspberries. They'll be asking for seconds in no time!

כמו
תגובה
לַחֲלוֹק
Donna Valentine
Donna Valentine  
1 י ·תרגם

Whipped Ricotta Delight: Easy 5-Minute Appetizer! Looking for a quick and delicious appetizer to impress your guests or simply treat yourself to a gourmet snack? Look no further than this Whipped Ricotta Delight! In just five minutes, you can transform ordinary ricotta cheese into a creamy, flavorful spread that's perfect for serving with crackers, bread, or fresh vegetables. Whether you're hosting a dinner party, enjoying a cozy night in, or looking for a simple yet satisfying snack, this whipped ricotta recipe is sure to delight your taste buds.

Ingredients:
- 1 cup ricotta cheese
- 1 tablespoon olive oil
- 1 clove garlic, minced
- 1 teaspoon lemon zest
- Salt and pepper, to taste
- Fresh herbs (such as basil, parsley, or thyme) for garnish (optional)
- Crackers, bread, or fresh vegetables for serving

Instructions:
1. In a medium bowl, combine the ricotta cheese, olive oil, minced garlic, and lemon zest.
2. Using a hand mixer or immersion blender, whip the mixture until smooth and creamy, about 2-3 minutes.
3. Season the whipped ricotta with salt and pepper to taste, adjusting the seasoning as needed.
4. Transfer the whipped ricotta to a serving bowl and garnish with fresh herbs, if desired.
5. Serve the whipped ricotta with crackers, bread, or fresh vegetables for dipping.

Tips for Success:
- Use whole milk ricotta for the creamiest texture, but part-skim ricotta will also work well.
- Feel free to customize the flavor of the whipped ricotta by adding your favorite herbs, spices, or citrus zest.
- For extra flavor, drizzle the whipped ricotta with a bit of honey or balsamic glaze before serving.
- Leftover whipped ricotta can be stored in an airtight container in the refrigerator for up to 3 days.

Conclusion:
With just a handful of simple ingredients and five minutes of your time, you can whip up this delicious and versatile appetizer that's sure to impress. Whether you're entertaining guests or enjoying a quiet night in, this Whipped Ricotta Delight is the perfect way to elevate any occasion. So go ahead, give it a try, and prepare to be delighted by the creamy, flavorful goodness of whipped ricotta!

כמו
תגובה
לַחֲלוֹק
Donna Valentine
Donna Valentine  
1 י ·תרגם

Introducing \Real Healthy\: Your Guide to Unprocessing Your Diet! Welcome to "Real Healthy," your ultimate guide to unprocessing your diet and embracing a lifestyle of real, wholesome foods. In a world inundated with processed snacks, fast food, and convenience meals, it's easy to lose sight of the importance of nourishing our bodies with natural, nutrient-dense ingredients. But fear not, because "Real Healthy" is here to show you how to reclaim control of your diet and prioritize health and wellness like never before.

Unprocessed Eating: What It's All About
At its core, unprocessed eating is about returning to the basics – consuming foods in their most natural state, free from artificial additives, preservatives, and excess sugar, salt, and unhealthy fats. By focusing on whole foods like fruits, vegetables, lean proteins, whole grains, and healthy fats, you'll not only nourish your body with essential nutrients but also support optimal health and well-being.

Benefits of Unprocessing Your Diet
Unprocessing your diet offers a myriad of benefits, including:
1. Improved Nutrition: Whole foods are packed with essential vitamins, minerals, antioxidants, and fiber that support overall health and vitality.
2. Better Digestion: By eliminating processed foods, you'll reduce your intake of gut-disrupting ingredients like artificial sweeteners, emulsifiers, and refined grains, leading to improved digestion and gut health.
3. Weight Management: Whole foods are naturally lower in calories and higher in satiating nutrients, making it easier to manage your weight and maintain a healthy body composition.
4. Enhanced Energy Levels: Real, unprocessed foods provide sustained energy without the crashes and cravings associated with processed snacks and sugary treats.
5. Reduced Risk of Chronic Disease: A diet rich in whole foods has been linked to a lower risk of chronic diseases like heart disease, diabetes, and certain cancers.

Getting Started with 'Real Healthy'
Ready to embark on your journey to unprocessed eating? Here's how to get started:
1. Stock Your Kitchen: Fill your pantry and fridge with whole foods like fruits, vegetables, whole grains, lean proteins, nuts, and seeds.
2. Read Labels: Learn to decipher food labels and avoid products with long lists of ingredients, artificial additives, and added sugars.
3. Cook at Home: Embrace home cooking and experiment with simple, nutritious recipes using fresh, whole ingredients.
4. Plan Ahead: Take time to meal plan and prep ahead to ensure you have healthy options on hand throughout the week.
5. Practice Mindful Eating: Slow down, savor your meals, and listen to your body's hunger and fullness cues to avoid overeating.

Conclusion:
"Real Healthy" is more than just a diet – it's a lifestyle centered around nourishing your body with real, wholesome foods that support your health and well-being. By unprocessing your diet and embracing the power of whole foods, you'll not only look and feel better but also enjoy a lifetime of vibrant health and vitality. So join us on this journey to unprocessed eating and discover the incredible benefits of embracing a real, healthy lifestyle.

כמו
תגובה
לַחֲלוֹק
Donna Valentine
Donna Valentine  
1 י ·תרגם

Wholesome Delight: Cauliflower Shawarma Bowls with Green Tahini Sauce Cauliflower Shawarma Bowls with Green Tahini Sauce offer a flavorful and nutritious twist on a beloved Middle Eastern dish. Packed with vibrant colors, bold flavors, and wholesome ingredients, these bowls are a feast for both the eyes and the taste buds. Whether you're a fan of cauliflower or looking to add more plant-based meals to your diet, this recipe is sure to impress.

Recipe:

Ingredients:
- 1 head cauliflower, cut into florets
- 2 tablespoons olive oil
- 1 tablespoon shawarma seasoning
- Salt and pepper, to taste
- 1 cup cooked quinoa
- 1 cup chickpeas, drained and rinsed
- 1 cup cherry tomatoes, halved
- 1 cucumber, diced
- 1/4 cup chopped fresh parsley
- Green Tahini Sauce:
- 1/4 cup tahini
- 1/4 cup fresh cilantro
- 1/4 cup fresh parsley
- 2 tablespoons lemon juice
- 1 clove garlic
- Salt and pepper, to taste
- Water, as needed

Instructions:
1. Preheat your oven to 425°F (220°C).
2. In a large bowl, toss the cauliflower florets with olive oil, shawarma seasoning, salt, and pepper until evenly coated.
3. Spread the cauliflower in a single layer on a baking sheet lined with parchment paper. Roast in the preheated oven for 25-30 minutes, or until golden brown and tender.
4. While the cauliflower is roasting, prepare the Green Tahini Sauce. In a blender or food processor, combine tahini, cilantro, parsley, lemon juice, garlic, salt, and pepper. Blend until smooth, adding water as needed to achieve your desired consistency. Set aside.
5. To assemble the bowls, divide cooked quinoa among serving bowls. Top with roasted cauliflower, chickpeas, cherry tomatoes, cucumber, and chopped parsley.
6. Drizzle Green Tahini Sauce over the bowls just before serving.

Serve:
These Cauliflower Shawarma Bowls with Green Tahini Sauce are best served fresh and enjoyed immediately. The combination of tender roasted cauliflower, fluffy quinoa, crunchy vegetables, and creamy tahini sauce creates a harmonious blend of textures and flavors. Serve as a light lunch or dinner, and savor every wholesome bite.

Conclusion:
Cauliflower Shawarma Bowls with Green Tahini Sauce are a delicious and nutritious meal option that's perfect for any occasion. Whether you're cooking for yourself or sharing with loved ones, these bowls are sure to delight your taste buds and nourish your body. So gather your ingredients, whip up a batch of these flavorful bowls, and treat yourself to a wholesome culinary experience that's as satisfying as it is nutritious.

כמו
תגובה
לַחֲלוֹק
Donna Valentine
Donna Valentine  
1 י ·תרגם

Sausage Biscuit Bites: Easy and Delicious Party Treats! Sausage Biscuit Bites are the ultimate crowd-pleaser, whether you're hosting a party or looking for a quick breakfast option. With just three simple ingredients, these bite-sized treats are easy to make and incredibly delicious. Perfectly savory and satisfying, they'll disappear in no time at your next gathering.

Recipe:
To make these Sausage Biscuit Bites, you'll need:
- Refrigerated biscuit dough
- Cooked breakfast sausage
- Shredded cheddar cheese

Instructions:
1. Preheat your oven to the temperature specified on the biscuit dough package.
2. Roll out the biscuit dough on a flat surface and cut it into small squares or circles.
3. Place a small piece of cooked breakfast sausage on each piece of dough.
4. Sprinkle shredded cheddar cheese over the sausage.
5. Fold the dough over the sausage and cheese, forming a mini biscuit bite.
6. Place the biscuit bites on a baking sheet lined with parchment paper.
7. Bake in the preheated oven for the time indicated on the biscuit dough package, or until the bites are golden brown and cooked through.

Serve:
Once baked, these Sausage Biscuit Bites are ready to serve and enjoy! They're perfect for serving as appetizers at parties or as a quick and satisfying breakfast option. Arrange them on a platter with toothpicks for easy serving, and watch as your guests devour them with delight.

Conclusion:
Sausage Biscuit Bites are a simple yet irresistible treat that's sure to be a hit at any gathering. With just three ingredients and minimal prep time, they're perfect for busy mornings or impromptu get-togethers. Whether you're hosting a party or simply looking for a tasty snack, these bite-sized delights are sure to satisfy. So, gather your ingredients and give this recipe a try – your taste buds will thank you!

כמו
תגובה
לַחֲלוֹק
Donna Valentine
Donna Valentine  
1 י ·תרגם

Decadent Chocolate Pudding Cake: A Skillet Delight! Indulge in the ultimate chocolate lover's dream with our decadent Chocolate Pudding Cake! This skillet dessert is a fudgy, moist delight that's sure to please even the toughest cake critics. Imagine the rich taste of chocolate pudding combined with the gooey goodness of lava cake – that's what you'll get with every bite of this heavenly treat. Top it off with a scoop of ice cream or whipped cream for an extra touch of indulgence. Plus, it's vegan and gluten-free, so everyone can enjoy!

### Ingredients:
- Non-dairy milk
- Coconut oil
- Vanilla extract
- Almond flour
- Coconut sugar
- Cacao powder
- Chocolate chips

### Instructions:
1. Preheat your oven and prepare a skillet.
2. In a mixing bowl, combine the non-dairy milk, melted coconut oil, and vanilla extract.
3. Add almond flour, coconut sugar, and cacao powder to the wet ingredients, stirring until well combined.
4. Fold in the chocolate chips to the batter.
5. Pour the batter into the prepared skillet and spread it evenly.
6. Bake the cake until it's set and a toothpick inserted into the center comes out clean.
7. Let the cake cool slightly before serving.
8. Top with a scoop of ice cream or whipped cream for an extra indulgent treat.

This Chocolate Pudding Cake is perfect for any occasion, whether you're celebrating a special event or simply craving something sweet. Its rich chocolate flavor and moist texture will have everyone coming back for seconds. Plus, since it's vegan and gluten-free, it's a dessert that can accommodate various dietary preferences. So, save this recipe and treat yourself to a slice of chocolatey bliss – you won't be disappointed!

כמו
תגובה
לַחֲלוֹק
Donna Valentine
Donna Valentine  
1 י ·תרגם

Rolling in Freshness: Mastering Gỏi Cuốn (Vietnamese Summer Rolls)


Experience the vibrant flavors and fresh ingredients of Vietnamese cuisine with our guide to mastering Gỏi Cuốn, also known as Vietnamese Summer Rolls. These delectable rolls are not only a culinary delight but also a feast for the eyes, bursting with colorful veggies, aromatic herbs, and your choice of protein. Join us as we dive into the art of making these refreshing summer treats right in your own kitchen.

1. Gather Your Ingredients:
To create the perfect Gỏi Cuốn, you'll need a few key ingredients. Start with rice paper wrappers, which serve as the base for your rolls. Then, select a variety of fresh vegetables such as lettuce, cucumber, carrots, and bell peppers. Don't forget to add some aromatic herbs like mint, cilantro, and Thai basil for an extra burst of flavor. Finally, choose your protein, whether it's succulent shrimp, tender slices of chicken or beef, or crispy tofu for a vegetarian option.

2. Prep Your Fillings:
Before assembling your summer rolls, it's essential to prepare your fillings. Wash and chop your vegetables into thin strips, ensuring they're all uniform in size for easy rolling. If using shrimp, cook them until they're pink and opaque, then slice them in half lengthwise. For tofu, cut it into thin strips and lightly fry or bake until golden brown and crispy.

3. Soak Your Rice Paper Wrappers:
To assemble your summer rolls, you'll need to soften the rice paper wrappers. Fill a shallow dish with warm water and dip each rice paper wrapper into the water for a few seconds until it becomes pliable. Place the soaked wrapper on a clean, damp kitchen towel or a plate.

4. Fill and Roll:
Now comes the fun part – filling and rolling your summer rolls! Start by placing a few strips of each vegetable, a couple of slices of protein, and a few herb leaves in the center of the rice paper wrapper, leaving some space on either side. Fold the bottom edge of the wrapper over the fillings, then fold in the sides and roll tightly until you reach the top. Repeat with the remaining wrappers and fillings.

5. Serve with Dipping Sauce:
No Gỏi Cuốn is complete without a delicious dipping sauce. Whip up a simple sauce using a combination of soy sauce, hoisin sauce, lime juice, garlic, and chili for a perfect balance of sweet, savory, and tangy flavors. Alternatively, you can use peanut sauce or nuoc cham, a traditional Vietnamese dipping sauce made with fish sauce, lime juice, sugar, garlic, and chili.

Conclusion:
With our guide to mastering Gỏi Cuốn, you can create your own fresh and flavorful Vietnamese Summer Rolls at home. Experiment with different fillings, sauces, and dipping options to customize your rolls to your taste preferences. Whether enjoyed as a light snack, appetizer, or even a main course, these homemade summer rolls are sure to impress with their vibrant colors, refreshing flavors, and irresistible crunch. So gather your ingredients, roll up your sleeves, and get ready to roll in freshness with Gỏi Cuốn!

image
כמו
תגובה
לַחֲלוֹק
Showing 7603 out of 8752
  • 7599
  • 7600
  • 7601
  • 7602
  • 7603
  • 7604
  • 7605
  • 7606
  • 7607
  • 7608
  • 7609
  • 7610
  • 7611
  • 7612
  • 7613
  • 7614
  • 7615
  • 7616
  • 7617
  • 7618

ערוך הצעה

הוסף נדבך


בחר תמונה
מחק את השכבה שלך
האם אתה בטוח שברצונך למחוק את השכבה הזו?

ביקורות

על מנת למכור את התוכן והפוסטים שלך, התחל ביצירת מספר חבילות. מונטיזציה

שלם באמצעות ארנק

התראת תשלום

אתה עומד לרכוש את הפריטים, האם אתה רוצה להמשיך?

בקש החזר