Good and Bad People Good and Bad People
    #homedecor #socialmedia #usa #digitalmarketer #seoservice
    Napredno pretraživanje
  • Prijaviti se
  • Registar

  • Noćni način
  • © 2025 Good and Bad People
    Oko • Imenik • Kontaktirajte nas • Programeri • Politika privatnosti • Uvjeti korištenja • Povrat novca • Referral Terms • Acceptable Use Policy • Community Guidelines • Write for Us

    Odaberi Jezik

  • Arabic
  • Bengali
  • Chinese
  • Croatian
  • Danish
  • Dutch
  • English
  • Filipino
  • French
  • German
  • Hebrew
  • Hindi
  • Indonesian
  • Italian
  • Japanese
  • Korean
  • Persian
  • Portuguese
  • Russian
  • Spanish
  • Swedish
  • Turkish
  • Urdu
  • Vietnamese

Gledati

Gledati Koluti

Događaji

Pregledajte događaje Moji događaji

Blog

Pregledajte članke

Tržište

Najnoviji proizvodi

Stranice

Moje stranice Stranice koje mi se sviđaju

Više

Istražiti popularne objave Poslovi Ponude Sredstva
Koluti Gledati Događaji Tržište Blog Moje stranice Vidi sve

Otkriti postovi

Posts

Korisnici

Stranice

Skupina

Blog

Tržište

Događaji

Poslovi

Sredstva

Amelia's Stylish Spaces
1 Y ·Prevedi

**Sweet and Savory Air Fryer Salmon with Honey Garlic Glaze: A Deliciously Simple Recipe**

If you're searching for a dinner option that's both easy to prepare and bursting with flavor, look no further than Sweet and Savory Air Fryer Salmon with Honey Garlic Glaze. This recipe combines the crispy perfection of air frying with the rich, complex flavors of honey and garlic, creating a dish that's both sophisticated and accessible. Whether you're a seasoned cook or a kitchen novice, this dish is sure to become a staple in your culinary repertoire.

### Why Use an Air Fryer for Salmon?

Air fryers have revolutionized home cooking by offering a way to achieve crispy, flavorful dishes with significantly less oil than traditional frying methods. This is particularly beneficial when preparing salmon, as the air fryer can crisp up the skin and edges while keeping the interior tender and moist. Additionally, air fryers cook food quickly, making them ideal for busy weeknights or spontaneous dinner plans.

### Ingredients You'll Need

**For the Salmon*

- 4 salmon fillets (6 oz each), skin-on or skinless

- 1 tablespoon olive oil

- Salt and black pepper to taste

**For the Honey Garlic Glaze*

- 1/4 cup honey

- 3 tablespoons soy sauce

- 2 cloves garlic, minced

- 1 tablespoon rice vinegar or apple cider vinegar

- 1 teaspoon grated fresh ginger (optional for added zing)

- 1 tablespoon cornstarch mixed with 2 tablespoons water (for thickening)

### Preparing the Salmon

1. **Preheat Your Air Fryer**: Set your air fryer to 400°F (200°C). Preheating ensures an even cooking temperature and helps achieve a crispy exterior.

2. **Prepare the Salmon**: Pat the salmon fillets dry with paper towels. This step is crucial for getting a crispy finish. Brush the fillets lightly with olive oil and season with salt and black pepper.

3. **Air Fry the Salmon**: Place the salmon fillets in the air fryer basket in a single layer, making sure they are not touching. Cook for 8-10 minutes, depending on the thickness of the fillets. The salmon should be cooked through and have a crispy exterior.

### Making the Honey Garlic Glaze

1. **Combine Ingredients**: In a small saucepan, combine the honey, soy sauce, minced garlic, and vinegar. If using ginger, add it to the mixture.

2. **Simmer and Thicken**: Heat the mixture over medium heat, stirring occasionally. Once it begins to simmer, mix the cornstarch with water to create a slurry. Slowly pour the slurry into the simmering sauce, stirring constantly until the glaze thickens and becomes glossy. This should take about 2-3 minutes. Remove from heat.

3. **Adjust Flavor**: Taste the glaze and adjust seasoning if necessary. If you prefer a sweeter glaze, add a bit more honey. For extra tanginess, add a splash more vinegar.

### Assembling the Dish

1. **Glaze the Salmon**: Once the salmon is cooked, transfer it to a serving plate. Spoon the warm honey garlic glaze generously over the top of each fillet. For an extra touch of flavor, drizzle a little more glaze on the plate.

2. **Garnish**: Garnish with chopped fresh parsley or sliced green onions if desired. A sprinkle of sesame seeds can also add a nice touch of texture and flavor.

### Serving Suggestions

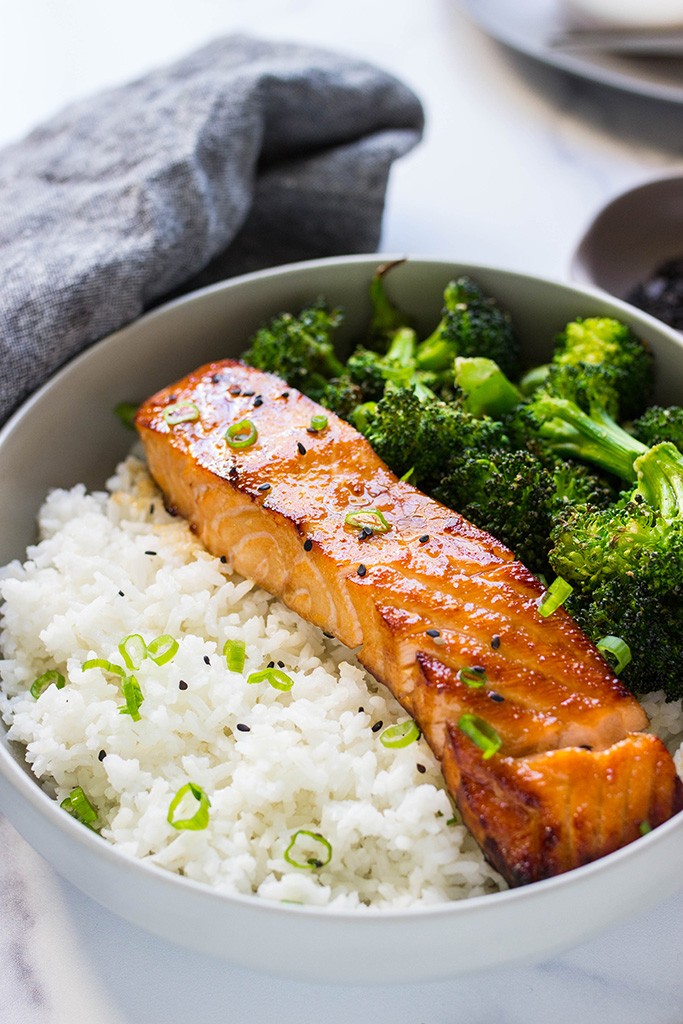
This Sweet and Savory Air Fryer Salmon pairs beautifully with a variety of side dishes. Consider serving it with:

- **Steamed Vegetables**: Broccoli, green beans, or asparagus are excellent choices.

- **Rice or Quinoa**: These grains are perfect for soaking up the extra glaze.

- **Salad**: A crisp green salad with a light vinaigrette can balance the rich flavors of the salmon.

### Tips for Perfect Air Fryer Salmon

1. **Avoid Overcrowding**: For the crispiest results, ensure the salmon fillets are not overcrowded in the air fryer basket. Cook in batches if necessary.

2. **Monitor Cooking Time**: Air fryer models can vary, so keep an eye on the salmon as it cooks. Start checking for doneness a couple of minutes before the recommended time to avoid overcooking.

3. **Rest the Salmon**: Allow the salmon to rest for a few minutes after cooking. This helps the juices redistribute and keeps the fish moist.

### Final Thoughts

Sweet and Savory Air Fryer Salmon with Honey Garlic Glaze is a delightful recipe that combines simplicity with sophistication. The air fryer makes cooking this dish a breeze, while the honey garlic glaze adds a burst of flavor that elevates the salmon to new heights. Whether you're preparing a quick weeknight dinner or a special meal for guests, this recipe is sure to impress. Give it a try and enjoy a deliciously healthy meal that's both easy and elegant!

#easydinneridea

image
Kao
Komentar
Udio
Rack occasion discount
1 Y

image
Kao
Komentar
Udio
Henry Travel Dreamscapes
1 Y ·Prevedi

Unleash Your Creativity with the Cheyona Melaliner Eyeshadow Palette

Are you ready to elevate your eye makeup game to new heights? The Cheyona Melaliner Eyeshadow Palette is here to transform your beauty routine with its stunning array of vibrant, blendable shades. Whether you're a makeup enthusiast or just looking to experiment with new looks, this palette offers everything you need to create breathtaking eye-catching styles.

**Why You’ll Love the Cheyona Melaliner Eyeshadow Palette**

1. **Vibrant Color Selection**: The Cheyona Melaliner Palette features a diverse range of hues that cater to every mood and occasion. From bold, striking colors to subtle, sophisticated tones, this palette provides endless possibilities for creating both everyday and dramatic eye looks. Each shade is carefully curated to offer versatility and impact.

2. **Exceptional Blendability**: Designed for ease of use, the eyeshadows in this palette blend seamlessly. The smooth, velvety texture allows for effortless application and blending, helping you achieve a flawless finish every time. Whether you're crafting a soft gradient or a bold, layered look, you'll find that these shades work harmoniously together.

3. **Intense Pigmentation**: Each shade in the Cheyona Melaliner Palette is formulated to deliver rich, intense color payoff. You can expect vibrant, true-to-pan colors that pop on your eyelids, making it easy to create stunning eye looks that stand out.

4. **Long-Lasting Wear**: The high-quality formula ensures that your eye makeup stays put throughout the day or night. Enjoy a long-lasting, smudge-resistant finish that maintains its brilliance from morning until evening, so you can look fabulous without constant touch-ups.

5. **Versatile Looks**: Whether you're going for a subtle daytime look or a bold, dramatic evening style, the Cheyona Melaliner Palette has you covered. Mix and match shades to create personalized looks that suit your mood, occasion, and outfit.

**How to Get the Most Out of Your Palette**

- **Prep Your Eyes**: Start with a primer or eyeshadow base to create a smooth canvas and enhance the longevity of your eyeshadow.
- **Build Your Look**: Apply your chosen shades starting with lighter colors as a base and build up with darker or bolder hues. Use blending brushes to create seamless transitions between shades.
- **Experiment and Play**: Don’t be afraid to mix colors and experiment with different combinations. The versatility of the palette allows you to explore various looks, from classic smokey eyes to vibrant, artistic designs.

**Perfect for Every Makeup Lover**

The Cheyona Melaliner Eyeshadow Palette is ideal for makeup lovers of all levels. Its blendable textures, rich pigments, and versatile shades make it a staple for anyone looking to enhance their eye makeup collection. Whether you're preparing for a casual day out or a glamorous night on the town, this palette provides everything you need to achieve the perfect look.

**Get Your Cheyona Melaliner Eyeshadow Palette Today**

Ready to bring a splash of color and creativity into your beauty routine? The Cheyona Melaliner Eyeshadow Palette is your go-to for achieving stunning, standout eye looks. Don’t miss out on the chance to elevate your makeup game with this must-have palette.

Order yours today and start exploring the endless possibilities of vibrant, beautiful eye makeup!

image
Kao
Komentar
Udio
Henry Travel Dreamscapes
1 Y ·Prevedi

Achieve Flawless Precision with Lancôme Artliner Gentle Felt Eyeliner – Bold Line 01 Black

Looking for an eyeliner that combines precision, intensity, and ease of use? Look no further than the Lancôme Artliner Gentle Felt Eyeliner in Bold Line 01 Black. This luxurious eyeliner is designed to help you create sharp, dramatic lines with ease, making it a must-have for any beauty enthusiast.

**Why Choose Lancôme Artliner Gentle Felt Eyeliner?**

1. **Precision with Every Stroke**: The Lancôme Artliner features a felt-tip applicator that delivers impeccable precision, allowing you to create everything from delicate, thin lines to bold, dramatic statements. The gentle felt tip glides smoothly across your eyelid, ensuring a clean and even application every time.

2. **Intense Black Pigment**: The Bold Line 01 Black shade offers a deep, intense black color that provides maximum impact. Whether you're aiming for a classic winged look or a more daring graphic eyeliner style, this rich, saturated pigment ensures your eyes make a statement.

3. **Gentle Formula**: Despite its bold performance, the Artliner’s formula is designed to be gentle on your delicate eye area. It’s ideal for those with sensitive eyes or contact lens wearers, providing a comfortable wear without irritation.

4. **Long-Lasting Wear**: Enjoy confidence that your eyeliner will stay put from morning until night. Lancôme’s Artliner is formulated to be long-lasting, resisting smudging and fading so your eye look remains flawless throughout the day.

5. **User-Friendly Design**: The ergonomic design of the Artliner makes it easy to handle and control, even for those who are new to applying liquid eyeliner. Its sleek packaging and convenient size ensure that it’s perfect for both home use and travel.

**How to Apply for Maximum Impact**

- **Prep Your Eyes**: Start with a clean, primed eyelid to ensure your eyeliner adheres smoothly and lasts longer.
- **Draw Your Line**: Using the felt-tip applicator, gently trace along your lash line. For a classic look, apply as close to the lashes as possible. For a bolder effect, extend the line outward and upward.
- **Build Intensity**: Layer the eyeliner to achieve your desired level of boldness. The Artliner’s formula allows you to build intensity without clumping or smudging.

**Ideal for Any Look**

Whether you’re crafting a sophisticated, everyday look or a bold, glamorous statement, Lancôme Artliner Gentle Felt Eyeliner is your go-to product. Its versatile design makes it suitable for any occasion, from professional meetings to glamorous nights out.

**Get Your Lancôme Artliner Gentle Felt Eyeliner Today**

Elevate your eye makeup routine with the Lancôme Artliner Gentle Felt Eyeliner in Bold Line 01 Black. With its precise application, intense color payoff, and long-lasting formula, it’s an essential addition to your beauty arsenal.

Don’t miss out—experience the perfect blend of precision and intensity and transform your eye looks effortlessly. Grab your Lancôme Artliner now and make every line count!

image
Kao
Komentar
Udio
Tamsin Haute Hues
Tamsin Haute Hues
1 Y ·Prevedi

### 35+ Budget-Friendly Family Meals: Delicious & Easy Recipes for Every Night

Feeding a family can be both a joyous and challenging task, especially when trying to stick to a budget. But don't worry—delicious and affordable meals are within reach! We’ve gathered over 35 budget-friendly family meal ideas that are not only easy to prepare but also packed with flavor. These recipes will help you save money while keeping your family happy and satisfied every night of the week.

#### Why Budget-Friendly Meals?

Balancing family meals with a budget can be a daunting task, but it’s essential for maintaining financial health and ensuring you’re not sacrificing taste or nutrition. Budget-friendly meals allow you to enjoy hearty, flavorful dishes without overspending. By incorporating affordable ingredients and simple cooking techniques, you can create meals that everyone will love and that won’t break the bank.

#### Recipe Ideas:

**1. One-Pan Chicken and Vegetables**
- This easy recipe combines chicken thighs with a variety of seasonal vegetables, all cooked together in one pan. Simply season, roast, and enjoy a hearty, healthy meal.

**2. Spaghetti Aglio e Olio**
- A classic Italian dish made with just spaghetti, garlic, olive oil, and red pepper flakes. It’s simple, quick, and incredibly affordable.

**3. Beef and Bean Chili**
- A rich and comforting chili that uses ground beef and beans for protein. Top with cheese and sour cream for extra flavor without adding much cost.

**4. Veggie Stir-Fry**
- Toss together your favorite vegetables with a simple stir-fry sauce. Serve over rice or noodles for a filling, inexpensive meal.

**5. Chicken and Rice Casserole**
- This comforting casserole combines chicken, rice, and vegetables in a creamy sauce. It’s a great way to use up pantry staples and leftovers.

**6. Lentil Soup**
- Packed with protein and fiber, lentil soup is not only nutritious but also budget-friendly. It’s a great way to use dried lentils, which are very economical.

**7. Tuna Pasta Bake**
- Combine canned tuna, pasta, and a cheesy sauce for a quick and easy meal that’s both filling and affordable.

**8. Homemade Pizza**
- Make your own pizza dough and top with simple ingredients like tomato sauce, cheese, and vegetables. It’s cheaper than takeout and you can customize it to your family’s tastes.

**9. Stuffed Bell Peppers**
- Bell peppers stuffed with a mixture of rice, ground meat, and spices. It’s a colorful and satisfying meal that’s easy on the wallet.

**10. Egg Fried Rice**
- A great way to use up leftover rice and vegetables. Scramble eggs into the mix for a quick and satisfying meal.

#### Tips for Budget-Friendly Meal Planning:

1. **Plan Your Meals**: Take the time to plan your weekly meals and make a shopping list based on your plan. This helps avoid impulse buys and reduces food waste.

2. **Use Pantry Staples**: Make the most of pantry staples like rice, pasta, canned beans, and tomatoes. These ingredients are versatile and can form the base of many budget-friendly meals.

3. **Buy in Bulk**: Purchasing items like meat and grains in bulk can save money in the long run. Freeze portions to use over time.

4. **Cook in Batches**: Prepare larger quantities and freeze leftovers for future meals. This saves time and ensures you always have a quick meal on hand.

5. **Seasonal Produce**: Buy fruits and vegetables that are in season. They are often cheaper and fresher, which enhances your meals.

6. **Repurpose Leftovers**: Get creative with leftovers. For example, leftover chicken can become chicken salad, a topping for pizza, or be added to a soup.

7. **Embrace Meatless Meals**: Incorporate meatless dishes like beans, lentils, and vegetables into your meal plan. They are usually more affordable and can be just as satisfying.

#### Sample Meal Plan:

**Monday* One-Pan Chicken and Vegetables
**Tuesday* Spaghetti Aglio e Olio
**Wednesday* Beef and Bean Chili
**Thursday* Veggie Stir-Fry
**Friday* Chicken and Rice Casserole
**Saturday* Lentil Soup
**Sunday* Homemade Pizza

With these 35+ budget-friendly family meal ideas, you’ll find that eating well doesn’t have to be expensive. By planning ahead and making smart ingredient choices, you can enjoy a variety of delicious meals without stretching your budget. Start incorporating these recipes into your meal planning, and watch as dinner time becomes both easier and more affordable.

Happy cooking, and don’t forget to share your favorite budget-friendly recipes with friends and family!

#budgetfriendlymeals #familydinnerideas #easyrecipes #cheapeats #mealplanning #affordablemeals #weeklymenu #healthyeating #cookingonabudget

image
Kao
Komentar
Udio
Henry Travel Dreamscapes
1 Y ·Prevedi

Discover the Maven Basic Beat Eyeshadow Palette: Your Ultimate Beauty Essential

Are you ready to elevate your eye makeup game? The Maven Basic Beat Eyeshadow Palette for Women is here to transform your beauty routine with its exquisite range of neutral shades. Whether you're a makeup novice or a seasoned pro, this palette is designed to help you create effortlessly stunning looks for any occasion.

**Why You'll Love the Maven Basic Beat Eyeshadow Palette**

1. **Perfectly Curated Shades**: The Maven Basic Beat Palette features a versatile selection of neutral tones that are perfect for any look. From soft beiges and warm browns to rich taupes and deep charcoals, these shades are designed to complement all skin tones and enhance your natural beauty.

2. **Silky-Smooth Formula**: Each eyeshadow in the palette is crafted with a silky-smooth formula that glides on effortlessly and blends seamlessly. The high-quality pigments provide rich color payoff and long-lasting wear, so your eye makeup stays flawless from morning to night.

3. **Versatile Looks**: Whether you're aiming for a subtle everyday look or a dramatic evening eye, the Maven Basic Beat Palette has you covered. Mix and match shades to create endless combinations, from soft and understated to bold and smoky. The palette’s versatility makes it a must-have for any beauty enthusiast.

4. **Easy Application**: Designed with user-friendly application in mind, the palette’s shades are easy to apply and blend. Whether you're using a brush or your fingers, you’ll find that the eyeshadows layer beautifully, allowing you to achieve the perfect look with minimal effort.

5. **Compact and Travel-Friendly**: The sleek, compact design of the Maven Basic Beat Palette makes it ideal for on-the-go beauty. Its durable packaging ensures that your eyeshadows stay intact and travel-friendly, so you can bring your favorite shades wherever you go.

**How to Use the Maven Basic Beat Palette**

- **Base Shade**: Start with a neutral base shade to create a smooth canvas for the rest of your eyeshadow.
- **Crease Definition**: Apply a slightly darker shade to the crease to add depth and dimension to your eyes.
- **Lid Color**: Choose a lighter or shimmer shade to highlight the lid and brighten your eyes.
- **Smoky Effect**: For a dramatic look, blend deeper shades along the lash line and outer corners to create a smoky effect.

**Perfect for Every Occasion**

From everyday wear to special events, the Maven Basic Beat Eyeshadow Palette is your go-to for creating beautiful, versatile eye looks. Its neutral tones make it suitable for any occasion, whether you're heading to the office, a night out, or a special celebration.

**Get Your Maven Basic Beat Eyeshadow Palette Today!**

Elevate your eye makeup game and embrace the versatility of the Maven Basic Beat Eyeshadow Palette. With its blendable formulas and flattering shades, it’s your key to achieving flawless eye looks effortlessly.

Don’t miss out—add this essential palette to your beauty collection and discover the perfect shades to enhance your natural beauty. Get ready to shine with every blink!

image
Kao
Komentar
Udio
Tamsin Haute Hues
Tamsin Haute Hues
1 Y ·Prevedi

### 30-Minute Creamy Cajun Chicken Pasta: Quick & Easy Dinner Recipe!

Looking for a quick dinner that’s both rich and full of flavor? Our 30-Minute Creamy Cajun Chicken Pasta is the perfect answer. This dish combines the bold spices of Cajun seasoning with a creamy, luscious sauce, making it a delightful choice for busy weeknights or when you’re simply craving something indulgent. With just 30 minutes from start to finish, this recipe is both convenient and satisfying. Let’s dive into how you can whip up this delicious meal with ease.

#### Ingredients:
- 1 lb (450g) chicken breasts or thighs, diced
- 8 oz (225g) pasta (penne, fettuccine, or your favorite)
- 2 tablespoons Cajun seasoning
- 2 tablespoons olive oil
- 1 small onion, finely chopped
- 3 cloves garlic, minced
- 1 cup heavy cream
- 1/2 cup chicken broth
- 1/2 cup grated Parmesan cheese
- 1 cup cherry tomatoes, halved (optional)
- 1/4 cup chopped fresh parsley
- Salt and pepper, to taste

#### Instructions:

1. **Cook the Pasta**:
- Bring a large pot of salted water to a boil. Cook the pasta according to package instructions until al dente. Drain and set aside.

2. **Season and Cook the Chicken**:
- While the pasta is cooking, season the diced chicken with Cajun seasoning. Heat olive oil in a large skillet over medium-high heat. Add the chicken and cook for 5-7 minutes, or until fully cooked and golden brown. Remove the chicken from the skillet and set aside.

3. **Sauté the Aromatics**:
- In the same skillet, add a little more olive oil if needed. Sauté the chopped onion until translucent, about 2-3 minutes. Add the minced garlic and cook for another 30 seconds, or until fragrant.

4. **Make the Sauce**:
- Pour in the heavy cream and chicken broth, stirring to combine. Bring to a simmer and let the sauce cook for 2-3 minutes, or until it starts to thicken. Stir in the Parmesan cheese until melted and well combined.

5. **Combine and Finish**:
- Return the cooked chicken to the skillet and mix well. If using, add the cherry tomatoes and cook for an additional 2 minutes. Toss the cooked pasta into the skillet, ensuring it’s fully coated with the creamy sauce. Season with additional salt and pepper if needed.

6. **Garnish and Serve**:
- Sprinkle the chopped parsley over the pasta for a fresh touch. Serve immediately and enjoy your creamy, spicy, and satisfying meal.

#### Tips for Success:

- **Pasta Choice**: Choose a pasta shape that holds onto sauce well, like penne or fettuccine.
- **Cream**: For a lighter version, you can substitute heavy cream with half-and-half or whole milk, though the sauce will be less rich.
- **Heat Level**: Adjust the Cajun seasoning to your taste. For a milder dish, use less seasoning or choose a milder Cajun blend.

#### Variations and Add-Ins:

- **Veggies**: Add sautéed bell peppers, spinach, or mushrooms for extra flavor and nutrition.
- **Protein**: Swap chicken for shrimp or sausage for a different twist on this dish.
- **Cheese**: Experiment with different cheeses like Gouda or Asiago for a unique flavor profile.

Our 30-Minute Creamy Cajun Chicken Pasta is not only quick to prepare but also packed with flavor, making it a go-to recipe for busy nights. With its creamy sauce and spicy kick, it’s sure to become a favorite in your recipe rotation. Enjoy this delicious, hassle-free meal that brings both comfort and excitement to your table!

Don’t forget to share your culinary creations and follow us for more quick and tasty recipes. Happy cooking!

#creamycajunchickenpasta #quickdinner #easyrecipes #30minutemeals #spicypasta #comfortfood #weeknightdinner #deliciousandeasy

image
Kao
Komentar
Udio
Henry Travel Dreamscapes
1 Y ·Prevedi

Elevate Your Look with the Gradient Brown Curly Lace Front Wig: The Ultimate Glueless Synthetic Party Essential

Are you ready to make a stunning impression at your next event? The Gradient Brown Curly Lace Front Wig is here to revolutionize your style game! Whether you're gearing up for a glamorous party or just want to add some flair to your everyday look, this wig is the perfect choice.

**Why Choose the Gradient Brown Curly Lace Front Wig?**

1. **Captivating Gradient Brown Color**: The gradient brown hue seamlessly blends lighter and darker tones, creating a rich, multi-dimensional effect that catches the light beautifully. This natural-looking gradient adds depth and dimension, making it the perfect choice for anyone looking to enhance their look with a touch of sophistication.

2. **Luscious Curly Texture**: Featuring voluminous curls that cascade in soft waves, this wig provides an effortlessly glamorous look. The curls are bouncy and full of life, giving you that enviable, just-stepped-out-of-the-salon appearance.

3. **Lace Front for Natural Beauty**: The lace front design ensures a seamless blend with your natural hairline, giving the illusion of real hair growing right from your scalp. The lace is comfortable and breathable, allowing you to wear it all day or night without any discomfort.

4. **Glueless Convenience**: Say goodbye to the hassle of glue and complicated applications. This wig is designed to be worn without adhesives, making it easy to put on and take off whenever you like. It’s perfect for those who want a quick style change without the mess.

5. **Soft and Comfortable**: Made from high-quality synthetic fibers, the Gradient Brown Curly Lace Front Wig is not only beautiful but also incredibly soft to the touch. The fibers mimic the look and feel of natural hair, ensuring you stay comfortable and stylish.

**How to Style and Care for Your Wig**

To keep your Gradient Brown Curly Lace Front Wig looking its best, follow these simple care tips:

- **Gently Detangle**: Use a wide-tooth comb or your fingers to detangle the curls, starting from the ends and working your way up to avoid breakage.
- **Wash with Care**: Use a mild, sulfate-free wig shampoo to gently clean your wig. Avoid rubbing or twisting the fibers; instead, swish it gently in cool water.
- **Dry Naturally**: Allow your wig to air dry on a wig stand to maintain its shape and avoid heat damage.

**Perfect for Any Occasion**

Whether you’re attending a party, a wedding, or just want to add a touch of glamour to your daily routine, the Gradient Brown Curly Lace Front Wig has got you covered. Its versatile style makes it suitable for any occasion, ensuring you always look your best.

Don’t wait to transform your look! Embrace effortless elegance with the Gradient Brown Curly Lace Front Wig and step out with confidence and style.

**Order Yours Today!**

Ready to turn heads and make a lasting impression? Get your Gradient Brown Curly Lace Front Wig now and experience the ultimate in style and convenience. With its stunning gradient color, luscious curls, and glueless design, this wig is the perfect addition to any beauty collection.

Feel fabulous, look fantastic, and enjoy every moment with your new favorite accessory!

image
Kao
Komentar
Udio
Tamsin Haute Hues
Tamsin Haute Hues
1 Y ·Prevedi

### Garlic Parmesan Chicken: Savory and Irresistible Delight

Are you in search of a recipe that combines simplicity with rich, mouthwatering flavors? Look no further! Our Garlic Parmesan Chicken is the answer to your culinary cravings. This dish strikes the perfect balance between crispy, savory, and cheesy, making it an irresistible delight for any meal. Whether you're cooking for a family dinner or prepping a weeknight meal, this recipe promises to deliver delicious results with minimal effort.

#### Ingredients:
- 1 lb (450g) chicken breasts or thighs
- 1/2 cup grated Parmesan cheese
- 1/2 cup breadcrumbs (preferably Panko for extra crunch)
- 4 cloves garlic, minced
- 1/4 cup chopped fresh parsley (or 1 tablespoon dried parsley)
- 1/4 cup melted butter or olive oil
- 1/2 teaspoon dried oregano
- 1/2 teaspoon paprika
- Salt and pepper, to taste
- Lemon wedges, for garnish (optional)

#### Instructions:

1. **Prep the Chicken**:
- Preheat your oven to 400°F (200°C). If using chicken breasts, consider pounding them to an even thickness to ensure uniform cooking. Season both sides of the chicken with salt, pepper, and paprika.

2. **Prepare the Coating**:
- In a shallow dish, combine the grated Parmesan cheese, breadcrumbs, minced garlic, dried oregano, and parsley. Mix well to combine the flavors.

3. **Coat the Chicken**:
- Dip each piece of chicken into the melted butter or olive oil, making sure it’s fully coated. Then, press the chicken into the Parmesan breadcrumb mixture, ensuring it’s well-covered on all sides.

4. **Bake the Chicken**:
- Place the coated chicken pieces on a baking sheet lined with parchment paper or lightly greased. Bake in the preheated oven for 20-25 minutes, or until the chicken is cooked through and the coating is golden and crispy. The internal temperature of the chicken should reach 165°F (75°C).

5. **Serve and Enjoy**:
- Let the chicken rest for a few minutes before serving. Garnish with additional chopped parsley and lemon wedges if desired. This dish pairs wonderfully with a side of roasted vegetables, a fresh salad, or some creamy mashed potatoes.

#### Tips for Success:

- **Breadcrumbs**: For an extra crispy texture, use Panko breadcrumbs. They add a delightful crunch to the coating.
- **Cheese**: Freshly grated Parmesan cheese offers the best flavor and texture. Avoid pre-grated cheese if possible, as it can be less flavorful.
- **Butter vs. Oil**: Using melted butter adds a richer flavor, but olive oil works well for a lighter option.

#### Variations and Add-Ins:

- **Herbs**: Experiment with different herbs like thyme or rosemary for a unique twist.
- **Spicy Kick**: Add a pinch of red pepper flakes to the breadcrumb mixture for a spicy kick.
- **Cheesy**: For an extra cheesy version, sprinkle additional Parmesan on top during the last few minutes of baking.

Garlic Parmesan Chicken is a versatile and delectable dish that’s sure to become a staple in your recipe collection. With its golden, crispy exterior and tender, juicy interior, it’s a crowd-pleaser that’s as easy to make as it is delicious. Perfect for any occasion, this recipe is bound to impress family and friends alike.

Enjoy this savory delight and don’t forget to share your delicious results with us! For more scrumptious recipes and cooking tips, follow our blog and stay inspired in the kitchen.

#garlicparmesanchicken #savoryrecipes #easydinner #cheesygoodness #dinnertonight #quickmeals #comfortfood #foodiefavorites

image
Kao
Komentar
Udio
Amelia's Stylish Spaces
1 Y ·Prevedi

Philly Cheesesteak Roll-Ups! **Philly Cheesesteak Roll-Ups: A Delicious Twist on a Classic Favorite**

Philly cheesesteak is a beloved American classic, known for its tender beef, melted cheese, and savory flavors. But what if you could enjoy all those irresistible elements in a fun, portable, and easy-to-make format? Enter Philly Cheesesteak Roll-Ups—a creative spin on the traditional cheesesteak that’s perfect for appetizers, snacks, or even a casual dinner. This article will guide you through making these delectable roll-ups, exploring their components, providing a step-by-step recipe, and offering tips and variations to make this dish your own.

### The Charm of Philly Cheesesteak Roll-Ups

Philly Cheesesteak Roll-Ups take the essence of the classic Philly cheesesteak and transform it into a versatile, bite-sized treat. These roll-ups feature tender beef and gooey cheese wrapped in a crispy, golden exterior. They’re perfect for parties, game days, or as a fun family dinner. The roll-up format makes them easy to handle, and their flavor-packed filling ensures each bite is full of the cheesesteak goodness you love.

### Ingredients

To make Philly Cheesesteak Roll-Ups, you’ll need the following ingredients:

#### For the Filling:

- 1 lb (450 g) thinly sliced beef sirloin or ribeye

- 1 tbsp olive oil

- 1 medium onion, thinly sliced

- 1 green bell pepper, thinly sliced

- 1/2 cup sliced mushrooms (optional)

- 2 cloves garlic, minced

- Salt and pepper to taste

- 1 tsp Worcestershire sauce

- 1 cup shredded provolone cheese or mozzarella cheese

#### For the Roll-Ups:

- 1 package refrigerated crescent roll dough (or pizza dough for a sturdier option)

- 1 egg, beaten (for egg wash)

### Instructions

#### 1. Prepare the Beef Filling

1. **Cook the Vegetables* In a large skillet, heat olive oil over medium heat. Add the sliced onion, bell pepper, and mushrooms (if using). Sauté for 5-7 minutes, until the vegetables are softened and slightly caramelized.

2. **Cook the Beef* Add the minced garlic to the skillet and cook for an additional minute. Add the thinly sliced beef to the skillet, season with salt and pepper, and cook until browned and cooked through, about 4-5 minutes. Stir in Worcestershire sauce and cook for another minute. Remove from heat and let the mixture cool slightly.

#### 2. Assemble the Roll-Ups

1. **Preheat the Oven* If using crescent roll dough, preheat your oven to 375°F (190°C). If using pizza dough, preheat to 425°F (220°C).

2. **Roll Out Dough* Unroll the crescent roll dough or pizza dough on a lightly floured surface. If using crescent roll dough, press the seams together to form a solid sheet. If using pizza dough, roll it out into a rectangle.

3. **Add the Filling* Spread the beef mixture evenly over the dough, leaving a small border around the edges. Sprinkle the shredded cheese on top of the beef mixture.

4. **Roll and Slice* Carefully roll the dough into a tight log or cylinder, starting from one edge. Slice the roll into 1-inch (2.5 cm) wide pieces.

5. **Prepare for Baking* Place the roll-ups on a baking sheet lined with parchment paper. Brush the tops with the beaten egg to give them a golden finish.

#### 3. Bake the Roll-Ups

1. **Bake* Place the baking sheet in the preheated oven. Bake for 12-15 minutes (cresent roll dough) or 15-18 minutes (pizza dough), until the roll-ups are golden brown and the cheese is melted and bubbly.

2. **Cool* Let the roll-ups cool for a few minutes before serving. They’re best enjoyed warm.

### Tips for Perfect Philly Cheesesteak Roll-Ups

1. **Use Thinly Sliced Beef* Thinly sliced beef cooks quickly and evenly, ensuring a tender filling. If you don’t have pre-sliced beef, you can freeze a steak for about 30 minutes and then slice it thinly.

2. **Customize Your Filling* Feel free to add or omit ingredients based on your preferences. Some people like extra cheese, additional vegetables, or a touch of hot sauce for a kick.

3. **Ensure Even Cooking* Make sure the roll-ups are spaced apart on the baking sheet to ensure even cooking and crispiness.

4. **Serve with Dipping Sauce* These roll-ups are fantastic with a side of dipping sauce. Try a spicy mustard, creamy ranch, or a simple marinara sauce.

### Variations and Add-Ons

1. **Spicy Kick* Add sliced jalapeños or a dash of hot sauce to the beef mixture for an extra kick of heat.

2. **Cheesesteak Deluxe* Incorporate different types of cheese, such as cheddar or American, for a gooey and flavorful filling.

3. **Vegetarian Option* Substitute the beef with sautéed mushrooms, peppers, and onions, and use a plant-based cheese for a vegetarian version.

4. **Philly Cheesesteak Meatballs* Use the same filling recipe to make mini meatballs instead of roll-ups. Serve with toothpicks and dipping sauce for a party appetizer.

### Serving Suggestions

- **For Parties* Serve Philly Cheesesteak Roll-Ups as an appetizer at your next gathering. They’re perfect for finger food and can be enjoyed with a variety of dipping sauces.

- **As a Main Dish* Pair the roll-ups with a side salad or vegetable sticks for a complete meal.

- **For Game Day* These roll-ups are ideal for game day snacks. Prepare them ahead of time and reheat them as needed.

### Conclusion

Philly Cheesesteak Roll-Ups are a creative and delicious twist on the classic Philly cheesesteak sandwich. By transforming this beloved dish into a bite-sized roll-up, you get a crispy, cheesy, and flavorful treat that’s perfect for any occasion. With their versatility and easy preparation, these roll-ups are sure to become a favorite in your recipe collection. Whether you’re hosting a party, preparing a casual dinner, or simply indulging in a snack, Philly Cheesesteak Roll-Ups offer a fun and satisfying way to enjoy all the deliciousness of a classic cheesesteak. Enjoy every savory, cheesy bite! 🥪🌟

#easydinneridea

Kao
Komentar
Udio
Showing 7765 out of 11094
  • 7761
  • 7762
  • 7763
  • 7764
  • 7765
  • 7766
  • 7767
  • 7768
  • 7769
  • 7770
  • 7771
  • 7772
  • 7773
  • 7774
  • 7775
  • 7776
  • 7777
  • 7778
  • 7779
  • 7780

Uredi ponudu

Dodajte razinu


Odaberite sliku
Izbrišite svoju razinu
Jeste li sigurni da želite izbrisati ovu razinu?

Recenzije

Kako biste prodali svoj sadržaj i postove, počnite s stvaranjem nekoliko paketa. Monetizacija

Plaćanje novčanikom

Upozorenje o plaćanju

Spremate se kupiti artikle, želite li nastaviti?

Zatražite povrat novca