Nail Care Routine for Healthy and Strong Nails
Nail Care Routine for Healthy and Strong Nails
If you’ve ever struggled with brittle, weak nails, you’re not alone. Many people face challenges in keeping their nails healthy and strong. However, with the right nail care routine, you can transform your nails and achieve the strength and beauty you’ve always wanted. Here’s a comprehensive guide to help you establish an effective nail care routine.
1. Regular Trimming and Filing
Keeping your nails trimmed and filed is the first step to maintaining their health. Regular trimming prevents breakage and splitting, while filing helps you shape your nails and prevent snags. Use a fine-grit nail file to gently smooth the edges of your nails, and always file in one direction to avoid weakening them.
2. Moisturize Your Nails and Cuticles
Just like your skin, your nails need moisture to stay healthy. Dry nails are more prone to breaking and splitting, so keeping them hydrated is crucial. Apply a moisturizing hand cream regularly, focusing on your nails and cuticles. You can also use cuticle oil to nourish and soften the cuticles, which helps promote healthy nail growth.
3. Protect Your Nails from Harsh Chemicals
Exposure to harsh chemicals can weaken your nails and cause damage over time. Whether you’re doing household chores or applying nail polish, it’s important to protect your nails. Wear gloves when cleaning or washing dishes, and choose acetone-free nail polish removers to minimize chemical exposure. This small step can make a big difference in the long-term health of your nails.
4. Eat a Nutrient-Rich Diet
Your diet plays a significant role in the health of your nails. Incorporating foods rich in vitamins and minerals, such as biotin, zinc, and vitamin E, can help strengthen your nails from the inside out. Include eggs, nuts, leafy greens, and fish in your meals to support healthy nail growth and prevent brittleness.
5. Give Your Nails a Break from Polish
While it’s fun to keep your nails polished, it’s also important to give them a break occasionally. Continuous use of nail polish can lead to discoloration and weaken your nails. Allow your nails to breathe for a few days between manicures, and focus on moisturizing and nourishing them during this time. This will help maintain their natural strength and beauty.
6. Practice Gentle Nail Care
When caring for your nails, it’s important to be gentle. Avoid using your nails as tools to open packages or scrape off stickers, as this can lead to breakage and damage. Additionally, be cautious when pushing back your cuticles—use a soft cuticle pusher and don’t push too hard. Gentle care ensures that your nails stay strong and healthy.
Conclusion
A consistent nail care routine is the key to achieving healthy and strong nails. By trimming and filing regularly, moisturizing your nails and cuticles, protecting them from harsh chemicals, eating a balanced diet, and giving them breaks from polish, you can transform your nails and maintain their strength and beauty. Remember, healthy nails are a reflection of how well you care for them, so start incorporating these tips into your routine today.
#nailcare #healthynails #strongnails #nailroutine #nailinspo #nailgoals #nailtips #nailtrends2024 #nailhealth #beautyroutine
Opdage indlæg


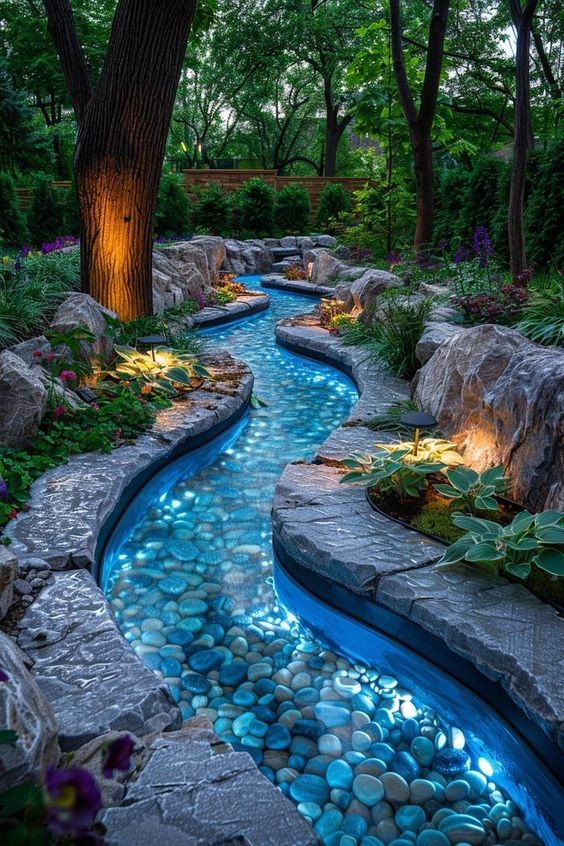
25 Stunning Backyard Stream Designs to Transform Your Garden
Transform your garden into a serene retreat with a stunning backyard stream. A well-designed stream can turn any ordinary outdoor space into a tranquil oasis, adding beauty, soothing sounds, and a touch of nature to your backyard. Whether you have a sprawling landscape or a small garden, there's a stream design to suit your space and style. Here are 25 incredible backyard stream designs that will inspire you to create your own garden paradise.
Natural Meadow Stream
Create a gentle, meandering stream that mimics natural watercourses. Use native stones and plants to enhance the natural look, and let the water flow slowly, creating a peaceful ambiance.
Miniature Waterfall Stream
Incorporate a small waterfall at the beginning of your stream for added drama. The cascading water adds a dynamic element and enhances the soothing sounds of the stream.
Rock-Lined Stream
Use large, smooth rocks to line the edges of your stream. This design adds a rustic charm and helps blend the stream with the natural landscape of your garden.
Modern Stone Stream
Opt for clean, geometric lines and polished stones to give your stream a contemporary feel. This design works well in modern gardens with minimalist aesthetics.
Woodland Stream
Create a whimsical woodland stream with moss-covered rocks, fallen branches, and lush greenery. This design brings a fairy-tale element to your garden and blends seamlessly with natural surroundings.
Asian-Inspired Stream
Incorporate elements like bamboo, lanterns, and smooth pebbles for an Asian-inspired stream. This design emphasizes tranquility and harmony, perfect for a zen garden.
Desert Oasis Stream
Use desert-friendly plants and materials like sand-colored rocks and succulents. This stream design is ideal for dry climates and adds a refreshing contrast to arid landscapes.
Koi Pond Stream
Combine your stream with a koi pond for a luxurious touch. The flowing water and colorful fish create a dynamic and visually stunning feature.
Tropical Stream
Create a lush, tropical paradise with vibrant plants, oversized stones, and a stream that winds through palm trees and ferns. This design adds a touch of the exotic to your backyard.
Rustic Country Stream
Use weathered wood and large stones to build a stream that complements a country-style garden. This design evokes a cozy, homey feel.
Japanese Garden Stream
Incorporate stepping stones, lanterns, and carefully pruned plants for a serene Japanese garden stream. This design focuses on simplicity and natural beauty.
Mediterranean Stream
Use terracotta pots, olive trees, and stone features to create a Mediterranean-inspired stream. This design brings a touch of Southern Europe to your backyard.
Whimsical Fairy Stream
Add elements like miniature bridges, fairy houses, and colorful pebbles for a whimsical touch. This design is perfect for families with children who love fantasy.
Contemporary Glass Stream
Incorporate glass panels and sleek materials for a modern twist. This design emphasizes clean lines and integrates seamlessly with contemporary outdoor spaces.
Cottage Garden Stream
Create a charming stream surrounded by blooming flowers, ivy-covered stones, and cozy seating areas. This design complements a quaint, cottage-style garden.
Mountain Stream
Recreate the rugged beauty of a mountain stream with jagged rocks, rushing water, and alpine plants. This design adds a dramatic, natural element to your garden.
Floating Bridge Stream
Add a floating bridge or boardwalk over your stream for a unique touch. This design provides a functional element and enhances the visual appeal of your backyard.
Formal Garden Stream
Opt for symmetrical lines, neatly trimmed plants, and elegant stonework for a formal garden stream. This design adds sophistication and order to your outdoor space.
Zen Garden Stream
Incorporate pebbles, sand, and carefully placed rocks for a Zen-inspired stream. This design focuses on simplicity, tranquility, and the art of minimalism.
Enchanted Forest Stream
Create a magical atmosphere with glowing lanterns, moss-covered stones, and winding paths. This design brings an enchanted forest vibe to your backyard.
Eco-Friendly Stream
Use recycled materials and native plants to create a sustainable stream. This design emphasizes environmental responsibility while enhancing your garden's beauty.
Garden Island Stream
Incorporate an island in the middle of your stream with seating or a small garden. This design adds a unique focal point and creates a relaxing retreat within your garden.
Elegant Curved Stream
Design a stream with gentle curves and elegant stonework for a classic look. This design adds sophistication and flow to your outdoor space.
Tropical Waterfall Stream
Combine a cascading waterfall with tropical plants and vibrant colors for a dramatic effect. This design brings the allure of a tropical paradise to your backyard.
Secret Garden Stream
Create a secluded stream with lush foliage and hidden nooks. This design offers a private escape and enhances the sense of discovery in your garden.
No matter which design you choose, a backyard stream can transform your garden into a serene and stunning space. By incorporating natural elements and thoughtful design, you can create a tranquil retreat that enhances the beauty and ambiance of your outdoor area.
**32 Inspirational Bible Drawings to Spark Your Creativity**
If you're looking for a source of inspiration that combines spiritual depth with artistic expression, look no further than Bible drawings. These illustrations can offer a profound way to connect with your faith while exploring your creativity. Whether you're an artist, a student, or simply someone who appreciates beautiful art, these 32 inspirational Bible drawings are perfect for sparking your imagination and enhancing your creative projects. Here’s how you can use these drawings to ignite your artistic journey.
### **Why Bible Drawings?**
Bible drawings are more than just artistic representations; they are a means to visually explore the profound stories, teachings, and symbolism found in the Bible. Here’s why they’re so impactful:
1. **Spiritual Connection**: Drawing Biblical scenes and symbols can deepen your connection to the stories and teachings of the Bible.
2. **Creative Exploration**: The rich imagery and themes in the Bible offer endless opportunities for artistic interpretation and creativity.
3. **Inspirational Projects**: These drawings can be used in various projects, from personal artwork to church decorations or educational materials.
### **Top 32 Inspirational Bible Drawings**
Here’s a curated list of 32 Bible drawings to inspire and guide you in your artistic endeavors:
1. **The Creation of Adam**: Capture the moment of divine creation with detailed depictions of Adam and God’s outstretched hands.
2. **The Last Supper**: Illustrate the iconic scene of Jesus and his disciples sharing their final meal together.
3. **The Good Shepherd**: Draw Jesus as the Good Shepherd, guiding and protecting his flock.
4. **The Nativity Scene**: Create a peaceful scene of the birth of Jesus, including Mary, Joseph, and the baby Jesus in the manger.
5. **The Ten Commandments**: Depict Moses receiving the tablets of the Ten Commandments on Mount Sinai.
6. **David and Goliath**: Illustrate the dramatic moment when young David defeats the giant Goliath with a single stone.
7. **Noah’s Ark**: Draw the majestic ark as it floats on the floodwaters, filled with pairs of animals.
8. **The Parting of the Red Sea**: Capture the dramatic moment when Moses parts the Red Sea for the Israelites to escape Egypt.
9. **The Resurrection of Jesus**: Illustrate the triumphant resurrection of Jesus from the tomb, symbolizing hope and renewal.
10. **The Prodigal Son**: Depict the parable of the Prodigal Son’s return and the joy of his father’s forgiveness.
11. **The Creation of Eve**: Draw the moment Eve is created from Adam’s rib, highlighting the divine act of companionship.
12. **The Baptism of Jesus**: Capture the serene moment when John the Baptist baptizes Jesus in the Jordan River.
13. **The Sermon on the Mount**: Illustrate Jesus delivering the Sermon on the Mount, offering wisdom and teachings to the crowd.
14. **The Miracle of the Loaves and Fishes**: Show Jesus feeding the multitude with five loaves and two fish.
15. **The Ascension of Jesus**: Depict Jesus ascending to heaven, surrounded by his disciples.
16. **The Beatitudes**: Create a series of drawings that reflect the Beatitudes from the Sermon on the Mount.
17. **The Wedding at Cana**: Illustrate the moment when Jesus performs his first miracle by turning water into wine.
18. **Daniel in the Lion’s Den**: Draw Daniel’s miraculous survival in the lion’s den, emphasizing faith and protection.
19. **The Armor of God**: Depict the metaphorical armor of God, including the helmet of salvation and the sword of the Spirit.
20. **The Angel Gabriel**: Illustrate the angel Gabriel’s announcement to Mary about the birth of Jesus.
21. **The Harvest**: Create a drawing that symbolizes the biblical concept of harvest and abundance.
22. **The Fruit of the Spirit**: Depict the various fruits of the Spirit as described in Galatians, such as love, joy, and peace.
23. **The Baptism of the Ethiopian Eunuch**: Show Philip baptizing the Ethiopian eunuch in a river.
24. **The Vision of Ezekiel**: Illustrate Ezekiel’s vision of the valley of dry bones coming to life.
25. **Jesus Calms the Storm**: Capture the moment when Jesus calms a storm on the Sea of Galilee.
26. **The Healing of the Blind Man**: Draw Jesus healing a blind man, emphasizing compassion and miracles.
27. **The Last Judgment**: Depict the final judgment scene as described in Revelation, highlighting the themes of justice and redemption.
28. **The Parable of the Lost Sheep**: Illustrate the shepherd’s joy in finding his lost sheep and bringing it back to the fold.
29. **The Fruitful Tree**: Draw a tree bearing fruit as a symbol of a life lived according to God’s teachings.
30. **Jesus and the Children**: Capture Jesus welcoming and blessing the children, showing his love and care.
31. **The Pentecost**: Depict the descent of the Holy Spirit on the apostles during Pentecost, symbolized by tongues of fire.
32. **The Conversion of Saul**: Illustrate Saul’s dramatic conversion on the road to Damascus, transforming into Paul the Apostle.
### **Tips for Drawing Bible Scenes**
1. **Use Reference Images**: Look at various artistic interpretations and historical depictions to guide your drawings.
2. **Incorporate Symbolism**: Add symbolic elements that enhance the story and meaning of each scene.
3. **Experiment with Styles**: Feel free to explore different artistic styles, from realistic to abstract, to find what resonates with you.
4. **Pay Attention to Detail**: Focus on capturing the emotions, expressions, and finer details to bring the scenes to life.
5. **Seek Feedback**: Share your work with others to get constructive feedback and improve your skills.
### **Conclusion**
Drawing Bible scenes offers a meaningful way to explore artistic expression and spiritual reflection. With these 32 inspirational Bible drawings, you have a diverse range of subjects to inspire your creativity. Whether you're creating art for personal reflection, church activities, or educational purposes, these illustrations will guide you on a journey of artistic and spiritual enrichment. Enjoy the process of bringing these sacred stories to life through your art!

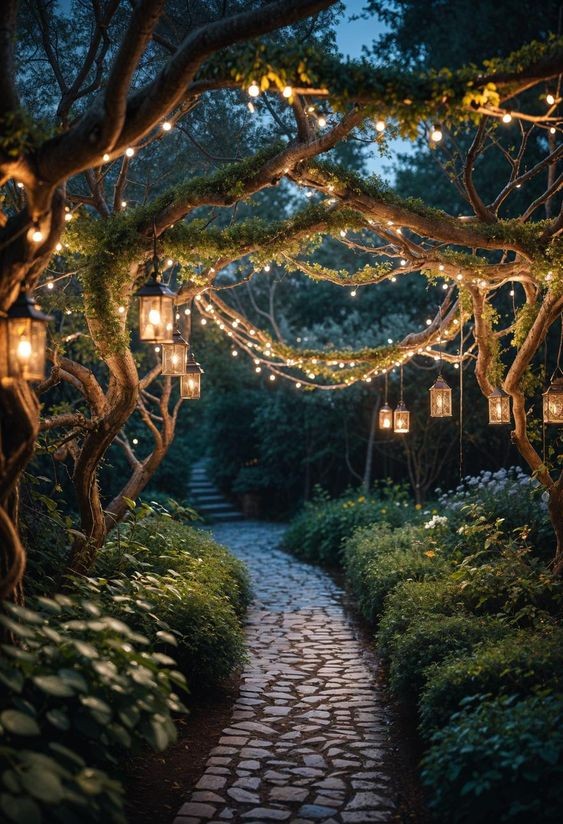
32 Secret Garden Ideas to Create Your Peaceful Retreat
Transforming your garden into a tranquil oasis can provide a much-needed escape from the daily grind. Whether you have a small balcony or a sprawling backyard, creating a secret garden allows you to enjoy nature's beauty and find serenity in your own private retreat. Here are 32 ideas to inspire your secret garden makeover:
Hidden Pathways: Create winding paths with stepping stones or gravel to lead you through your garden. Incorporate lush greenery and fragrant plants along the way to enhance the sense of discovery.
Garden Archways: Install a charming archway at the entrance to your secret garden. Climbing plants like roses or wisteria can add a touch of magic.
Secluded Seating Areas: Add cozy seating with outdoor cushions or a hammock in a secluded corner. Choose comfortable, weather-resistant furniture that complements your garden's style.
Water Features: Install a small pond, fountain, or birdbath to introduce the soothing sound of water. These features can attract wildlife and add a calming effect to your space.
Enclosed Spaces: Use trellises, hedges, or fencing to create a sense of enclosure. This adds privacy and a sense of intimacy to your garden.
Flowering Plants: Incorporate a variety of flowering plants to provide color and fragrance. Consider perennial blooms for lasting beauty.
Herb Gardens: Grow a small herb garden with aromatic herbs like lavender, rosemary, and mint. Not only do they add fragrance, but they also provide fresh ingredients for cooking.
Fairy Lights: Hang string lights or fairy lights to create a magical ambiance. They’re perfect for evening relaxation or entertaining guests.
Garden Sculptures: Add sculptures or garden ornaments to infuse personality into your space. Choose pieces that reflect your style or create a whimsical touch.
Cozy Fire Pit: Install a fire pit or chiminea for warmth and ambiance during cooler evenings. Surround it with comfortable seating to create a gathering spot.
Vertical Gardens: Utilize wall space for vertical gardening. Install shelves or hanging pots to grow plants and maximize your garden area.
Private Nooks: Designate small, private nooks with comfortable seating and a canopy of plants for peaceful retreats.
Garden Rugs: Lay down outdoor rugs to define seating areas and add a touch of comfort to your garden.
Seasonal Plants: Choose plants that offer seasonal interest. Consider spring bulbs, summer perennials, fall foliage, and winter evergreens.
Birdhouses and Feeders: Attract birds with decorative birdhouses and feeders. The sight and sound of birds can enhance your garden's tranquility.
Garden Furniture: Opt for elegant garden furniture that blends with your garden’s theme. Wrought iron, wood, and wicker pieces can add charm.
Pergolas: Install a pergola draped with climbing plants or sheer curtains to create a shaded retreat.
Outdoor Art: Incorporate outdoor art pieces like mosaics or metal sculptures to add a creative element to your garden.
Zen Garden: Create a Zen garden with sand, stones, and minimalist plants. This can provide a meditative space for relaxation.
Gazeebo: Build a gazebo or covered pavilion for a sheltered space where you can enjoy the garden regardless of the weather.
Privacy Screens: Use bamboo screens or decorative panels to create secluded areas and block out unwanted views.
Wildlife Habitat: Plant native species to support local wildlife. Butterflies, bees, and other pollinators will appreciate the diversity.
Garden Shed: Convert a garden shed into a cozy retreat or a functional space for gardening tools and supplies.
Climbing Plants: Train climbing plants like ivy or clematis to cover walls or fences, adding lush greenery and a touch of privacy.
Potted Plants: Use pots and containers to add color and flexibility. You can easily rearrange them to change the garden’s look.
Herb Spiral: Build a herb spiral to create a vertical garden space that maximizes plant growth and provides easy access to fresh herbs.
Garden Pond: Create a tranquil pond with fish or water lilies. The sight and sound of water can enhance the peaceful atmosphere.
Moon Garden: Plant white or pale flowers that glow in the moonlight for a nighttime garden experience.
Garden Treasures: Incorporate small treasures like antique furniture, mirrors, or whimsical objects to add character.
Natural Shade: Use trees or large shrubs to create natural shade and cool spots in your garden.
Seasonal Decor: Decorate with seasonal accents to keep your garden fresh and inviting year-round.
Personal Touches: Add personal elements like handmade garden markers, custom planters, or a small library of garden-themed books.
Creating a secret garden is all about infusing your space with elements that bring you joy and relaxation. With these ideas, you can craft a personalized retreat where you can escape, unwind, and enjoy nature’s beauty
The Ultimate Secret to Beautiful Nails
The Ultimate Secret to Beautiful Nails
When it comes to achieving beautiful nails, it’s easy to get overwhelmed by the endless products and tips out there. But what if we told you there’s only one thing that truly works to keep your nails looking flawless? Whether you're dealing with breakage, chips, or simply want stronger, healthier nails, this ultimate secret is your key to success.
1. Consistent Nail Care Routine
The foundation of beautiful nails lies in a consistent nail care routine. Regularly trimming, filing, and moisturizing your nails and cuticles helps prevent breakage and keeps your nails strong and healthy. Invest in a good quality nail file and a nourishing cuticle oil, and make it a habit to care for your nails at least once a week. This simple routine is the cornerstone of maintaining beautiful nails.
2. Proper Hydration
Hydration is key not only for your skin but also for your nails. Dry, brittle nails are more prone to breaking and chipping, so keeping them hydrated is essential. Drink plenty of water throughout the day and apply a hand cream that also nourishes your nails. You can even use natural oils like coconut or almond oil to massage into your nails and cuticles for an added boost of moisture.
3. Avoid Harsh Chemicals
One of the biggest culprits of damaged nails is exposure to harsh chemicals. Whether it’s household cleaning products or acetone-based nail polish removers, these chemicals can weaken your nails over time. Whenever possible, wear gloves when cleaning and opt for acetone-free nail polish removers. This small change can make a big difference in the health and appearance of your nails.
4. Balanced Diet
Your nails reflect your overall health, so what you eat plays a crucial role in their appearance. A balanced diet rich in vitamins and minerals, especially biotin, zinc, and vitamin E, can help promote strong and beautiful nails. Incorporate foods like eggs, nuts, leafy greens, and fish into your diet to give your nails the nutrients they need to thrive.
5. Regular Nail Breaks
While it’s tempting to keep your nails polished 24/7, giving them a break every now and then is essential for their health. Regularly removing nail polish and letting your nails breathe helps prevent discoloration and damage. Use this time to focus on nourishing your nails with oils and creams, ensuring they stay strong and beautiful even without polish.
Conclusion
Achieving beautiful nails doesn’t have to be complicated. By focusing on a consistent nail care routine, staying hydrated, avoiding harsh chemicals, eating a balanced diet, and giving your nails regular breaks, you can keep your nails looking their best all year round. Remember, the secret to beautiful nails is simple: care for them from the inside out, and they’ll reward you with strength, shine, and natural beauty.
#beautifulnails #nailcare #nailinspo #healthynails #nailtips #nailgoals #nailtrends2024 #nailhealth #nailroutine
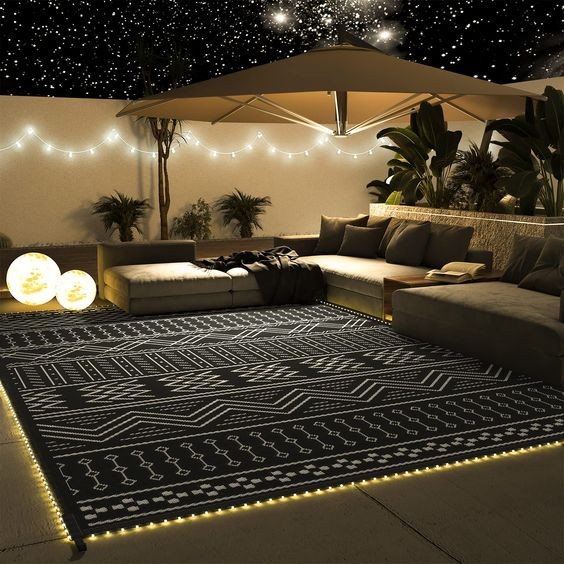
Illuminate Your Outdoor Space: The Ultimate Guide to the 8x10 ft Waterproof Outdoor Rug with LED Strip Lights
Transform your outdoor living area into a cozy, stylish haven with the versatile 8x10 ft Waterproof Outdoor Rug featuring LED Strip Lights. This mat combines practicality with a touch of magic, making it perfect for patios, RV camping, picnics, and more. Here’s everything you need to know about this innovative outdoor rug that’s taking outdoor decor to the next level.
Why Choose an Outdoor Rug with LED Strip Lights?
1. Versatile Design: The 8x10 ft size is ideal for various outdoor settings, offering ample coverage for your patio, deck, or camping area. Its reversible design adds functionality, allowing you to switch up the look whenever you want while maintaining a fresh appearance.
2. Durable and Waterproof: Crafted from lightweight plastic straw material, this rug is built to withstand the elements. It’s waterproof, making it a perfect choice for any weather conditions. Rain, spills, or splashes are no problem for this durable mat, ensuring your outdoor area stays clean and dry.
3. Illuminating LED Strip Lights: What sets this rug apart is its integrated LED strip lights. These lights are strategically placed around the edges to provide a soft, ambient glow that enhances your outdoor space’s atmosphere. Perfect for evening gatherings, the LED lights create a warm, inviting environment that makes your patio the place to be.
4. Easy Maintenance: Cleaning this rug is a breeze. The plastic straw material is easy to wipe down and resistant to stains. Simply hose it off or use a mild detergent for a quick refresh, and it will look as good as new.
5. Lightweight and Portable: Despite its large size, the rug is surprisingly lightweight, making it easy to move and store. Whether you’re setting up for a picnic or heading out on a camping trip, you can conveniently pack and transport it without hassle.
6. Boho Chic Aesthetic: With its stylish design, this rug adds a touch of bohemian flair to your outdoor decor. The intricate patterns and colors complement various design themes, blending seamlessly with your existing furniture and accessories.
How to Style Your Outdoor Rug
1. Patio Perfection: Place the rug in the center of your patio to anchor your seating area. Pair it with comfortable outdoor furniture and accent with throw pillows and blankets for a cozy, stylish setup.
2. RV Campground Chic: Lay the rug outside your RV to create a welcoming outdoor space. The LED lights are perfect for evening relaxation, and the waterproof feature ensures it remains in top condition despite constant use.
3. Picnic Ready: Bring the rug along for picnics and outdoor events. Its lightweight design and easy maintenance make it ideal for spreading out on the grass or sand, while the LED lights add a touch of glamour to your gatherings.
4. Backyard Oasis: Use the rug to define a specific area of your backyard. Whether it’s a dining nook or a lounging zone, the rug will enhance your space’s functionality and aesthetic appeal.
Conclusion
The 8x10 ft Waterproof Outdoor Rug with LED Strip Lights is more than just a mat; it’s an upgrade to your outdoor living experience. With its blend of durability, style, and functionality, it’s an excellent investment for anyone looking to elevate their patio, RV, or picnic area. Embrace the perfect combination of practicality and ambiance, and let your outdoor space shine with this remarkable rug.
Perfect School Nails: Cute and Trendy Ideas for the Classroom
Perfect School Nails: Cute and Trendy Ideas for the Classroom
Heading back to school is the perfect time to refresh your look, and your nails are no exception! Whether you’re looking for something simple and understated or a bit more fun and colorful, these nail ideas are perfect for keeping your style on point while staying school-appropriate. Here are some cute and trendy nail designs that are perfect for the classroom.
1. Subtle French Tips
French tips are a classic choice that never goes out of style. For a school-friendly twist, opt for a subtle, thin white tip instead of the traditional thick line. You can also experiment with different colors for the tip, like a soft pink or a light blue, for a fun and modern look. This design is simple yet elegant, making it perfect for everyday wear.
2. Pastel Perfection
Pastel shades are perfect for school nails because they’re soft, subtle, and stylish. Choose from colors like lavender, mint green, or baby blue to give your nails a fresh and airy feel. Pastels are versatile and go with just about any outfit, making them a great choice for the school year. Add a matte top coat for a trendy, modern finish.
3. Minimalist Dots and Stripes
If you prefer a minimalist style, dots and stripes are a great way to add a little something extra to your nails without going overboard. A single dot in the center of each nail or a thin stripe down the middle can make a big impact while still being understated. Choose neutral colors like white, beige, or soft pink for a look that’s simple and chic.
4. Fun and Playful Designs
For those who like to add a bit of personality to their nails, fun and playful designs are the way to go. Think tiny hearts, stars, or even a little smiley face on one or two accent nails. These designs add a touch of whimsy to your manicure and are sure to make you smile every time you look at them. Just be sure to keep the overall look balanced by pairing the designs with a neutral base color.
5. Glitter Accent Nails
If you love a bit of sparkle, glitter accent nails are a great way to add some shine without being too flashy for school. Choose one or two nails to cover in glitter while keeping the rest of your nails in a neutral or pastel shade. This look is both fun and sophisticated, perfect for making a subtle statement in the classroom.
6. Neutral Nudes
For a more understated look, nude nails are always a safe bet. Choose a shade that matches your skin tone for a clean, polished look that’s perfect for school. Nude nails are versatile and go with any outfit, making them a great choice for busy school days. Plus, they’re low-maintenance and don’t show chips as easily as darker colors.
7. Conclusion
Your nails are a great way to express your personal style, even at school. Whether you prefer something simple and chic or a bit more playful, these nail ideas are perfect for keeping your look fresh and trendy all school year long. So go ahead and experiment with different designs and colors to find the perfect school nails that make you feel confident and ready to take on the day!
#schoolnails #nailinspo #backtoschool #cutenails #nail
DIY Lattice Ideas to Elevate Your Home's Aesthetic
Lattice designs have long been celebrated for their versatility and charm, adding a touch of elegance and functionality to any home. From enhancing garden spaces to creating stylish interior accents, DIY lattice projects can transform your home in no time. Here's a guide to some creative and quick DIY lattice ideas that will help you elevate your home’s aesthetic.
1. Garden Privacy Screen
Transform your garden with a DIY lattice privacy screen. This project is perfect for creating secluded areas in your outdoor space. Simply frame a piece of lattice with wood, and anchor it into the ground or attach it to an existing fence. To add a personal touch, paint or stain the lattice to match your garden theme. For added privacy and beauty, consider climbing plants like ivy or jasmine, which will grow through the lattice, creating a lush green wall.
2. Lattice Wall Art
Bring a touch of sophistication indoors with lattice wall art. Cut a piece of lattice to your desired size and shape, then paint it in a color that complements your decor. Hang it on a wall or place it in a frame for a chic, custom piece. You can also use this technique to create a striking backdrop for photos, mirrors, or even a statement light fixture.
3. Decorative Lattice Shelving
Upgrade your storage solutions with decorative lattice shelving. By attaching lattice panels to a wall and adding floating shelves, you create a stylish and functional display area. This setup works well in kitchens, bathrooms, or any space where you want both storage and visual appeal. Paint or stain the lattice to match your existing furniture or decor for a cohesive look.
4. Lattice Planter Box
Add a bit of greenery to your outdoor space with a lattice planter box. Construct a simple box from wood, and attach lattice panels to the sides. This design not only provides ample space for plants but also serves as a trellis for climbing vines. Place the planter box on your porch, patio, or balcony for a charming and practical garden feature.
5. Lattice Curtain
For an easy and stylish way to divide spaces or add a decorative touch, consider a lattice curtain. Attach a lattice frame to a ceiling or wall, then hang fabric or a curtain from it. This setup is ideal for creating a cozy reading nook, separating a dining area, or adding texture to a plain wall. Choose fabrics that complement your room's color scheme for a cohesive look.
6. Lattice Entryway Trellis
Make a welcoming statement with a lattice entryway trellis. Position lattice panels on either side of your front door, and decorate them with hanging baskets of flowers or climbing plants. This not only adds curb appeal but also creates a beautiful focal point for your entrance. Enhance the effect by adding lighting to highlight the lattice and plants at night.
7. Lattice Headboard
For a quick bedroom makeover, try a lattice headboard. Attach lattice panels to the wall behind your bed, and paint or stain them to match your bedroom decor. This DIY project adds a unique touch to your sleeping space and can be customized to fit any size bed. Add fairy lights or fabric to the lattice for a cozy, inviting atmosphere.
Quick Tips for DIY Lattice Projects
Choose Quality Materials: Opt for durable wood or composite materials to ensure your lattice projects last.
Measure Carefully: Accurate measurements are crucial for a seamless fit, whether you're making a screen, planter, or headboard.
Use Outdoor Paint: For outdoor projects, use weather-resistant paint or stain to protect the lattice from the elements.
Get Creative: Personalize your lattice projects with paint, fabric, or embellishments to match your home's style.
Lattice designs are a fantastic way to enhance your home's beauty and functionality with minimal effort. Whether you're adding privacy to your garden, creating stylish wall art, or upgrading your storage solutions, these DIY lattice ideas will make a noticeable impact. Dive into these projects and enjoy the charm and versatility that lattice can bring to your home!

**25 Realistic Cat Drawing Ideas and Tutorials for Every Skill Level**
Are you a cat lover with a passion for drawing? Whether you're just starting out or looking to refine your skills, realistic cat drawing offers a delightful way to capture the charm and elegance of our feline friends. With our curated list of 25 drawing ideas and tutorials, you can explore various techniques and styles to bring your cat portraits to life. Here’s a comprehensive guide to help you master the art of drawing realistic cats.
### **Why Draw Realistic Cats?**
Drawing realistic cats is more than just capturing their physical features; it’s about conveying their unique personalities and emotions. Realistic cat drawings can:
1. **Enhance Your Artistic Skills**: Working on realistic drawings improves your attention to detail, shading techniques, and overall drawing ability.
2. **Bring Joy and Relaxation**: Drawing cats can be a therapeutic and enjoyable activity, offering a break from daily routines.
3. **Create Meaningful Art**: Realistic cat drawings make for cherished keepsakes and thoughtful gifts for fellow cat enthusiasts.
### **Top 25 Realistic Cat Drawing Ideas and Tutorials**
1. **Basic Cat Anatomy**: Start with the fundamentals by learning about the basic structure and proportions of a cat’s body.
2. **Expressive Cat Faces**: Practice drawing different facial expressions to capture the personality of various cat breeds.
3. **Detailed Fur Texture**: Master the art of rendering realistic fur with various shading techniques and pencil strokes.
4. **Playful Kittens**: Draw adorable kittens in various playful poses to capture their energy and cuteness.
5. **Sleeping Cats**: Create serene and peaceful images of cats napping, focusing on relaxed body positions and soft textures.
6. **Realistic Cat Eyes**: Learn how to draw expressive and lifelike cat eyes, which are crucial for capturing their emotional depth.
7. **Cat Breeds**: Explore tutorials for drawing specific cat breeds, such as Siamese, Persian, Maine Coon, and Bengal.
8. **Cat Paws and Claws**: Focus on the details of cat paws, claws, and their intricate features.
9. **Whiskers and Noses**: Perfect the details of whiskers and noses to add realism to your drawings.
10. **Cats in Motion**: Draw cats in various action poses, such as jumping or playing, to capture their dynamic movements.
11. **Cat Portraits**: Create detailed portraits that emphasize the unique features and expressions of individual cats.
12. **Cats with Accessories**: Experiment with drawing cats wearing accessories like collars, hats, or bows.
13. **Stylized Realism**: Combine realistic techniques with a touch of stylization for a unique artistic interpretation.
14. **Black and White vs. Color**: Practice drawing cats in both black and white as well as in color to explore different effects.
15. **Cat Silhouettes**: Use silhouettes to highlight the form and posture of cats in a minimalist style.
16. **Cat in Various Textures**: Experiment with different backgrounds and textures to complement your cat drawings.
17. **Multi-Cat Scenes**: Draw scenes featuring multiple cats interacting with each other for added complexity.
18. **Famous Cat Figures**: Try drawing famous cats from popular culture or social media to challenge your skills.
19. **Mixed Media**: Combine drawing with other media, like watercolor or digital tools, for a mixed-media approach.
20. **Realistic Cat Features**: Focus on specific features such as the cat’s nose, ears, or fur patterns.
21. **Cat in Different Lighting**: Practice drawing cats under various lighting conditions to understand how light affects fur and features.
22. **Cats and Nature**: Integrate cats into natural settings or landscapes to create a harmonious and realistic scene.
23. **Cartoon vs. Realistic**: Compare and contrast cartoon-style and realistic cat drawings to see how different styles impact the portrayal.
24. **Personal Cat Portraits**: Create detailed portraits of your own cats or those of friends and family for a personal touch.
25. **Cat Sketchbook Projects**: Compile a sketchbook of various cat drawings to track your progress and refine your techniques.
### **Tips for Drawing Realistic Cats**
1. **Study Real Cats**: Observe real cats or reference photos to understand their anatomy and features better.
2. **Use Quality Materials**: Invest in good-quality pencils, paper, and erasers for the best results.
3. **Practice Regularly**: The more you draw, the better you’ll become. Set aside time each week to practice and experiment.
4. **Seek Feedback**: Share your work with others and seek constructive criticism to improve your skills.
5. **Enjoy the Process**: Embrace the learning process and have fun with your art. Each drawing is a step towards mastering your craft.
### **Conclusion**
Our collection of 25 realistic cat drawing ideas and tutorials is designed to inspire and guide artists of all skill levels. From mastering fur texture to capturing expressive faces, these tutorials provide a comprehensive approach to drawing realistic cats. Dive into these ideas and tutorials to enhance your artistic abilities, create meaningful art, and enjoy the creative journey. Happy drawing!

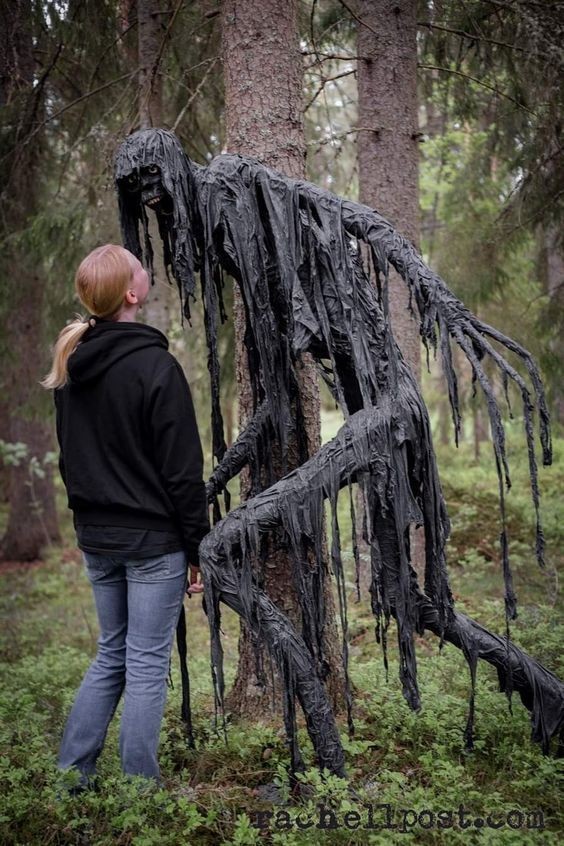
Spook Up Your Space: Creepy Halloween Outdoor Decoration Ideas
Halloween is the perfect time to transform your outdoor space into a haunted haven, and with a bit of creativity, you can make your yard the talk of the neighborhood. Whether you're aiming for a subtle spook or full-blown fright fest, these creepy outdoor decoration ideas will elevate your Halloween game and give trick-or-treaters a memorable experience.
1. Graveyard Setup
Create a chilling cemetery scene with tombstones, skeletons, and eerie fog. Use foam or plastic tombstones for an easy and cost-effective setup. Add some fake cobwebs, skeletal remains, and dim lighting to enhance the haunted atmosphere. Don’t forget to place some motion-activated sound effects for added spookiness!
2. Ghostly Figures
Hang ghostly figures around your yard to give the impression of wandering spirits. Use white sheets or fabric draped over wire frames to create ghost shapes. Light them from below with a soft, green or blue light to give an eerie glow. For extra fright, use wind chimes to make them sway in the breeze.
3. Creepy Spider Invasion
Transform your yard into a spider’s lair with oversized fake spiders and webbing. Stretch spider webs between trees, bushes, and outdoor furniture, and place large spiders strategically throughout. You can even use motion sensors to make the spiders’ legs move or light up for an added scare.
4. Sinister Pumpkins
Go beyond traditional jack-o’-lanterns by carving or painting pumpkins with sinister faces, or using pre-made creepy pumpkin decorations. Arrange them in a spooky pattern, and light them with flickering LED candles for an unsettling glow. Try using different colors and textures to give your pumpkin display an extra edge.
5. Hanging Bats and Witches
Hang plastic bats and witches from tree branches or porch ceilings. Use fishing line to make them sway eerily in the wind. You can also add some dim, colored spotlights to make them stand out against the night sky, creating a haunting silhouette effect.
6. Eerie Pathway Lights
Guide visitors to your front door with creepy pathway lights. Use lanterns shaped like skulls or pumpkins, or place glowing orbs along the path. Add some fog machines or dry ice for an extra layer of spookiness. You can also use motion-activated lights that flash or change color for a more dynamic effect.
7. Haunted Forest
Turn a section of your yard into a haunted forest with the help of some dark fabric, fake trees, and creepy props. Add strobe lights and fog machines to create a misty, otherworldly atmosphere. You can even include hidden animatronics or spooky sound effects to startle unsuspecting visitors.
8. Scary Soundtrack
Enhance your outdoor Halloween decor with a chilling soundtrack. Play creepy sound effects like howling wolves, rattling chains, or ghostly moans from hidden speakers. Make sure the volume is high enough to be heard from the street but not so loud that it becomes annoying to neighbors.
Quick Tips for Success:
Plan Ahead: Start decorating a few weeks before Halloween to ensure you have time to perfect your setup.
Safety First: Ensure all decorations are securely fastened and that pathways are clear to avoid accidents.
DIY Touches: Incorporate some homemade elements like painted mason jars or hand-drawn signs for a personalized touch.
With these creepy outdoor decoration ideas, you’ll have everything you need to make your Halloween celebrations spooktacularly memorable. So grab your props, get creative, and prepare for a frightful night of fun!