Good and Bad People Good and Bad People
    #socialmedia #usa #uk #contentwriter #ai
    Erweiterte Suche
  • Anmelden
  • Registrieren

  • Tagesmodus
  • © 2025 Good and Bad People
    Über Uns • Verzeichnis • Kontaktiere uns • Entwickler • Datenschutz • Nutzungsbedingungen • Rückerstattung • Referral Terms • Acceptable Use Policy • Community Guidelines • Write for Us

    Wählen Sprache

  • Arabic
  • Bengali
  • Chinese
  • Croatian
  • Danish
  • Dutch
  • English
  • Filipino
  • French
  • German
  • Hebrew
  • Hindi
  • Indonesian
  • Italian
  • Japanese
  • Korean
  • Persian
  • Portuguese
  • Russian
  • Spanish
  • Swedish
  • Turkish
  • Urdu
  • Vietnamese

Betrachten

Betrachten Rollen

Veranstaltungen

Events durchsuchen Meine ereignisse

Blog

Artikel durchsuchen

Markt

Neueste Produkte

Seiten

Meine Seiten Gefallene Seiten

mehr

Erforschen Beliebte Beiträge Arbeitsplätze Bietet an Förderungen
Rollen Betrachten Veranstaltungen Markt Blog Meine Seiten Alles sehen

Entdecken Beiträge

Posts

Benutzer

Seiten

Gruppe

Blog

Markt

Veranstaltungen

Arbeitsplätze

Förderungen

Charlotte Chic Nomad
1 y ·übersetzen

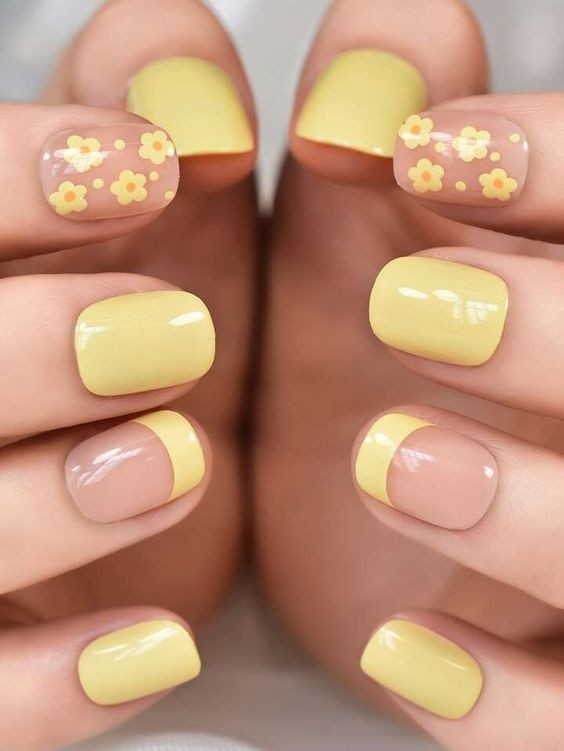
Elevate Your Style with the 24-Piece Short Square Yellow French Floral Fake Nail Set

Are you looking to upgrade your nail game with a touch of elegance and convenience? Look no further than the 24-piece short square yellow French floral fake nail set. This comprehensive kit provides everything you need for a stunning manicure that effortlessly combines style and practicality. Here’s why this set is your new go-to for achieving a flawless look in no time.

Why Choose the 24-Piece Nail Set?

**1. Stunning Design

The centerpiece of this set is the vibrant yellow short square nails adorned with delicate French floral patterns. The yellow hue offers a fresh and cheerful look, perfect for adding a pop of color to your everyday style or brightening up any special occasion. The floral accents add a touch of sophistication, making your nails stand out with elegance and charm.

**2. Complete Kit

This nail set is designed with convenience in mind. It includes:

24 Fake Nails: Each nail features a short square shape and a beautiful French floral design, ensuring a chic and modern look.

1 Nail File: Achieve the perfect nail shape with the included file, essential for smoothing edges and customizing the fit of your fake nails.

1 Glue Stick: Easy-to-use glue for secure adhesion, ensuring that your nails stay in place and look flawless.

1 Glue Sticker Sheet: For an alternative application method, these glue stickers offer a mess-free way to apply your fake nails without the need for traditional glue.

**3. Easy Application

Whether you’re a nail art novice or a seasoned pro, this kit makes application simple and hassle-free. The press-on nails are designed for quick and easy use, so you can achieve a professional-looking manicure in just minutes. The included nail file allows you to customize the shape and fit of each nail, while the glue stickers and glue stick offer versatile application options to suit your preference.

**4. Durable and Long-Lasting

The high-quality materials used in these fake nails ensure durability and longevity. With proper application and care, your nails will stay intact and look beautiful for days, making this set perfect for both short-term and long-term wear.

**5. Versatile Use

Whether you're preparing for a special event, a holiday celebration, or simply want to add a touch of elegance to your everyday look, this nail set is versatile enough to suit any occasion. The charming floral design and vibrant yellow color make it a perfect choice for a wide range of styles and outfits.

How to Apply Your Fake Nails

Prepare Your Natural Nails: Start with clean, trimmed nails. Remove any existing nail polish and ensure your nails are free from oils and residue.

File and Shape: Use the provided nail file to shape your natural nails and smooth the edges. This will help the fake nails adhere better.

Select the Right Size: Choose the fake nails that best fit your natural nails. Each fake nail is designed to fit a range of nail sizes, but it’s important to select the one that fits most comfortably.

Apply Glue or Stickers: If you’re using glue, apply a thin layer to the back of the fake nail and your natural nail. For glue stickers, peel off the backing and place the sticker on your natural nail before pressing on the fake nail.

Press and Hold: Press the fake nail onto your natural nail, holding it firmly for a few seconds to ensure a strong bond. If you’re using glue, be sure to let it dry fully.

Finishing Touches: Once applied, you can use the nail file to refine the shape and ensure a perfect fit. Apply a top coat if desired to add extra shine and protection.

Final Thoughts

The 24-piece short square yellow French floral fake nail set is a stylish and practical solution for anyone looking to elevate their nail game with minimal effort. With its stunning design, complete kit, and easy application, this set offers everything you need to achieve a chic and elegant manicure in no time. Whether you're preparing for a special occasion or simply want to refresh your look, this nail set is your perfect choice for a fabulous finish. Transform your style and enjoy beautiful, hassle-free nails with this must-have nail kit!

image
Gefällt mir
Kommentar
Teilen
Scarletts Style Journey
1 y ·übersetzen

**Effortless and Fast DIY Halloween Decorations for Your Front Yard**

Transforming your front yard for Halloween doesn’t have to be complicated or time-consuming. With a few simple DIY ideas, you can create a festive and spooky atmosphere that will impress trick-or-treaters and neighbors alike. Here are some quick and easy DIY Halloween decorations to give your front yard a hauntingly delightful makeover:

**1. Ghostly Garlands**

Create a spooky garland by cutting out ghost shapes from white fabric or plastic tablecloths. Hang them along your porch or fence for an eerie effect. Add some glow-in-the-dark paint to make them stand out at night.

**2. Spooky Lawn Signs**

Craft your own Halloween-themed lawn signs using foam board or cardboard. Paint them with creepy messages like “Boo!” or “Enter if You Dare” and stake them into the ground for a simple yet effective decoration.

**3. Pumpkin Planters**

Turn small pumpkins into charming planters by cutting out the top and scooping out the insides. Fill them with autumn flowers or seasonal plants to add a touch of Halloween cheer to your front yard.

**4. Bat Silhouettes**

Make bat silhouettes using black construction paper or cardboard. Cut out different sizes and attach them to your windows or walls with tape or suction cups to create a flying bat effect.

**5. DIY Tombstones**

Create spooky tombstones using foam insulation boards. Cut them into tombstone shapes and use a craft knife to add eerie inscriptions. Paint them gray or black, and place them around your yard for a graveyard feel.

**6. Spider Webs**

Stretch out cotton batting or white yarn to create spider webs in your bushes or on your porch. Add a few plastic spiders for a creepy, crawly touch.

**7. Lanterns and Lights**

Repurpose old jars or containers into Halloween lanterns by painting them with spooky faces and adding tea lights or LED candles inside. Line your walkway with these glowing decorations to guide trick-or-treaters.

**8. Scary Silhouettes**

Cut out spooky shapes like witches, ghosts, or skeletons from black poster board. Tape them to your windows or garage door to create haunting silhouettes that come to life at night.

**9. Mummy Decorations**

Wrap old plastic bottles or jars in white gauze or fabric strips to create mummy decorations. Add googly eyes to the front for a fun and creepy touch. Place them around your yard or on your porch.

**10. Witch’s Broomstick**

Create a simple witch’s broomstick by tying together sticks or bamboo poles with twine. Add a spooky sign or a pumpkin to the handle and lean it against your front door or porch for a whimsical Halloween touch.

These DIY decorations are perfect for getting your front yard into the Halloween spirit quickly and easily. With a little creativity and effort, you can achieve a spook-tacular look that will delight visitors and make your home stand out this Halloween.

#diyhalloweendecor

image
Gefällt mir
Kommentar
Teilen
Scarletts Style Journey
1 y ·übersetzen

**Spookify Your Front Yard: 14 Halloween Decorations That Will Wow Your Neighbors**

As Halloween approaches, it’s time to turn your front yard into a chillingly delightful spectacle that captures the essence of the season. Whether you're aiming for eerie elegance or all-out fright fest, these 14 Halloween decorations will help you create a front yard that’s both memorable and mischievous. Get ready to impress trick-or-treaters and passersby alike with these spine-tingling ideas!

**1. Glowing Jack-o’-Lanterns**

No Halloween display is complete without the classic pumpkin. Elevate your jack-o’-lantern game by using LED lights for a glowing effect that lasts all night. Arrange them in clusters or create a pumpkin patch to set a spooky scene.

**2. Eerie Gravestones**

Create a mini graveyard with faux gravestones. Choose from humorous or haunting inscriptions to suit your style. Adding some fog machines or spooky sound effects will enhance the eerie atmosphere.

**3. Ghostly Figures**

Hang ghost decorations from trees or place them in your front yard. These can be made from cheesecloth or white fabric and can be illuminated from within for a ghostly glow.

**4. Scary Skeletons**

Position life-sized skeletons in various poses around your yard. Have them “crawling” out of the ground or engaging in spooky activities to add a touch of macabre humor.

**5. Spooky Spider Webs**

Cover your bushes and trees with large, fake spider webs. Add some plastic spiders to complete the look. This simple decoration can make a big impact, especially when illuminated with a black light.

**6. Animated Props**

Surprise your guests with motion-activated decorations. From cackling witches to rising skeletons, these props add an interactive element that will delight and frighten.

**7. Creepy Clowns**

For a touch of eerie fun, include creepy clown decorations. Whether they’re inflatable or static, clowns can add a whimsical yet unsettling vibe to your Halloween display.

**8. Haunted Doorway**

Transform your front door into a haunted entrance with a spooky wreath, hanging bats, or a creepy door cover. Welcome guests with a frightfully festive first impression.

**9. Scary Sound Effects**

Enhance the spooky ambiance with a sound machine that plays eerie noises like howling wolves, creaking doors, or ghostly whispers. Position speakers discreetly for maximum impact.

**10. Bewitched Pathway**

Line your walkway with Halloween-themed lights or lanterns to guide trick-or-treaters to your door. Pumpkin or skull-shaped lights add a festive touch while illuminating the path.

**11. Sinister Scarecrows**

Craft a scarecrow with a Halloween twist. Dress it in tattered clothes and a spooky mask, and place it in your yard to keep watch over your Halloween festivities.

**12. Floating Bats**

Create the illusion of bats flying through the air by hanging them from trees or overhangs. Use lightweight materials and clear fishing line for a floating effect.

**13. Wicked Witch’s Cauldron**

Set up a witch’s cauldron on your porch or in your yard. Fill it with dry ice and water for a foggy, bubbling effect, and add some witchy props for extra flair.

**14. Pumpkin Topiary**

For a unique twist, create a pumpkin topiary by stacking decorative pumpkins in a tiered arrangement. This eye-catching decoration is sure to stand out in any front yard.

**Get Inspired and Get Decorating**

Ready to bring these spooky ideas to life? Click over to GoodandBad to explore more Halloween decoration inspiration and find everything you need to make your front yard the spookiest on the block. Dive into the ultimate Halloween transformation and start decorating today!

🎃👻 #halloweenyarddecor #spookyfrontyard #getyourspookon

image
Gefällt mir
Kommentar
Teilen
Charlotte Chic Nomad
1 y ·übersetzen

Adorable Valentine's Day Nail Ideas You'll Love

Valentine’s Day is the perfect occasion to show off your love and affection, and what better way to do that than with a stunning set of nails? Whether you’re planning a romantic date, a fun Galentine’s celebration, or simply want to embrace the season of love, these adorable Valentine’s Day nail ideas will add a touch of charm and sweetness to your look. From classic hearts to playful designs, here are some delightful nail ideas to help you celebrate in style.

1. Classic Red Hearts

Embrace the traditional Valentine’s color with a classic red manicure adorned with small, hand-painted hearts. This design is timeless and perfect for showing your love in a chic and elegant way.

2. Pink and Gold Glitter

Combine soft pink with sparkling gold glitter for a glamorous Valentine’s look. The gold adds a touch of luxury and shine, making your nails stand out with a festive flair.

3. Love Letter Nail Art

Create a romantic touch with love letter nail art. Paint tiny envelopes with heart stamps or messages of love on your nails for a unique and heartfelt design that’s perfect for Valentine’s Day.

4. Heartfelt Ombre

Achieve a dreamy effect with a heart-themed ombre manicure. Gradually blend shades of pink and red, and add tiny heart decals or painted hearts to complete the look.

5. Cupid’s Arrows

Channel Cupid with arrow designs on your nails. Use red or gold arrows against a neutral base for a playful yet sophisticated Valentine’s Day look that captures the essence of the holiday.

6. Sweetheart Stripes

Add a touch of fun with sweet striped patterns. Use pastel colors or classic Valentine’s hues to create candy-striped nails, giving your manicure a playful and festive vibe.

7. Kiss Prints

Make your nails pop with kiss print designs. Use red or pink polish to create kiss marks on a white or nude base for a flirty and fun touch that’s perfect for Valentine’s Day.

8. Heart and XOXO Combo

Combine hearts and XOXO (hugs and kisses) for a sweet and romantic manicure. Mix and match these symbols on your nails for a design that’s both cute and expressive.

9. Red and White Polka Dots

Create a classic and playful look with red and white polka dots. This design is perfect for those who love a retro or whimsical touch to their Valentine’s Day style.

10. Love-themed Nail Art Stickers

For an easy and quick Valentine’s manicure, use love-themed nail art stickers. Choose designs with hearts, Cupid, or romantic phrases to effortlessly add a festive touch to your nails.

11. Heartbeat Line

Show your love in a unique way with heartbeat line nail art. Use a nude base with red or pink heartbeat lines to create a design that’s both stylish and symbolic.

12. Romantic Roses

Celebrate romance with delicate rose designs. Paint small roses or use rose-themed nail decals to create a floral and romantic look that’s perfect for the season.

13. Candy Hearts

Embrace the playful side of Valentine’s Day with candy heart designs. Use pastel colors to paint tiny candy hearts with sweet sayings, adding a fun and nostalgic touch to your manicure.

14. Love Birds

Capture the essence of romance with love bird designs. Paint cute love birds on a soft pink or blue base for a design that’s both charming and affectionate.

15. Heart Confetti

Add a touch of whimsy with heart confetti. Use a clear base coat with scattered heart-shaped confetti for a playful and festive look that’s perfect for celebrating love.

How to Achieve These Adorable Valentine’s Day Nails

Prep Your Nails: Start with clean, trimmed nails. Apply a base coat to protect your nails and create a smooth surface for your design.

Choose Your Design: Select the Valentine’s Day design that best suits your style. Gather your nail art tools, including brushes, dotting tools, or nail decals.

Apply the Base Color: Apply your chosen base color evenly and allow it to dry completely before adding any additional details.

Create the Design: Use your nail art tools to carefully create the Valentine’s Day design. Take your time to ensure precision and achieve the desired look.

Seal with a Topcoat: Finish with a clear topcoat to protect your design and add shine. This step helps to prolong the life of your manicure and keep your nails looking fresh.

Final Thoughts

Valentine’s Day is a wonderful time to express your love and affection, and these adorable nail designs are a fun and stylish way to celebrate the occasion. Whether you opt for classic hearts, playful kiss prints, or elegant roses, there’s a design here to match every mood and style. So, get creative, and let your nails add a touch of romance and charm to your Valentine’s Day celebrations.

image
Gefällt mir
Kommentar
Teilen
Scarletts Style Journey
1 y ·übersetzen

**Spook-tacular Savings: Transform Your Space with Dollar Tree Halloween Decorations**

Halloween is just around the corner, and it’s the perfect time to get your home ready for some spooky fun! But who says you need to spend a fortune to create a hauntingly festive atmosphere? Dollar Tree has you covered with a fantastic range of budget-friendly Halloween decorations that will make your home the envy of the neighborhood.

**1. Hauntingly Affordable Decor**

Dollar Tree is a treasure trove for anyone looking to add a touch of Halloween magic without breaking the bank. From eerie skeletons and ghostly figures to vibrant pumpkin garlands and faux spider webs, their selection has something for every Halloween enthusiast. The best part? Everything is priced at just a dollar (or a bit more for select items), making it easy to get into the Halloween spirit on a budget.

**2. Creepy-Cool DIY Projects**

One of the joys of decorating for Halloween is the chance to get creative. Dollar Tree’s wide array of Halloween supplies can serve as the foundation for countless DIY projects. Turn plastic skeletons into spooky centerpieces, create custom candy dishes with festive containers, or use faux cobwebs to transform your home into a haunted house. The possibilities are endless, and with such affordable options, you can experiment to your heart’s content.

**3. Complete Your Spooky Look**

Looking to impress your guests with a complete Halloween makeover for your space? Dollar Tree offers everything from eerie tablecloths and themed dinnerware to ghoulish lawn signs and window clings. Pair these items with their selection of Halloween-themed lights and candles to set the perfect eerie ambiance.

**4. The Perfect Setting for Any Celebration**

Whether you’re hosting a Halloween party, setting up a trick-or-treat station, or simply adding some festive touches to your home, Dollar Tree has you covered. Their decorations are perfect for both indoor and outdoor settings, ensuring that every corner of your space gets a spooky touch.

**5. Discover More on GoodandBad**

Ready to start your Halloween decorating spree? Click over to GoodandBad to explore our full range of Dollar Tree Halloween decorations. Find inspiration, tips, and tricks to make the most of your Halloween decor. Dive into the ultimate spooky transformation and get your home boo-tifully decorated in no time!

Get ready to transform your space into a Halloween haven with Dollar Tree’s fabulous and frightfully fun decorations. Your next Halloween celebration is just a click away!

🕸️🎃 #dollartreehalloween #spookydecor #goodandbad

image
Gefällt mir
Kommentar
Teilen
Charlotte Chic Nomad
1 y ·übersetzen

23+ Trendy Back-to-School Nail Designs for 2024

As the new school year approaches, it’s the perfect time to refresh your look and express your style through your nails. From classic designs to the latest trends, back-to-school nails can be both fun and fashionable, adding a personal touch to your school uniform or casual outfits. Here are 23+ trendy nail designs for 2024 that will help you start the school year with a bang and keep your manicure game on point.

1. Minimalist Chic

Embrace the minimalist trend with clean lines and simple shapes. Opt for neutral tones or soft pastels with geometric accents for a sophisticated yet understated look that’s perfect for any school setting.

2. Classic French Twist

Give the traditional French manicure a modern update with bold colors or subtle patterns. Think vibrant tips or delicate stripes for a fresh take on this timeless style.

3. Playful Polka Dots

Add a touch of whimsy with playful polka dots. Choose contrasting colors or keep it simple with monochrome dots on a neutral base. This design is both fun and versatile, making it ideal for school.

4. Soft Ombre

Create a dreamy effect with soft ombre nails. Blend shades from light to dark for a gradient that adds depth and dimension, giving your nails a polished yet eye-catching look.

5. Abstract Art

Channel your inner artist with abstract nail designs. Use bold brush strokes and unique shapes to create a design that stands out and showcases your creativity.

6. Pastel Perfection

Soft pastels are perfect for a gentle and stylish look. Opt for colors like lavender, mint green, and peach to create a serene and elegant manicure that’s perfect for school.

7. Classic Stripes

Stripes are always in style. Whether you choose thin or thick lines, vertical or horizontal, stripes add a graphic element to your nails that’s both chic and versatile.

8. Glitter Accents

Add a touch of sparkle with glitter accents. Use glitter polish on a few nails or as a subtle detail to bring a bit of shimmer to your everyday look without being overwhelming.

9. Starry Night

Create a celestial effect with starry night designs. Paint tiny stars or constellations on a dark base for a manicure that’s both mystical and stylish.

10. Nature-Inspired

Bring the outdoors in with nature-inspired designs. Think leaves, flowers, or delicate branches to add a touch of natural beauty to your nails.

11. Neon Pop

Make a statement with neon colors. Bright pinks, greens, and yellows are perfect for adding a burst of color and energy to your back-to-school look.

12. Geometric Patterns

Geometric patterns are both trendy and sophisticated. Use bold lines and shapes in contrasting colors to create a modern and eye-catching design.

13. Monochrome Magic

Keep it sleek with monochrome designs. Stick to one color or different shades of the same hue for a cohesive and stylish look.

14. Doodle Art

Let your creativity shine with doodle art. Draw small, fun designs or inspirational quotes to personalize your nails and make them uniquely yours.

15. Classic Red

Never underestimate the power of a classic red manicure. It’s bold, timeless, and perfect for making a statement as you head back to school.

16. Marble Effect

Create a sophisticated marble effect with swirls of white, gray, and gold. This elegant design adds a touch of luxury to your nails and is perfect for a refined look.

17. Gradient Nails

Opt for a gradient design that transitions from one color to another. This effect can be subtle or bold, depending on the colors you choose, and adds a dynamic touch to your manicure.

18. Abstract Florals

Combine abstract art with floral elements for a unique and stylish design. Use bold colors and shapes to create a manicure that’s both modern and feminine.

19. Colorful Confetti

Celebrate the start of the school year with colorful confetti nails. Use a mix of bright and fun colors for a design that’s playful and full of energy.

20. Checkerboard Patterns

Add a touch of retro with checkerboard patterns. Use contrasting colors for a bold and graphic look that’s sure to turn heads.

21. Metallic Finishes

Shine bright with metallic finishes. Gold, silver, and bronze add a touch of glamour and sophistication, perfect for making your nails stand out.

22. Cute Icons

Incorporate cute icons like hearts, stars, or smiley faces into your nail design. These small details add a fun and playful element to your manicure.

23. Watercolor Wash

Create a soft, artistic look with watercolor wash nails. Use light, blended colors to achieve a dreamy, watercolor effect that’s both stylish and unique.

24. Neon French Tips

Combine the classic French manicure with neon tips for a bold and modern twist. This design adds a pop of color while keeping the sophisticated lines of the French manicure.

How to Achieve These Nail Designs

Prep Your Nails: Start with clean, trimmed nails. Apply a base coat to protect your nails and provide a smooth surface for your design.

Choose Your Design: Select the nail design that best suits your style and gather your nail art tools, including brushes, dotting tools, or nail decals.

Apply the Base Color: Choose a base color that complements your design. Apply it evenly and allow it to dry completely before adding any additional details.

Create the Design: Use your chosen tools to carefully create the nail art. Take your time to ensure precision and achieve the desired look.

Seal with a Topcoat: Finish with a clear topcoat to protect your design and add shine. This step helps to extend the life of your manicure and keep your nails looking fresh.

Final Thoughts

Starting the school year with stylish nails is a great way to express your personality and boost your confidence. With these 23+ trendy back-to-school nail designs for 2024, you can easily find a look that matches your style and adds a touch of flair to your school outfits. Whether you prefer minimalist chic or bold colors, there’s a design here to suit every taste and occasion. So, get creative and make a statement with your nails as you head back to school in style!

image
Gefällt mir
Kommentar
Teilen
77WIN Nhà Cái Uy Tín
77WIN Nhà Cái Uy Tín  hat sein Titelbild geändert
1 y

image
Gefällt mir
Kommentar
Teilen
Charlotte Chic Nomad
1 y ·übersetzen

15 Stunning Beach-Themed Nail Ideas for a Chic Summer Look

As summer approaches and beach days become more frequent, it’s time to embrace the season’s vibrant spirit with some stylish beach-themed nails. Whether you’re lounging by the shore, attending a summer party, or simply enjoying the sunny days, your nails can be the perfect accessory to complement your summer vibe. Here are 15 stunning beach-themed nail ideas to help you achieve a chic and effortless summer look, capturing the essence of coastal glamour and seaside fun.

1. Tropical Sunset Ombre

Capture the breathtaking beauty of a tropical sunset with an ombre nail design. Blend shades of orange, pink, and purple to create a gradient effect that mirrors the colors of the evening sky as the sun sets over the ocean. This design adds a warm, glowing touch to your summer style.

2. Ocean Waves

Bring the tranquility of the sea to your fingertips with ocean wave nail art. Use varying shades of blue and white to paint swirling waves that evoke the soothing movement of the ocean. This dynamic design is perfect for a refreshing and vibrant summer look.

3. Seashell Accents

Celebrate the charm of beachcombing with seashell accents. Apply tiny seashell decals or hand-paint delicate seashell designs onto your nails. This detail-oriented design evokes the joy of collecting treasures along the shore.

4. Palm Tree Silhouettes

Embrace the classic symbol of tropical paradise with palm tree silhouettes. Paint dark, elegant palm trees against a bright, colorful background to capture the essence of a tropical getaway. This design is perfect for a chic and timeless summer look.

5. Nautical Stripes

Channel a classic nautical aesthetic with stripes in navy blue, white, and red. This design exudes a sophisticated maritime vibe and pairs beautifully with any beach attire, making it an ideal choice for a polished summer manicure.

6. Sandy Beach Textures

Simulate the texture of sandy beaches on your nails with a textured topcoat or sandy nail polish. This tactile design adds a unique dimension to your manicure, reminiscent of a day spent relaxing on the shore.

7. Coral Reef Colors

Celebrate the vibrant underwater world with coral reef-inspired colors. Use bright and bold shades like coral, turquoise, and sea green to create a lively and colorful design that reflects the beauty of marine life.

8. Beach Ball Patterns

Add a fun and playful touch with beach ball patterns. Incorporate bright, cheerful colors to mimic the classic beach ball design, creating a manicure that’s as lively and exciting as a day at the beach.

9. Starfish Designs

Infuse your nails with a bit of seaside magic by incorporating starfish designs. Use metallic or glittery polish to create starfish shapes, adding a touch of sparkle and whimsy to your manicure.

10. Sunset Gradient

For a more subtle beach-inspired look, opt for a sunset gradient design. Blend warm hues like pink, orange, and yellow to create a serene and picturesque sunset scene on your nails, perfect for a relaxed and elegant summer style.

11. Beach Wave French Tips

Give the classic French manicure a beachy twist with wave-inspired tips. Use soft blues and whites to create a wavy effect at the tips of your nails, combining sophistication with a relaxed coastal feel.

12. Anchor Designs

Celebrate nautical charm with anchor designs. Paint anchors in navy blue or gold for a classic maritime look that’s perfect for pairing with summer outfits and beachwear.

13. Seashell and Starfish Mix

Combine seashells and starfish for a detailed and enchanting beach-themed design. Mix and match these elements to create a manicure that captures the essence of a seaside adventure and adds a touch of whimsy.

14. Tropical Fruits

Add a fruity twist to your nails with designs inspired by tropical fruits like pineapples, watermelons, and coconuts. Use vibrant colors and fun patterns to create a fresh and fruity look that’s perfect for summer.

15. Beach Sunset Nails

Create a serene beach sunset scene on your nails with blended colors and delicate details. Depict the sun setting over the ocean and add silhouettes of palm trees or seagulls for a beautifully detailed and relaxing summer design.

How to Achieve the Perfect Beach-Themed Nails

Prep Your Nails: Start with clean, trimmed nails. Apply a base coat to protect your natural nails and ensure a smooth surface for your design.

Choose Your Design: Pick the beach-themed design that resonates with your style. Gather your nail art tools, including brushes, dotting tools, or nail decals.

Apply the Base Color: Use a base color that complements your chosen design. For example, light blue for ocean-themed nails or warm orange for sunset gradients.

Create the Design: Use your nail art tools to carefully create the beach-themed design. Precision is key to achieving a polished and professional look.

Seal with a Topcoat: Finish with a clear topcoat to protect your design and add a glossy finish. This step helps to prolong the life of your manicure and keeps your nails looking fresh.

Final Thoughts

Embrace the vibrant spirit of summer with these 15 stunning beach-themed nail ideas. From tropical sunsets to playful beach balls, each design captures the essence of the season and adds a stylish touch to your look. Whether you're hitting the beach or simply enjoying the sunny days, these nail art ideas will ensure your fingertips are the highlight of your summer style. So, get creative, and let your nails reflect the beauty and fun of the coastal season

image
Gefällt mir
Kommentar
Teilen
77WIN Nhà Cái Uy Tín
1 y

image
Gefällt mir
Kommentar
Teilen
Charlotte Chic Nomad
1 y ·übersetzen

Cozy Knit Nail Trend: The Perfect Winter Sweater Companion

As the crisp winter air settles in and cozy sweaters become a staple of our wardrobes, why not extend that warm, snug feeling to your nails as well? The cozy knit nail trend is the perfect way to match your manicure with your winter wardrobe, creating a seamless look that’s both stylish and seasonal. Here’s everything you need to know about embracing this trend and making your nails as cozy as your favorite knitwear.

Why the Cozy Knit Nail Trend?

1. Seasonal Charm

The cozy knit nail trend is inspired by the beloved textures and patterns of winter sweaters. By incorporating these knit-like designs into your nails, you bring a touch of winter charm and warmth to your overall look. It’s a fun and festive way to celebrate the season.

2. Textural Appeal

Knit patterns on nails mimic the texture of actual knitwear, adding a unique tactile element to your manicure. This trend isn’t just about visual appeal; it’s also about creating a three-dimensional effect that feels as cozy as it looks.

3. Versatility

The cozy knit design is incredibly versatile, allowing you to experiment with different colors and patterns. Whether you prefer classic neutrals or vibrant hues, there’s a knit pattern to suit every style and occasion.

Top Cozy Knit Nail Designs

1. Classic Cable Knit

Emulate the traditional cable knit pattern with intricate designs that mimic the twisted, braided look of your favorite sweaters. This timeless pattern is perfect for a sophisticated and elegant winter manicure.

2. Simple Knit Patterns

For a more understated approach, opt for simple knit designs that use minimal lines and shapes. These designs can be easily adapted to fit any nail shape and length, providing a subtle nod to the trend without overwhelming your look.

3. Colorful Knit Accents

Add a pop of color to your winter nails with colorful knit patterns. Choose hues that complement your wardrobe, such as soft pastels or bold jewel tones, to create a playful and eye-catching effect.

4. Textured Finish

Enhance the cozy feel of your nails with a textured finish that mimics the softness of knitted fabrics. Use nail art tools or textures to create a raised effect that adds depth and dimension to your manicure.

5. Holiday-Inspired Knits

Celebrate the festive season with holiday-themed knit designs. Think snowflakes, reindeer, or candy canes incorporated into your knit patterns for a cheerful and seasonal touch.

How to Achieve the Cozy Knit Nail Trend

1. Prep Your Nails

Start by prepping your nails. Clean and trim them, and apply a base coat to ensure a smooth surface for your nail art. This step helps your manicure last longer and prevents staining.

2. Choose Your Colors

Select the colors you want to use for your knit pattern. Classic winter colors like deep blues, rich burgundies, and warm taupes are great choices, but feel free to experiment with any shades that fit your style.

3. Create the Knit Pattern

You can create knit patterns using a variety of techniques. Nail art brushes and dotting tools are great for painting intricate designs, while nail stamping kits can help you achieve more detailed patterns. For a DIY approach, use a fine brush to draw the knit design directly onto your nails.

4. Add Texture

To add a textured effect, apply a textured topcoat or use a nail art technique like sponging or stamping. This will give your nails a more authentic knit appearance.

5. Seal the Design

Finish with a clear topcoat to protect your design and add shine. This step is crucial for ensuring your manicure looks fresh and lasts longer.

Final Thoughts

The cozy knit nail trend is a delightful way to embrace the winter season and bring a touch of warmth and texture to your manicure. With its versatility and charm, this trend allows you to express your style while staying on theme with your winter wardrobe. Whether you opt for classic cable knits or playful patterns, your nails can be just as cozy and fashionable as your favorite sweater.

So, get creative and give your winter look a stylish upgrade with this cozy nail trend. Your hands will thank you for the extra warmth and flair, making your winter season all the more stylish and fun!

image
Gefällt mir
Kommentar
Teilen
Showing 8295 out of 11753
  • 8291
  • 8292
  • 8293
  • 8294
  • 8295
  • 8296
  • 8297
  • 8298
  • 8299
  • 8300
  • 8301
  • 8302
  • 8303
  • 8304
  • 8305
  • 8306
  • 8307
  • 8308
  • 8309
  • 8310

Angebot bearbeiten

Tier hinzufügen


Wählen Sie ein Bild aus
Löschen Sie Ihren Tier
Bist du sicher, dass du diesen Tier löschen willst?

Bewertungen

Um Ihre Inhalte und Beiträge zu verkaufen, erstellen Sie zunächst einige Pakete. Monetarisierung

Bezahlen von Brieftasche

Zahlungsalarm

Sie können die Artikel kaufen, möchten Sie fortfahren?

Eine Rückerstattung anfordern