Suka
Komentar
Membagikan


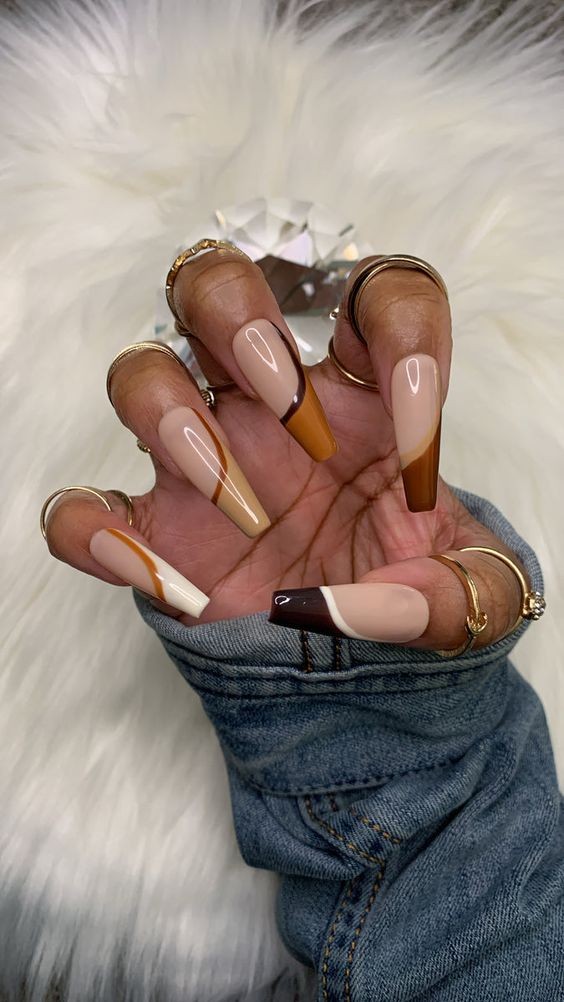
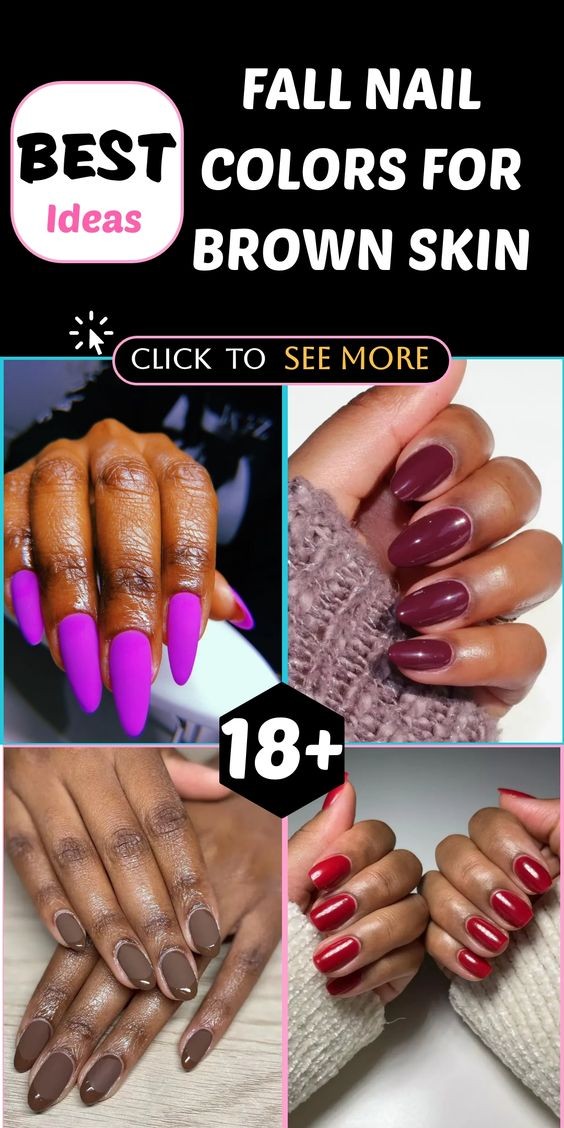
Top Fall Nail Colors for Brown Skin: 18 Ideas to Elevate Your Style
As the leaves begin to change and the air turns crisp, it’s time to embrace the beautiful hues of fall—not only in your wardrobe but also in your nail art. For those with brown skin tones, the right nail colors can enhance your natural beauty, complement your skin tone, and add a touch of sophistication to any outfit. Here are 18 stunning nail color ideas perfect for the fall season that will flatter brown skin beautifully.
1. Rich Burgundy
Burgundy is a classic fall color that radiates warmth and elegance. This deep red hue is perfect for those with warm undertones, adding a touch of glam to your look. Whether in a glossy finish or matte, burgundy nails can be worn at work or special events.
2. Earthy Olive Green
Olive green is a trendy and earthy shade that complements brown skin tones beautifully. This color evokes the essence of fall foliage and pairs well with neutral and vibrant outfits alike. Try it in a glossy or satin finish for a modern twist.
3. Mustard Yellow
Mustard yellow is a bold and cheerful choice that stands out against darker skin tones. This warm shade can brighten up your fall wardrobe and add a playful element to your style. Consider a matte finish for a chic, understated look.
4. Deep Plum
Deep plum is another stunning choice that works wonders on brown skin. This dark, moody shade is perfect for evening events and adds a sense of drama to your nails. Pair it with gold or silver accents for a touch of sparkle.
5. Classic Red
A classic red never goes out of style. This vibrant shade is perfect for fall and adds a pop of color to any outfit. Whether you prefer a glossy or matte finish, red nails are a statement that exudes confidence.
6. Terracotta Orange
Terracotta orange is an earthy, muted color that captures the essence of autumn. It complements warm brown skin tones beautifully, creating a harmonious look. This shade can be worn as a solid color or paired with nail art for added flair.
7. Chocolate Brown
Embrace the season with a rich chocolate brown that mirrors the falling leaves. This deep shade is sophisticated and versatile, making it an excellent choice for both casual and formal occasions. Consider adding a glossy topcoat for extra shine.
8. Warm Taupe
Warm taupe is a neutral option that enhances the natural beauty of brown skin. This versatile shade works well for everyday wear and can be dressed up with nail art or embellishments for special occasions. It’s a go-to choice for a sophisticated, understated look.
9. Berry Pink
Berry pink is a vibrant and playful color that adds a youthful touch to your nails. This lively shade pops beautifully against brown skin, making it perfect for fall festivities. Consider using this shade in a gradient or ombre effect for a fun twist.
10. Soft Mocha
For those who prefer more muted tones, soft mocha is an excellent choice. This light brown hue is understated yet elegant, making it suitable for any occasion. Pair it with minimalist nail art for a chic, modern look.
11. Emerald Green
Emerald green is a luxurious color that stands out beautifully against brown skin. This rich hue is reminiscent of nature and works well for fall celebrations. You can opt for a glossy finish or add glitter for a touch of glamour.
12. Slate Gray
Slate gray is a trendy neutral that pairs well with various fall outfits. This modern shade offers a chic alternative to traditional colors and looks stunning on brown skin. Try it with matte or glossy finishes for a versatile look.
13. Rust Red
Rust red is a warm, earthy tone that captures the essence of fall. This rich color complements brown skin beautifully and adds warmth to your overall look. Consider pairing it with gold accents for an extra touch of elegance.
14. Soft Lilac
Soft lilac is a delicate and feminine color that adds a refreshing touch to your nails. This light purple shade works surprisingly well with brown skin, making it perfect for a more whimsical fall look. Pair it with silver or gold for added shine.
15. Charcoal Black
For those who love bold colors, charcoal black is an edgy choice that never goes out of style. This dark shade provides a striking contrast to brown skin and can be dressed up or down for any occasion. Consider adding nail art or metallic accents for a modern twist.
16. Coral Red
Coral red is a vibrant and lively color that adds a fun touch to your fall nail palette. This shade complements warm undertones and looks fabulous on brown skin. It's perfect for a playful and energetic look during the fall season.
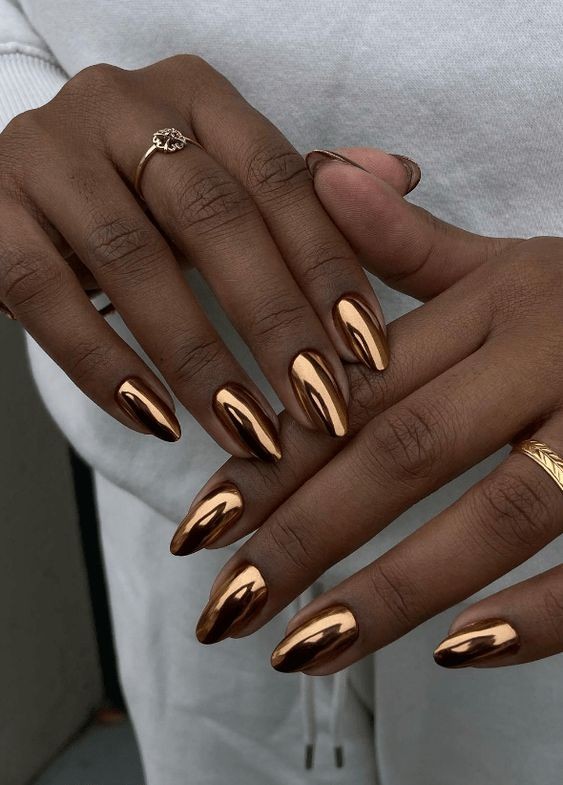
17. Copper Metallic
Copper metallic nails add a touch of luxury and shine to your look. This warm, reflective color is ideal for evening events and complements brown skin beautifully. Pair it with a simple outfit to let your nails take center stage.
18. Sand Beige
For a classic and understated look, sand beige is a fantastic choice. This neutral shade works well with all skin tones and is perfect for everyday wear. Consider using it with a matte finish for a modern, chic appearance.
Conclusion
With so many beautiful nail colors to choose from, fall is the perfect time to experiment with shades that complement your brown skin. Whether you prefer bold hues or subtle tones, these 18 nail color ideas will help you express your style and embrace the beauty of the season. So grab your favorite polishes, and let your creativity shine this fall!
Puppies in the Garden: The Ultimate Guide to a Joyful Outdoor Adventure
There's something undeniably magical about watching puppies frolic in a garden. The sight of these energetic bundles of fur tumbling through the flowers, chasing butterflies, and exploring every nook and cranny brings joy to anyone who witnesses it. If you're a dog lover or simply looking to add a bit of charm to your outdoor space, this guide on "Puppies in the Garden" will help you create an unforgettable experience for your furry friends.
The Joy of Puppies in the Garden
Gardens offer a sensory wonderland for puppies. The soft grass under their paws, the vibrant colors of blooming flowers, and the intriguing smells of soil and plants create an ideal playground. For puppies, the garden is not just a place to run around; it's a place where they can stimulate their senses, develop their motor skills, and enjoy the great outdoors.
Preparing Your Garden for Puppy Playtime
Before letting your puppies loose in the garden, it’s essential to ensure the space is safe and enjoyable for them. Here are some tips to prepare your garden for puppy playtime:
Puppy-Proof Your Garden:
Check for Toxic Plants: Some plants are toxic to dogs. Make sure your garden is free from plants like oleander, azaleas, and lilies.
Secure the Perimeter: Ensure that your garden fence is high and secure enough to prevent puppies from escaping. Puppies are notorious for their curiosity and agility!
Remove Small Objects: Small garden decorations or tools can be choking hazards. Keep the area clean and free from potential hazards.
Create a Safe Play Area:
Install a Sandbox: Puppies love digging. Providing a sandbox or designated digging area can keep them from uprooting your garden plants.
Add Shaded Spots: Puppies can easily overheat, so ensure there are shaded areas or a doghouse where they can cool off.
Introduce Interactive Toys:
Interactive Toys: Consider placing some interactive toys around the garden to keep your puppies entertained. Toys that dispense treats or make noises can be particularly engaging.
Fun Activities for Puppies in the Garden
Hide and Seek: Play hide and seek with your puppies by hiding treats or toys around the garden. This activity will stimulate their natural hunting instincts and keep them engaged.
Obstacle Course: Set up a simple obstacle course with items like cones, tunnels, and low jumps. This not only provides physical exercise but also mental stimulation as they navigate the course.
Water Fun: If the weather is warm, consider setting up a kiddie pool for some splashing fun. Many puppies love playing in water, and it’s a great way for them to cool down.
Gardening Together: Let your puppies “help” with gardening tasks. They can dig in designated spots while you work on planting flowers or vegetables. This interaction helps them bond with you and understand their role in the garden.
Safety and Health Considerations
While gardens offer endless fun, it’s crucial to prioritize your puppies' safety and health:
Monitor Their Health: Keep an eye on your puppies for any signs of overexertion or health issues. Ensure they have constant access to fresh water.
Check for Pests: Regularly check your garden for pests that could harm your puppies, such as ticks or fleas.
Grooming: After a play session in the garden, check your puppies for any burrs, ticks, or debris caught in their fur.
Conclusion
Creating a puppy-friendly garden is a rewarding experience that can enhance both your and your puppy’s quality of life. By preparing your garden, introducing engaging activities, and ensuring safety, you’ll provide a delightful environment where your puppies can thrive and have endless fun. So grab your camera, let the puppies loose, and enjoy the heartwarming spectacle of puppies discovering the joys of the garden.

**Classic Solid Shag Rug: A Timeless Addition to Any Space**
In the world of interior design, certain elements have a way of transcending trends and enduring through the ages. One such timeless classic is the solid shag rug. Known for its plush texture, inviting warmth, and versatile style, the classic solid shag rug has maintained its place as a favorite choice for homeowners and designers alike. This article delves into the many reasons why a classic solid shag rug is a superb choice for any space, offering insights on its benefits, styling tips, and maintenance advice.
### **1. The Allure of the Shag Rug**
The shag rug, with its long, fluffy fibers, is celebrated for its luxurious feel and cozy comfort. While shag rugs come in various patterns and colors, the classic solid shag rug stands out for its simplicity and versatility. Here’s why the solid shag rug continues to be a staple in home decor:
- **Luxurious Texture* The deep pile of a shag rug creates a soft, cushiony surface that feels wonderful underfoot. This tactile quality adds a sense of opulence to any room.
- **Visual Warmth* A solid shag rug can bring an element of warmth and comfort to a space. Its rich texture and depth create a visual softness that can make a room feel more inviting.
- **Versatile Style* The simplicity of a solid color allows it to blend seamlessly with various decor styles, from contemporary and minimalist to traditional and bohemian.
### **2. Choosing the Right Classic Solid Shag Rug**
When selecting a classic solid shag rug, there are several factors to consider to ensure it fits perfectly into your space:
- **Color* Opt for a color that complements your existing decor. Neutral tones like beige, gray, or cream offer versatility and can seamlessly blend with most color schemes. For a bolder statement, consider a rich jewel tone or deep, saturated color.
- **Material* Shag rugs can be made from a variety of materials, including wool, polyester, or synthetic fibers. Wool is known for its durability and natural warmth, while synthetic fibers are often more affordable and easy to clean.
- **Pile Height* The pile height of a shag rug determines its level of plushness. Higher piles offer more cushioning but may be harder to clean, while shorter piles are easier to maintain and provide a more understated look.
### **3. Styling Your Classic Solid Shag Rug**
A classic solid shag rug can be styled in numerous ways to enhance the look of your room. Here are some ideas to help you integrate this timeless piece into your decor:
- **Living Room* Place a large shag rug in the center of your living room to anchor the space and create a cozy area for lounging. Pair it with a comfortable sofa and stylish coffee table for a welcoming, well-designed setting.
- **Bedroom* In the bedroom, a shag rug adds a touch of luxury and comfort. Position it at the foot of the bed or beside it to provide a soft surface to step onto when getting out of bed.
- **Home Office* Enhance your home office with a shag rug to create a warm and inviting workspace. A solid shag rug can help to delineate your work area and make it more comfortable for long hours spent at the desk.
- **Playroom* For a kid-friendly space, a shag rug can offer a soft, safe surface for children to play. Choose a durable material that can withstand frequent use and is easy to clean.
### **4. Care and Maintenance**
Maintaining the beauty and functionality of your classic solid shag rug requires some regular care. Here are tips to keep your rug looking its best:
- **Vacuuming* Regular vacuuming is essential to keep the rug free of dust and debris. Use a vacuum with a beater bar or rotating brush set to a high pile setting to prevent damage to the fibers.
- **Spot Cleaning* Address spills and stains promptly to avoid setting them into the fibers. Blot the area with a clean cloth and a mild cleaning solution, then rinse with water and blot dry.
- **Professional Cleaning* For deep cleaning, consider hiring a professional rug cleaner who specializes in shag rugs. Professional cleaning can help to remove dirt and restore the rug’s original texture and appearance.
### **5. Budget-Friendly Options**
A classic solid shag rug doesn’t have to break the bank. Here are some tips for finding budget-friendly options without sacrificing quality:
- **Look for Sales and Discounts* Many retailers offer sales or discounts on rugs throughout the year. Keep an eye out for promotions to find a great deal on a high-quality shag rug.
- **Explore Online Retailers* Online marketplaces and retailers often have a wide selection of rugs at various price points. Be sure to read reviews and check return policies before making a purchase.
- **Consider Synthetic Fibers* While natural fibers like wool are luxurious, synthetic materials can be more affordable and offer good durability and ease of maintenance.
### **6. Real-Life Inspirations**
To further inspire your decor journey, consider exploring real-life examples of classic solid shag rugs in various settings:
- **Pinterest and Instagram* Social media platforms are excellent resources for finding design inspiration. Search for hashtags like #shagrug and #interiordesign to see how others have styled their shag rugs.
- **Design Magazines and Blogs* Many home decor magazines and blogs feature beautiful room designs that include shag rugs. These resources can provide ideas for integrating a classic solid shag rug into different styles and spaces.
- **Home Decor Stores* Visiting home decor stores and showrooms can give you a firsthand look at shag rugs in various settings. Take note of how they are styled and consider how similar ideas might work in your home.
### **Conclusion**
The classic solid shag rug remains a beloved choice for adding texture, warmth, and style to any room. Its timeless appeal, combined with its luxurious feel and versatility, makes it a valuable addition to your home decor. By carefully selecting the right rug, styling it thoughtfully, and maintaining it properly, you can enjoy the beauty and comfort of a classic solid shag rug for years to come. Embrace the enduring charm of this classic piece and transform your space into a cozy, stylish retreat.
#modernbedroomidea

57 The Best Short Fall Nails of 2024
As the leaves begin to turn and the air grows crisp, it’s time to embrace the beauty of fall—not just in nature, but in our beauty routines as well. Fall is the perfect season to experiment with nail designs that reflect the warm, earthy tones and cozy vibes of autumn. Short nails have become increasingly popular for their practicality and chic aesthetic, making them an ideal canvas for a variety of designs. In this article, we’ll explore 57 of the best short fall nails for 2024, showcasing trends, colors, and designs that will have you looking stylish all season long.
1. Warm Earthy Tones
1.1. Rust Orange
A vibrant rust orange is a quintessential fall color. It evokes the warmth of autumn leaves and pairs beautifully with neutral outfits. Consider a simple glossy finish or a matte top coat for an elegant look.
1.2. Deep Olive Green
This rich hue mimics the changing foliage and adds a touch of sophistication. A glossy olive green with a high-shine top coat can elevate any fall outfit.
1.3. Burnt Sienna
Burnt sienna is a warm, reddish-brown shade that captures the essence of fall. It looks stunning on short nails, especially when combined with gold accents.
2. Subtle Neutrals
2.1. Beige with Gold Foil
A soft beige base with delicate gold foil accents offers a classy and understated look. This design is perfect for both casual and formal occasions.
2.2. Taupe Ombre
A taupe ombre effect blends two neutral shades, creating a soft gradient. It’s a versatile option that looks great on short nails.
2.3. Soft Gray
A light gray color adds a modern touch to your fall nail game. Pair it with minimalist designs like stripes or dots for a chic effect.
3. Cozy Textures
3.1. Sweater Nail Art
Nail designs that mimic the look of knitted sweaters are perfect for fall. Use a nude base with white or cream designs to achieve this cozy aesthetic.
3.2. Matte Finish
Matte nails are trendy and chic. Opt for a matte finish in a dark color, such as burgundy or navy, for a sophisticated look.
3.3. Velvet Effect
Adding a velvet top coat to your nails gives them a unique texture that feels luxurious. This works beautifully with jewel tones like emerald or amethyst.
4. Nature-Inspired Designs
4.1. Leaf Motifs
Incorporating leaf designs into your nail art can capture the spirit of the season. Use gold or copper polish for the leaves over a nude base for a subtle yet striking look.
4.2. Acorn and Pinecone
These charming designs can be created using nail stickers or hand-painted art. They’re perfect for embracing the fall theme.
4.3. Floral Patterns
Fall florals often feature rich, dark colors. Choose flowers like dahlias or chrysanthemums in shades of burgundy and orange for a bold statement.
5. Seasonal Sparkle
5.1. Glitter Tips
Add a touch of glam with glitter tips. Choose gold or copper glitter over a deep plum base for an elegant look that sparkles.
5.2. Metallic Accents
Incorporate metallic shades like gold, silver, or bronze into your designs. A metallic stripe across a solid color can create a modern and stylish appearance.
5.3. Sparkly Gradients
A gradient effect that transitions from a dark color to glitter can create a stunning visual. This design captures the essence of fall evenings filled with twinkling lights.
6. Fun Patterns
6.1. Plaid Designs
Plaid is a classic fall pattern. Use shades of red, green, and cream to create a plaid design that looks cozy and warm.
6.2. Houndstooth
This timeless pattern can add a touch of elegance to your short nails. A classic black and white houndstooth can be particularly chic.
6.3. Stripes
Bold stripes in fall colors, like mustard and dark green, can create a playful yet sophisticated look.
7. Bold Colors
7.1. Burgundy
Burgundy is a fall staple, offering depth and richness. A high-gloss finish can enhance this deep shade, making it a favorite for the season.
7.2. Navy Blue
A deep navy blue is versatile and chic. It pairs well with a variety of outfits, making it a great choice for short nails.
7.3. Mustard Yellow
This unique shade brings warmth and brightness to fall nail designs. Pair it with a matte finish for a modern twist.
8. Artistic Flair
8.1. Abstract Art
Experiment with abstract designs using fall colors. Swirls and shapes in shades of orange, brown, and yellow can create a stunning artistic effect.
8.2. Geometric Patterns
Geometric nail art using triangles and lines can add a contemporary feel. Opt for a mix of matte and glossy finishes to enhance the design.
8.3. Watercolor Effect
The watercolor technique can create beautiful, soft designs. Choose fall colors like burgundy and burnt orange for a dreamy effect.
9. Seasonal Themes
9.1. Halloween-Inspired Nails
Embrace the spooky season with subtle Halloween-themed designs. Consider ghost motifs or pumpkin patterns on a muted background.
9.2. Thanksgiving Nail Art
Celebrate Thanksgiving with designs featuring turkeys, pumpkins, or autumn leaves. These playful designs can be subtle and stylish.
9.3. Harvest Colors
Incorporate colors that reflect the harvest season, like deep reds, oranges, and browns. These colors can be used in various patterns or as solid shades.
10. Final Touches
10.1. Nail Care
To keep your short fall nails looking their best, prioritize nail care. Regular moisturizing and cuticle care can ensure your nails are healthy and vibrant.
10.2. Nail Accessories
Consider adding nail jewels or charms for an extra touch of flair. Small details can elevate your nail designs and make them stand out.
10.3. Seasonal Nail Wraps
For an easy way to achieve stunning designs, consider using seasonal nail wraps. They come in various fall designs and can be a quick alternative to traditional nail art.
Conclusion
As we step into the fall season of 2024, embracing short nails with unique designs, colors, and patterns can elevate your style and reflect the beauty of autumn. From earthy tones to sparkling accents, there are endless possibilities to explore. Whether you prefer a subtle look or something bold and vibrant, these 57 short fall nails are sure to inspire your next manicure. Embrace the season, and let your nails be a canvas for your creativity!

**Adorable Room Design Inspiration: Transform Your Space with Charming Decor**
When it comes to designing a room, the possibilities are endless. Whether you’re looking to revamp a single room or redecorate your entire home, infusing your space with adorable design elements can transform it into a cozy, inviting haven. Adorable room design is all about creating a space that feels both stylish and comfortable, with touches of whimsy and personality that make it uniquely yours. In this comprehensive guide, we’ll explore various ways to infuse cuteness and charm into your room design, offering tips, ideas, and inspiration to help you create a space you’ll love.
### 1. **Start with a Vision: Define Your Style**
Before diving into the details, it’s essential to define the overall style you want for your room. Adorable room design can encompass a variety of aesthetics, from charming cottage vibes to playful modern looks. Consider these popular styles:
- **Shabby Chic* Characterized by its vintage charm and soft pastel colors, shabby chic design often features distressed furniture, floral patterns, and delicate fabrics.
- **Scandinavian* Known for its minimalist approach and emphasis on functionality, Scandinavian design uses clean lines, neutral tones, and cozy textiles.
- **Bohemian* This style embraces a laid-back, eclectic vibe with vibrant colors, patterned rugs, and a mix of textures and materials.
Determine which style resonates with you the most, and use it as a foundation for your design decisions.
### 2. **Play with Color: Add a Pop of Charm**
Color plays a significant role in setting the tone of a room. To create an adorable atmosphere, consider using soft, soothing colors or playful, vibrant hues. Here are a few color schemes to inspire you:
- **Pastels* Soft pinks, blues, and greens can create a serene and charming environment. Pastel shades work well in bedrooms, nurseries, and living areas.
- **Bold Accents* If you prefer a more dynamic look, add bold accents in colors like teal, mustard yellow, or coral. These pops of color can be incorporated through accessories like cushions, rugs, or artwork.
- **Monochromatic Palettes* Choose a single color and use different shades and textures to add depth and interest to your room. This approach can create a cohesive and visually appealing space.
### 3. **Furniture Fun: Choose Pieces with Personality**
Furniture is a crucial component of room design, and incorporating adorable pieces can make a big difference. Look for furniture with unique shapes, patterns, or details:
- **Whimsical Shapes* Opt for furniture with playful shapes, such as a cloud-shaped ottoman or a heart-shaped chair. These pieces add character and charm to any room.
- **Vintage Finds* Scour thrift stores or antique shops for vintage furniture that can be refinished or repurposed. Items like an old wooden dresser or a retro armchair can bring a touch of nostalgia and uniqueness to your space.
- **Custom Pieces* Consider investing in custom-made furniture that reflects your style. For example, a bespoke bookshelf with quirky design elements can become a focal point in your room.
### 4. **Textile Bliss: Cozy Up with Fabrics**
Textiles are a fantastic way to add comfort and style to your room. Consider incorporating these adorable textile ideas:
- **Throw Pillows* Mix and match pillows with different patterns, textures, and sizes. Opt for fun shapes, like stars or animals, to add a whimsical touch.
- **Rugs* Choose a rug with a cute pattern or vibrant color to anchor your space. Round rugs or those with playful designs can add a fun element to your floor.
- **Curtains* Select curtains with light, airy fabrics or charming prints. Sheer curtains with subtle patterns can create a soft, dreamy atmosphere.
### 5. **Wall Wonders: Decorate with Style**
Your walls offer a blank canvas for creativity. Enhance your room with adorable wall decor ideas:
- **Gallery Walls* Create a gallery wall with a mix of artwork, photos, and decorative items. Choose frames in different styles or colors to add visual interest.
- **Wall Decals* Use removable wall decals to add playful patterns or illustrations. This is a great option for renters or those who like to change their decor frequently.
- **Statement Wallpaper* Consider using wallpaper with whimsical patterns, such as floral prints, polka dots, or animal motifs. Wallpaper can make a bold statement and add charm to any room.
### 6. **Accessory Magic: Add the Finishing Touches**
Accessories are the final pieces that tie a room together. Incorporate these adorable accessories to complete your design:
- **Lighting* Choose lighting fixtures with unique designs, such as a chandelier with playful elements or a lamp with a quirky base. Fairy lights and string lights can also add a touch of magic.
- **Plants* Add a touch of nature with indoor plants. Choose cute planters or macramé hangers to display your greenery in style.
- **Personal Touches* Incorporate personal items that reflect your personality, such as handmade crafts, travel souvenirs, or sentimental objects.
### 7. **Budget-Friendly Tips: Create Charm Without Breaking the Bank**
Creating an adorable room design doesn’t have to be expensive. Here are some budget-friendly tips to help you achieve your desired look:
- **DIY Projects* Get creative with DIY projects, such as painting your furniture, making your own wall art, or sewing custom cushions.
- **Thrift Shopping* Explore thrift stores, flea markets, and garage sales for affordable and unique decor items. You might find hidden gems that add character to your room.
- **Repurposing* Repurpose existing items in your home to give them new life. For example, an old ladder can become a stylish bookshelf, or a vintage suitcase can serve as a unique storage solution.
### 8. **Inspiration from Real Homes: See How Others Have Styled Their Spaces**
To spark your creativity, take a look at real homes and how they’ve incorporated adorable design elements:
- **Social Media* Platforms like Pinterest and Instagram are great for finding design inspiration. Search for hashtags like #adorableroomdesign or #cozyhome to discover new ideas.
- **Design Blogs* Read design blogs and websites to see how interior designers and enthusiasts are styling their spaces. Look for home tours or before-and-after projects to gain insight and inspiration.
- **Magazines* Browse home decor magazines for curated design ideas and tips. Many magazines feature adorable room designs and provide practical advice on achieving similar looks.
### Conclusion
Creating an adorable room design is all about infusing your space with charm, personality, and comfort. By defining your style, playing with color, choosing unique furniture, and adding cozy textiles, you can transform any room into a delightful retreat. With a little creativity and inspiration, you’ll be well on your way to designing a space that’s not only adorable but also a true reflection of your personality and taste. Happy decorating!
#modernbedroomidea

90+ Fall Nails for Your Autumn Manicure: Embrace the Season with Stylish and Trendy Designs
As the leaves begin to change and the air becomes crisp, it's time to transition your wardrobe and beauty routine to reflect the rich, cozy hues of autumn. One of the most exciting aspects of this seasonal shift is the opportunity to experiment with new nail art designs. Whether you’re a fan of classic fall colors, intricate patterns, or chic minimalist styles, this season has something for everyone. In this article, we’ve curated a list of over 90 stunning fall nail ideas to inspire your next manicure. Get ready to fall in love with these beautiful designs!
1. Warm Neutrals and Earthy Tones
Autumn is all about embracing the warmth of nature's palette. Think shades of brown, beige, taupe, and terracotta. These colors exude a sense of coziness and are incredibly versatile, making them perfect for any occasion.
Nude Almond Nails: Simple yet elegant, nude almond-shaped nails are a timeless choice. Add a matte topcoat for a modern twist.
Terracotta Tips: French tips in a terracotta hue add a subtle pop of color while keeping your nails chic and sophisticated.
Beige Gradient: A soft gradient from light beige to a deeper taupe creates a smooth and stylish look.
2. Rich Jewel Tones
Jewel tones like deep emerald, sapphire, amethyst, and ruby are quintessential fall colors. These shades are bold, luxurious, and add a touch of glamour to your manicure.
Emerald Green Gloss: A high-shine emerald green polish is perfect for those who love a bold and luxurious look.
Amethyst Accents: Incorporate amethyst purple into your manicure with accent nails or subtle ombre effects.
Sapphire Sparkle: Add a touch of glitter to your sapphire blue nails for a dazzling finish that’s perfect for both day and night.
3. Plaid Perfection
Plaid is a classic pattern that screams fall. Whether it’s on your clothes, accessories, or nails, this pattern adds a cozy and stylish vibe to your look.
Tartan Nail Art: Go all out with a detailed tartan pattern across all your nails for a bold statement.
Subtle Plaid Accents: If you prefer something more understated, try a single accent nail with a plaid design.
Monochrome Plaid: Use different shades of the same color to create a monochrome plaid effect that’s both chic and subtle.
4. Metallic Marvels
Metallic nails are perfect for adding a bit of sparkle to your autumn days. Gold, bronze, and copper are especially popular during the fall season.
Bronze Ombre: Transition from a dark brown base to a shimmering bronze tip for a gorgeous ombre effect.
Gold Foil Details: Add gold foil accents to a dark base color for a luxurious and eye-catching look.
Copper Chrome: Chrome nails in a copper shade offer a sleek, modern look that’s perfect for autumn.
5. Matte Magic
Matte nails are a fall staple. The soft, velvety finish adds a sophisticated touch to any color or design.
Matte Maroon: A deep maroon color with a matte finish is a classic fall look that never goes out of style.
Dusty Rose Matte: For something softer, try a dusty rose matte polish that’s perfect for everyday wear.
Matte with Glossy Tips: Combine matte and glossy finishes in the same color for a chic, modern twist on the French manicure.
6. Autumn Florals
Who says florals are just for spring? Fall florals in muted tones like mustard, burgundy, and burnt orange can create a stunning seasonal look.
Muted Floral Accents: Pair a solid color base with delicate floral accents on a couple of nails.
Vintage Florals: Choose a vintage-inspired color palette with soft floral designs for a retro autumn vibe.
Floral Nail Stickers: If intricate designs aren’t your thing, nail stickers can give you the perfect floral look with minimal effort.
7. Pumpkin Spice Inspired
What’s fall without pumpkin spice? Capture the essence of the season with warm orange tones and cozy designs.
Pumpkin Spice Latte Nails: Combine warm orange, cinnamon brown, and creamy white for a manicure inspired by everyone’s favorite fall drink.
Mini Pumpkins: Add tiny pumpkin designs on an accent nail for a cute and festive touch.
Cinnamon and Spice: Mix and match cinnamon browns with soft creams for a manicure that’s as warm and inviting as a fall day.
8. Animal Prints
Animal prints are timeless and versatile, and they pair perfectly with fall’s earthy tones. Leopard, cheetah, and snake prints are especially popular this season.
Leopard Print Accents: Pair a solid color with leopard print accents on one or two nails for a trendy yet sophisticated look.
Monochrome Animal Prints: Try animal prints in black and white for a modern, high-contrast look.
Snake Print Nails: Snake print designs in muted tones like olive green and brown are perfect for an edgy autumn look.
9. Gradient and Ombré Designs
Gradients and ombré designs are perfect for fall, allowing you to blend the season's rich hues in a seamless and stylish way.
Sunset Ombre: Blend warm oranges, pinks, and purples to create a stunning sunset ombre effect.
Moody Blues: Combine dark blue shades with gray for a cool, moody gradient that’s perfect for autumn.
Forest Green Ombre: Transition from a deep forest green to a lighter shade for a nature-inspired look.
10. Minimalist Elegance
Sometimes, less is more. Minimalist designs can be incredibly chic and allow you to embrace the season’s colors in a subtle, understated way.
Simple Lines: A nude base with simple black or white lines creates a minimalist yet stylish look.
Dot Details: Add tiny dots in fall colors to a nude or clear base for a modern and understated design.
Negative Space: Use negative space in your manicure to create unique and artistic designs with minimal effort.
11. Cozy Sweater Nails
Capture the cozy essence of fall with sweater-inspired nail art. These textured designs mimic the look of knitted fabrics, making your nails look as warm and snug as your favorite sweater.
Cable Knit Texture: Create a cable knit pattern on a couple of accent nails for a cozy and stylish look.
Sweater Print Stamps: Use nail stamps with sweater-like patterns for an intricate and detailed design without the hassle.
Monochromatic Sweater Nails: Choose a single color and create sweater patterns using a matte and glossy finish for subtle texture.
12. Halloween-Inspired Designs
Embrace the spooky season with Halloween-inspired nail art. From cute to creepy, there’s a design for everyone.
Cute Ghosts: Add tiny ghost designs on a dark base for a playful and festive look.
Spider Webs: Create intricate spider webs on your nails for a spooky yet elegant design.
Pumpkin Faces: Add jack-o’-lantern faces to your nails for a fun and festive touch.
Tips for Maintaining Your Fall Manicure
After spending time perfecting your fall manicure, you’ll want to ensure it lasts as long as possible. Here are some tips to keep your nails looking fresh and beautiful:
Use a Quality Base and Top Coat: A good base coat will protect your nails from staining, while a top coat will seal your design and add longevity.
Moisturize Your Cuticles: Cooler weather can dry out your skin and nails, so keep your cuticles hydrated with cuticle oil.
Avoid Hot Water: Prolonged exposure to hot water can cause your nail polish to chip or peel. Try to wear gloves when washing dishes or use lukewarm water.
Touch Up as Needed: Keep your polish looking fresh by touching up any chips or wear with a matching color.
Conclusion
Fall is the perfect time to experiment with new nail designs and colors. Whether you’re into bold jewel tones, cozy sweater patterns, or minimalist elegance, there’s a fall manicure out there that’s perfect for you. With over 90 ideas to choose from, you’re sure to find inspiration for your next salon visit or DIY nail session. So, grab your favorite polish and get ready to embrace the beauty of autumn with these stunning nail designs.
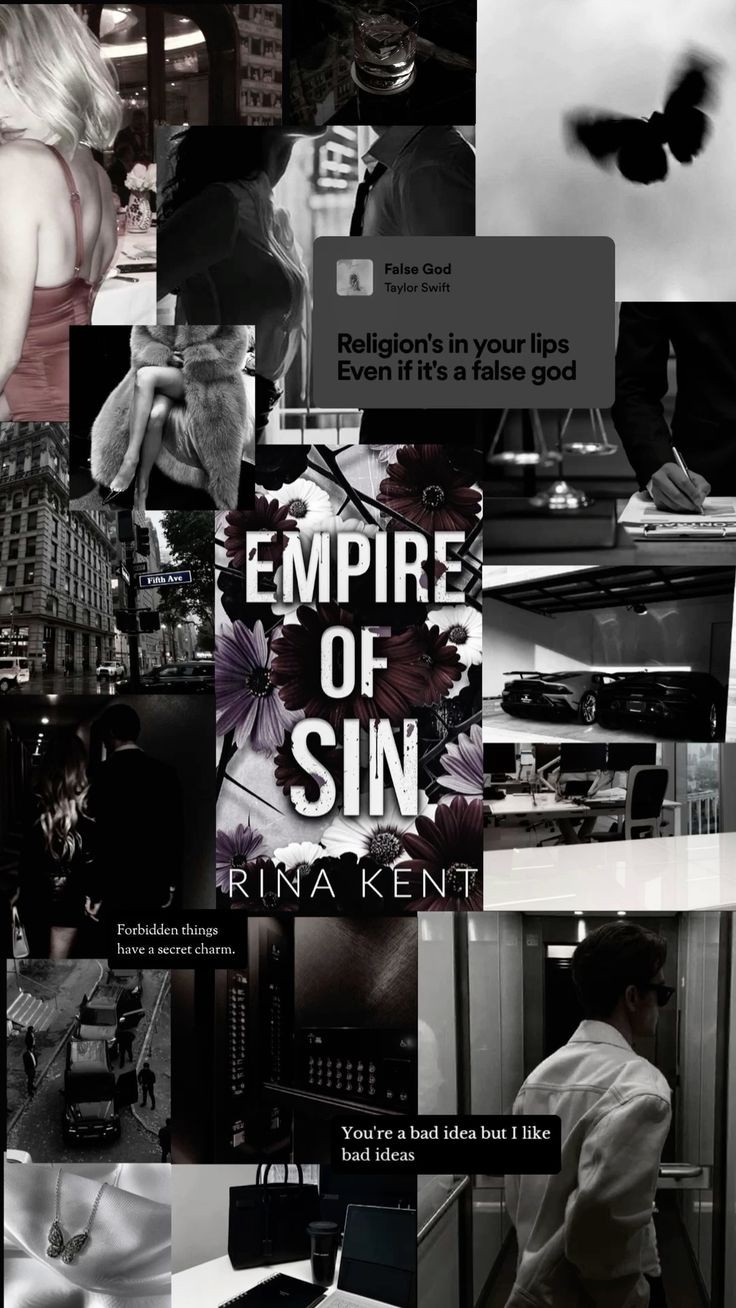
**Emperor of Sin by Rina Kent: Darkly Captivating Aesthetics**
Rina Kent’s *Emperor of Sin* is a novel that enthralls with its darkly captivating aesthetics, blending intense drama, opulent settings, and complex characters into a rich, immersive experience. The book’s allure lies not just in its riveting plot but in the way Kent crafts a world that is both beautifully sinister and irresistibly engaging. Here’s an exploration of the distinct elements that define the aesthetics of *Emperor of Sin* and why it resonates so powerfully with readers.
### **1. Opulent and Decadent Setting**
One of the standout features of *Emperor of Sin* is its opulent, luxurious setting. The novel paints a vivid picture of a world where wealth and power dominate, and every detail exudes sophistication and excess. From grandiose estates and extravagant parties to dark, hidden corners of high society, Kent’s descriptions immerse readers in a visually striking and atmospheric environment.
**Setting Detail Tip* Pay attention to the lavish descriptions of the setting. The contrast between the opulence of the environments and the underlying darkness enhances the novel’s dramatic tension and intrigue.
### **2. Dark and Mysterious Tone**
The tone of *Emperor of Sin* is steeped in mystery and darkness, creating a sense of suspense that pervades the narrative. Kent masterfully builds a world where secrets, power struggles, and hidden agendas are ever-present. This dark ambiance sets the stage for intense drama and high stakes, keeping readers on edge as the plot unfolds.
**Atmospheric Impact Tip* Embrace the novel’s moody and mysterious tone. It not only enhances the suspense but also adds depth to the emotional and psychological dimensions of the story.
### **3. Complex and Enigmatic Characters**
The characters in *Emperor of Sin* are multi-dimensional and richly developed, each contributing to the novel’s dark allure. The protagonist, often depicted as powerful and enigmatic, embodies the themes of control and dominance. His interactions with other characters are charged with tension, adding layers of complexity to the narrative.
**Character Insight Tip* Delve into the intricacies of the characters’ motivations and relationships. Their internal conflicts and moral ambiguities are central to the novel’s dark aesthetic and emotional depth.
### **4. Themes of Power and Control**
Central to the aesthetics of *Emperor of Sin* are themes of power and control. The novel explores how these themes manifest in the characters’ relationships and interactions. The struggle for dominance and influence drives much of the drama, creating a dynamic and compelling narrative.
**Theme Exploration Tip* Reflect on how power dynamics shape the story. The exploration of control and influence adds a layer of intensity and intrigue to the characters' relationships and the plot.
### **5. Sensual and Intense Romantic Dynamics**
Romantic elements in *Emperor of Sin* are both sensual and intense, reflecting the novel’s overall aesthetic. The romance is characterized by passion and complexity, often intertwined with the darker aspects of the plot. This adds a layer of emotional depth and drives the story forward.
**Romantic Tension Tip* Observe how the romantic dynamics complement the novel’s dark themes. The intense passion and emotional conflicts enhance the overall atmosphere and narrative impact.
### **6. Luxurious Fashion and Style**
Fashion plays a significant role in reinforcing the novel’s opulent aesthetic. Characters are often depicted in elaborate and stylish attire that reflects their status and personality. This attention to detail in clothing and appearance contributes to the visual richness of the narrative.
**Fashion Focus Tip* Note the descriptions of characters’ clothing and style. The luxurious fashion details help to establish the novel’s high-society setting and enhance the characters' personalities.
### **7. Intricate Plot and Suspense**
The plot of *Emperor of Sin* is complex and layered, with numerous twists and turns that keep readers engaged. The suspenseful nature of the story is matched by the novel’s dark aesthetic, creating a compelling narrative that is both thrilling and emotionally charged.
**Plot Engagement Tip* Follow the intricate developments and surprises in the plot. The suspense and twists contribute significantly to the novel’s dark and captivating atmosphere.
### **Conclusion**
*Emperor of Sin* by Rina Kent is a compelling exploration of dark and captivating aesthetics. Through its opulent settings, mysterious tone, and complex characters, the novel creates an immersive experience that resonates deeply with readers. Themes of power and control, sensual romance, and luxurious fashion all contribute to the novel’s rich, atmospheric quality. For fans of dramatic and sophisticated romance with a touch of darkness, *Emperor of Sin* offers a thrilling and visually striking journey into a world where elegance and intrigue collide.
Sweet Little Kitty: A Portrait of Pure Adorableness
In a world brimming with charm and cuteness, one of the most endearing sights is that of a sweet little kitty. These tiny bundles of fur bring an unparalleled warmth and joy to our lives with their playful antics, affectionate behavior, and irresistible charm. This article explores the delightful characteristics of sweet little kitties and the joy they bring to those fortunate enough to know them.
The Essence of a Sweet Little Kitty
**1. Irresistible Cuteness: Sweet little kitties are the epitome of cuteness. With their tiny paws, soft fur, and wide, curious eyes, they captivate hearts from the moment they enter a room. Their small size and delicate features make them incredibly endearing, and their every move seems to radiate charm.
**2. Playful Nature: A hallmark of a sweet little kitty is its playful disposition. From chasing after feather toys to pouncing on crinkly balls, their energy and enthusiasm are infectious. This playful behavior not only entertains but also helps them develop their coordination and social skills.
**3. Affectionate Companionship: Sweet little kitties are known for their affectionate nature. They often seek out cuddles, nuzzle against their favorite people, and purr contentedly when petted. Their ability to offer comfort and companionship makes them cherished members of any household.
The Joy of Having a Sweet Little Kitty
**1. Emotional Comfort: The presence of a sweet little kitty can be incredibly soothing. Their gentle purring and cuddly demeanor provide emotional support and comfort, especially during stressful times. The simple act of holding a purring kitten can bring a sense of peace and relaxation.
**2. Entertainment and Fun: Kitties bring endless fun and amusement to their homes. Their playful antics, such as pouncing on toys or darting around the room, offer endless entertainment. Watching a kitten explore its environment with boundless curiosity can be both delightful and amusing.
**3. Strengthening Bonds: The affectionate nature of a sweet little kitty fosters strong emotional bonds with its human companions. Regular interactions, including playtime and cuddles, enhance these relationships and create a deep sense of connection and mutual affection.
Caring for Your Sweet Little Kitty
**1. Proper Nutrition: Ensuring your kitty has a balanced and nutritious diet is essential for their growth and development. High-quality kitten food provides the necessary nutrients to support their health and well-being. Consulting with a veterinarian can help you choose the right diet for your feline friend.
**2. Health and Hygiene: Regular veterinary check-ups are crucial for maintaining your kitty’s health. Vaccinations, flea and tick prevention, and routine grooming are important aspects of kitten care. Keeping their environment clean and providing a litter box are also key to their overall well-being.
**3. Socialization and Enrichment: Early socialization helps sweet little kitties grow into well-adjusted adults. Introducing them to various people, pets, and experiences can help build their confidence and adaptability. Providing interactive toys and engaging activities also supports their physical and mental development.
Capturing the Charm of Your Sweet Little Kitty
**1. Photography Tips: Capturing the charm of your sweet little kitty can be a rewarding experience. Use natural light to highlight their features, and try to capture candid moments of their playful or affectionate behavior. Close-ups of their expressive eyes or fluffy fur can showcase their cuteness.
**2. Sharing Their Story: Sharing photos and stories of your sweet little kitty can bring joy to others and connect you with fellow cat enthusiasts. Social media platforms and pet forums are great places to showcase your kitten’s adorable moments and unique personality.
Conclusion
Sweet little kitties embody the essence of charm and cuteness. Their playful nature, affectionate behavior, and adorable appearance make them delightful companions and bring immense joy to their human families. As you experience the pleasure of having a sweet little kitty in your life, you’ll find that their endearing qualities enrich your daily routine and create lasting memories.
Embrace the love and joy that your sweet little kitty brings, and cherish the special moments you share. Their playful antics and gentle companionship are a reminder of the simple pleasures and deep connections that our furry friends offer. 🌟🐱💕
Nude Tonez: The Ultimate Guide to Short Square Nail Art
Introduction
In the world of nail art, trends come and go, but some styles have a timeless appeal. One such trend that has captured the hearts of many is nude-tone nail art. Subtle, elegant, and versatile, nude tones are the perfect canvas for creating sophisticated designs that suit any occasion. When paired with the classic short square nail shape, the result is a chic and understated look that can effortlessly transition from day to night. This article will delve into the beauty of nude-tone short square nail art, offering inspiration, tips, and step-by-step guides to help you master this elegant style.
Why Nude Tones?
Nude tones are universally flattering, offering a wide range of shades that can match any skin tone. From soft beige to warm caramel, nude nails can be customized to enhance your natural beauty. The appeal of nude-tone nail art lies in its simplicity and versatility. It’s perfect for those who prefer a minimalist aesthetic but still want to make a stylish statement. Nude nails are also ideal for professional settings, as they provide a polished look without being overly bold.
The Allure of Short Square Nails
Short square nails have long been a favorite among nail enthusiasts. This shape is not only practical but also exudes a modern and clean aesthetic. The straight edges and sharp corners of square nails create a neat appearance that complements the subtlety of nude tones. Short square nails are also less prone to breakage, making them a durable choice for those who lead active lifestyles.
Popular Nude Tonez Designs for Short Square Nails
1. Minimalist Nude Mani
A minimalist approach to nude-tone nail art involves keeping the design simple yet stylish. You can opt for a single nude shade across all your nails for a clean and cohesive look. For a touch of elegance, consider adding a thin metallic stripe at the base or tip of each nail. This design is perfect for those who prefer understated sophistication.
2. Nude Ombré
Ombré nails have been a popular trend for several years, and they look especially stunning in nude tones. The gradual transition from a light nude at the cuticle to a darker shade at the tip creates a soft and seamless gradient. This design adds depth and dimension to your nails while maintaining a subtle and elegant appearance.
3. Geometric Patterns
For those who want to add a bit of flair to their nude nails, geometric patterns are a great option. Using a contrasting color like white or black, you can create sharp lines and shapes that stand out against the nude background. Whether it’s triangles, chevrons, or simple stripes, geometric designs add a modern twist to classic nude nails.
4. Nude and Glitter Combo
If you’re looking to add some sparkle to your nude-tone nails, consider incorporating glitter into your design. You can apply glitter to a single accent nail, use it to create a glitter gradient, or even mix it with a nude polish for a subtle shimmer. The combination of nude tones and glitter creates a glamorous look that’s perfect for special occasions.
5. Floral Accents
Floral designs are timeless and feminine, making them a great addition to nude-tone nail art. You can paint delicate flowers on a nude base or use floral decals for an easier application. The contrast between the soft nude background and the vibrant floral accents creates a beautiful and eye-catching design.
6. Matte Nude Nails
Matte nails have a velvety finish that adds a unique texture to your manicure. Nude tones look particularly sophisticated in a matte finish, offering a subtle yet stylish alternative to glossy nails. To enhance the look, consider adding a glossy accent or a metallic stripe for contrast.
Step-by-Step Guide to Creating Nude Tonez Short Square Nails
Materials Needed:
Nude nail polish (choose a shade that complements your skin tone)
Base coat
Top coat
Nail file and buffer
Nail art brushes or tools (for designs)
Optional: glitter, decals, or metallic nail polish for accents
Step 1: Prepare Your Nails
Start by trimming your nails to your desired length, keeping them short and square. Use a nail file to shape the edges, ensuring that they are straight and even. Gently buff the surface of your nails to remove any ridges and create a smooth base for your polish.
Step 2: Apply a Base Coat
Apply a thin layer of base coat to your nails. This step is crucial as it protects your nails from staining and helps the polish adhere better. Allow the base coat to dry completely before moving on to the next step.
Step 3: Apply the Nude Polish
Once the base coat is dry, apply your chosen nude polish. Start with a thin layer, covering the entire nail surface. Allow this first layer to dry before applying a second coat for full coverage and a smooth finish.
Step 4: Add Your Design
Now comes the fun part—adding your design! Depending on your chosen look, use nail art brushes, tools, or decals to create your design. Whether you’re going for a minimalist stripe, a geometric pattern, or a glitter accent, take your time to ensure precision. If you’re new to nail art, consider practicing on a piece of paper before applying the design to your nails.
Step 5: Seal with a Top Coat
Once your design is complete and dry, apply a top coat to seal in the design and add shine. A top coat also helps to extend the longevity of your manicure, preventing chips and cracks. For a matte finish, use a matte top coat instead of a glossy one.
Step 6: Cleanup
After applying the top coat, use a small brush dipped in nail polish remover to clean up any excess polish around the edges of your nails. This step ensures a neat and professional-looking manicure.
Tips for Maintaining Nude Tonez Short Square Nails
Moisturize Regularly: Keep your cuticles and nails hydrated by applying cuticle oil and hand cream daily. This prevents dryness and keeps your manicure looking fresh.
Use Gloves: Protect your nails from harsh chemicals and water by wearing gloves when doing household chores.
Touch Up: If your polish begins to chip, touch up the affected area with a small brush and apply a fresh layer of top coat.
Conclusion
Nude-tone short square nail art is the epitome of elegance and versatility. Whether you prefer a minimalist look or something more elaborate, there’s a nude-tone design to suit your style. By following the tips and steps outlined in this article, you can create a chic and sophisticated manicure that’s perfect for any occasion. Embrace the beauty of nude tones and the practicality of short square nails to achieve a timeless and stylish look.