Good and Bad People Good and Bad People
    #socialmedia #usa #uk #contentwriter #ai
    Masusing Paghahanap
  • Mag log in
  • Magrehistro

  • Night mode
  • © 2025 Good and Bad People
    Tungkol sa • Direktoryo • Makipag-ugnayan sa amin • Mga developer • Patakaran sa Privacy • Mga Tuntunin ng Paggamit • Refund • Referral Terms • Acceptable Use Policy • Community Guidelines • Write for Us

    Pumili Wika

  • Arabic
  • Bengali
  • Chinese
  • Croatian
  • Danish
  • Dutch
  • English
  • Filipino
  • French
  • German
  • Hebrew
  • Hindi
  • Indonesian
  • Italian
  • Japanese
  • Korean
  • Persian
  • Portuguese
  • Russian
  • Spanish
  • Swedish
  • Turkish
  • Urdu
  • Vietnamese

Panoorin

Panoorin Mga reel

Mga kaganapan

Mag-browse ng Mga Kaganapan Aking mga kaganapan

Blog

Mag-browse ng mga artikulo

Merkado

Pinakabagong produkto

Mga pahina

Aking Mga Pahina Mga Ni-like na Page

Higit pa

Galugarin Mga Sikat na Post Mga trabaho Mga alok Mga pondo
Mga reel Panoorin Mga kaganapan Merkado Blog Aking Mga Pahina Ipakita lahat

Matuklasan mga post

Posts

Mga gumagamit

Mga pahina

Grupo

Blog

Merkado

Mga kaganapan

Mga trabaho

Mga pondo

Tamsin Haute Hues
Tamsin Haute Hues
1 Y ·Isalin

### Honey Garlic Chicken: Delicious & Healthy Dinner Recipe

Looking for a meal that's both delectable and wholesome? Honey Garlic Chicken is the answer! This recipe combines the sweetness of honey with the robust flavor of garlic to create a dish that's both satisfying and healthy. Perfect for busy weeknights or a special family dinner, Honey Garlic Chicken offers a balance of flavors and nutrition that’s hard to beat. Let’s dive into why this dish should be on your menu and how you can prepare it with ease.

#### Why You'll Love Honey Garlic Chicken

1. **Delicious Flavor Combination**: The marriage of honey and garlic creates a sweet and savory sauce that’s irresistible. This flavor profile adds depth and richness to the chicken without being overpowering.

2. **Health-Conscious**: Using lean chicken breast and natural ingredients, this dish is low in fat and high in protein. The honey provides a natural sweetness without excessive sugar, making it a healthier alternative to many other savory dishes.

3. **Quick and Easy**: Ready in under 30 minutes, this recipe is perfect for those busy nights when you want a homemade meal without spending hours in the kitchen.

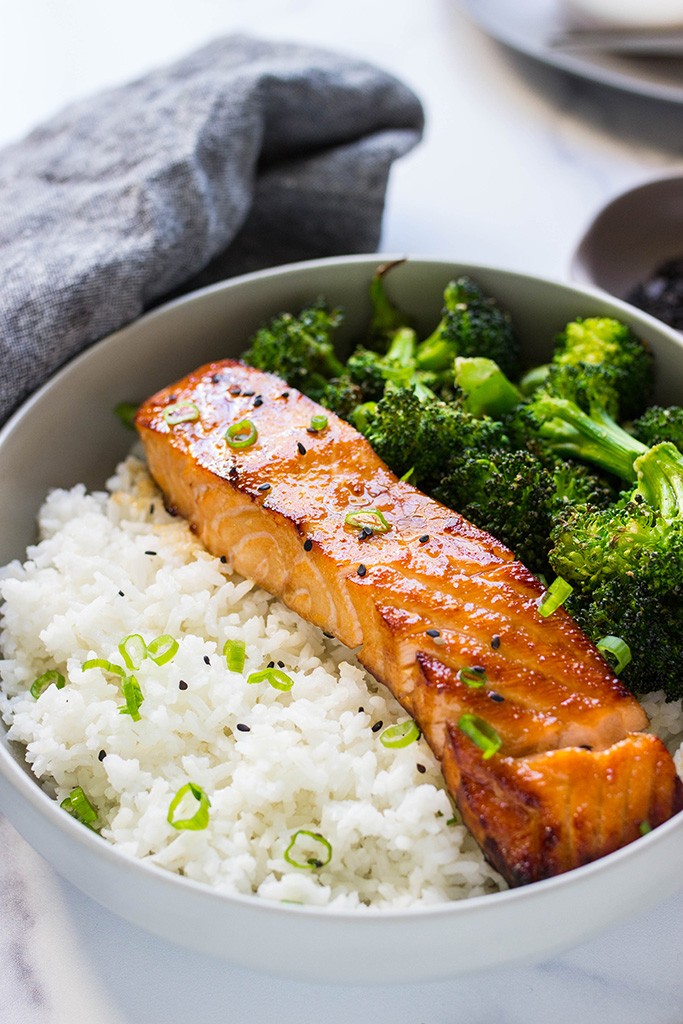
4. **Versatile**: Whether you’re serving it over rice, alongside steamed vegetables, or in a wrap, Honey Garlic Chicken can be adapted to fit various meal plans and dietary preferences.

#### Ingredients:

- **4 boneless, skinless chicken breasts**
- **1/4 cup honey**
- **1/4 cup soy sauce** (or tamari for a gluten-free option)
- **2 tablespoons olive oil**
- **4 cloves garlic**, minced
- **1 tablespoon cornstarch** (optional, for thickening the sauce)
- **2 tablespoons water** (optional, for cornstarch mixture)
- **1 teaspoon dried thyme** or rosemary (optional)
- **Salt and pepper**, to taste
- **Chopped green onions** and **sesame seeds** for garnish

#### Instructions:

1. **Prepare the Chicken**:
- Season the chicken breasts with salt and pepper on both sides.

2. **Cook the Chicken**:
- Heat olive oil in a large skillet over medium-high heat. Add the chicken breasts and cook for 5-7 minutes on each side, or until golden brown and cooked through. Remove the chicken from the skillet and set aside.

3. **Make the Sauce**:
- In the same skillet, reduce the heat to medium and add minced garlic. Sauté for 1-2 minutes until fragrant.
- Stir in the honey and soy sauce, allowing the mixture to come to a gentle simmer.

4. **Thicken the Sauce** (Optional):
- If you prefer a thicker sauce, mix cornstarch with water to create a slurry. Stir this into the simmering sauce and cook for another 2-3 minutes until thickened.

5. **Combine Chicken and Sauce**:
- Return the chicken to the skillet and coat with the honey garlic sauce. Cook for an additional 2-3 minutes, allowing the chicken to absorb the flavors.

6. **Garnish and Serve**:
- Garnish with chopped green onions and sesame seeds before serving. Enjoy over rice, with a side of steamed vegetables, or in a wrap for a versatile meal option.

#### Tips for Perfect Honey Garlic Chicken:

- **Adjust the Sweetness**: Feel free to adjust the amount of honey based on your preference for sweetness. If you prefer a less sweet sauce, reduce the honey slightly.
- **Add Vegetables**: For a complete meal, you can add vegetables like bell peppers, broccoli, or snap peas to the skillet while cooking the chicken.
- **Marinate Ahead**: Marinating the chicken in a mixture of honey, soy sauce, and garlic for at least 30 minutes can enhance the flavor and make the dish even more delicious.

#### Variations:

- **Spicy Honey Garlic Chicken**: Add a pinch of red pepper flakes or a small amount of sriracha to the sauce for a spicy kick.
- **Honey Garlic Chicken Thighs**: Substitute chicken thighs for a richer flavor. Adjust cooking times as needed, as thighs may take slightly longer to cook.

Honey Garlic Chicken is a delightful blend of sweet and savory flavors that comes together in a snap, making it a perfect choice for a quick and healthy dinner. With its vibrant taste and nutritious ingredients, this recipe is sure to become a family favorite. Whether you’re cooking for yourself or hosting a dinner, this dish promises to impress and satisfy.

Enjoy your culinary creation, and don’t forget to share your results and favorite adaptations!

#honeygarlicchicken #healthydinner #easyrecipes #chickendinner #quickmeals #deliciousandhealthy #dinnerinspiration #familyfriendlyrecipes #weeknightmeals

image
Gusto
Magkomento
Ibahagi
Tamsin Haute Hues
Tamsin Haute Hues
1 Y ·Isalin

### Million-Dollar Ravioli Bake: A Luxurious and Easy Casserole

If you're looking for a dish that combines the richness of luxury with the convenience of ease, look no further than the Million-Dollar Ravioli Bake. This casserole elevates the humble ravioli into a decadent, crowd-pleasing meal that’s perfect for any occasion—from casual weeknight dinners to festive gatherings. With its creamy, cheesy layers and hearty flavors, it’s no wonder this recipe is called "Million-Dollar"—it truly feels like a million bucks.

#### Why You’ll Love This Recipe

The Million-Dollar Ravioli Bake is a game-changer in the world of casseroles. It’s not just about indulgence; it's about achieving a sophisticated flavor profile without spending hours in the kitchen. Here’s why this recipe is a must-try:

1. **Luxurious Flavor**: The combination of rich, creamy cheese sauce with savory ravioli creates a dish that's as indulgent as it is satisfying.
2. **Easy Preparation**: Despite its gourmet taste, this casserole is incredibly easy to prepare. It’s perfect for busy weeknights or when you want to impress guests with minimal effort.
3. **Versatile**: Customize with your favorite ravioli fillings and add-ins to suit your tastes and dietary preferences.

#### Ingredients:

- **1 package frozen cheese ravioli** (about 25-30 oz)
- **2 cups marinara sauce**
- **1 cup heavy cream**
- **1 cup grated Parmesan cheese**
- **2 cups shredded mozzarella cheese**
- **1 cup ricotta cheese**
- **1/2 cup grated Pecorino Romano cheese** (optional, for extra flavor)
- **2 cloves garlic**, minced
- **1 tablespoon Italian seasoning**
- **1/2 teaspoon dried basil**
- **Salt and pepper**, to taste
- **Fresh basil or parsley**, chopped (for garnish)

#### Instructions:

1. **Preheat the Oven**:
- Preheat your oven to 375°F (190°C) to ensure it's hot and ready for your casserole.

2. **Prepare the Sauce**:
- In a large bowl, combine the marinara sauce, heavy cream, Parmesan cheese, garlic, Italian seasoning, and dried basil. Mix until well combined.

3. **Assemble the Casserole**:
- Spread a thin layer of the sauce mixture on the bottom of a greased 9x13-inch baking dish.
- Arrange half of the frozen ravioli in a single layer over the sauce.
- Spoon half of the ricotta cheese over the ravioli, and sprinkle with a third of the mozzarella cheese.
- Pour half of the remaining sauce mixture over the layered ingredients.
- Repeat the layers with the remaining ravioli, ricotta, sauce, and top with the remaining mozzarella and Pecorino Romano cheese.

4. **Bake**:
- Cover the dish with aluminum foil and bake in the preheated oven for 30 minutes.
- Remove the foil and bake for an additional 15-20 minutes, or until the cheese is bubbly and golden brown.

5. **Garnish and Serve**:
- Let the casserole cool for a few minutes before garnishing with fresh basil or parsley.
- Serve warm and enjoy the creamy, cheesy goodness!

#### Tips for the Perfect Ravioli Bake:

- **Use Quality Ingredients**: Opt for high-quality marinara sauce and cheese for the best flavor.
- **Frozen Ravioli**: Using frozen ravioli simplifies the recipe and ensures a consistent texture. You can choose cheese, meat, or vegetable-filled ravioli based on your preference.
- **Make Ahead**: This casserole can be assembled ahead of time and stored in the refrigerator for up to 24 hours before baking. Simply cover with foil and bake as directed.
- **Add Veggies**: For a boost of nutrition, consider adding sautéed spinach, mushrooms, or bell peppers to the layers.

#### Variations:

- **Meat Lover’s Ravioli Bake**: Add cooked ground beef, sausage, or Italian sausage to the sauce for a heartier version.
- **Vegetarian Option**: Use spinach or mushroom ravioli and add extra veggies like zucchini or bell peppers.

The Million-Dollar Ravioli Bake is a testament to the idea that comfort food can also be sophisticated. With its layers of creamy, cheesy goodness and effortless preparation, it’s no surprise that this dish earns its “million-dollar” title. Whether you’re cooking for family or entertaining guests, this casserole is sure to be a hit. Enjoy the luxury of a gourmet meal without the fuss—your taste buds will thank you!

Happy cooking, and don’t forget to share your delicious results with friends and family!

#milliondollarraviolibake #luxuriouscasserole #easydinner #cheesygoodness #comfortfood #dinnerideas #bakingrecipes #familyfavorite #indulgentmeals

image
Gusto
Magkomento
Ibahagi
Henry Travel Dreamscapes
1 Y ·Isalin

Just In!!! Unleash Your Drama with New Black Eyelashes – Available in Various Sizes!

Get ready to elevate your eye game with our latest arrival: dramatic black eyelashes that are set to redefine your beauty routine. Whether you’re a makeup aficionado or simply looking to add some flair to your everyday look, these new lashes are your perfect solution for achieving show-stopping eyes.

**Why You'll Love These New Dramatic Eyelashes**

1. **Bold and Beautiful**: Our new black eyelashes are designed to bring the drama to your eyes with their voluminous and striking appearance. Perfect for making a statement, these lashes enhance your natural beauty and add a touch of glamour to any makeup look.

2. **Versatile Sizes**: Available in various sizes, these eyelashes offer you the flexibility to choose the perfect pair for any occasion. Whether you’re aiming for a subtle enhancement or a full-on dramatic effect, we’ve got the right size to match your style and preference.

3. **Comfortable Wear**: Despite their dramatic appearance, these lashes are designed with comfort in mind. Lightweight and easy to apply, they stay in place without irritating your eyes, ensuring you look fabulous all day or night.

4. **Easy Application**: The lashes come with a flexible band that makes application a breeze. Simply apply a thin layer of lash glue, wait for it to become tacky, and place the lashes along your natural lash line for a seamless, flawless fit.

5. **Reusable Design**: These lashes are crafted for durability and reusability. With proper care, you can wear them multiple times, making them a cost-effective addition to your beauty arsenal.

**How to Apply Your New Dramatic Eyelashes**

- **Prepare Your Lashes**: Gently remove the lashes from the packaging and trim them to fit your eye shape if necessary.
- **Apply Glue**: Apply a thin layer of lash glue along the band of the eyelashes. Wait about 30 seconds for the glue to become tacky.
- **Apply Lashes**: Use tweezers or your fingers to carefully place the lashes along your natural lash line. Press gently to secure them in place.
- **Finishing Touches**: Once the lashes are set, blend them with your natural lashes using a coat of mascara if desired.

**Perfect for Every Occasion**

Whether you’re preparing for a glamorous night out, a special event, or just want to add a touch of drama to your daily look, these new black eyelashes are versatile enough for any occasion. They’re designed to enhance your eyes with a bold, captivating flair that ensures all eyes are on you.

**Get Yours Today!**

Don’t miss out on the chance to transform your eye makeup routine with our new dramatic black eyelashes. Available in various sizes to suit every look, these lashes are a must-have for anyone looking to make a statement and elevate their beauty game.

Order yours today and unleash the drama with every blink!

image
Gusto
Magkomento
Ibahagi
Tamsin Haute Hues
Tamsin Haute Hues
1 Y ·Isalin

### 15 Effortless Summer Dinner Recipes for Lazy Days

Summer is the season of sun, relaxation, and fun, and it’s the perfect time to embrace meals that are as laid-back as your schedule. When the temperatures rise and the days are long, the last thing you want to do is spend hours in the kitchen. Luckily, we’ve got you covered with 15 effortless summer dinner recipes that make lazy days both delicious and enjoyable. These recipes are designed to be quick, easy, and require minimal effort, so you can spend more time soaking up the sun and less time cooking.

#### 1. **Caprese Pasta Salad**
- **Ingredients**: Cherry tomatoes, fresh mozzarella, basil, cooked pasta, balsamic glaze.
- **Instructions**: Toss cooked pasta with cherry tomatoes, mozzarella balls, and fresh basil. Drizzle with balsamic glaze and a sprinkle of salt and pepper.

#### 2. **Grilled Chicken Skewers**
- **Ingredients**: Chicken breast, bell peppers, onions, olive oil, your favorite seasoning.
- **Instructions**: Thread chicken and vegetables onto skewers, brush with olive oil, season, and grill until cooked through. Serve with a side of rice or a fresh salad.

#### 3. **No-Cook Greek Salad**
- **Ingredients**: Cucumber, tomatoes, Kalamata olives, feta cheese, red onion, olive oil, oregano.
- **Instructions**: Combine chopped vegetables, olives, and feta in a bowl. Drizzle with olive oil, season with oregano, salt, and pepper.

#### 4. **Avocado Tuna Salad**
- **Ingredients**: Canned tuna, ripe avocado, red onion, lemon juice, salt, and pepper.
- **Instructions**: Mix drained tuna with mashed avocado, finely chopped red onion, and a squeeze of lemon juice. Season with salt and pepper.

#### 5. **Shrimp Tacos with Lime Slaw**
- **Ingredients**: Shrimp, taco seasoning, cabbage, lime, cilantro, tortillas.
- **Instructions**: Season shrimp with taco seasoning and cook quickly in a skillet. Toss shredded cabbage with lime juice and cilantro. Serve shrimp in tortillas topped with slaw.

#### 6. **Zucchini Noodles with Pesto**
- **Ingredients**: Zucchini, pesto sauce, cherry tomatoes, Parmesan cheese.
- **Instructions**: Use a spiralizer to create zucchini noodles. Toss with pesto sauce, halved cherry tomatoes, and a sprinkle of Parmesan.

#### 7. **Chicken Caesar Wraps**
- **Ingredients**: Cooked chicken, Caesar dressing, romaine lettuce, tortillas.
- **Instructions**: Toss shredded chicken with Caesar dressing. Fill tortillas with chicken and chopped romaine lettuce, then wrap and enjoy.

#### 8. **Easy Bean and Cheese Quesadillas**
- **Ingredients**: Flour tortillas, canned beans, shredded cheese, salsa.
- **Instructions**: Spread beans and cheese between tortillas. Cook in a skillet until the cheese melts and the tortillas are golden. Serve with salsa.

#### 9. **Tomato Basil Bruschetta**
- **Ingredients**: Baguette, tomatoes, basil, garlic, olive oil.
- **Instructions**: Toast baguette slices, then top with a mixture of chopped tomatoes, basil, and minced garlic. Drizzle with olive oil.

#### 10. **Chilled Cucumber Soup**
- **Ingredients**: Cucumbers, Greek yogurt, garlic, dill, lemon juice.
- **Instructions**: Blend cucumbers with Greek yogurt, garlic, dill, and a squeeze of lemon juice. Chill before serving.

#### 11. **Simple Pita Pizzas**
- **Ingredients**: Pita bread, pizza sauce, shredded cheese, your favorite toppings.
- **Instructions**: Spread pizza sauce on pita bread, sprinkle with cheese and toppings, and bake until cheese is melted.

#### 12. **Cold Pasta Salad with Veggies**
- **Ingredients**: Cooked pasta, cherry tomatoes, cucumbers, olives, Italian dressing.
- **Instructions**: Toss cooked pasta with chopped vegetables and Italian dressing. Chill before serving.

#### 13. **Turkey and Avocado Lettuce Wraps**
- **Ingredients**: Sliced turkey, avocado, lettuce leaves, mustard or mayo.
- **Instructions**: Layer turkey and avocado on lettuce leaves. Add a smear of mustard or mayo, then roll up and enjoy.

#### 14. **Fruit and Cheese Platter**
- **Ingredients**: Assorted cheeses, fresh fruits, crackers, nuts.
- **Instructions**: Arrange a selection of cheeses, fruits, crackers, and nuts on a platter for an easy and elegant dinner.

#### 15. **Frozen Yogurt Bark**
- **Ingredients**: Greek yogurt, honey, fresh berries, nuts.
- **Instructions**: Spread Greek yogurt on a baking sheet, drizzle with honey, and top with berries and nuts. Freeze until firm, then break into pieces.

#### Tips for Effortless Summer Dinners:

- **Prep Ahead**: Prepare ingredients earlier in the day or even the night before to make dinner time a breeze.
- **Keep It Simple**: Stick to recipes with few ingredients and minimal steps for the easiest preparation.
- **Embrace Fresh Produce**: Summer is the perfect time to enjoy fresh fruits and vegetables, which require less cooking and offer great flavor.
- **Use Your Grill**: Take advantage of outdoor grilling to keep your kitchen cool and add a smoky flavor to your meals.

These 15 effortless summer dinner recipes are perfect for those days when you want a delicious meal with minimal fuss. Enjoy more time relaxing and less time cooking, while still indulging in meals that are fresh, flavorful, and easy to prepare.

Happy summer dining! Feel free to share your favorite lazy-day recipes and enjoy the season to its fullest.

#effortlesssummerdinners #lazydaymeals #quickrecipes #easycooking #summermeals #nocookrecipes #simpledinnerideas #healthyeating #coolandeasy

image
Gusto
Magkomento
Ibahagi
Henry Travel Dreamscapes
1 Y ·Isalin

Make a Splash with Maven Waterproof Liquid Eyeliner – Dive Into Atlantis Blue!

Ready to transform your eye makeup routine? Maven’s Waterproof Liquid Eyeliner in Atlantis Blue is here to take your look to the next level with its stunning, vibrant hue and unbeatable staying power. Whether you’re aiming for a daring statement or just a splash of color, this eyeliner is your new go-to for bold, beautiful eyes.

**Why You’ll Love Maven’s Atlantis Blue Eyeliner**

1. **Stunning Atlantis Blue Shade**: Dive into the deep, mesmerizing shade of Atlantis Blue. This eye-catching color delivers a rich, electric blue that adds a pop of vibrancy and excitement to your makeup look. Perfect for making a statement or adding a unique twist to your everyday eye makeup.

2. **Waterproof Formula**: No more worries about smudging or fading. Maven’s waterproof formula ensures that your eyeliner stays intact even through water, sweat, or tears. Whether you’re hitting the beach, working out, or navigating a rainy day, your eyeliner will remain flawless and fierce.

3. **Precision Application**: The sleek applicator provides precise control, allowing you to create everything from fine lines to bold winged designs. The liquid formula glides on smoothly, making it easy to achieve clean, sharp lines without any fuss.

4. **Long-Lasting Wear**: Enjoy confidence that your look will last all day and night. The long-wearing formula ensures that your eyeliner remains vibrant and fresh, so you can go about your day or night with absolute assurance that your eyes will stay stunning.

5. **Easy Removal**: Despite its long-lasting power, removing the eyeliner is a breeze. Use a gentle eye makeup remover to effortlessly wipe away the color without irritating your delicate eye area.

**How to Apply for Maximum Impact**

- **Prime Your Lids**: Start with a clean, primed eyelid to ensure smooth application and enhance the longevity of your eyeliner.
- **Apply with Precision**: Use the applicator to draw your desired line. For a classic look, trace close to the lash line. For a bolder effect, extend the line into a wing or experiment with creative shapes.
- **Build and Define**: Layer the eyeliner if you want a more intense color payoff. Allow each layer to dry before applying the next to avoid smudging.

**Perfect for Every Occasion**

Maven’s Waterproof Liquid Eyeliner in Atlantis Blue is versatile enough for any occasion. Whether you’re attending a summer festival, heading to a night out, or just want to brighten up your daily look, this eyeliner adds the perfect touch of color and confidence.

**Get Your Maven Waterproof Liquid Eyeliner in Atlantis Blue Today!**

Ready to dive into a world of vibrant, long-lasting color? The Maven Waterproof Liquid Eyeliner in Atlantis Blue is your ultimate tool for achieving bold, unforgettable eye looks. Don’t miss out on this must-have beauty essential—grab yours today and make a splash with every blink!

Transform your eye makeup game with the striking, stay-put allure of Atlantis Blue. Your eyes will thank you!

image
Gusto
Magkomento
Ibahagi
Tamsin Haute Hues
Tamsin Haute Hues
1 Y ·Isalin

### Crockpot Marry Me Chicken: Irresistible Slow-Cooker Delight

Looking for a dish that’s so delectable it might just lead to a marriage proposal? Meet the Crockpot Marry Me Chicken—an irresistible slow-cooker delight that’s taking the culinary world by storm. This recipe combines tender chicken with a creamy, savory sauce that’s perfect for impressing your loved ones or making a special dinner any day of the week. If you’re ready to discover the ultimate easy meal that could make you the star of any kitchen, read on!

#### What Makes Marry Me Chicken So Special?

The name "Marry Me Chicken" might sound like a playful exaggeration, but it’s not far from the truth. This dish is named for its extraordinary flavor and comfort factor, which have won hearts (and stomachs) everywhere. The magic lies in the combination of simple ingredients and slow-cooked perfection, resulting in a meal that’s rich, creamy, and utterly delicious.

#### Ingredients:

- **4 boneless, skinless chicken breasts** (or thighs)
- **1 cup heavy cream**
- **1/2 cup chicken broth**
- **1/2 cup grated Parmesan cheese**
- **1/4 cup sun-dried tomatoes**, chopped
- **2 cloves garlic**, minced
- **1 tablespoon Italian seasoning**
- **1 teaspoon dried basil**
- **1/2 teaspoon crushed red pepper flakes** (optional, for a bit of heat)
- **Salt and pepper**, to taste
- **2 tablespoons olive oil** (for browning, optional)
- **Fresh basil**, chopped (for garnish)

#### Instructions:

1. **Prepare the Chicken**:
- Season the chicken breasts with salt, pepper, and a pinch of Italian seasoning. For added flavor, you can brown the chicken in a skillet with a bit of olive oil over medium-high heat for about 2-3 minutes per side. This step is optional but adds extra depth to the dish.

2. **Make the Sauce**:
- In a mixing bowl, combine the heavy cream, chicken broth, Parmesan cheese, sun-dried tomatoes, garlic, Italian seasoning, dried basil, and crushed red pepper flakes. Stir until well mixed.

3. **Assemble in the Crockpot**:
- Place the chicken breasts in the slow cooker. Pour the creamy sauce mixture over the chicken, making sure it’s well covered.

4. **Cook**:
- Cover and cook on low for 6-7 hours or on high for 3-4 hours, until the chicken is tender and easily shredded with a fork. The sauce will thicken and develop a rich, creamy texture as it cooks.

5. **Garnish and Serve**:
- Once the chicken is cooked, shred it lightly with two forks right in the Crockpot or remove and slice it if preferred. Garnish with fresh chopped basil before serving.

6. **Serving Suggestions**:
- This dish pairs beautifully with a side of rice, pasta, or a simple green salad. The creamy sauce also makes a great accompaniment for steamed vegetables or crusty bread for dipping.

#### Tips for the Perfect Marry Me Chicken:

- **Use Fresh Ingredients**: Fresh garlic and sun-dried tomatoes elevate the flavor of the dish. While you can use jarred minced garlic or dried tomatoes in a pinch, fresh ingredients deliver the best results.
- **Adjust Spice Level**: Customize the level of heat by adjusting or omitting the crushed red pepper flakes according to your taste.
- **Make it Lighter**: Substitute half-and-half or whole milk for a lighter version of the creamy sauce, though the flavor and richness may vary slightly.

#### Variations:

- **Vegetable Add-Ins**: Add vegetables like spinach, mushrooms, or bell peppers to the Crockpot for a one-pot meal with extra nutrients.
- **Cheese Options**: Experiment with different cheeses such as Asiago or Gruyère for a unique twist on the sauce.

Crockpot Marry Me Chicken is the perfect example of how a few simple ingredients and a slow cooker can create a meal that’s both easy and extraordinarily flavorful. It’s ideal for busy days, special occasions, or whenever you want to make an impression with minimal effort. Enjoy this irresistible dish and get ready for everyone to ask for seconds—or maybe even a proposal!

Happy cooking, and don’t forget to share your delicious results with friends and family. For more mouthwatering recipes and cooking tips, follow our blog and stay inspired!

#marrymechicken #crockpotrecipes #slowcookermagic #easymeals #comfortfood #dinnerideas #irresistibleeats #cookingwithlove #onepotmeals

image
Gusto
Magkomento
Ibahagi
Amelia's Stylish Spaces
1 Y ·Isalin

How to Make Tanghulu at Home: A Step-by-Step Guide **How to Make Tanghulu at Home: A Step-by-Step Guide**

Tanghulu, a popular Chinese street food, is a delightful treat that features fruits coated in a hard, shiny sugar syrup. Originating from Beijing, this sweet confection is loved for its crunchy texture and glossy appearance. If you’ve ever wanted to recreate this eye-catching snack at home, you’re in luck! This comprehensive guide will walk you through everything you need to know to make perfect Tanghulu in your own kitchen.

### What is Tanghulu?

Tanghulu, also known as sugar-coated fruit skewers, is a traditional Chinese snack made by dipping fruits in a hot sugar syrup and then letting it cool and harden. The result is a crispy, caramel-like shell surrounding the fresh fruit, creating a contrast between the sweet, crunchy coating and the juicy fruit inside. It’s not only delicious but also visually stunning, making it a great treat for special occasions or just a fun project to try at home.

### Ingredients You’ll Need

**For the Tanghulu*

- 1 cup granulated sugar

- 1/2 cup water

- 1/4 cup light corn syrup (optional, helps prevent crystallization)

- Fresh fruits of your choice (strawberries, grapes, apple slices, or tangerine segments are popular choices)

- Wooden skewers (or bamboo skewers)

**For Preparation*

- Parchment paper or a silicone baking mat (for cooling)

- A candy thermometer (for precise temperature control)

### Equipment Required

- A medium saucepan

- Wooden or bamboo skewers

- Tongs or a fork (for dipping)

- A heat-resistant spatula or spoon

- A cooling rack or tray lined with parchment paper

### Step-by-Step Instructions

#### 1. **Prepare the Fruit**

1. **Wash and Dry**: Thoroughly wash and dry your fruits. For berries, you can simply pat them dry with paper towels. For fruits like apples or pears, it’s best to slice them into bite-sized pieces. Make sure the fruit is completely dry before dipping, as water can cause the sugar syrup to seize up.

2. **Skewer the Fruit**: Thread the fruit onto the skewers, arranging them as desired. Leave some space at the bottom of each skewer to hold onto while dipping. If using larger fruit slices, you may need to use stronger skewers or even small wooden sticks.

#### 2. **Make the Sugar Syrup**

1. **Combine Ingredients**: In a medium saucepan, combine the granulated sugar, water, and corn syrup (if using). Stir to mix the ingredients.

2. **Heat the Mixture**: Place the saucepan over medium heat and bring the mixture to a boil. Do not stir the syrup once it starts boiling, as this can cause crystallization. Instead, gently swirl the pan occasionally to ensure even heating.

3. **Monitor Temperature**: Use a candy thermometer to keep track of the temperature. The syrup needs to reach 300°F (150°C), which is the hard crack stage. This is crucial for achieving the right consistency. Be patient; this process usually takes about 10-15 minutes.

4. **Test the Syrup**: To check if the syrup is ready, drop a small amount into a glass of cold water. It should harden immediately into a brittle, snapable texture. If it doesn’t, continue heating and testing until it reaches the correct stage.

#### 3. **Dip the Fruit**

1. **Prepare Cooling Area**: While the syrup is heating, line a cooling rack or tray with parchment paper or a silicone baking mat. This will prevent the Tanghulu from sticking.

2. **Dip the Skewers**: Once the syrup has reached 300°F (150°C), carefully dip each skewer of fruit into the hot syrup. Swirl the skewer to coat the fruit evenly and allow any excess syrup to drip off.

3. **Cool and Set**: Place the coated fruit skewers onto the prepared cooling rack or tray. Allow them to cool and harden for about 10-15 minutes. The sugar coating will become crisp and glossy as it cools.

### Tips for Perfect Tanghulu

1. **Use Fresh Fruit**: The fruit’s freshness is key to a delicious Tanghulu. Ensure it is fully dry to prevent any issues with the syrup.

2. **Temperature Control**: Precise temperature control is crucial for making the right syrup consistency. If the syrup is too hot, it may burn. If it’s not hot enough, it won’t harden properly.

3. **Work Quickly**: Sugar syrup can harden quickly once it starts to cool. Work swiftly to coat the fruit before the syrup sets.

4. **Avoid Humidity**: Humid environments can cause the sugar coating to become sticky. Try to make Tanghulu in a dry, cool place.

### Serving and Storage

**Serving**: Tanghulu is best enjoyed fresh on the same day it’s made. It’s a fun and interactive treat that’s perfect for parties, gatherings, or as a unique dessert.

**Storage**: If you need to store Tanghulu, keep it in an airtight container in a cool, dry place. The sugar coating may become sticky over time, so it's best consumed within a few days.

### Final Thoughts

Making Tanghulu at home is a rewarding and enjoyable experience that brings a touch of Chinese street food magic to your kitchen. With a bit of patience and practice, you can create stunning fruit skewers that are as beautiful as they are delicious. Whether you're looking to impress guests or simply indulge in a fun culinary project, this step-by-step guide will help you achieve Tanghulu perfection every time. Happy candy-making!

#easyrecipeidea

Gusto
Magkomento
Ibahagi
Tamsin Haute Hues
Tamsin Haute Hues
1 Y ·Isalin

### 25 Effortless Crockpot Recipes for a Perfect Summer

Summer is the season for outdoor fun, relaxation, and enjoying the warm weather. But when the temperature rises, the last thing you want to do is spend hours in a hot kitchen. That’s where your trusty Crockpot comes in! With these 25 effortless Crockpot recipes, you can keep your kitchen cool and still serve up delicious meals with minimal effort. Perfect for lazy summer days, backyard gatherings, or busy weeknights, these recipes are designed to make your summer cooking a breeze.

#### Why Crockpot Recipes for Summer?

Crockpot cooking is ideal for summer for several reasons:
1. **No Heating Up the Kitchen**: Slow cookers don’t generate much heat, so they’re perfect for keeping your kitchen cool during the hotter months.
2. **Set It and Forget It**: Just prep your ingredients, set your Crockpot, and let it do the work. You’ll have a hot meal waiting for you with minimal hands-on time.
3. **Versatility**: From soups and stews to casseroles and even desserts, Crockpot recipes cover a wide range of dishes that suit summer’s laid-back vibe.

#### 25 Effortless Crockpot Recipes

**1. Tropical Pulled Pork**
- Slow-cooked pork with pineapple and a hint of BBQ sauce creates a sweet and tangy pulled pork perfect for sandwiches or tacos.

**2. Lemon Garlic Chicken**
- Chicken breasts cooked with lemon, garlic, and herbs. Light and zesty, this dish is great with a side of steamed veggies.

**3. Mediterranean Beef Stew**
- Tender beef simmered with tomatoes, olives, and capers. Serve with crusty bread for a hearty summer meal.

**4. Creamy Tomato Basil Soup**
- A comforting soup made with fresh tomatoes and basil, finished with a touch of cream. Perfect for a light lunch or dinner.

**5. BBQ Chicken Tacos**
- Chicken cooked in BBQ sauce, shredded, and served in tacos with your favorite toppings. Easy and crowd-pleasing!

**6. Sweet and Sour Meatballs**
- Flavorful meatballs in a tangy sweet and sour sauce. Serve over rice or noodles for a simple and satisfying dinner.

**7. Corn and Potato Chowder**
- A creamy chowder loaded with fresh corn and potatoes. This dish is both hearty and refreshing for summer.

**8. Chicken and Vegetable Stir-Fry**
- Chicken and a medley of vegetables cooked in a savory sauce. Serve over rice or noodles for a quick and easy meal.

**9. Beef and Vegetable Kebabs**
- Slow-cooked beef and vegetables, infused with your favorite seasonings. Serve with a side of couscous or quinoa.

**10. Italian Sausage and Peppers**
- Italian sausages cooked with bell peppers, onions, and marinara sauce. Serve on hoagie rolls or over pasta.

**11. Black Bean and Corn Salsa**
- A fresh and zesty salsa made with black beans, corn, tomatoes, and lime. Great as a dip or a topping for grilled meats.

**12. Chicken Enchilada Soup**
- A flavorful soup with shredded chicken, enchilada sauce, and a variety of toppings. Perfect for a light and comforting meal.

**13. Teriyaki Pork Ribs**
- Tender pork ribs cooked in a sweet and savory teriyaki sauce. Serve with steamed rice and a side of veggies.

**14. Zesty Lemon Herb Chicken**
- Chicken cooked with lemon and herbs, offering a fresh and vibrant flavor. Ideal for pairing with a summer salad.

**15. Greek Chicken and Potatoes**
- Chicken thighs slow-cooked with potatoes, olives, and a blend of Greek spices. A flavorful and easy meal that’s perfect for summer.

**16. Chili Lime Chicken**
- Chicken breasts cooked in a zesty chili lime sauce. Serve with a side of rice or a fresh salad for a light yet flavorful dinner.

**17. Beef Stroganoff**
- Tender beef and mushrooms in a creamy sauce, served over egg noodles or rice. A classic dish made effortlessly in the Crockpot.

**18. Spicy Sausage and Kale Soup**
- Hearty sausage soup with kale and spicy seasonings. A warming dish that’s light enough for summer nights.

**19. Stuffed Bell Peppers**
- Bell peppers filled with a savory mixture of ground beef, rice, and spices. A complete meal that cooks all in one pot.

**20. Honey Garlic Chicken**
- Chicken thighs simmered in a sweet and savory honey garlic sauce. Serve with rice and steamed veggies for a simple dinner.

**21. Creamy Buffalo Chicken Dip**
- A creamy and spicy dip made with shredded chicken and buffalo sauce. Perfect for summer parties or as a snack.

**22. Slow Cooker Ratatouille**
- A vegetable medley of zucchini, eggplant, and tomatoes, simmered to perfection. Serve as a main or a side dish.

**23. Pineapple Teriyaki Chicken**
- Chicken cooked with pineapple and teriyaki sauce for a tropical twist. Serve with rice or noodles for a complete meal.

**24. Taco Soup**
- A hearty soup with all the flavors of tacos, including ground beef, beans, and corn. Top with cheese and sour cream.

**25. Strawberry Rhubarb Crisp**
- A sweet and tart dessert made with fresh strawberries and rhubarb, topped with a buttery crumble. A delightful treat to end your summer meal.

#### Tips for Using Your Crockpot in Summer:

- **Use Fresh Ingredients**: Embrace the abundance of summer produce for fresh, flavorful meals.
- **Prep Ahead**: Chop vegetables and measure out ingredients the night before to make your meal preparation even easier.
- **Cook in Batches**: Make larger quantities and freeze leftovers for busy days.

These 25 effortless Crockpot recipes will help you make the most of your summer, keeping your meals delicious and your kitchen cool. From savory main dishes to refreshing sides and even desserts, there’s something here for every taste and occasion. Enjoy the ease of slow cooking while savoring all the flavors of the season!

Happy cooking, and don’t forget to share your favorite Crockpot recipes with friends and family!

#crockpotrecipes #summermeals #easycooking #slowcookerrecipes #effortlesscooking #summerdinners #healthyeating #coolkitchen #deliciousandeasy

image
Gusto
Magkomento
Ibahagi
Amelia's Stylish Spaces
1 Y ·Isalin

**Sweet and Savory Air Fryer Salmon with Honey Garlic Glaze: A Deliciously Simple Recipe**

If you're searching for a dinner option that's both easy to prepare and bursting with flavor, look no further than Sweet and Savory Air Fryer Salmon with Honey Garlic Glaze. This recipe combines the crispy perfection of air frying with the rich, complex flavors of honey and garlic, creating a dish that's both sophisticated and accessible. Whether you're a seasoned cook or a kitchen novice, this dish is sure to become a staple in your culinary repertoire.

### Why Use an Air Fryer for Salmon?

Air fryers have revolutionized home cooking by offering a way to achieve crispy, flavorful dishes with significantly less oil than traditional frying methods. This is particularly beneficial when preparing salmon, as the air fryer can crisp up the skin and edges while keeping the interior tender and moist. Additionally, air fryers cook food quickly, making them ideal for busy weeknights or spontaneous dinner plans.

### Ingredients You'll Need

**For the Salmon*

- 4 salmon fillets (6 oz each), skin-on or skinless

- 1 tablespoon olive oil

- Salt and black pepper to taste

**For the Honey Garlic Glaze*

- 1/4 cup honey

- 3 tablespoons soy sauce

- 2 cloves garlic, minced

- 1 tablespoon rice vinegar or apple cider vinegar

- 1 teaspoon grated fresh ginger (optional for added zing)

- 1 tablespoon cornstarch mixed with 2 tablespoons water (for thickening)

### Preparing the Salmon

1. **Preheat Your Air Fryer**: Set your air fryer to 400°F (200°C). Preheating ensures an even cooking temperature and helps achieve a crispy exterior.

2. **Prepare the Salmon**: Pat the salmon fillets dry with paper towels. This step is crucial for getting a crispy finish. Brush the fillets lightly with olive oil and season with salt and black pepper.

3. **Air Fry the Salmon**: Place the salmon fillets in the air fryer basket in a single layer, making sure they are not touching. Cook for 8-10 minutes, depending on the thickness of the fillets. The salmon should be cooked through and have a crispy exterior.

### Making the Honey Garlic Glaze

1. **Combine Ingredients**: In a small saucepan, combine the honey, soy sauce, minced garlic, and vinegar. If using ginger, add it to the mixture.

2. **Simmer and Thicken**: Heat the mixture over medium heat, stirring occasionally. Once it begins to simmer, mix the cornstarch with water to create a slurry. Slowly pour the slurry into the simmering sauce, stirring constantly until the glaze thickens and becomes glossy. This should take about 2-3 minutes. Remove from heat.

3. **Adjust Flavor**: Taste the glaze and adjust seasoning if necessary. If you prefer a sweeter glaze, add a bit more honey. For extra tanginess, add a splash more vinegar.

### Assembling the Dish

1. **Glaze the Salmon**: Once the salmon is cooked, transfer it to a serving plate. Spoon the warm honey garlic glaze generously over the top of each fillet. For an extra touch of flavor, drizzle a little more glaze on the plate.

2. **Garnish**: Garnish with chopped fresh parsley or sliced green onions if desired. A sprinkle of sesame seeds can also add a nice touch of texture and flavor.

### Serving Suggestions

This Sweet and Savory Air Fryer Salmon pairs beautifully with a variety of side dishes. Consider serving it with:

- **Steamed Vegetables**: Broccoli, green beans, or asparagus are excellent choices.

- **Rice or Quinoa**: These grains are perfect for soaking up the extra glaze.

- **Salad**: A crisp green salad with a light vinaigrette can balance the rich flavors of the salmon.

### Tips for Perfect Air Fryer Salmon

1. **Avoid Overcrowding**: For the crispiest results, ensure the salmon fillets are not overcrowded in the air fryer basket. Cook in batches if necessary.

2. **Monitor Cooking Time**: Air fryer models can vary, so keep an eye on the salmon as it cooks. Start checking for doneness a couple of minutes before the recommended time to avoid overcooking.

3. **Rest the Salmon**: Allow the salmon to rest for a few minutes after cooking. This helps the juices redistribute and keeps the fish moist.

### Final Thoughts

Sweet and Savory Air Fryer Salmon with Honey Garlic Glaze is a delightful recipe that combines simplicity with sophistication. The air fryer makes cooking this dish a breeze, while the honey garlic glaze adds a burst of flavor that elevates the salmon to new heights. Whether you're preparing a quick weeknight dinner or a special meal for guests, this recipe is sure to impress. Give it a try and enjoy a deliciously healthy meal that's both easy and elegant!

#easydinneridea

image
Gusto
Magkomento
Ibahagi
Rack occasion discount
1 Y

image
Gusto
Magkomento
Ibahagi
Showing 8465 out of 11794
  • 8461
  • 8462
  • 8463
  • 8464
  • 8465
  • 8466
  • 8467
  • 8468
  • 8469
  • 8470
  • 8471
  • 8472
  • 8473
  • 8474
  • 8475
  • 8476
  • 8477
  • 8478
  • 8479
  • 8480

I-edit ang Alok

Magdagdag ng tier


Pumili ng larawan
Tanggalin ang iyong tier
Sigurado ka bang gusto mong tanggalin ang tier na ito?

Mga pagsusuri

Upang maibenta ang iyong nilalaman at mga post, magsimula sa pamamagitan ng paglikha ng ilang mga pakete. Monetization

Magbayad sa pamamagitan ng Wallet

Alerto sa Pagbabayad

Bibili ka na ng mga item, gusto mo bang magpatuloy?

Humiling ng Refund