Good and Bad People Good and Bad People
    #socialmedia #usa #uk #contentwriter #casino
    جستجوی پیشرفته
  • وارد شدن
  • ثبت نام

  • حالت روز
  • © 2025 Good and Bad People
    در باره • فهرست راهنما • با ما تماس بگیرید • توسعه دهندگان • سیاست حفظ حریم خصوصی • شرایط استفاده • بازپرداخت • Referral Terms • Acceptable Use Policy • Community Guidelines • Write for Us

    انتخاب کنید زبان

  • Arabic
  • Bengali
  • Chinese
  • Croatian
  • Danish
  • Dutch
  • English
  • Filipino
  • French
  • German
  • Hebrew
  • Hindi
  • Indonesian
  • Italian
  • Japanese
  • Korean
  • Persian
  • Portuguese
  • Russian
  • Spanish
  • Swedish
  • Turkish
  • Urdu
  • Vietnamese

تماشا کردن

تماشا کردن قرقره ها

مناسبت ها

مرور رویدادها رویدادهای من

وبلاگ

مقالات را مرور کنید

بازار

آخرین محصولات

صفحات

صفحات من صفحات لایک شده

بیشتر

کاوش کنید پست های محبوب شغل ها ارائه می دهد بودجه
قرقره ها تماشا کردن مناسبت ها بازار وبلاگ صفحات من همه را ببین

کشف کردن نوشته ها

Posts

کاربران

صفحات

گروه

وبلاگ

بازار

مناسبت ها

شغل ها

بودجه

Seren's Urban Elegance
1 Y ·ترجمه کردن

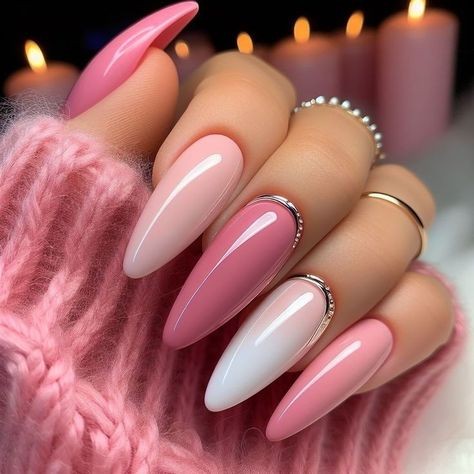
💖✨ Mauve Pink & Rhinestone Borders: Gorgeous Wedding Nail Art Ideas 💍

Your wedding day is a celebration of love and beauty, and every detail matters, including your nails. If you’re looking for the perfect manicure to complement your bridal look, consider the elegant combination of mauve pink and rhinestone borders. This stunning design exudes sophistication and charm, making it a top choice for brides who want their nails to be as radiant as they are. Here’s everything you need to know about creating gorgeous wedding nail art with mauve pink and rhinestone accents.

Why Choose Mauve Pink for Your Wedding Nails?

Mauve pink is a soft, romantic color that adds a touch of elegance to any bridal look. Its muted tones create a refined and classic appearance, making it ideal for a wedding. Mauve pink can complement a wide range of wedding themes and dress styles, from modern to vintage, and it pairs beautifully with various skin tones.

Key Benefits:

Versatility: Mauve pink is a neutral shade that works well with different wedding color palettes.

Elegance: The soft, sophisticated hue enhances your overall bridal look without overwhelming it.

Timelessness: Mauve pink is a classic color that never goes out of style, ensuring your nails look chic for years to come.

Incorporating Rhinestone Borders

Rhinestones add a touch of glamour and sparkle, making them a perfect addition to bridal nail art. When paired with mauve pink, rhinestones create a striking contrast that catches the light beautifully, enhancing your nails with a luxurious finish.

Why Rhinestones?

Glamour: Rhinestones provide a sparkling effect that elevates your nail design and adds a touch of opulence.

Customization: They can be applied in various patterns and placements to match your unique style.

Attention to Detail: Rhinestone borders frame your nails elegantly, making them stand out and complementing your overall bridal look.

Design Ideas for Mauve Pink & Rhinestone Borders

Classic Rhinestone Edges

For a timeless and elegant look, create a delicate border of rhinestones along the tips or edges of your mauve pink nails. This design adds just the right amount of sparkle without being too flashy.

How to Achieve the Look:

Apply a mauve pink base coat and let it dry completely.

Use nail glue or clear top coat to carefully place rhinestones along the nail edges or tips.

Finish with a top coat to secure the rhinestones and ensure a smooth finish.

Full Rhinestone Accent Nails

If you prefer a bit more sparkle, consider an accent nail on each hand with a full coverage of rhinestones. This design creates a focal point that draws attention to your hands.

How to Achieve the Look:

Paint all nails with mauve pink polish.

Choose one or two accent nails and cover them entirely with rhinestones.

Apply a clear top coat to secure the rhinestones and enhance the shine.

Rhinestone Floral Patterns

For a more intricate and romantic design, use rhinestones to create floral patterns on your mauve pink nails. This design adds a touch of whimsy and elegance to your bridal look.

How to Achieve the Look:

Apply a base coat of mauve pink polish.

Use a fine brush or dotting tool to place rhinestones in floral patterns or designs.

Seal the design with a top coat to keep the rhinestones in place and add shine.

Gradient Rhinestone Accents

Create a gradient effect with rhinestones, transitioning from a few stones at the base to a full coverage towards the tips. This design adds depth and dimension to your nails.

How to Achieve the Look:

Paint your nails with a mauve pink base coat.

Apply a small number of rhinestones at the base of the nails and gradually increase the amount towards the tips.

Finish with a top coat to ensure the rhinestones stay in place.

Tips for Perfect Wedding Nail Art

Prep Your Nails: Ensure your nails are clean, shaped, and well-moisturized before applying any polish or rhinestones.

Use Quality Products: Choose high-quality nail polishes and rhinestones to ensure a long-lasting and professional finish.

Practice Patience: Allow each layer of polish and glue to dry completely before moving on to the next step to avoid smudging or shifting.

Consider Professional Help: If you’re unsure about applying rhinestones yourself, consider visiting a nail salon for expert assistance.

Conclusion

Mauve pink nails with rhinestone borders offer a perfect blend of elegance and sparkle for your wedding day. This stunning design not only complements your bridal attire but also adds a touch of glamour to your overall look. Whether you opt for classic rhinestone edges, full accent nails, floral patterns, or gradient effects, this nail art choice will ensure your nails are as beautiful and memorable as your special day.

Celebrate your wedding with nails that shine as brightly as your love, and let the combination of mauve pink and rhinestones add the finishing touch to your perfect bridal look. 💖✨💍

image
پسندیدن
اظهار نظر
اشتراک گذاری
Violet Creative Pins
1 Y ·ترجمه کردن

8 Stunning Nail Art Designs Perfect for Short Nails

Short nails don’t have to be plain or boring. With the right designs, they can look just as fabulous and trendy as longer nails. Whether you're new to nail art or looking for fresh inspiration, these 8 stunning designs will make your short nails stand out and turn heads.

1. Classic French Twist

The French manicure is a timeless look that can be adapted for short nails. Swap out the traditional white tips for a more modern twist by using pastel or metallic shades. The simplicity of this design complements the elegance of short nails perfectly.

2. Geometric Patterns

Geometric designs are all about sharp lines and bold shapes. These patterns can add a touch of sophistication to your short nails. Opt for a minimalist approach with black and white or choose vibrant colors for a more striking look. Triangle, chevron, and stripe patterns are all great options.

3. Floral Accents

Floral designs aren’t just for long nails. Small, delicate flowers can look beautiful on short nails. Choose subtle, tiny blooms or go for a bolder look with larger flower decals. Soft pastels or classic reds can make your floral accents pop.

4. Metallic Marvels

Add a touch of glamour to your short nails with metallic shades. Gold, silver, and bronze can create a sleek, chic appearance. Try a full metallic coat, or use metallic polish to highlight certain areas of your nail for a modern, eye-catching effect.

5. Marble Effect

The marble nail trend is perfect for short nails, providing a sophisticated and unique look. Use a combination of white, grey, and metallic shades to achieve a stunning marble effect. This design adds an element of elegance without needing much length.

6. Negative Space

Negative space designs use unpainted parts of your nails to create a striking contrast. This minimalist approach works exceptionally well on short nails, allowing the natural nail to shine through while still showcasing artistic flair. Experiment with shapes and patterns to find what suits you best.

7. Ombre Gradient

Ombre nails blend two or more colors seamlessly, creating a beautiful gradient effect. For short nails, opt for a subtle ombre with soft, complementary colors. This design adds depth and dimension to your nails, making them look more elongated.

8. Polka Dots

Polka dots are playful and versatile, making them an excellent choice for short nails. You can use different sizes and colors of dots to create a fun and vibrant look. Try a monochromatic scheme for a chic touch or mix bright colors for a more energetic style.

Conclusion

Short nails offer the perfect canvas for a range of stunning nail art designs. Whether you prefer classic elegance, bold patterns, or playful accents, there’s a design out there that will make your short nails shine. Experiment with these ideas and discover which styles best express your personality. Happy nail painting!

image
پسندیدن
اظهار نظر
اشتراک گذاری
Tamsin Haute Hues
Tamsin Haute Hues
1 Y ·ترجمه کردن

### The 1950s Blue Polka Dot Buttoned Romper: A Retro Revival

If you're a fan of vintage fashion, the **1950s Blue Polka Dot Buttoned Romper** is a piece you’ll want to add to your collection. This charming romper pays homage to the classic style of the 1950s, combining timeless elegance with playful polka dots and a flattering buttoned design. Here’s a closer look at why this romper is a standout piece and how you can make it your own.

#### **A Nod to Vintage Charm**

The 1950s were a golden era for fashion, characterized by elegant silhouettes and whimsical patterns. The Blue Polka Dot Buttoned Romper embodies the essence of this era with its retro polka dot print and button-up front. The playful polka dots add a touch of whimsy, while the buttoned design enhances its classic appeal. This romper is a perfect way to channel vintage vibes and bring a bit of mid-century flair into your modern wardrobe.

#### **Design Features**

- **Polka Dot Print* The romper features a classic blue polka dot pattern, a staple of 1950s fashion. Polka dots were immensely popular during this decade, symbolizing fun and femininity. This timeless print makes the romper both eye-catching and versatile.

- **Buttoned Front* The button-up design adds a touch of retro elegance. It allows for adjustable styling and creates a flattering V-neckline. The buttons are not just functional but also serve as a stylish detail that enhances the romper’s vintage aesthetic.

- **Flattering Fit* Designed to accentuate the waist and create an hourglass silhouette, this romper is perfect for various body types. The high-waisted design and cinched waist help to define your shape while providing comfort and ease of movement.

- **Comfortable Fabric* Made from high-quality fabric, the romper is both comfortable and breathable. Whether you’re attending a summer event or simply enjoying a day out, this romper ensures you stay stylish without sacrificing comfort.

#### **Styling Your 1950s Romper**

The beauty of the 1950s Blue Polka Dot Buttoned Romper lies in its versatility. Here are a few ways to style it:

- **Vintage-Inspired Look* Pair the romper with red or white accessories to enhance its retro charm. Classic cat-eye sunglasses, a red lip, and vintage-inspired pumps will complete the look and transport you straight to the 1950s.

- **Casual Day Out* For a more relaxed style, wear the romper with white sneakers or espadrilles. Add a denim jacket or cardigan for cooler days, and accessorize with a simple tote bag for a laid-back, yet stylish, outfit.

- **Elegant Evening Wear* Dress up the romper with statement jewelry, such as a bold necklace or vintage brooch. Choose strappy heels or ballet flats to elevate the look, making it perfect for evening events or summer parties.

#### **Care and Maintenance**

To keep your 1950s Blue Polka Dot Buttoned Romper looking its best:

- **Gentle Washing* Follow the care label instructions, usually recommending hand wash or gentle machine wash in cold water. This helps preserve the fabric and the integrity of the polka dot print.

- **Drying* Air dry the romper to prevent any potential damage from heat. Avoid wringing or twisting the fabric to maintain its shape.

- **Storage* Store the romper in a cool, dry place away from direct sunlight to prevent fading. Using a garment bag can help protect it from dust and potential damage.

#### **Conclusion**

The **1950s Blue Polka Dot Buttoned Romper** is a delightful tribute to vintage fashion, offering both style and nostalgia. Its classic polka dot print, flattering fit, and elegant buttoned design make it a must-have for anyone who loves retro style. Whether you’re dressing up for a special occasion or keeping it casual, this romper provides endless styling possibilities. Embrace the charm of the 1950s and make a timeless fashion statement with this delightful romper.

image
پسندیدن
اظهار نظر
اشتراک گذاری
Seren's Urban Elegance
1 Y ·ترجمه کردن

Classy Baddie Nails | Extra Glamour Nails | Mob Wife Chic | Bad and Boujee Styles | Latina Nail Art: The Ultimate Guide to Fabulous Nail Designs

Nail art has evolved into an essential form of self-expression, combining creativity with personal style to make a statement. Whether you’re aiming for a sophisticated look or something that exudes confidence and edge, there’s a perfect nail design for you. In this guide, we’ll explore five stunning nail trends: Classy Baddie Nails, Extra Glamour Nails, Mob Wife Chic, Bad and Boujee Styles, and Latina Nail Art. Each style offers its own unique flair and sophistication, ensuring your nails are always on point.

1. Classy Baddie Nails

Classy Baddie Nails are all about striking the perfect balance between elegance and boldness. These designs often feature clean lines, minimalist patterns, and understated luxury. Think neutral tones, delicate nail art, and a polished finish that exudes confidence and sophistication.

Key Features:

Colors: Neutral shades like nude, beige, and soft pink, often paired with subtle metallic accents.

Designs: Simple geometric patterns, delicate lines, or minimalist designs.

Finishes: Glossy or matte topcoats that enhance the elegance.

How to Achieve the Look: Start with a base coat of a neutral shade. Add minimalist designs using thin brushes or nail stickers. For an extra touch of class, incorporate a hint of gold or silver accent, and seal with a glossy top coat.

2. Extra Glamour Nails

If you’re in the mood to dazzle, Extra Glamour Nails are your go-to. This style is all about opulence and sparkle, featuring eye-catching embellishments that ensure your nails stand out. Think bold glitter, rhinestones, and vibrant colors that scream luxury.

Key Features:

Colors: Rich hues like deep reds, royal blues, and shimmering golds and silvers.

Designs: Full glitter coverage, 3D embellishments like rhinestones or studs, and dramatic gradients.

Finishes: High-shine topcoats to accentuate the glamour.

How to Achieve the Look: Apply a base color and let it dry. Add a layer of glitter polish or apply loose glitter while the base is still tacky. Use nail glue to place rhinestones or other embellishments. Finish with a top coat to lock in the sparkle.

3. Mob Wife Chic

Mob Wife Chic nails channel a luxurious and bold aesthetic, often associated with high fashion and sophistication. This style combines rich colors with striking designs that command attention, perfect for making a statement.

Key Features:

Colors: Deep, opulent shades like burgundy, emerald green, and jet black.

Designs: Bold patterns, intricate nail art, and high-contrast elements.

Finishes: Glossy or semi-gloss finishes to enhance the dramatic effect.

How to Achieve the Look: Choose a rich, dark base color and apply it evenly. Add dramatic patterns or designs, such as gold or silver foil accents or intricate hand-painted details. Seal with a top coat to maintain the chic and polished look.

4. Bad and Boujee Styles

For those who love to make a statement, Bad and Boujee nail designs are all about high-impact and high-fashion. This style is characterized by extravagant patterns, bold colors, and luxurious details that showcase confidence and flair.

Key Features:

Colors: Bold and vibrant hues, including neon shades and high-contrast color combinations.

Designs: Large, eye-catching patterns, including animal prints, abstract art, and statement nail decals.

Finishes: Glossy, high-shine topcoats with potential for added textures like matte or metallic finishes.

How to Achieve the Look: Start with a base coat of a vibrant color or a dark, dramatic shade. Add bold patterns or designs using nail art brushes, stickers, or stamping techniques. Finish with a glossy top coat to enhance the overall impact.

5. Latina Nail Art

Latina Nail Art celebrates vibrant culture and creativity, featuring bold colors, intricate designs, and a flair for the dramatic. This style often incorporates elements inspired by Latin American art and traditions, making it perfect for those who love to showcase their heritage and individuality.

Key Features:

Colors: Bright and lively colors like hot pinks, bright oranges, and rich purples.

Designs: Detailed, culturally inspired patterns such as floral motifs, geometric shapes, and vibrant gradients.

Finishes: Glossy or matte, with potential for textured elements.

How to Achieve the Look: Choose a base color that reflects your chosen design. Use nail art brushes or stamping tools to add intricate patterns and details. For added flair, consider incorporating embellishments like gems or glitter. Seal with a top coat to preserve the vibrant design.

Conclusion

From the understated elegance of Classy Baddie Nails to the bold, dramatic flair of Bad and Boujee Styles, there’s a perfect nail design for every mood and occasion. Whether you’re drawn to the opulence of Extra Glamour Nails, the luxurious Mob Wife Chic, or the vibrant energy of Latina Nail Art, these designs offer endless possibilities for showcasing your style. Embrace your creativity and experiment with these stunning looks to make every manicure a masterpiece.

With these fabulous nail designs, you’re sure to make a lasting impression wherever you go. So go ahead, elevate your nail game and let your fingertips shine with confidence and style!

image
پسندیدن
اظهار نظر
اشتراک گذاری
Seren's Urban Elegance
1 Y ·ترجمه کردن

20 Absolutely Gorgeous Black Nail Designs You’ll Love

Black nails are timeless, versatile, and undeniably chic. Whether you're preparing for a night out, a special event, or just want to add a touch of elegance to your everyday look, black nail designs offer endless possibilities. From classic solid black to intricate nail art, these designs can suit any style and occasion. Here are 20 absolutely gorgeous black nail designs that are sure to inspire your next manicure.

1. Classic Solid Black

Sometimes, less is more. A classic solid black manicure is sleek, sophisticated, and perfect for any occasion. This timeless look never goes out of style and adds a touch of elegance to any outfit.

How to Achieve the Look: Apply a base coat, then use a high-quality black polish. Finish with a glossy top coat for a smooth, polished finish.

2. Black and Gold Glam

Add a touch of luxury to your black nails with gold accents. Whether it's a glittery gold tip or intricate gold patterns, this combination exudes glamour and sophistication.

How to Achieve the Look: Paint your nails black and let them dry. Use gold nail tape or a fine brush to add gold designs or tips. Seal with a top coat for a glossy finish.

3. Matte Black Elegance

For a modern twist on the classic black nail, try a matte finish. Matte black nails offer a chic, understated look that's perfect for any occasion.

How to Achieve the Look: Apply a base coat and a layer of black polish. Once dry, use a matte top coat to achieve a sleek, non-glossy finish.

4. Black and White Stripes

Black and white stripes create a bold, graphic design that’s both eye-catching and stylish. This design works well for a sophisticated and modern look.

How to Achieve the Look: Paint your nails black, then use striping tape to apply white stripes. Alternatively, use a fine brush to paint on the stripes and finish with a top coat.

5. Black with Silver Glitter

Combine black polish with silver glitter for a dazzling effect. This design is perfect for adding a bit of sparkle and glamour to your nails.

How to Achieve the Look: Apply black polish as your base color. Once dry, apply a layer of silver glitter polish or sprinkle loose glitter on top. Finish with a top coat to seal in the glitter.

6. Black and Red Drama

Create a dramatic and bold look by pairing black nails with red accents. This combination is perfect for making a statement and adding a touch of edge to your style.

How to Achieve the Look: Paint your nails black and let them dry. Use red polish to add accents, such as tips, stripes, or geometric patterns. Seal with a top coat.

7. Black Floral Art

Add a touch of femininity to your black nails with delicate floral designs. This look combines the elegance of black with the beauty of intricate floral patterns.

How to Achieve the Look: Apply black polish as a base. Once dry, use a fine brush or nail art stickers to create floral designs in contrasting colors like white or pastel shades.

8. Black Ombre Fade

A black ombre fade creates a stunning gradient effect that’s perfect for a chic and modern look. This design transitions smoothly from black to another color or a lighter shade.

How to Achieve the Look: Apply black polish to the tips of your nails and use a makeup sponge to blend it into a lighter color towards the base. Seal with a top coat.

9. Black with Negative Space

Negative space designs are on-trend and offer a minimalist approach. Combine black polish with clear areas for a sophisticated and modern look.

How to Achieve the Look: Paint your nails black, then use nail tape or a fine brush to create clear sections. You can create geometric shapes or abstract patterns with the negative space.

10. Black and Nude Combo

Pairing black with nude creates a chic and understated design. This combination is perfect for a polished, sophisticated look.

How to Achieve the Look: Paint some nails black and leave others nude. You can also use black polish to create accents or patterns on nude nails.

11. Black with Metallic Accents

Add a touch of shine to your black nails with metallic accents. Silver or gold details can elevate your manicure and add a touch of sophistication.

How to Achieve the Look: Paint your nails black and let them dry. Use metallic nail polish to add accents, such as tips, lines, or dots. Finish with a top coat.

12. Black with 3D Nail Art

For a standout look, add 3D elements to your black nails. This could include rhinestones, studs, or textured designs that add dimension and interest.

How to Achieve the Look: Apply black polish as your base. Once dry, add 3D embellishments using nail glue. Seal with a top coat to keep everything in place.

13. Black and Pastel Accent Nails

Combine the boldness of black with soft pastel accents for a playful yet sophisticated design. This combination offers a nice contrast and adds a touch of color.

How to Achieve the Look: Paint most of your nails black, then add pastel accents on one or two nails. Use pastel polish to create designs or simple dots on the black base.

14. Black with Abstract Art

Abstract nail art provides a creative and unique look. Use black as a base and add abstract patterns or shapes in contrasting colors.

How to Achieve the Look: Apply black polish as a base. Use different colors and nail art brushes to create abstract patterns. Finish with a top coat.

15. Black and Green Mystique

Pair black with deep green for a mystical and intriguing look. This combination is perfect for a dramatic and stylish manicure.

How to Achieve the Look: Paint your nails black and add green accents or designs. You can also use green glitter for added sparkle.

16. Black with Holographic Polish

Holographic polish adds a mesmerizing effect to your black nails. This design combines the elegance of black with a rainbow of colors that change with the light.

How to Achieve the Look: Apply black polish as a base. Once dry, apply a holographic top coat or polish for a shimmering, prismatic effect.

17. Black with Animal Prints

Add a wild touch to your black nails with animal prints. Leopard spots, zebra stripes, or snake patterns create a bold and edgy design.

How to Achieve the Look: Paint your nails black and use a fine brush or nail art stickers to add animal print designs in contrasting colors.

18. Black with Lace Details

Lace nail art adds a delicate and elegant touch to your black nails. This design is perfect for special occasions or a refined look.

How to Achieve the Look: Apply black polish as a base. Once dry, use lace nail stickers or a fine brush to create lace patterns. Seal with a top coat.

19. Black and Neon Accents

Bright neon accents against a black base create a striking and energetic look. This design is perfect for making a bold statement.

How to Achieve the Look: Paint your nails black and add neon accents in patterns or designs. Neon polish can be used for tips, lines, or dots.

20. Black with Gradient Glitter

Create a glamorous effect with a gradient of glitter over a black base. This design adds sparkle and dimension, perfect for a festive occasion.

How to Achieve the Look: Apply black polish as your base. Once dry, use a sponge to apply glitter from the tips to the base for a gradient effect. Seal with a top coat.

Conclusion

Black nails are versatile and can be styled in countless ways to suit any occasion or personal style. Whether you prefer classic solid black, glittery accents, or intricate designs, these 20 gorgeous black nail ideas offer something for everyone. Embrace your creativity and experiment with these stunning looks to make your next manicure truly unforgettable.

So go ahead—let your nails make a bold statement with these fabulous black nail designs!

image
پسندیدن
اظهار نظر
اشتراک گذاری
Violet Creative Pins
1 Y ·ترجمه کردن

12 Nail Colors Everyone Will Be Obsessed With This Summer

Summer is the perfect time to experiment with bold and vibrant nail colors. As the temperatures rise and the days get longer, it’s the ideal moment to refresh your manicure with shades that reflect the season’s energy. This summer, several nail colors are making waves and quickly becoming the must-have hues for every fashion-forward individual. Here are 12 stunning nail colors that everyone will be obsessed with this season.

1. Electric Blue

Make a statement with electric blue—a striking shade that radiates confidence and fun. This bold color is perfect for summer nights out or beach parties, offering a vibrant and refreshing alternative to traditional blues.

2. Tropical Teal

Inspired by the crystal-clear waters of exotic locales, tropical teal is a rich, mesmerizing shade that captures the essence of summer. It’s ideal for those who want a color that’s both bold and serene, perfect for any summer occasion.

3. Sunny Yellow

Embrace the brightness of the sun with sunny yellow nails. This cheerful, eye-catching color adds a burst of happiness to your look and pairs beautifully with summer outfits, from swimsuits to sundresses.

4. Coral Crush

Coral is a quintessential summer color, combining the warmth of orange with the softness of pink. Coral crush is perfect for creating a vibrant and playful manicure that complements a tan and enhances your summer glow.

5. Mint Green

Mint green offers a cool and refreshing alternative to brighter summer shades. This soft, pastel color evokes a sense of tranquility and pairs well with both casual and dressy summer looks.

6. Classic Red

Red is timeless, and this summer, classic red nails are making a strong comeback. Whether you opt for a bright, fire-engine red or a deeper crimson, this color adds a touch of sophistication and is perfect for any summer event.

7. Lavender Fields

Lavender is the go-to shade for those who prefer a softer, more feminine look. Lavender fields brings a touch of elegance to your manicure while maintaining a relaxed and airy feel, ideal for garden parties and summer picnics.

8. Hot Pink

Hot pink is all about fun and flair. This vibrant, energetic color is perfect for making a bold statement and is sure to be a favorite for those who love to stand out and shine in the summer sun.

9. Sunset Orange

Capture the beauty of a summer sunset with sunset orange. This warm, radiant hue is perfect for those who want a color that’s both dynamic and eye-catching, making it a great choice for day-to-night summer activities.

10. Soft Peach

Soft peach offers a delicate and elegant touch, perfect for a more understated summer look. This color works well with a variety of outfits and is ideal for those who prefer a subtle yet stylish manicure.

11. Seafoam Green

Seafoam green brings a serene, beachy vibe to your nails. This calming color is reminiscent of ocean waves and coastal breezes, making it a perfect choice for a laid-back summer manicure.

12. Metallic Gold

Add a touch of glamour to your summer look with metallic gold. This dazzling color is perfect for evening events or special occasions, offering a chic and luxurious finish that will make your nails stand out.

Tips for Rocking These Summer Nail Colors

Prep Your Nails: Start with a good base coat to ensure your nail color goes on smoothly and lasts longer. This will also help prevent staining and keep your manicure looking fresh.

Choose the Right Finish: Depending on your mood and the occasion, you can go for a glossy, matte, or even a glitter finish. Each finish adds a different dimension to your nail color.

Match Your Outfits: Coordinate your nail color with your summer wardrobe to create a cohesive and stylish look. These colors work well with various summer outfits, from casual beachwear to elegant evening dresses.

Experiment with Nail Art: Add a touch of creativity by incorporating nail art designs that complement your chosen color. From simple stripes to intricate floral patterns, nail art can enhance your manicure and make it truly unique.

Regular Maintenance: Keep your nails looking their best by applying a top coat regularly to prevent chipping and maintain shine. Also, make sure to moisturize your cuticles and nails to keep them healthy and vibrant.

Conclusion

This summer, don’t be afraid to experiment with these 12 nail colors that are sure to turn heads and keep you on-trend. Whether you’re drawn to bold brights or soft pastels, there’s a shade here to suit every style and occasion. Embrace the season with a fresh manicure that reflects the vibrant and carefree spirit of summer. Your nails will be the perfect accessory to your sunny adventures!

image
پسندیدن
اظهار نظر
اشتراک گذاری
Violet Creative Pins
1 Y ·ترجمه کردن

Stunning Floral Nail Art Ideas You Must Try This Summer

Summer is the perfect time to refresh your look, and what better way to do that than with some stunning floral nail art? Flowers are a timeless and versatile design element that can be as simple or intricate as you like, making them the ideal choice for your summer manicures. Whether you're lounging by the pool, attending a garden party, or just enjoying the sunny weather, these floral nail art ideas will ensure your nails are always on point.

1. Delicate Daisies

Nothing says summer quite like daisies. These simple yet charming flowers can add a touch of whimsy to your nails. Opt for a pastel base color like soft pink or baby blue, and then add tiny white daisies with yellow centers. This design is perfect for a fresh, understated look that still feels summery and fun.

2. Bold Sunflowers

Bring the sunshine to your fingertips with bold sunflower nail art. Sunflowers are bright, cheerful, and instantly recognizable, making them a standout choice. Use a vibrant yellow for the petals and a deep brown for the center. Pair the sunflowers with a green background to mimic a summer field, or keep it simple with a neutral base color that lets the flowers pop.

3. Tropical Hibiscus

If you're dreaming of a tropical getaway, why not bring the tropics to your nails? Hibiscus flowers are the ultimate symbol of a summer vacation. Use bright, vivid colors like hot pink, coral, or red for the flowers, and add lush green leaves for contrast. This design works well on both short and long nails, giving you an instant island vibe.

4. Vintage Roses

For a touch of elegance, go for vintage rose nail art. These classic flowers never go out of style and are perfect for any summer occasion. Choose a muted, dusty rose color palette, or mix in some soft whites and greens for a romantic, vintage look. You can create an all-over floral pattern or focus on just one or two accent nails for a more subtle effect.

5. Wildflower Mix

If you love variety, a wildflower nail design is the way to go. Combine different types of flowers—like daisies, poppies, and lavender—on each nail for a colorful and eclectic look. This design is all about embracing nature's diversity, so don't be afraid to mix and match colors and flower shapes. The result is a vibrant, cheerful manicure that captures the carefree spirit of summer.

6. Cherry Blossoms

Cherry blossoms are delicate and beautiful, making them a great choice for a softer, more subtle floral design. Paint a light, neutral background—think pale pink or cream—and then add branches with tiny cherry blossoms in shades of pink or white. This design is perfect for those who prefer a more minimalist look while still embracing the beauty of flowers.

7. Watercolor Florals

Watercolor floral designs are perfect for creating a dreamy, ethereal look. Use soft, blended colors to create a watercolor effect on your nails, and then add delicate floral patterns on top. This technique works well with pastels and light, airy colors, giving your nails a soft, romantic feel that's perfect for summer weddings or special occasions.

8. Garden Party Chic

For a more sophisticated take on floral nail art, try a garden party theme. Use a pale, neutral base color like beige or light gray, and then add intricate floral designs in darker, richer colors like burgundy, navy, or emerald. You can even add some gold or silver accents to elevate the look. This design is ideal for those who want a chic, polished manicure that still celebrates the beauty of summer flowers.

9. Neon Florals

If you love bold, eye-catching designs, neon florals are the way to go. Choose bright neon shades—like electric pink, lime green, or neon orange—and create flower patterns that really stand out. This look is perfect for festivals, beach days, or any time you want your nails to make a statement. Pair neon flowers with a neutral background or go all-out with a full neon manicure.

10. Pressed Flower Effect

For a truly unique look, try a pressed flower effect. This design mimics the appearance of real flowers pressed into your nails. Use translucent or sheer nail polish as a base, and then add delicate floral decals or stamps to create the illusion of pressed flowers. Finish with a clear top coat to seal the design. This technique results in a natural, organic look that's perfect for nature lovers.

How to Achieve the Perfect Floral Nails

Creating floral nail art can be as simple or intricate as you like, depending on your skill level and the tools you have available. Here are a few tips to help you get started:

Start with a Good Base: Use a high-quality base coat to ensure your nails are smooth and ready for polish. This will also help your manicure last longer.

Use Nail Art Tools: Invest in some nail art brushes, dotting tools, and stencils to help you create precise, detailed floral designs. If you're new to nail art, start with simple flowers and work your way up to more complex patterns.

Consider Stickers and Decals: If you're short on time or not confident in your freehand skills, nail stickers and decals are a great alternative. They come in a wide range of floral designs and can be easily applied to your nails.

Seal with a Top Coat: Always finish your manicure with a clear top coat to protect your design and add shine. This will also help prevent chipping, so your floral nails stay looking fresh for longer.

Conclusion

Floral nail art is a beautiful way to embrace the spirit of summer. Whether you prefer simple daisies, bold sunflowers, or intricate vintage roses, there's a floral design out there for everyone. So, why not give your nails a summer makeover with one of these stunning floral ideas? With the right tools and a bit of creativity, you can achieve a gorgeous, blooming manicure that will turn heads all season long.

image
پسندیدن
اظهار نظر
اشتراک گذاری
Seren's Urban Elegance
1 Y ·ترجمه کردن

Discover Fresh Fingernail Design Ideas with These Stunning Looks

The world of nail art is constantly evolving, and with each season, new trends emerge that offer exciting opportunities to express your personal style. If you're looking to update your manicure with something fresh and fabulous, you're in the right place. From minimalist elegance to bold statements, here are some stunning fingernail design ideas that will elevate your look and inspire your next salon visit.

1. Elegant French Twist

The classic French manicure gets a modern makeover with unique twists. Instead of the traditional white tips, try adding subtle metallic accents or pastel colors. A thin line of gold or silver along the tips adds a touch of sophistication and glamour, while pastel hues can give a softer, more contemporary feel.

How to Achieve the Look: Start with a neutral base coat, then use a fine brush or striping tape to create the tip. Add a metallic or pastel accent and finish with a glossy top coat for a polished look.

2. Bold Geometric Patterns

Geometric nail art is a fantastic way to add structure and modernity to your manicure. Bold shapes like triangles, diamonds, and stripes in contrasting colors create a visually striking design. This style is perfect for those who enjoy a minimalist yet impactful look.

How to Achieve the Look: Use nail tape to create sharp lines and geometric shapes. Apply your chosen colors in alternating patterns, then carefully remove the tape to reveal clean, crisp edges.

3. Soft Watercolor Hues

Watercolor nails offer a dreamy, ethereal quality that’s perfect for a soft and feminine look. This design mimics the fluidity of watercolor paintings, creating a delicate, blended effect.

How to Achieve the Look: Apply a base coat and let it dry. Using a makeup sponge, dab on several pastel colors in a random pattern to create a watercolor effect. Blend the colors slightly for a seamless transition and finish with a top coat for a smooth finish.

4. Tropical Bliss

Bring the vibrant energy of summer into your manicure with tropical-themed designs. Think bright, bold colors and fun patterns inspired by tropical fruits, palm leaves, and exotic flowers. This design is perfect for adding a splash of fun to your summer look.

How to Achieve the Look: Start with a bright base color, and use nail art brushes or decals to add tropical elements. Incorporate vibrant shades like turquoise, coral, and green for a lively finish.

5. Classic Polka Dots

Polka dots are a timeless design that never goes out of style. They’re versatile and can be adapted to suit any season or occasion. Whether you opt for small, delicate dots or large, bold ones, this design adds a playful touch to your nails.

How to Achieve the Look: Apply a base color and let it dry. Use a dotting tool to apply polka dots in varying sizes and colors. For a classic look, stick to black and white; for something more modern, experiment with bold and bright hues.

6. Glamorous Glitter

Add some sparkle to your nails with glittery designs that shine with every movement. Whether you choose to cover the entire nail or just add a touch of glitter to your tips, this design is perfect for a touch of glamour and festivity.

How to Achieve the Look: Apply your base color and let it dry. Apply a layer of glitter polish or sprinkle loose glitter over your nails while the base is still tacky. Seal with a top coat for a smooth and shiny finish.

7. Minimalist Lines

For a chic and understated look, minimalist line designs are a great choice. Simple, straight lines or delicate accents can create a sophisticated appearance that’s both elegant and modern.

How to Achieve the Look: Use nail tape or a fine brush to create straight lines or subtle accents on your nails. Stick to neutral or muted colors for a refined look, and finish with a top coat for a sleek finish.

8. Fun Fruit Designs

Fruit-themed nails are a playful and whimsical choice, perfect for adding a burst of color and fun to your manicure. Think juicy watermelons, zesty lemons, and vibrant strawberries for a fresh and fruity look.

How to Achieve the Look: Start with a base color that complements your fruit design. Use fine brushes or nail art pens to create detailed fruit illustrations. For a quick option, use fruit-themed nail decals.

9. Gradient Ombre

Ombre nails create a stunning gradient effect that transitions smoothly from one color to another. This design is versatile and can be adapted to suit any color palette, from subtle pastels to vibrant neons.

How to Achieve the Look: Apply a base coat and let it dry. Using a makeup sponge, dab on the colors you want in a gradient effect, starting from the tips and blending towards the base. Seal with a top coat for a smooth finish.

10. Artistic Abstracts

Abstract nail art allows for creativity and personal expression. Use bold colors and unique shapes to create a design that reflects your artistic side. This style is perfect for those who love to experiment and stand out.

How to Achieve the Look: Apply a base color and let it dry. Use different colors and nail art brushes to create abstract shapes and patterns. The key is to have fun and let your creativity shine.

Conclusion

There’s no shortage of fresh and stunning fingernail design ideas to elevate your next manicure. Whether you’re drawn to elegant French twists, bold geometric patterns, or playful fruit designs, these ideas offer something for every style and occasion. So go ahead, experiment with these looks, and let your nails make a statement this season!

Embrace your creativity and get ready to turn heads with your fabulous new manicure. Your perfect nail design is just a brushstroke away!

image
پسندیدن
اظهار نظر
اشتراک گذاری
Violet Creative Pins
1 Y ·ترجمه کردن

Teeth Nails Are Real—And Just When You Think It Can't Get Worse, Check Out This Photo

The beauty world is no stranger to unusual trends, but the latest craze is truly something out of a nightmare. Enter "teeth nails," the bizarre manicure trend that has everyone talking—and cringing. Just when you thought you'd seen it all, these unsettling nail designs are here to push the boundaries of what's possible (and palatable) in nail art.

The Origins of Teeth Nails

Teeth nails first emerged on social media as a shock factor trend, with nail artists experimenting with 3D designs that replicate the look of human teeth. These manicures feature everything from realistic tooth textures to dental elements like gums and roots, creating an uncanny valley effect that leaves viewers both fascinated and horrified.

This trend is not for the faint of heart, as it pushes the envelope of what’s considered beautiful or even acceptable in the world of nail art. What started as a niche experiment quickly gained viral attention, with influencers and nail enthusiasts jumping on the bandwagon to create their own versions of this creepy, yet captivating, look.

The Process Behind the Creepy Creations

Creating teeth nails is no simple task. It requires a skilled nail artist with a steady hand and a willingness to dive into the macabre. The process typically involves sculpting the teeth from acrylic or gel, painting them with lifelike details, and sometimes even adding additional elements like gums or braces to complete the look.

Nail artists often use white acrylic for the base of the tooth and add shading to create a realistic effect. The attention to detail is crucial, as the goal is to mimic the texture and appearance of real teeth as closely as possible. For some, the result is a set of nails that look like they belong in a dentist's office rather than on someone’s fingertips.

The Shock Factor

What makes teeth nails so shocking is the sheer realism of the designs. These aren’t just abstract representations of teeth—they look disturbingly lifelike. The uncanny resemblance to real teeth triggers an immediate reaction, whether it’s fascination, disgust, or a mix of both.

The shock factor has made teeth nails a viral sensation, with photos circulating widely across social media platforms. People can’t help but stare, sharing the images with captions like, "You won’t believe this," or, "Just when I thought I’d seen it all…" It’s a trend that thrives on its ability to provoke a strong emotional response.

Why Do People Do It?

You might be wondering why anyone would want to walk around with a set of teeth on their nails. For some, it’s all about the art and the challenge of creating something so realistic. For others, it’s about making a statement and standing out in a sea of conventional beauty trends.

Teeth nails are also a testament to the creativity and versatility of nail art. While it’s certainly not for everyone, it’s a bold expression of individuality that pushes the boundaries of what’s considered acceptable or attractive. In a world where beauty standards are constantly evolving, trends like this remind us that art has no limits.

The Viral Photo You Have to See

Just when you think teeth nails couldn’t get any weirder, along comes the photo that takes the trend to a whole new level. This viral image features a set of teeth nails that are so eerily realistic, they look like they could actually bite. The nails are meticulously crafted, complete with gums, shading, and even a slight gloss to mimic the natural sheen of real teeth.

The photo has taken the internet by storm, with reactions ranging from awe to absolute horror. It’s the kind of image that you can’t unsee—and it’s been shared thousands of times as people marvel at the bizarre creativity (and perhaps question the sanity) of the artist behind it.

Final Thoughts

Teeth nails are the latest example of how far people are willing to go in the name of art and self-expression. While this trend might not be for everyone, there’s no denying its impact on the beauty world. It’s a conversation starter, a shock to the system, and a reminder that sometimes, the strangest things are the ones that capture our attention the most.

So, if you’re brave enough, take a look at that viral photo and see for yourself just how far nail art has come—and how much further it might go. Just be warned: once you see it, you might not be able to look away!

image
پسندیدن
اظهار نظر
اشتراک گذاری
Seren's Urban Elegance
1 Y ·ترجمه کردن

10 Adorable Summer Nail Ideas to Elevate Your Next Manicure

Summer is the perfect time to experiment with your nails, embracing vibrant colors, fun designs, and playful patterns that reflect the season's energy. Whether you're headed to the beach, attending a summer soirée, or just enjoying sunny days, a fresh manicure can add a splash of excitement to your look. Here are 10 adorable summer nail ideas to elevate your next manicure and ensure your nails are the ultimate summer accessory.

1. Tropical Paradise

Bring a taste of the tropics to your fingertips with designs inspired by lush landscapes and vibrant flora. Think palm leaves, hibiscus flowers, and tropical fruit like pineapples and watermelons. Choose bright, bold colors like turquoise, coral, and lime green to capture the essence of a tropical getaway.

How to Achieve the Look: Use a base coat of a bright color, and then add hand-painted tropical elements or use nail decals for a quick and easy design.

2. Playful Polka Dots

Polka dots are a classic that never goes out of style, and they’re perfect for summer. Opt for playful polka dots in contrasting colors for a fun, whimsical look. You can go for a single color of dots on a neutral base or mix and match different colors for a more vibrant effect.

How to Achieve the Look: Start with a base color of your choice, then use a dotting tool to add polka dots in various sizes and colors for a playful pattern.

3. Sweet Fruit Designs

Fruit-themed nails are both fun and refreshing. Think juicy strawberries, zesty lemons, and watermelon slices. These designs are not only cute but also embody the essence of summer’s sweet treats.

How to Achieve the Look: Paint your nails in a base color that complements the fruit design you choose, then add detailed fruit illustrations using a fine brush or nail art pens.

4. Ocean Waves

Capture the beauty of the sea with ocean-inspired nails. Create a soothing blue ombre effect to mimic the waves or add delicate wave patterns for a serene and calming look. This design is perfect for beach days and summer vacations.

How to Achieve the Look: Apply a gradient of blues to create an ombre effect, and then use a thin brush to paint wave patterns or add small sea-themed embellishments.

5. Bold Neon Colors

If you’re a fan of bold statements, neon nails are a must-try. Neon colors like pink, green, and orange are eye-catching and perfect for summer parties and festivals. Combine neon hues with fun patterns or leave them as a striking solid color.

How to Achieve the Look: Choose a neon polish, apply two coats for maximum brightness, and consider adding a top coat with a slight shimmer for extra impact.

6. Elegant Pastels

For a softer, more sophisticated look, pastel nails are a great choice. Think mint greens, lavender, and soft pinks. Pastel nails can be styled with minimalistic designs or kept simple for a chic and elegant finish.

How to Achieve the Look: Apply a pastel base coat and add delicate details like tiny flowers or geometric shapes in complementary shades for a refined touch.

7. Fun Stripes

Stripes are a versatile design that can be as bold or as subtle as you like. Go for wide, contrasting stripes for a high-impact look, or opt for thin, pastel stripes for a more delicate appearance.

How to Achieve the Look: Use tape to create clean lines, and apply your chosen colors in alternating stripes. Remove the tape carefully for a crisp, professional finish.

8. Sparkling Glitter

Add some sparkle to your summer manicure with glitter accents. Whether you prefer full glitter nails or just a hint of sparkle on the tips, glitter adds a touch of glamour to any look.

How to Achieve the Look: Apply a base color of your choice, then add a glitter top coat or sprinkle loose glitter onto your nails. For a more controlled look, use glitter in a specific design or pattern.

9. Minimalistic Art

If you prefer a modern and clean look, minimalistic nail art is perfect. Think simple lines, geometric shapes, and subtle patterns. This style is all about elegance and simplicity, making it ideal for a sophisticated summer look.

How to Achieve the Look: Use nail art tape or a fine brush to create simple lines and shapes in contrasting colors. Keep the overall design clean and understated for a chic finish.

10. Sunset Gradient

Embrace the colors of a summer sunset with a gradient manicure. Blend warm tones like pink, orange, and yellow to create a beautiful ombre effect that resembles a sunset sky.

How to Achieve the Look: Apply a base coat of light yellow, then use a sponge to blend shades of pink and orange from the tips to the base of your nails. Finish with a top coat to smooth out the gradient.

Conclusion

These 10 adorable summer nail ideas are sure to inspire your next manicure and add a burst of fun to your summer style. From tropical designs and playful patterns to elegant pastels and bold neons, there’s a perfect summer nail look for everyone. So, gather your favorite polishes, experiment with these trends, and get ready to show off your fabulous summer nails!

Embrace the season with creativity and confidence—your next summer manicure is bound to be a hit!

image
پسندیدن
اظهار نظر
اشتراک گذاری
Showing 8926 out of 11913
  • 8922
  • 8923
  • 8924
  • 8925
  • 8926
  • 8927
  • 8928
  • 8929
  • 8930
  • 8931
  • 8932
  • 8933
  • 8934
  • 8935
  • 8936
  • 8937
  • 8938
  • 8939
  • 8940
  • 8941

ویرایش پیشنهاد

افزودن ردیف


یک تصویر را انتخاب کنید
لایه خود را حذف کنید
آیا مطمئن هستید که می خواهید این ردیف را حذف کنید؟

بررسی ها

برای فروش محتوا و پست های خود، با ایجاد چند بسته شروع کنید. کسب درآمد

پرداخت با کیف پول

هشدار پرداخت

شما در حال خرید اقلام هستید، آیا می خواهید ادامه دهید؟

درخواست بازپرداخت