Soi kèo Goteborg vs Mjallby lúc 0h00 ngày 22/5/2024
Xem thêm: https://nationalcorps.org/soi-....keo/soi-keo-goteborg
Hashtag: #haquangvan #bongdainfo #tysotructuyen #soikeo #nhandinhbongda

お気に入り
コメント
シェア
Soi kèo Goteborg vs Mjallby lúc 0h00 ngày 22/5/2024
Xem thêm: https://nationalcorps.org/soi-....keo/soi-keo-goteborg
Hashtag: #haquangvan #bongdainfo #tysotructuyen #soikeo #nhandinhbongda


Decadent Coffee Cheesecake with Oreo Cookie Crust and Chocolate Topping
Cheesecake is a timeless dessert that brings joy to any occasion, but when you add the bold flavors of coffee, the crunch of an Oreo cookie crust, and a rich chocolate topping, you elevate it to a whole new level. Our Coffee Cheesecake with Oreo Cookie Crust and Chocolate Topping is a luxurious treat that’s perfect for coffee lovers and dessert enthusiasts alike. In this article, we’ll guide you through the process of making this indulgent dessert, step by step.
**Ingredients*
To create this show-stopping Coffee Cheesecake, you'll need the following ingredients:
**For the Oreo Cookie Crust*
- 24 Oreo cookies, finely crushed
- 1/4 cup unsalted butter, melted
**For the Coffee Cheesecake Filling*
- 24 oz cream cheese, softened
- 1 cup granulated sugar
- 1 cup sour cream
- 3 large eggs
- 1/4 cup strong brewed coffee, cooled
- 2 tsp instant coffee granules
- 1 tsp vanilla extract
**For the Chocolate Topping*
- 1 cup heavy cream
- 8 oz semi-sweet chocolate, finely chopped
**Preparation*
**1. Making the Oreo Cookie Crust*
- Preheat your oven to 350°F (175°C).
- In a medium bowl, combine the finely crushed Oreo cookies with the melted butter until the mixture resembles wet sand.
- Press the mixture firmly into the bottom of a 9-inch springform pan to form an even crust.
- Bake the crust for 10 minutes, then remove it from the oven and let it cool while you prepare the filling.
**2. Preparing the Coffee Cheesecake Filling*
- In a large mixing bowl, beat the softened cream cheese and granulated sugar together until smooth and creamy.
- Add the sour cream and mix until well combined.
- Lightly beat the eggs in a separate bowl, then add them to the cream cheese mixture, blending thoroughly.
- Dissolve the instant coffee granules in the cooled brewed coffee, then add the coffee mixture and vanilla extract to the filling. Mix until fully incorporated.
- Pour the filling over the cooled Oreo crust, spreading it evenly.
**3. Baking the Cheesecake*
- Place the springform pan in a large roasting pan. Carefully pour hot water into the roasting pan until it reaches halfway up the sides of the springform pan, creating a water bath.
- Bake the cheesecake at 350°F (175°C) for about 1 hour, or until the center is set but still slightly jiggly.
- Turn off the oven and let the cheesecake sit in the oven with the door slightly ajar for an additional hour.
- Remove the cheesecake from the water bath and let it cool completely at room temperature. Then refrigerate for at least 4 hours, or overnight.
**4. Adding the Chocolate Topping*
- In a small saucepan, heat the heavy cream over medium heat until it begins to simmer.
- Remove the cream from the heat and pour it over the finely chopped semi-sweet chocolate in a heatproof bowl.
- Let the mixture sit for a minute, then stir until the chocolate is completely melted and the mixture is smooth.
- Pour the chocolate topping over the chilled cheesecake, spreading it evenly with a spatula.
- Refrigerate the cheesecake for an additional hour to set the chocolate topping.
**Serve and Enjoy*
Once the cheesecake is fully set, remove it from the springform pan and transfer it to a serving plate. Slice and serve this decadent Coffee Cheesecake with Oreo Cookie Crust and Chocolate Topping to delight your guests or enjoy as an indulgent treat for yourself.
**Conclusion*
This Coffee Cheesecake with Oreo Cookie Crust and Chocolate Topping is a dessert that combines rich flavors and textures for an unforgettable experience. The bold coffee flavor, creamy cheesecake filling, crunchy Oreo crust, and smooth chocolate topping come together to create a harmonious and indulgent treat. Whether you’re serving it at a special event or simply enjoying a slice with a cup of coffee, this cheesecake is sure to impress. So, why wait? Gather your ingredients and start baking this delightful dessert today!

Elevate Your Grilled Cheese Game with a Spicy Jalapeno Popper Twist
Grilled cheese sandwiches are the epitome of comfort food, but what happens when you take that classic recipe and give it a spicy, creamy twist? Enter the Jalapeno Popper Grilled Cheese – a tantalizing fusion of spicy jalapenos, crispy bacon, creamy cream cheese, and ooey-gooey melted cheese, all sandwiched between slices of perfectly grilled bread. In this article, we'll dive into the delicious world of this flavor-packed sandwich, exploring its origins, ingredients, and how to recreate it in your own kitchen.
**The Origin Story*
The Jalapeno Popper Grilled Cheese is a modern twist on two beloved classics: the grilled cheese sandwich and the jalapeno popper appetizer. While grilled cheese has been a comfort food staple for generations, jalapeno poppers gained popularity in the latter half of the 20th century as a spicy and indulgent appetizer. Combining the best of both worlds, the Jalapeno Popper Grilled Cheese offers a symphony of flavors and textures that is sure to satisfy your cravings.
**Ingredients*
To create the perfect Jalapeno Popper Grilled Cheese, you'll need a few key ingredients:
- Slices of your favorite bread (think hearty white or sourdough for optimal flavor)
- Sharp cheddar cheese, shredded
- Cream cheese, softened
- Fresh jalapenos, thinly sliced (remove seeds for less heat)
- Crispy bacon slices
- Butter for grilling
**Preparation*
1. Begin by frying or baking your bacon until it's crispy and golden brown. Set aside on paper towels to drain excess grease.
2. In a small bowl, mix together the softened cream cheese and shredded sharp cheddar cheese until well combined.
3. Spread a generous amount of the cheese mixture onto one slice of bread.
4. Layer on the crispy bacon slices and thinly sliced jalapenos, ensuring an even distribution of ingredients.
5. Top with another slice of bread to create a sandwich.
6. Heat a skillet or griddle over medium heat and add a pat of butter.
7. Place the assembled sandwich in the skillet and grill until the bread is golden brown and crispy, and the cheese is melted and gooey.
8. Carefully flip the sandwich and grill the other side until it's golden brown and the cheese is melted.
**Serve and Enjoy*
Once your Jalapeno Popper Grilled Cheese is grilled to perfection, remove it from the skillet and let it cool for a minute or two before slicing it in half. Serve it alongside your favorite dipping sauce or enjoy it on its own for a satisfyingly spicy meal.
**Conclusion*
The Jalapeno Popper Grilled Cheese is a delicious twist on a classic comfort food favorite. With its spicy kick, creamy cheese filling, and crispy bacon, it's sure to become a new go-to recipe for lunch, dinner, or anytime you're craving a hearty and indulgent meal. So why wait? Fire up the grill and treat yourself to a taste sensation that will leave your taste buds begging for more.

**Authentic Puerto Rican Sazón: Elevating Your Culinary Adventures**
Puerto Rican cuisine is renowned for its bold and vibrant flavors, and at the heart of many dishes lies the secret ingredient: sazón. While you can easily find pre-packaged sazón seasoning in stores, there's something special about crafting your own homemade blend.
### The Essence of Sazón
Sazón, which means "seasoning" in Spanish, is a staple in Puerto Rican cooking. It's not just about adding flavor; it's about infusing dishes with personality and tradition. The blend typically includes a mix of spices like cumin, coriander, garlic powder, and oregano, along with the distinctive orange hue from annatto seeds. This combination creates a symphony of flavors that dance on your taste buds.
### Crafting Your Own Sazón
Making your own sazón seasoning at home is surprisingly simple. All you need are a few common spices and a mortar and pestle or spice grinder. Begin by toasting whole spices like cumin seeds, coriander seeds, and annatto seeds to release their aromatic oils. Then, grind them into a fine powder along with other spices like garlic powder, onion powder, and oregano. The result? A fragrant, flavorful blend that's ready to elevate your dishes to new heights.
### Versatility in the Kitchen
One of the beauties of homemade sazón is its versatility. Whether you're seasoning meats, rice, beans, or vegetables, a sprinkle of this magic blend can transform ordinary ingredients into a culinary masterpiece. Use it as a dry rub for meats before grilling or roasting, or add it to soups and stews for an extra depth of flavor. The possibilities are endless, and the results are always delicious.
### Embracing Tradition
Beyond its culinary prowess, homemade sazón is a way to connect with Puerto Rican heritage and tradition. Each batch carries with it the essence of generations past, preserving the flavors and aromas that have been cherished for centuries. By making your own sazón, you're not just cooking a meal; you're celebrating a rich cultural legacy.
### Conclusion
In the world of Puerto Rican cuisine, sazón is the unsung hero that brings dishes to life. With its bold flavors and vibrant colors, homemade sazón seasoning is a must-have in any kitchen. Whether you're a seasoned chef or a novice cook, embracing the art of making your own sazón is a delicious journey worth taking. So, grab your spices, channel your inner chef, and let the magic of sazón transport you to the sunny shores of Puerto Rico with every bite.

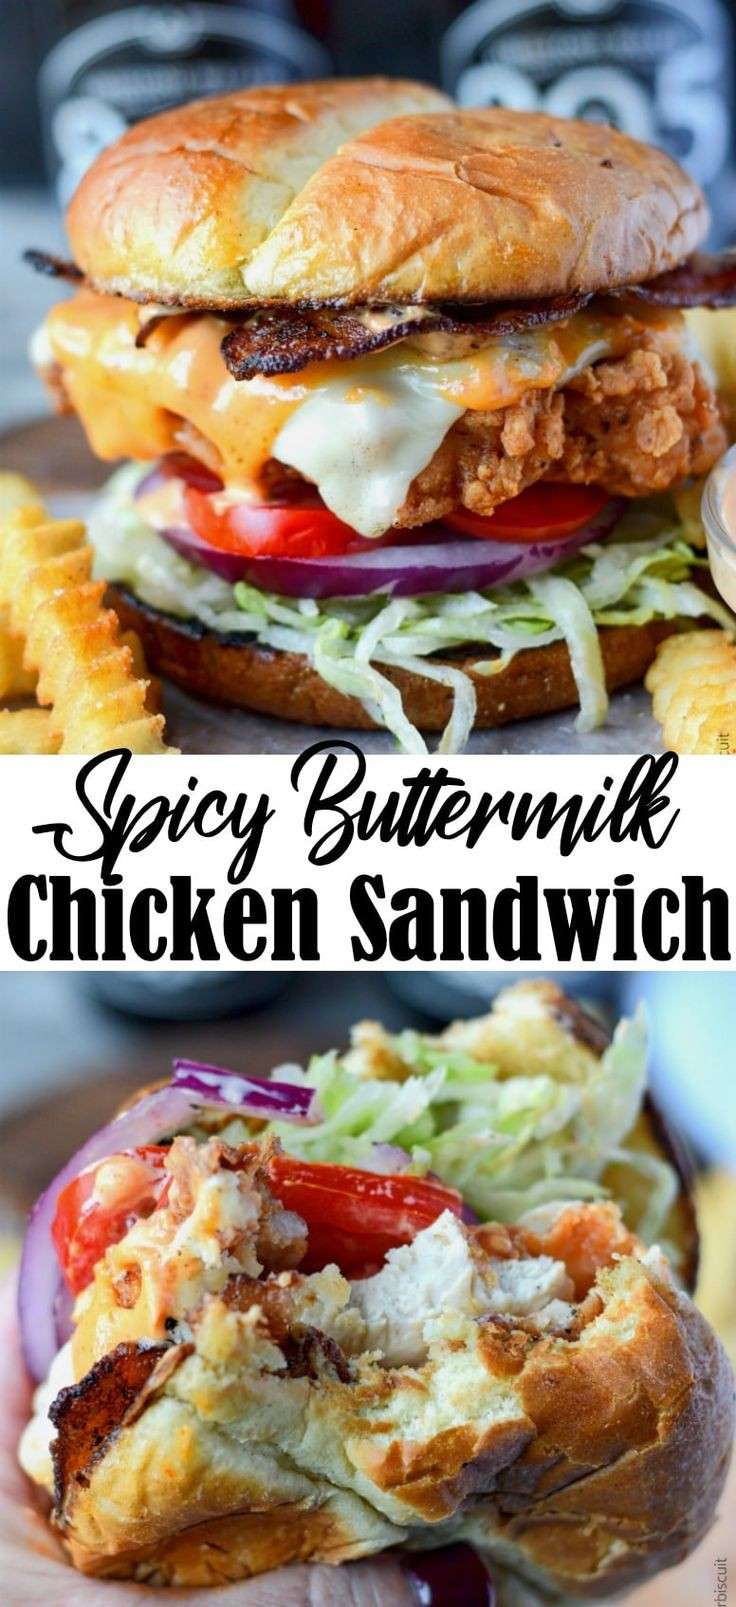
Sizzle and Spice: Buttermilk Bliss Chicken Sandwich
Are you ready to embark on a culinary adventure that tantalizes your taste buds and leaves you craving for more? Look no further than our mouthwatering creation – the Spicy Buttermilk Chicken Sandwich.
Picture this: a golden-brown, crispy chicken fillet, marinated in a secret blend of spices and buttermilk, nestled between two pillowy buns. With each bite, you're greeted by a symphony of flavors – the tanginess of the buttermilk, the kick of the spices, and the comforting warmth of the bread.
But what sets our sandwich apart is the heat. We're not talking about your run-of-the-mill spice; we're talking about a fiery kick that ignites your palate and keeps you coming back for more. It's the kind of spice that wakes up your taste buds and makes your mouth water in anticipation of the next bite.
And let's not forget about the texture. The crispy exterior of the chicken gives way to tender, juicy meat that practically melts in your mouth. Paired with the softness of the buns, each bite is a symphony of crunch and comfort that leaves you feeling satisfied yet yearning for another bite.
Whether you're craving a quick lunch on the go or looking to indulge in a flavorful dinner, our Spicy Buttermilk Chicken Sandwich is sure to hit the spot. So why wait? Come experience the magic for yourself and join us on a journey of taste and spice that you won't soon forget.
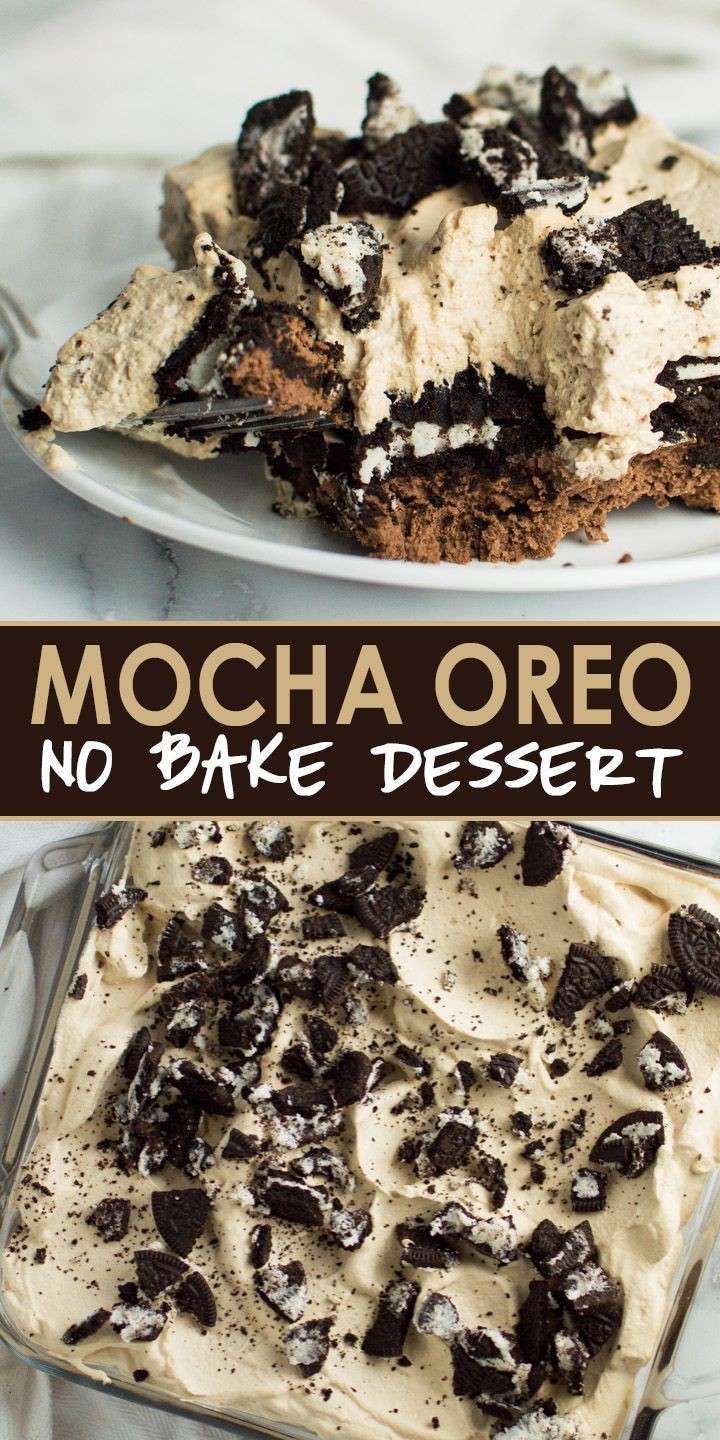
Mocha Oreo Bliss: A No-Bake Dessert Delight!
Get ready to experience pure indulgence with our mouthwatering Mocha Oreo no-bake dessert recipe. This delightful treat combines the rich flavors of mocha with the irresistible crunch of Oreo cookies, creating a dessert that is sure to satisfy your sweet tooth without the need for an oven. Perfect for any occasion, from casual gatherings to special celebrations, this dessert is guaranteed to be a crowd-pleaser.
#### Ingredients:
- 1 package (14.3 oz) Oreo cookies
- 1/2 cup (1 stick) unsalted butter, melted
- 1 package (8 oz) cream cheese, softened
- 1/2 cup granulated sugar
- 1 teaspoon vanilla extract
- 2 tablespoons instant espresso powder or instant coffee granules
- 1 cup heavy cream
- Chocolate shavings or cocoa powder for garnish (optional)
#### Instructions:
1. Start by crushing the Oreo cookies. You can use a food processor or simply place the cookies in a plastic bag and crush them with a rolling pin until they resemble fine crumbs.
2. In a mixing bowl, combine the crushed Oreo cookies with the melted butter. Mix until the crumbs are evenly coated.
3. Press the Oreo mixture into the bottom of a 9x9 inch square baking dish to form an even crust. Place the dish in the refrigerator to chill while you prepare the filling.
4. In another mixing bowl, beat the softened cream cheese with an electric mixer until smooth and creamy.
5. Add the granulated sugar, vanilla extract, and instant espresso powder to the cream cheese mixture. Beat until well combined and smooth.
6. In a separate bowl, whip the heavy cream until stiff peaks form.
7. Gently fold the whipped cream into the cream cheese mixture until fully incorporated.
8. Spread the mocha cream cheese filling evenly over the chilled Oreo crust in the baking dish.
9. Cover the dish with plastic wrap and refrigerate for at least 4 hours, or until the filling is set.
10. Before serving, garnish with chocolate shavings or a dusting of cocoa powder, if desired.
#### Tips for Success:
- For a stronger coffee flavor, you can increase the amount of instant espresso powder or coffee granules.
- Make sure to whip the heavy cream until stiff peaks form to ensure a light and fluffy texture for the filling.
- Feel free to get creative with the presentation by adding extra Oreo cookies on top or drizzling with chocolate sauce.
#### Serving Suggestions:
- Serve chilled slices of Mocha Oreo dessert as a delicious after-dinner treat or at your next party or gathering.
- Pair with a cup of hot coffee or espresso for the ultimate indulgent experience.
- Customize the recipe by experimenting with different flavors of Oreo cookies or adding toppings like whipped cream or caramel sauce.
#### Conclusion:
With its creamy mocha filling and crunchy Oreo crust, our Mocha Oreo no-bake dessert is sure to become a favorite in your recipe collection. Quick and easy to make, yet incredibly decadent and delicious, this dessert is perfect for satisfying your sweet cravings anytime, anywhere. So go ahead, whip up a batch, and treat yourself to a slice of pure bliss!
#mochaoreodessert #nobaketreats #easydessertrecipe #chocolatecravings #sweetindulgence #oreolovers #coffeedesserts #noovenneeded #dessertideas #quickanddelicious
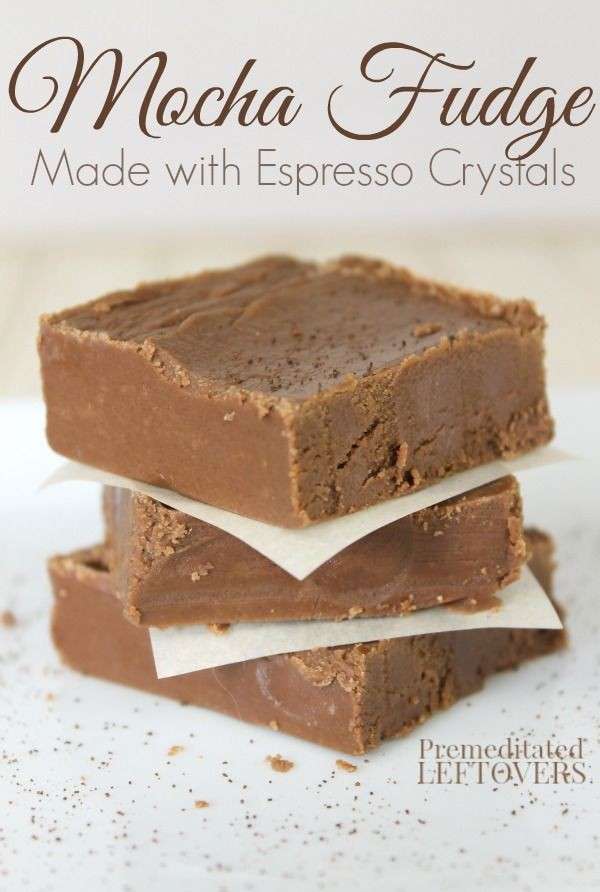
Espresso Crystal Mocha Fudge: A Decadent Delight for Coffee and Chocolate Lovers
Prepare to embark on a journey of indulgence with our irresistible espresso crystal mocha fudge recipe. This delectable treat combines the bold flavors of espresso with the creamy richness of chocolate, resulting in a harmonious blend of sweetness and coffee intensity. Whether you're satisfying your sweet tooth or looking for the perfect homemade gift, this mocha fudge is sure to delight.
#### Ingredients:
- 3 cups semi-sweet chocolate chips
- 1 can (14 oz) sweetened condensed milk
- 2 tablespoons butter
- 2 tablespoons instant espresso crystals
- 1 teaspoon vanilla extract
#### Instructions:
1. Line an 8x8 inch baking dish with parchment paper, leaving some overhang for easy removal later.
2. In a microwave-safe bowl, combine the chocolate chips, sweetened condensed milk, and butter.
3. Microwave the mixture in 30-second intervals, stirring each time, until the chocolate is melted and the mixture is smooth.
4. Stir in the instant espresso crystals and vanilla extract until well combined.
5. Pour the mixture into the prepared baking dish and spread it evenly with a spatula.
6. Refrigerate the fudge for at least 2 hours, or until firm.
7. Once the fudge is set, use the parchment paper overhang to lift it out of the baking dish. Cut into squares and serve.
#### Tips for Success:
- For a stronger coffee flavor, you can increase the amount of instant espresso crystals to suit your taste.
- To enhance the texture of the fudge, you can add chopped nuts such as walnuts or pecans before refrigerating.
- Store the fudge in an airtight container in the refrigerator for up to two weeks.
#### Serving Suggestions:
- Enjoy a square of mocha fudge with a freshly brewed cup of coffee for the ultimate indulgent experience.
- Package the fudge in decorative boxes or bags to give as thoughtful homemade gifts for friends and family.
- Serve the fudge as a delightful dessert at parties or gatherings, and watch as guests rave about its irresistible flavor.
#### Conclusion:
With its rich chocolatey goodness and intense coffee flavor, our espresso crystal mocha fudge is a true delight for coffee and chocolate lovers alike. Whether you're treating yourself or sharing with others, this homemade fudge is sure to impress with its decadent taste and luxurious texture.
So why wait? Whip up a batch of this delicious mocha fudge today and savor every blissful bite!
#mochafudge #espressotreats #homemadefudge #dessertlovers #coffeedesserts #chocolatefudge #sweettreats #gourmetfudge #easyrecipes #bakingjoy
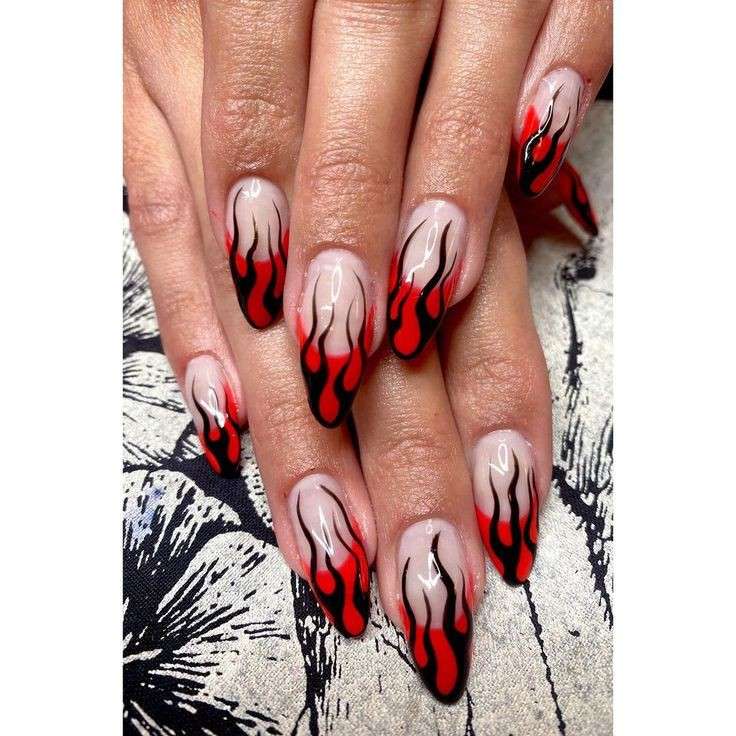
Stunning Nail Art Designs for Girls: Elevate Your Look with Beautiful Creations
Nail art has become a popular way to express individuality and style. Whether you prefer elegant minimalism or bold, intricate patterns, there's a design out there that will make your nails stand out. Here are some stunning nail art ideas that will elevate your look and showcase your unique personality.
#### 1. Classic French Tips with a Twist
The French manicure is a timeless choice, but adding a modern twist can make it more exciting. Try using different colors for the tips, like a soft pastel or a bold neon, instead of the traditional white.
#### 2. Elegant Minimalism
For a chic and sophisticated look, opt for minimalist designs. Simple lines, dots, and geometric shapes in neutral colors can create a refined and elegant appearance. A single accent nail with a delicate design can add a touch of uniqueness.
#### 3. Floral Patterns
Floral nail art is perfect for adding a touch of femininity and grace to your look. Whether you choose intricate hand-painted flowers or floral decals, these designs can brighten up your nails and make them stand out.
#### 4. Marble Effect
The marble effect is a trendy design that mimics the natural swirls and patterns of marble stone. Using a combination of white, black, and grey polishes, you can create a sophisticated and stylish look that’s perfect for any occasion.
#### 5. Glitter and Glam
For those who love a bit of sparkle, glitter nail art is the way to go. From full glitter nails to subtle glitter accents, this design adds a touch of glamour and excitement. Metallic colors like gold, silver, and rose gold are particularly popular.
#### 6. Ombre Nails
Ombre nails feature a gradient effect that transitions from one color to another. This design is versatile and can be created using a variety of color combinations. It’s perfect for adding depth and dimension to your nails.
#### 7. Abstract Art
Abstract designs are all about creativity and self-expression. Using bold colors and unique shapes, you can create a one-of-a-kind look that reflects your artistic side. Think splashes of color, random lines, and unusual patterns.
#### 8. Animal Prints
Animal print nail art is a fun and edgy way to showcase your wild side. Leopard spots, zebra stripes, and snake patterns can be created using a variety of colors to match your personal style.
#### 9. Metallic Accents
Metallic accents add a futuristic and edgy touch to your nails. Whether it’s a full metallic nail, metallic tips, or small metallic details, this design is sure to make a bold statement.
#### 10. Seasonal Themes
Celebrate the seasons with themed nail art. Spring florals, summer fruits, autumn leaves, and winter snowflakes can add a festive and playful touch to your nails. These designs are perfect for getting into the holiday spirit.
#### 11. Negative Space
Negative space nail art uses the natural nail as part of the design. By leaving portions of the nail bare and incorporating patterns around the empty spaces, you can create a modern and edgy look.
#### 12. Matte Finish
Matte nail polish offers a sleek and contemporary alternative to traditional glossy finishes. Matte nails can be paired with shiny accents or intricate designs for a sophisticated and stylish look.
#### 13. Polka Dots
Polka dot nail art is playful and fun. Using different colors and sizes of dots, you can create a variety of looks from subtle to bold. This design is easy to achieve and perfect for adding a bit of whimsy to your nails.
#### 14. Geometric Patterns
Geometric patterns are trendy and versatile. Using lines, triangles, squares, and other shapes, you can create a modern and eye-catching design. Combining geometric patterns with bold colors can make a striking statement.
#### 15. Custom Nail Art
For a truly unique and personal touch, consider custom nail art. Whether it’s a favorite character, a meaningful symbol, or a custom design, personalized nail art allows you to express your individuality in a creative way.
### Conclusion
Nail art is a fantastic way to showcase your personality and enhance your overall look. From elegant and minimalistic designs to bold and intricate patterns, these stunning nail art ideas offer something for every style. Get creative, have fun, and let your nails be the ultimate accessory that completes your look.
#nailartdesigns #stunningnails #nailinspiration #beautifulnails #nailtrends #elegantnailart #boldnaildesigns #nailfashion #glamnails #creativenailart
Ultimate Baby Boomer Travel: 15 Bucket List Ideas for Unforgettable Adventures
Retirement and the golden years offer the perfect opportunity to explore the world and tick off those long-awaited travel dreams. Whether you seek relaxation or adventure, these 15 bucket list ideas are tailored for baby boomers looking to create unforgettable memories. From serene beach getaways to thrilling expeditions, there's something for everyone.
#### 1. Explore the Wonders of Machu Picchu, Peru
Embark on a journey to the ancient Incan city of Machu Picchu. Nestled high in the Andes Mountains, this UNESCO World Heritage site offers breathtaking views and a glimpse into a fascinating historical civilization.
#### 2. Cruise the Mediterranean
A Mediterranean cruise provides a luxurious and leisurely way to explore Europe. Visit iconic destinations like Barcelona, Rome, and Athens while enjoying the comfort and convenience of a cruise ship.
#### 3. Discover the Magic of New Zealand
New Zealand's stunning landscapes offer endless opportunities for adventure. From exploring the fjords of Milford Sound to visiting the Hobbiton movie set, this country is a traveler's paradise.
#### 4. Experience the Northern Lights in Iceland
Witnessing the Northern Lights is a once-in-a-lifetime experience. Iceland's dramatic landscapes and geothermal wonders provide the perfect backdrop for this natural light show.
#### 5. Take a Safari in Kenya
Immerse yourself in the wild beauty of Kenya's national parks. A safari offers the chance to see the "Big Five" – lions, elephants, rhinos, leopards, and buffalo – in their natural habitat.
#### 6. Visit the Great Wall of China
Walk along the ancient Great Wall of China and marvel at one of the world's greatest engineering feats. The wall stretches over 13,000 miles and offers spectacular views of the surrounding countryside.
#### 7. Relax on the Beaches of Hawaii
Hawaii's pristine beaches and crystal-clear waters are perfect for a relaxing getaway. Enjoy activities like snorkeling, hiking, and exploring volcanic landscapes on these idyllic islands.
#### 8. Explore the National Parks of the USA
From the Grand Canyon to Yellowstone, America's national parks are home to some of the most breathtaking natural scenery in the world. Take a road trip and discover the diverse landscapes and wildlife.
#### 9. Discover the Culture of Japan
Japan seamlessly blends ancient traditions with modern innovation. Visit historical temples in Kyoto, experience the bustling streets of Tokyo, and soak in the natural beauty of Mount Fuji.
#### 10. Journey Through the Canadian Rockies
The Canadian Rockies offer stunning mountain scenery, pristine lakes, and abundant wildlife. Take a scenic train ride through this majestic landscape and experience the beauty of Banff and Jasper National Parks.
#### 11. Explore the Pyramids of Egypt
Step back in time and explore the ancient pyramids and temples of Egypt. The Great Pyramid of Giza, the Sphinx, and the Valley of the Kings are just a few of the historical treasures awaiting discovery.
#### 12. Take a River Cruise on the Danube
A river cruise on the Danube offers a relaxed and scenic way to explore Europe. Visit charming towns and historic cities such as Vienna, Budapest, and Prague along the way.
#### 13. Experience the Galápagos Islands
The Galápagos Islands are a haven for wildlife enthusiasts. Discover unique species of animals and plants, many of which are found nowhere else on Earth, in this isolated and pristine archipelago.
#### 14. Visit the Amalfi Coast, Italy
The Amalfi Coast is renowned for its picturesque coastal towns, dramatic cliffs, and crystal-clear waters. Enjoy the local cuisine, visit historic sites, and take in the stunning views.
#### 15. Explore the Historic Sites of Greece
Greece is home to some of the most significant historical sites in the world. Visit the Acropolis in Athens, the ancient city of Delphi, and the ruins of Olympia to immerse yourself in ancient history.
### Conclusion
The world is full of amazing destinations waiting to be explored. Whether you prefer cultural experiences, natural wonders, or leisurely cruises, these 15 bucket list ideas offer something for every baby boomer. So pack your bags, embrace the adventure, and make unforgettable memories on your travels.
#babyboomertravel #bucketlistadventures #travelinspiration #seniortravel #adventureawaits #travelgoals #exploretheworld #goldenyearstravel #traveldreams #wanderlust

Stunning Hairstyles for Girls: Transform Your Look with These Amazing Styles
Looking to switch up your hairstyle and turn heads wherever you go? Whether you're preparing for a special occasion or just want to feel fabulous in your everyday life, we've compiled a list of stunning hairstyles that will make you shine with confidence. From elegant updos and playful braids to chic bobs and glamorous waves, these styles are sure to elevate your hair game.
#### 1. Elegant Updos
Updos are a timeless choice for formal events and special occasions. They not only highlight your facial features but also add a touch of sophistication to your overall look. Consider these options:
- **Classic Chignon* This low bun is perfect for weddings or proms, exuding elegance and grace.
- **Messy Bun* A more relaxed version, the messy bun is great for casual outings while still looking effortlessly chic.
- **Braided Updo* Incorporating braids into your updo adds texture and intrigue, making it a standout choice.
#### 2. Playful Braids
Braids are versatile and can be adapted to suit any occasion, from casual days out to more formal settings. Here are some trendy braiding styles:
- **Fishtail Braid* This intricate style looks complex but is surprisingly easy to achieve. It's perfect for both everyday wear and special occasions.
- **Dutch Braids* These inside-out braids add a fun, youthful touch to your hairstyle. They can be worn as pigtails or merged into a single braid.
- **Waterfall Braid* Ideal for a romantic look, the waterfall braid allows your hair to flow freely while adding a touch of elegance.
#### 3. Chic Bobs
Short hair, don't care! The bob is a classic hairstyle that never goes out of fashion. It’s stylish, easy to manage, and works well with all hair types.
- **Blunt Bob* This cut is straight across and offers a bold, modern look that’s perfect for making a statement.
- **A-Line Bob* Longer in the front and shorter in the back, the A-line bob provides a flattering frame for the face.
- **Layered Bob* Adding layers to your bob creates movement and volume, giving a more dynamic appearance.
#### 4. Glamorous Waves
Wavy hair is the epitome of effortless beauty. Whether natural or styled, waves can add volume and texture to any hair type.
- **Beach Waves* Perfect for a laid-back, casual vibe, beach waves can be easily achieved with a curling wand or braiding damp hair overnight.
- **Hollywood Waves* For a more polished look, Hollywood waves are perfect for red carpet events and glamorous nights out.
- **Loose Waves* These soft, flowing waves offer a romantic and feminine touch, suitable for any occasion.
#### 5. Trendy Ponytails
Ponytails are not just for the gym. They can be dressed up or down, making them incredibly versatile.
- **High Ponytail* Sleek and chic, the high ponytail is a go-to for a polished, professional look.
- **Low Ponytail* Positioned at the nape of the neck, the low ponytail exudes elegance and sophistication.
- **Braided Ponytail* Adding a braid to your ponytail creates a unique, eye-catching style that stands out from the crowd.
### Conclusion
No matter your hair type or length, there's a stunning hairstyle out there for you. From elegant updos and playful braids to chic bobs and glamorous waves, these styles will not only enhance your beauty but also boost your confidence. Experiment with these looks and find the one that makes you feel amazing!
#hairstylegoals #stunninglooks #hairinspiration #glamhair #chicstyles #braidsandbuns #elegantupdos #gorgeouswaves #trendsetter #beautyinspiration