Good and Bad People Good and Bad People
    #technology #ai #body #seo #online
    tìm kiếm nâng cao
  • Đăng nhập

  • Chế độ ban ngày
  • © 2025 Good and Bad People
    Về • Danh mục • Liên hệ chúng tôi • Nhà phát triển • Chính sách bảo mật • Điều khoản sử dụng • Đền bù • Acceptable Use Policy • Community Guidelines • Affiliates Terms

    Lựa chọn Ngôn ngữ

  • Arabic
  • Bengali
  • Chinese
  • Croatian
  • Danish
  • Dutch
  • English
  • Filipino
  • French
  • German
  • Hebrew
  • Hindi
  • Indonesian
  • Italian
  • Japanese
  • Korean
  • Persian
  • Portuguese
  • Russian
  • Spanish
  • Swedish
  • Turkish
  • Urdu
  • Vietnamese

Đồng hồ

Đồng hồ cuộn phim

Sự kiện

Duyệt qua các sự kiện Sự kiện của tôi

Blog

Duyệt các bài báo

Thị trường

Sản phẩm mới nhất

Các trang

Trang của tôi Các trang được yêu thích

Hơn

Khám phá Bài viết phổ biến Việc làm Ưu đãi Kinh phí
cuộn phim Đồng hồ Sự kiện Thị trường Blog Trang của tôi Nhìn thấy tất cả
Ivys Glow Pins
User Image
Kéo để định vị lại trang bìa
Ivys Glow Pins

Ivys Glow Pins

@IvysGlowPins
  • Mốc thời gian
  • Các nhóm
  • Thích
  • Tiếp theo 50
  • Người theo dõi 42
  • Hình ảnh
  • Video
  • cuộn phim
  • Các sản phẩm
50 Tiếp theo
42 Người theo dõi
247 bài viết
Giống cái
Sống ở United States
image
image
image
image
image
image
Ivys Glow Pins
Ivys Glow Pins
39 Trong ·Dịch

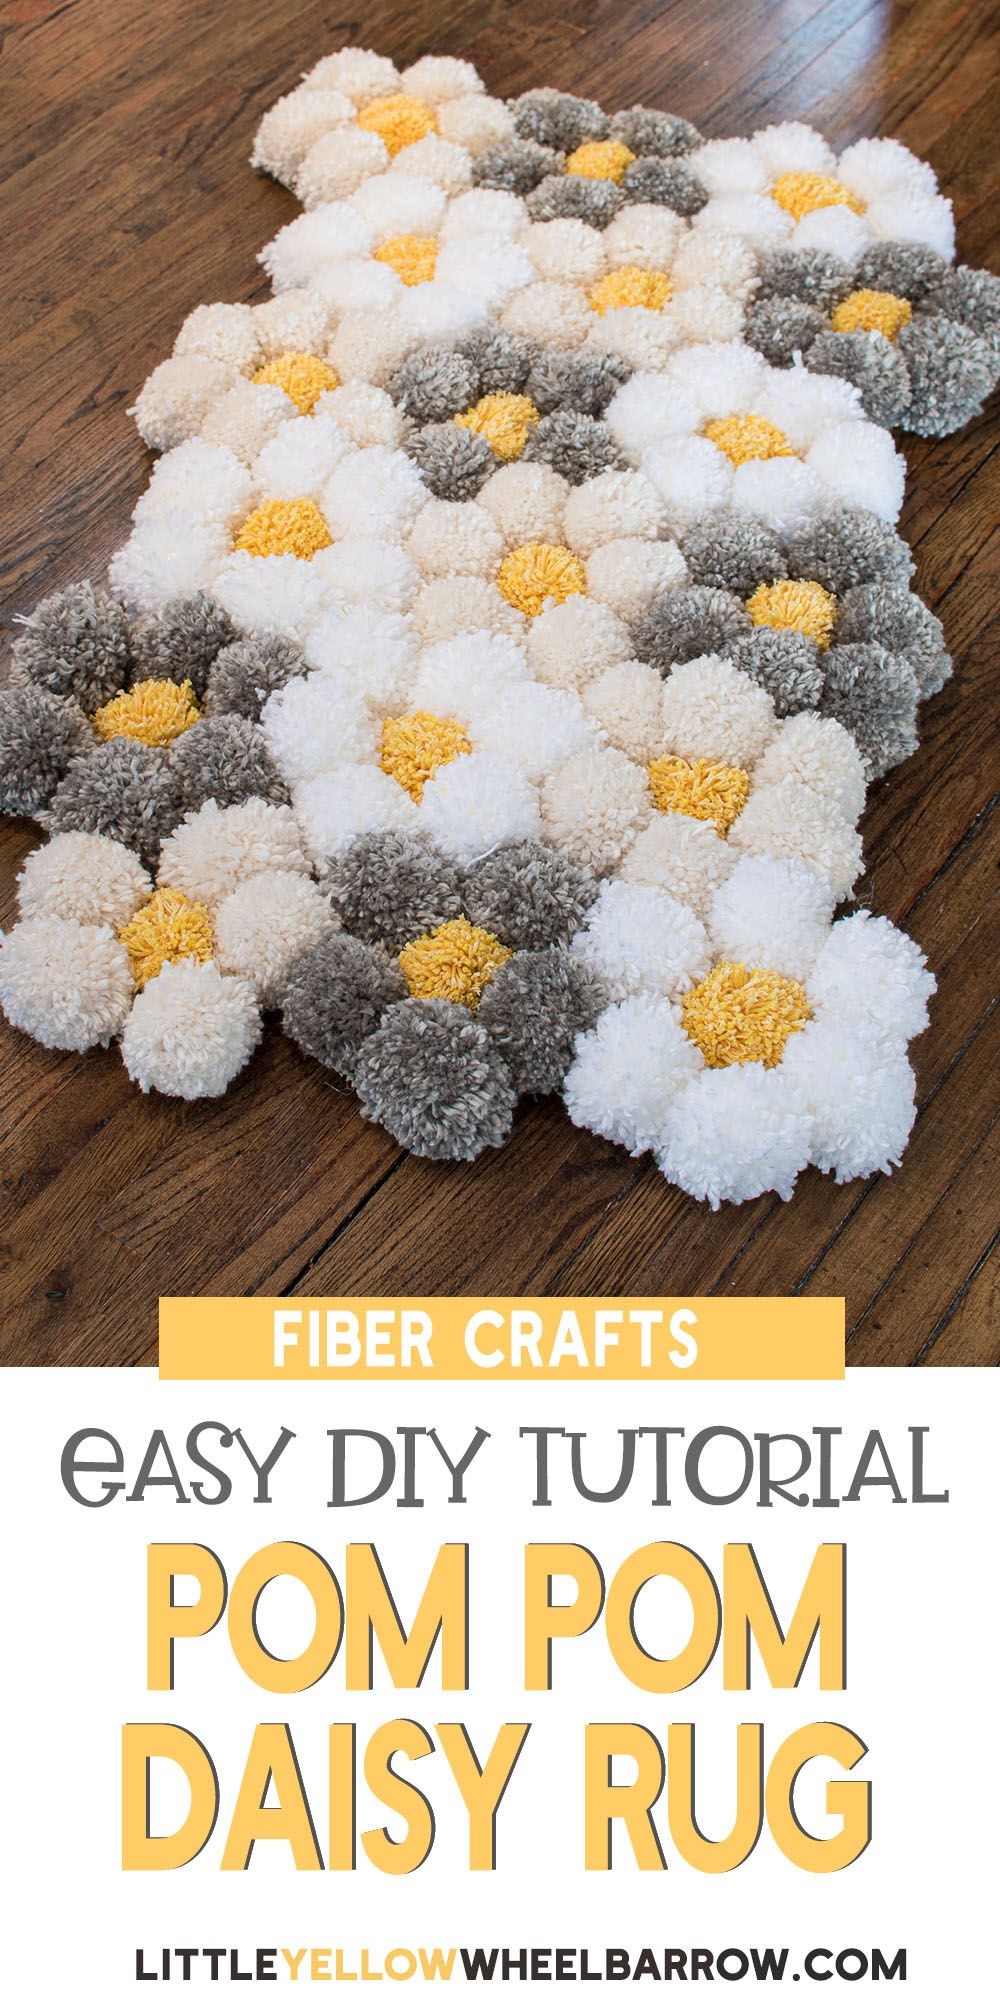
Transform Your Space: DIY Homemade Yarn Pom-Pom Rug That's Totally Trending

Looking to add a pop of personality and coziness to your home decor? A DIY homemade yarn pom-pom rug might be just what you need! This trendy, handcrafted rug is not only a fun project but also a stylish addition to any room. Whether you’re a seasoned crafter or a DIY novice, creating your own pom-pom rug is a satisfying and rewarding experience. Let’s dive into how you can transform your space with this charming and customizable rug!

## Why Choose a Yarn Pom-Pom Rug?

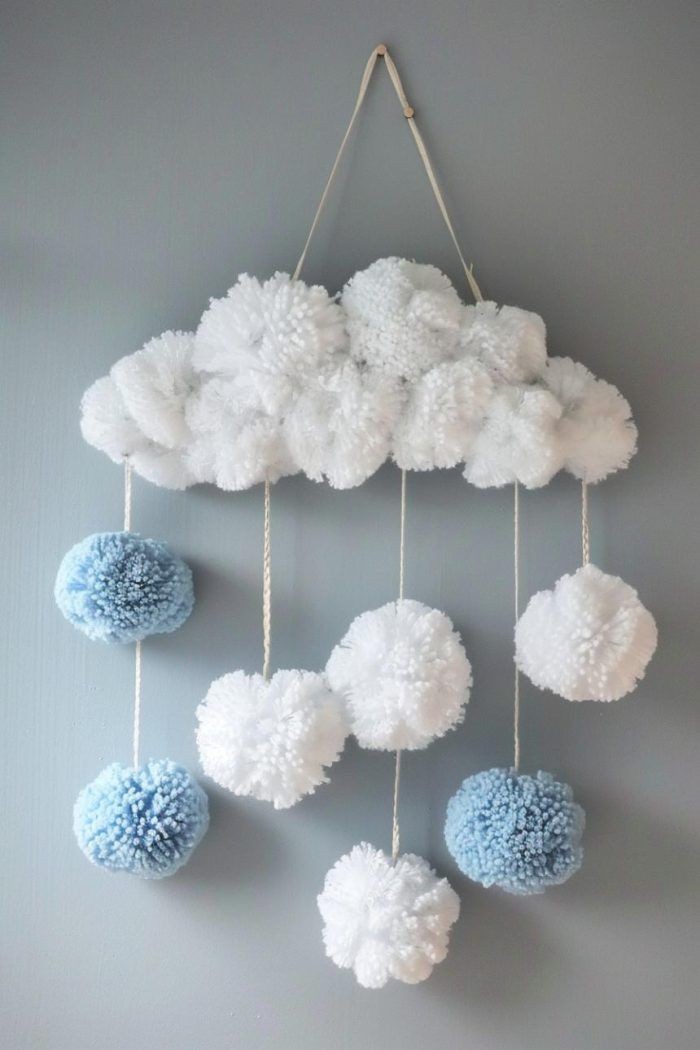
**Unique Style* Pom-pom rugs bring a playful and whimsical touch to your home decor. With their fluffy texture and vibrant colors, they can become a standout piece in any room.

**Personalization* You can customize the colors, sizes, and patterns of your pom-pom rug to perfectly match your style and space. Whether you prefer a bold, bright design or a more subtle, neutral look, the choices are endless.

**Craftsmanship* Making a pom-pom rug is a rewarding craft project that allows you to create something beautiful with your own hands. Plus, it’s a great way to relax and unwind while working on a creative project.

## Materials You'll Need

1. **Yarn* Choose your favorite yarn colors and textures. You’ll need several skeins of yarn to make enough pom-poms for your rug.

2. **Pom-Pom Maker* A pom-pom maker tool makes it easy to create evenly sized pom-poms. Alternatively, you can use cardboard circles to make pom-poms by hand.

3. **Rug Base* You can use a pre-made rug base or make your own by cutting a piece of fabric or burlap to the desired size.

4. **Scissors* Sharp scissors are essential for trimming your pom-poms to the desired fluffiness.

5. **Hot Glue Gun* A hot glue gun is useful for attaching the pom-poms to your rug base. Make sure to have plenty of glue sticks on hand.

6. **Ruler and Marker (Optional)* Use a ruler and marker to plan your pom-pom layout if you want a specific pattern or design.

## Steps to Create Your Yarn Pom-Pom Rug

### 1. **Prepare Your Yarn**

Choose your yarn colors and textures based on your design vision. For a vibrant rug, select a variety of bright colors. For a more subdued look, stick to neutral shades.

### 2. **Make Your Pom-Poms**

Using a pom-pom maker or cardboard circles, create your pom-poms:

- **Using a Pom-Pom Maker* Follow the instructions provided with your pom-pom maker. Generally, you’ll wrap yarn around the tool, secure it, and cut the loops to create fluffy pom-poms.

- **Using Cardboard Circles* Cut two circles of cardboard with a small hole in the center. Place the yarn between the circles, wrap it around, and then tie off the center. Cut the outer edges to create pom-poms.

### 3. **Trim and Fluff**

Once you’ve made your pom-poms, trim them to ensure they are even and fluffy. Use sharp scissors to cut any uneven areas and fluff up the pom-poms for a full, rounded look.

### 4. **Prepare Your Rug Base**

If you’re using a pre-made rug base, lay it flat on your work surface. If you’re making your own base, cut your fabric or burlap to the desired size and shape of your rug.

### 5. **Arrange Your Pom-Poms**

Before gluing, arrange your pom-poms on the rug base to plan your design. You can create a random, colorful pattern or a more structured design based on your preferences.

### 6. **Attach the Pom-Poms**

Using a hot glue gun, start attaching your pom-poms to the rug base. Apply glue to the center of each pom-pom and press it firmly onto the base. Continue adding pom-poms until the entire base is covered.

### 7. **Let It Dry**

Allow the glue to dry completely before using your new rug. This ensures that all the pom-poms are securely attached and won’t come loose.

### 8. **Add the Finishing Touches**

Once the glue is dry, you can give your rug a final trim if needed. Check for any uneven areas and adjust the pom-poms as necessary.

## Tips for Success

- **Be Patient* Making a pom-pom rug takes time and patience. Don’t rush the process, and take breaks if needed.

- **Experiment with Textures* Try using different types of yarn, such as chunky or fluffy yarn, to add texture to your rug.

- **Mix and Match Colors* Play with color combinations to create a dynamic and eye-catching rug.

## Caring for Your Pom-Pom Rug

To keep your pom-pom rug looking its best:

- **Vacuum Regularly* Gently vacuum the rug to remove dust and debris.

- **Spot Clean* If spills occur, spot clean with a damp cloth and mild detergent. Avoid soaking the rug.

- **Avoid High Traffic Areas* Consider placing your rug in low-traffic areas to prevent excessive wear.

## Final Thoughts

A DIY yarn pom-pom rug is more than just a home decor item; it’s a creative expression and a fun project that can transform any space. With its vibrant colors, fluffy texture, and personalized design, this rug is sure to bring joy and style to your home. So gather your materials, unleash your creativity, and enjoy the process of crafting your own adorable pom-pom rug!

Happy crafting!

image
Giống
Bình luận
Đăng lại
Ivys Glow Pins
Ivys Glow Pins
39 Trong ·Dịch

50+ Adorable Crafts and DIY Projects for Teens and Adults: Must-Try Ideas to Spark Your Creativity

Crafting isn’t just for kids! Whether you’re a teen looking for fun projects to do with friends or an adult wanting to unleash your creative side, these 50+ adorable crafts and DIY projects are perfect for all ages. From home decor to personalized gifts, these ideas will not only spark your creativity but also add a unique touch to your everyday life. Grab your supplies and get ready to create something amazing!

## 1. **Hand-Painted Mugs**

Transform plain mugs into personalized masterpieces with a bit of paint. Use ceramic markers or acrylic paints to design your own patterns, quotes, or images.

### Tip:

- Bake the mugs in the oven to set the paint and make them dishwasher safe.

## 2. **DIY Macrame Wall Hanging**

Create a stunning wall hanging using macrame techniques. This craft adds a bohemian flair to any room and is surprisingly easy to make with just a few knots.

### Tip:

- Choose neutral colors or pastels for a modern look.

## 3. **Personalized Phone Cases**

Design your own phone case by adding stickers, paint, or fabric. Personalize it with your initials, favorite patterns, or designs that reflect your style.

### Tip:

- Use a clear case to showcase your design while keeping your phone protected.

## 4. **Decorative Picture Frames**

Give old picture frames a makeover by adding paint, fabric, or decorative elements. These frames make great gifts and can match any decor style.

### Tip:

- Use washi tape or glitter for an extra touch of sparkle.

## 5. **Handmade Jewelry**

Create custom jewelry pieces like necklaces, bracelets, and earrings. Use beads, charms, and wires to craft unique accessories that complement your wardrobe.

### Tip:

- Experiment with different styles, from minimalist to boho.

## 6. **Custom Tote Bags**

Design your own tote bags using fabric paint, iron-on transfers, or embroidery. This project is perfect for carrying books, groceries, or beach essentials.

### Tip:

- Choose a sturdy fabric for durability.

## 7. **DIY Candle Making**

Make your own candles with personalized scents and colors. This craft is not only fun but also results in beautiful, custom candles for your home or as gifts.

### Tip:

- Use essential oils for a natural fragrance and add colorants for a unique look.

## 8. **Upcycled Furniture**

Give old furniture a new lease on life with paint, new hardware, or fabric. Transform chairs, tables, and dressers into stylish statement pieces.

### Tip:

- Sand and prime furniture before painting for a smooth finish.

## 9. **Customized T-Shirts**

Design your own T-shirts with fabric paint, tie-dye, or iron-on transfers. Create designs that express your personality or make matching shirts for a group event.

### Tip:

- Use high-quality fabric paint for vibrant, lasting colors.

## 10. **Scrapbook Albums**

Create a personalized scrapbook to preserve memories. Add photos, tickets, and mementos with decorative papers, stickers, and embellishments.

### Tip:

- Use acid-free paper and adhesives to protect your photos.

## 11. **Decorative Plant Pots**

Decorate plain plant pots with paint, washi tape, or decoupage. This craft is perfect for adding a touch of style to your indoor or outdoor plants.

### Tip:

- Seal your painted pots with a clear coat to protect them from the elements.

## 12. **Personalized Keychains**

Make custom keychains with resin, beads, or charms. These small projects are great for gifts or to add a personal touch to your keys.

### Tip:

- Use a keychain ring that matches your design style.

## 13. **Handmade Greeting Cards**

Design your own greeting cards for any occasion. Use stamps, markers, or scrapbook paper to create beautiful cards that stand out.

### Tip:

- Add personal messages or small embellishments for an extra special touch.

## 14. **DIY Bath Bombs**

Create relaxing bath bombs with essential oils and colorful additives. These are perfect for a spa day at home or as thoughtful gifts.

### Tip:

- Store bath bombs in airtight containers to keep them fresh and fizzy.

## 15. **Handcrafted Quilts**

Sew your own quilts using fabric scraps or pre-cut squares. This project is perfect for creating cozy blankets or personalized gifts.

### Tip:

- Choose fabrics with complementary colors for a cohesive look.

## 16. **Personalized Mugs with Vinyl**

Use vinyl decals to personalize mugs with names, quotes, or designs. This method is easy and results in a sleek, professional-looking product.

### Tip:

- Use a heat press or iron to ensure the vinyl adheres properly.

## 17. **Macrame Plant Hangers**

Create stylish plant hangers using macrame techniques. These hangers are perfect for displaying your favorite plants and adding a touch of boho charm.

### Tip:

- Experiment with different knotting patterns for a unique look.

## 18. **Customized Pillow Covers**

Design your own pillow covers with fabric paint, iron-on transfers, or embroidery. These DIY pillow covers add a personalized touch to your home decor.

### Tip:

- Choose fabrics that are easy to wash and care for.

## 19. **DIY Bath Salts**

Mix your own bath salts with essential oils and dried herbs. This craft is perfect for creating relaxing, aromatic baths or as gifts for loved ones.

### Tip:

- Use a variety of scents and colors to customize your bath salts.

## 20. **Handmade Coasters**

Make coasters with cork, tile, or fabric. Decorate them with paint, decoupage, or fabric for a functional and stylish addition to your home.

### Tip:

- Seal coasters with a waterproof finish to protect against spills.

## 21. **Embroidered Hoop Art**

Create beautiful wall art using embroidery hoops and fabric. Stitch designs, quotes, or patterns for a charming, handcrafted look.

### Tip:

- Use contrasting thread colors for a standout design.

## 22. **DIY Candle Holders**

Craft unique candle holders using materials like glass jars, clay, or wood. Decorate with paint, beads, or fabric for a personalized touch.

### Tip:

- Ensure your candle holders are heat-resistant and safe for use.

## 23. **Personalized Aprons**

Design your own aprons with fabric paint, embroidery, or iron-on transfers. Perfect for cooking, crafting, or as gifts for friends and family.

### Tip:

- Choose durable fabrics that can withstand frequent washing.

## 24. **DIY Jewelry Holders**

Create your own jewelry holders using materials like wire, wood, or fabric. Organize your accessories in style with these functional and decorative pieces.

### Tip:

- Customize with hooks, trays, or compartments to suit your needs.

## 25. **Handcrafted Bookmarks**

Design unique bookmarks using cardstock, washi tape, or fabric. Add decorative elements like tassels or charms for a personalized touch.

### Tip:

- Laminate bookmarks for added durability.

## 26. **Customized Tote Bags**

Create stylish tote bags with fabric paint, iron-on transfers, or embroidery. Perfect for carrying groceries, books, or beach essentials.

### Tip:

- Use high-quality fabric paint for a long-lasting design.

## 27. **DIY Bathrobes**

Sew your own bathrobe with soft, cozy fabric. Personalize with embroidery or fabric paint for a luxurious and unique addition to your loungewear.

### Tip:

- Choose absorbent fabric for maximum comfort.

## 28. **Personalized Wall Art**

Design custom wall art with your favorite quotes, patterns, or images. Use canvas, wood, or framed prints to showcase your artwork.

### Tip:

- Use a high-resolution image for crisp and clear prints.

## 29. **DIY Wall Decals**

Create your own wall decals using vinyl or fabric. Cut out shapes, quotes, or designs to decorate your walls without the commitment of paint.

### Tip:

- Use removable vinyl for easy application and removal.

## 30. **Handmade Journals**

Craft your own journals with decorative covers and personalized pages. Perfect for note-taking, journaling, or as gifts.

### Tip:

- Use a sturdy binding method to keep pages secure.

## 31. **Customized Phone Stands**

Design functional phone stands using materials like wood, acrylic, or clay. Personalize with paint or decals for a stylish and practical accessory.

### Tip:

- Ensure the stand is stable and can support your phone securely.

## 32. **DIY Flower Arrangements**

Create beautiful flower arrangements using fresh or artificial blooms. Design custom arrangements for your home or as gifts for special occasions.

### Tip:

- Use a variety of flowers and greenery for a full, vibrant arrangement.

## 33. **Handcrafted Dream Catchers**

Make your own dream catchers with hoops, feathers, and beads. Customize with colors and designs to match your bedroom decor.

### Tip:

- Use strong thread to ensure the web is securely woven.

image
Giống
Bình luận
Đăng lại
Ivys Glow Pins
Ivys Glow Pins
39 Trong ·Dịch

35 Pom-Pom Craft Ideas That Will Totally Wow You: Fun Projects for Every Occasion

Pom-poms are the ultimate crafting accessory: fun, versatile, and incredibly easy to make! From adding a playful touch to your home decor to creating unique gifts, pom-poms can transform any project into a standout creation. Whether you're a seasoned crafter or just getting started, these 35 pom-pom craft ideas will inspire you to get creative and add a splash of color to your life.

## 1. **Pom-Pom Wall Art**

Create a vibrant piece of wall art using pom-poms in various colors and sizes. Arrange them into fun shapes or patterns on a canvas or framed board for a striking visual display.

### Tip:

- Use a hot glue gun to secure the pom-poms in place.

## 2. **Pom-Pom Keychains**

Add a fun and fluffy pom-pom to your keys or bag. Customize your keychains by using different colors and sizes to match your style.

### Tip:

- Attach pom-poms to key rings or clips for easy customization.

## 3. **Pom-Pom Garlands**

Decorate your space with colorful pom-pom garlands. Perfect for parties, holidays, or just adding a cheerful touch to any room.

### Tip:

- String pom-poms together using needle and thread or a thin rope.

## 4. **Pom-Pom Cushion Covers**

Give your cushions a makeover with pom-pom trim. Sew pom-poms onto the edges of a cushion cover for a playful and cozy touch.

### Tip:

- Use contrasting colors to make the pom-poms pop against the cushion fabric.

## 5. **Pom-Pom Christmas Ornaments**

Craft unique Christmas ornaments by gluing pom-poms onto felt shapes or wire forms. They add a whimsical touch to your holiday decor.

### Tip:

- Add a ribbon loop for hanging on the tree.

## 6. **Pom-Pom Bookmark**

Make reading more fun with a pom-pom bookmark. Attach a fluffy pom-pom to a decorative bookmark for a practical and cute accessory.

### Tip:

- Use a sturdy cardstock for the bookmark base to ensure durability.

## 7. **Pom-Pom Phone Case**

Personalize your phone case with a pom-pom decoration. Glue or sew pom-poms onto the case for a trendy, tactile addition.

### Tip:

- Opt for small pom-poms to avoid covering important features like buttons or cameras.

## 8. **Pom-Pom Wreath**

Craft a stunning wreath for any season using pom-poms. Arrange them in a circular pattern on a wreath form for a cheerful, eye-catching decoration.

### Tip:

- Combine different shades and textures of pom-poms for a dynamic look.

## 9. **Pom-Pom Bunting**

Create festive bunting for parties or celebrations by attaching pom-poms to string or ribbon. This simple decoration adds a splash of fun to any event.

### Tip:

- Mix and match colors to match the theme of your party.

## 10. **Pom-Pom Hair Accessories**

Make cute hair clips or headbands by adding pom-poms to hair accessories. They're perfect for adding a touch of fun to your hairstyle.

### Tip:

- Secure the pom-poms with a strong adhesive to ensure they stay in place.

## 11. **Pom-Pom Coasters**

Add a touch of whimsy to your coffee table with pom-pom coasters. Glue pom-poms onto cork or felt bases for a playful and functional decoration.

### Tip:

- Choose colors that complement your home decor.

## 12. **Pom-Pom Brooches**

Design custom brooches by attaching pom-poms to pin backs. These make great accessories for jackets, bags, or hats.

### Tip:

- Combine pom-poms with other embellishments like beads or sequins for added flair.

## 13. **Pom-Pom Gift Wrap**

Give your gifts a personal touch with pom-pom decorations. Attach pom-poms to gift wrap or tags for an extra special presentation.

### Tip:

- Match the pom-pom colors to the wrapping paper for a cohesive look.

## 14. **Pom-Pom Curtain Tiebacks**

Add charm to your curtains with pom-pom tiebacks. Simply attach pom-poms to a ribbon or fabric tieback for a playful detail.

### Tip:

- Choose colors that coordinate with your curtain fabric.

## 15. **Pom-Pom Place Settings**

Make your dining table more festive with pom-pom place settings. Attach pom-poms to napkin rings or place cards for a fun and creative touch.

### Tip:

- Use seasonal colors for special occasions like holidays or birthdays.

## 16. **Pom-Pom Rugs**

Create a cozy and colorful rug by sewing pom-poms onto a base fabric. This DIY project adds a fun and unique element to any room.

### Tip:

- Choose a durable fabric base for long-lasting use.

## 17. **Pom-Pom Baskets**

Decorate baskets with pom-poms for a whimsical storage solution. Glue or sew pom-poms onto the basket’s exterior for a charming look.

### Tip:

- Use baskets in different sizes and shapes for varied storage options.

## 18. **Pom-Pom Magnets**

Turn your refrigerator or other metal surfaces into a canvas for pom-pom art. Create fun magnets by attaching pom-poms to magnetic bases.

### Tip:

- Customize with different colors and sizes to match your kitchen decor.

## 19. **Pom-Pom Placemats**

Craft unique placemats by gluing pom-poms onto felt or fabric bases. These add a playful touch to your dining table.

### Tip:

- Wash and care for your placemats to keep them looking fresh.

## 20. **Pom-Pom Christmas Tree Toppers**

Create a festive Christmas tree topper with pom-poms. Attach a large pom-pom or a cluster of smaller ones to a tree topper base for a cheerful holiday look.

### Tip:

- Combine with other Christmas decorations for a complete festive display.

## 21. **Pom-Pom Picture Frames**

Give your photo frames a makeover by adding pom-pom embellishments. Glue pom-poms around the edges of a frame for a fun and colorful touch.

### Tip:

- Use pom-poms in coordinating colors to match your photos or decor.

## 22. **Pom-Pom Party Hats**

Make party hats extra special with pom-pom decorations. Attach pom-poms to the top of paper or felt party hats for a festive look.

### Tip:

- Add glitter or other embellishments for added sparkle.

## 23. **Pom-Pom Animal Toys**

Craft adorable animal toys by combining pom-poms with other craft materials. Create animals like bunnies or bears with fluffy pom-pom bodies.

### Tip:

- Use different sizes and colors of pom-poms for various animal features.

## 24. **Pom-Pom Pompom Balls**

Make a fun, bouncy toy by stringing together multiple pom-poms. These pom-pom balls are great for playtime or as stress relievers.

### Tip:

- Use a sturdy string or cord to keep the pom-poms securely attached.

## 25. **Pom-Pom Garden Markers**

Add a touch of whimsy to your garden with pom-pom garden markers. Attach pom-poms to sticks or stakes and label them with plant names.

### Tip:

- Use waterproof markers to ensure the labels last.

## 26. **Pom-Pom Pillow Covers**

Upgrade your pillows with pom-pom trim or designs. Sew pom-poms onto pillow covers for a fun and fluffy addition.

### Tip:

- Choose pom-pom colors that complement your existing decor.

## 27. **Pom-Pom Wall Hangers**

Create unique wall hangings with pom-poms. Arrange them in a pattern or shape on a dowel or branch for an eye-catching decor piece.

### Tip:

- Combine pom-poms with other materials like beads or feathers.

## 28. **Pom-Pom Purses**

Add a playful touch to your purses by attaching pom-poms. Whether you make a pom-pom clutch or decorate an existing bag, this accessory will stand out.

### Tip:

- Use different sizes and colors to create a fun, layered effect.

## 29. **Pom-Pom Keychains**

Make adorable keychains by attaching pom-poms to key rings. Customize with different colors and sizes to match your style.

### Tip:

- Add charms or small decorations to enhance your keychains.

## 30. **Pom-Pom Baby Mobile**

Craft a whimsical baby mobile with pom-poms. Hang them from a circular frame or hoop for a charming and playful nursery decoration.

### Tip:

- Use soft, pastel colors for a soothing look.

## 31. **Pom-Pom Bookmarks**

Make reading more enjoyable with pom-pom bookmarks. Attach a fluffy pom-pom to the end of a bookmark for a cute and functional accessory.

### Tip:

- Personalize with colors and patterns that reflect your style.

## 32. **Pom-Pom Garland for Special Occasions**

Celebrate special occasions with a pom-pom garland. Whether it’s a birthday, graduation, or holiday, this garland adds a festive touch to any event.

### Tip:

- Match pom-pom colors to the theme of your celebration.

## 33. **Pom-Pom Flower Bouquets**

Create colorful and long-lasting flower bouquets using pom-poms. Arrange them in a vase or bouquet for a vibrant floral display.

### Tip:

- Combine with faux leaves and stems for a realistic look.

## 34. **Pom-Pom Apron**

Add a touch of fun to your kitchen with a pom-pom apron. Sew pom-poms onto the edges or pockets of your apron for a playful cooking accessory.

### Tip:

- Choose pom-pom colors that match your kitchen decor.

## 35. **Pom-Pom Dream

image
Giống
Bình luận
Đăng lại
Ivys Glow Pins
Ivys Glow Pins
39 Trong ·Dịch

Earn Extra Cash While Having a Blast: 10 Fun Hobbies You Can Do at Home

In today’s fast-paced world, finding ways to make extra money while doing something you love is a win-win. Fortunately, many hobbies not only offer personal satisfaction and enjoyment but also the potential to generate extra income. Whether you’re looking to monetize a passion or just want to explore new interests, here are ten fun hobbies you can do at home that can help you earn extra cash.

## 1. **Crafting and Selling Handmade Goods**

Crafting can be a therapeutic and rewarding hobby, and with platforms like Etsy and local craft fairs, you can turn your creations into cash. Consider making jewelry, candles, or home decor items. Personalized and unique crafts often have a high demand, allowing you to set your own prices and reach a wide audience.

### Tips:

- Focus on quality and originality.

- Take high-quality photos of your products for online listings.

- Promote your items on social media.

## 2. **Freelance Writing and Blogging**

If you have a way with words, freelance writing or blogging might be the perfect hobby for you. Many businesses and websites are looking for content creators who can write articles, blog posts, or marketing materials. Start your own blog on a topic you’re passionate about and monetize it through ads, affiliate marketing, or sponsored posts.

### Tips:

- Choose a niche that interests you and has a market demand.

- Build a portfolio of writing samples.

- Use SEO techniques to increase your blog’s visibility.

## 3. **Online Tutoring or Teaching**

If you have expertise in a particular subject, consider offering online tutoring or teaching. With platforms like Tutor.com and Teachable, you can create courses or provide one-on-one sessions in subjects ranging from math to music. This is a great way to share your knowledge and make money from home.

### Tips:

- Identify subjects you’re skilled in and passionate about.

- Create engaging and informative lesson plans.

- Use video conferencing tools to interact with students.

## 4. **Graphic Design and Digital Art**

Graphic design and digital art are in high demand, especially with the growing need for online content. If you have skills in Photoshop, Illustrator, or other design software, you can offer your services for logo design, social media graphics, or digital illustrations. Websites like Fiverr and Upwork are great platforms to find clients.

### Tips:

- Build a strong portfolio showcasing your best work.

- Offer a range of services to attract different types of clients.

- Stay updated with design trends to keep your work relevant.

## 5. **Photography and Stock Photos**

If you have a passion for photography, you can monetize your skills by selling stock photos. Websites like Shutterstock and Adobe Stock allow you to upload your images and earn royalties each time they’re downloaded. You can also offer portrait or event photography services locally.

### Tips:

- Invest in quality equipment and editing software.

- Focus on high-demand themes and subjects.

- Ensure your photos meet the technical requirements of stock photo sites.

## 6. **Baking and Cooking**

For those who enjoy spending time in the kitchen, baking and cooking can be both fun and profitable. Consider starting a small baking business, offering custom cakes, cookies, or other treats. You can also provide meal prep services or cooking classes, depending on your skills and interests.

### Tips:

- Develop a unique selling point, such as specialty flavors or dietary options.

- Promote your offerings through social media and local community groups.

- Ensure you comply with local food safety regulations.

## 7. **Pet Sitting and Dog Walking**

If you’re an animal lover, pet sitting and dog walking can be a great way to earn extra cash. Many pet owners are willing to pay for reliable care for their furry friends while they’re away. You can offer services through apps like Rover or create your own business.

### Tips:

- Get certified in pet first aid to increase your credibility.

- Build strong relationships with clients by being reliable and attentive.

- Offer additional services, such as pet grooming or training, to attract more clients.

## 8. **Virtual Assistant Services**

Virtual assistants help businesses with administrative tasks such as email management, scheduling, and customer service. If you’re organized and detail-oriented, you can offer virtual assistant services from the comfort of your home. Platforms like Belay and Time Etc. connect virtual assistants with clients.

### Tips:

- Identify your strengths and the services you can offer.

- Create a professional website or profile to showcase your skills.

- Network with small business owners and entrepreneurs.

## 9. **Music Lessons and Production**

If you’re musically inclined, consider offering music lessons or production services. You can teach instruments, vocal techniques, or music theory online. Alternatively, you can offer music production services, such as mixing and mastering tracks for aspiring artists.

### Tips:

- Build a portfolio of your work and testimonials from students or clients.

- Use online platforms for video lessons and live sessions.

- Stay current with music trends and technology.

## 10. **DIY and Home Improvement Projects**

DIY and home improvement projects can be both enjoyable and profitable. You can create and sell home decor items, offer home renovation advice, or even start a YouTube channel showcasing DIY projects. Share your expertise and monetize through ads, sponsorships, or affiliate links.

### Tips:

- Focus on projects that are popular and in demand.

- Document your process and results to attract an audience.

- Collaborate with other DIY enthusiasts or brands for additional exposure.

## Conclusion

Finding a hobby that not only brings you joy but also helps you earn extra money is a fantastic way to balance your interests and financial goals. Whether you’re crafting, writing, teaching, or exploring new skills, there are countless opportunities to turn your passions into profit. So, pick a hobby that excites you, dive in, and start making extra cash while having a blast from the comfort of your home!

image
Giống
Bình luận
Đăng lại
Ivys Glow Pins
Ivys Glow Pins
39 Trong ·Dịch

4 Easy DIY Macrame Water Bottle Holders You Need to Try – Simple Tutorials by SilentKnot

In a world where practicality meets creativity, DIY projects like macrame water bottle holders stand out as both functional and stylish. Whether you're heading to the gym, going for a hike, or simply want to add a touch of handmade charm to your daily routine, these macrame water bottle holders are the perfect solution. Thanks to SilentKnot's simple tutorials, you can create these trendy accessories with ease. In this article, we’ll explore four easy DIY macrame water bottle holder projects that you need to try.

## What is Macrame?

Macrame is a form of textile art that uses knotting techniques to create decorative patterns and designs. Originating from ancient times, macrame has seen a resurgence in recent years, thanks to its versatility and unique aesthetic. Macrame projects can range from intricate wall hangings to functional items like plant hangers and water bottle holders.

## Why Make Your Own Macrame Water Bottle Holder?

Creating your own macrame water bottle holder offers several benefits:

### 1. **Customization**

When you make your own holder, you can choose the colors, patterns, and sizes that suit your personal style and needs. This ensures that your holder is unique and perfectly suited to your preferences.

### 2. **Eco-Friendly**

Using a handmade holder reduces your reliance on disposable or mass-produced products. By opting for a reusable macrame holder, you contribute to a more sustainable lifestyle.

### 3. **Cost-Effective**

DIY projects often come at a fraction of the cost of buying ready-made items. With a few basic supplies, you can create a stylish and functional accessory without breaking the bank.

### 4. **Fun and Rewarding**

Making your own macrame water bottle holder is a fun and rewarding craft project. It provides a creative outlet and a sense of accomplishment when you see your finished creation.

## 1. **Simple Knot Water Bottle Holder**

### Materials:

- Cotton macrame cord

- Scissors

- Measuring tape

### Instructions:

1. **Cut the Cord* Measure and cut four pieces of macrame cord, each about 3 feet long.

2. **Tie the Base Knots* Gather the cords together and tie a simple knot about 6 inches from the end. This will create the base of your holder.

3. **Create the Pattern* Use square knots or alternating half-hitches to create a pattern around the bottle. Ensure the holder has enough space to comfortably fit your water bottle.

4. **Finish and Adjust* Once you reach the top, tie a knot to secure the design. Trim any excess cord and adjust the holder to fit your bottle.

## 2. **Boho-Chic Macrame Holder**

### Materials:

- Jute or colored macrame cord

- Scissors

- Wooden ring

### Instructions:

1. **Prepare the Cord* Cut several pieces of cord, each about 4 feet long.

2. **Attach to the Ring* Fold the cords in half and attach them to a wooden ring using Lark’s Head knots.

3. **Create the Design* Use a combination of knots, such as square knots and spiral knots, to create a boho-chic pattern. Leave enough space for the water bottle to fit snugly.

4. **Secure and Trim* Tie off the top of the design and trim any excess cord. You can also add beads or tassels for extra flair.

## 3. **Geometric Macrame Holder**

### Materials:

- Colored or natural macrame cord

- Scissors

- Metal ring

### Instructions:

1. **Cut the Cord* Measure and cut six pieces of macrame cord, each about 4 feet long.

2. **Attach to the Ring* Fold the cords and attach them to a metal ring using Lark’s Head knots.

3. **Create the Geometric Pattern* Use a combination of square knots and diagonal knots to form a geometric pattern around the bottle.

4. **Finish and Adjust* Secure the top of the holder with a knot and trim any excess. Ensure the design supports the bottle securely.

## 4. **Minimalist Macrame Holder**

### Materials:

- Thin macrame cord

- Scissors

- Metal or wooden ring

### Instructions:

1. **Cut the Cord* Cut four pieces of thin macrame cord, each about 3 feet long.

2. **Attach to the Ring* Fold the cords in half and attach them to the ring using Lark’s Head knots.

3. **Create a Simple Design* Use basic knots, such as half-hitches, to create a minimalist design around the bottle. Keep the design clean and straightforward for a modern look.

4. **Secure and Trim* Tie off the top of the holder and trim any excess cord. Adjust the holder to fit your bottle snugly.

## Conclusion

Macrame water bottle holders are a delightful way to combine functionality with artistry. With these four easy DIY tutorials from SilentKnot, you can create stunning and practical holders that are perfect for everyday use. Whether you prefer a simple design or a more intricate pattern, these projects offer something for everyone. So gather your materials, get knotting, and enjoy the process of making your very own macrame water bottle holder. Your hydration needs will be stylishly met, and you’ll have a unique accessory that’s a testament to your creativity.

image
Giống
Bình luận
Đăng lại
Tải thêm bài viết

Hủy kết bạn

Bạn có chắc chắn muốn hủy kết bạn không?

Báo cáo người dùng này

Nâng cao hình ảnh hồ sơ của bạn

Số dư khả dụng

0

Hình ảnh

Chỉnh sửa phiếu mua hàng

Thêm bậc


Chọn một hình ảnh
Xóa bậc của bạn
Bạn có chắc chắn muốn xóa tầng này không?

Nhận xét

Để bán nội dung và bài đăng của bạn, hãy bắt đầu bằng cách tạo một vài gói. Kiếm tiền

Thanh toán bằng ví

Thông báo Thanh toán

Bạn sắp mua các mặt hàng, bạn có muốn tiếp tục không?

Yêu cầu hoàn lại