Good and Bad People Good and Bad People
    #socialmedia #technology #usa #digitalmarketer #seoservice
    tìm kiếm nâng cao
  • Đăng nhập
  • Đăng ký

  • Chế độ ban ngày
  • © 2025 Good and Bad People
    Về • Danh mục • Liên hệ chúng tôi • Nhà phát triển • Chính sách bảo mật • Điều khoản sử dụng • Đền bù • Referral Terms • Acceptable Use Policy • Community Guidelines • Write for Us

    Lựa chọn Ngôn ngữ

  • Arabic
  • Bengali
  • Chinese
  • Croatian
  • Danish
  • Dutch
  • English
  • Filipino
  • French
  • German
  • Hebrew
  • Hindi
  • Indonesian
  • Italian
  • Japanese
  • Korean
  • Persian
  • Portuguese
  • Russian
  • Spanish
  • Swedish
  • Turkish
  • Urdu
  • Vietnamese

Đồng hồ

Đồng hồ cuộn phim

Sự kiện

Duyệt qua các sự kiện Sự kiện của tôi

Blog

Duyệt các bài báo

Thị trường

Sản phẩm mới nhất

Các trang

Trang của tôi Các trang được yêu thích

Hơn

Khám phá Bài viết phổ biến Việc làm Ưu đãi Kinh phí
cuộn phim Đồng hồ Sự kiện Thị trường Blog Trang của tôi Nhìn thấy tất cả

Phát hiện bài viết

Posts

Người dùng

Các trang

Tập đoàn

Blog

Thị trường

Sự kiện

Việc làm

Kinh phí

Pennys Pretty Projects
1 Y ·Dịch

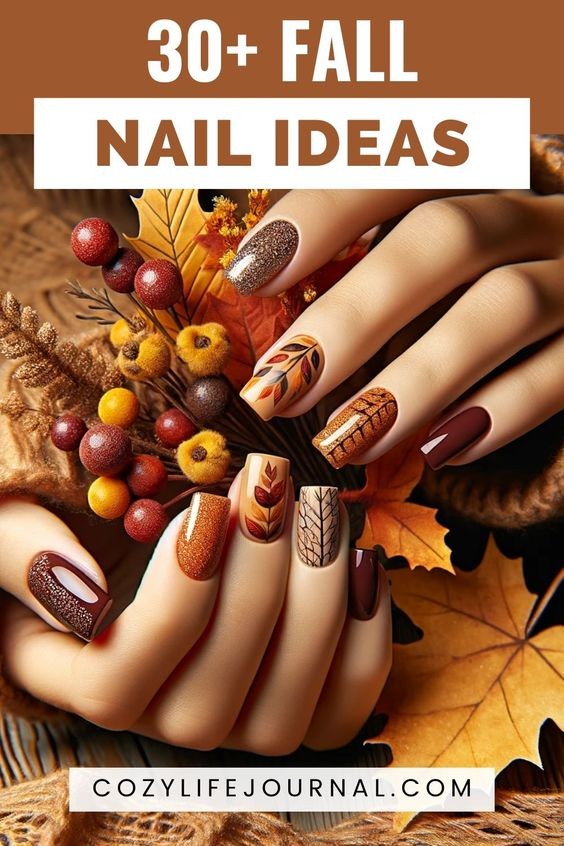
Top Fall Nail Trends: Embrace the Season with Style

As the crisp air of fall begins to set in, it's time to switch up your beauty routine to reflect the changing season. Just as your wardrobe shifts from light summer dresses to cozy sweaters and boots, your nails too deserve a seasonal update. Fall nail trends offer a rich palette of colors, designs, and textures that can transform your look, adding a touch of autumnal elegance. Whether you're into bold statements or subtle sophistication, this season has something for everyone. Let’s explore the top fall nail trends that will have you embracing the season in style.

1. Moody Neutrals
Fall is the perfect time to tone down bright summer hues and transition into moody neutrals. Think of deep taupes, rich greys, and muted browns. These shades are versatile, complementing any outfit while providing a sophisticated, understated look. Matte finishes in these colors add an extra layer of chic, giving your nails a modern, velvety appearance. For a twist, try a gradient effect that transitions from one neutral shade to another, creating a subtle ombre that mimics the natural fading of daylight in autumn.

2. Jewel Tones
Jewel tones are a fall staple, and they’re making a strong comeback in nail trends this year. Emerald greens, sapphire blues, and ruby reds capture the richness of the season’s palette. These colors are bold yet elegant, offering a striking contrast to the neutral tones of your fall wardrobe. To elevate the look, consider adding a metallic finish or a hint of shimmer. Jewel-toned nails with a glossy top coat will catch the light beautifully, adding a touch of glamor to any ensemble.

3. Earthy Greens
Green is having a major moment this fall, especially in earthy shades like olive, moss, and forest green. These tones connect with nature, reflecting the changing leaves and the deepening hues of the season. Pair these greens with gold accents or leaf-inspired designs for a look that’s both trendy and seasonal. For those who love nail art, earthy greens provide the perfect backdrop for minimalist designs, such as delicate gold lines or subtle foliage patterns.

4. Rich Berries
Berry tones are another classic for fall, offering a range of shades from deep plums to juicy raspberries. These colors are vibrant yet dark enough to feel autumnal. Berry shades work well in both glossy and matte finishes, and they’re perfect for adding a pop of color without overwhelming your overall look. Consider trying a gradient berry manicure that transitions from light to dark, or add a touch of glitter to one or two accent nails for a bit of sparkle.

5. Textured Nails
Fall 2024 is all about texture. Velvet, leather, and even knitted effects are making their way into nail art. These textures not only look interesting but also add a tactile element to your nails. Velvet nails, with their soft, plush finish, are perfect for cooler weather. Leather-effect nails, often achieved with matte black polish and a top coat, offer a sleek and edgy look. If you’re into DIY, try a knitted design that mimics the appearance of a cozy sweater—perfect for those who love to embrace the cozy side of fall.

6. Metallic Accents
Metallics are a trend that refuses to fade, and they’re particularly popular in the fall. Gold, silver, and bronze are all in play this season, adding a luxurious touch to your nails. You can go full-on metallic for a bold look, or use metallic accents like stripes, dots, or geometric shapes to enhance a more subdued base color. A popular trend this fall is the “half-moon” manicure, where the base of the nail is highlighted with a metallic hue, creating a modern, stylish effect.

7. Plaid Patterns
Nothing says fall quite like plaid. This iconic pattern, reminiscent of cozy flannel shirts, has made its way into nail art. Plaid nails can be achieved in a variety of color combinations, from classic red and black to more subtle earth tones. The key to nailing this trend (pun intended) is precision—clean lines and sharp contrasts are a must. If you’re not confident in your freehand skills, consider using nail stickers or stencils to achieve the perfect plaid design.

8. Classic Burgundy
Burgundy is a perennial favorite for fall, and it’s easy to see why. This deep, wine-red color is both timeless and trendy, offering a sophisticated option that works for both everyday wear and special occasions. Burgundy pairs well with gold jewelry and warm-toned outfits, making it a versatile choice for the season. For a modern twist, try pairing burgundy with a matte top coat or adding a subtle gold accent to one or two nails.

9. Animal Prints
Animal prints continue to be a popular trend, and fall is the perfect time to experiment with these bold designs. Leopard spots, zebra stripes, and even snake skin patterns are all the rage this season. To keep the look fall-appropriate, opt for muted tones like tan, brown, and black rather than bright, summery hues. Animal print nails can be as subtle or as bold as you like—consider doing a full set or just accenting one or two nails for a more understated take on the trend.

10. Burnt Orange
Burnt orange is the quintessential fall color, evoking the warmth of autumn leaves and pumpkin spice. This year, burnt orange nails are everywhere, and they’re a must-try for anyone looking to embrace the season. This color works well in both matte and glossy finishes, and it pairs beautifully with gold accents or simple, minimalist designs. Burnt orange nails can also be combined with other fall colors like deep browns or rich reds for a striking, multi-toned manicure.

Conclusion
Fall nail trends for 2024 offer a rich tapestry of colors, textures, and designs that cater to every style. Whether you prefer the subtle elegance of moody neutrals or the bold statements made by jewel tones and metallics, this season’s trends provide endless opportunities to express your personal style. So as the leaves start to turn and the days grow shorter, give your nails a seasonal update that’s as stylish and vibrant as fall itself. Embrace the trends, experiment with new designs, and let your nails be the perfect accessory to your autumn wardrobe.

image
Giống
Bình luận
Đăng lại
Pennys Pretty Projects
1 Y ·Dịch

47 Cute September Nails of 2024: Must-Try September Nail Designs for a Stylish Fall

As the crisp autumn breeze begins to sweep away the last remnants of summer, it's time to transition your wardrobe and beauty routine to reflect the enchanting vibes of fall. September is the perfect month to experiment with new nail designs, blending the bright and playful tones of summer with the deep, warm hues that characterize autumn. Whether you're a fan of minimalist designs or prefer something bold and eye-catching, there’s a September nail style out there for everyone. Here are 47 cute September nails of 2024 that you absolutely have to try!

1. Pumpkin Spice Dreams
Embrace the essence of fall with a pumpkin spice-inspired manicure. Think warm oranges, deep browns, and hints of cream. Add subtle gold accents or glitter for a touch of glam.

2. Muted Maroons
Rich, muted maroons are a fall staple. Perfect for a sophisticated, yet bold look, this shade is versatile enough to carry you through the entire season.

3. Sunflower Delight
Celebrate the last bloom of summer with sunflower nail art. A neutral base with delicate sunflower designs on one or two nails adds a pop of brightness to your look.

4. Olive Green Elegance
Olive green is a trending color this fall. Pair it with gold leaf accents or simple line art to elevate your September style.

5. Golden Hour Ombre
Capture the beauty of a September sunset with ombre nails that fade from warm yellows to deep oranges. Add a matte top coat for a chic finish.

6. Crisp Leaves and Plaid
Nothing says fall like plaid! Combine plaid patterns in warm hues with leafy designs for a cozy and cute September manicure.

7. Cinnamon Swirl
A swirl of cinnamon brown and cream tones can create a delightful, autumnal effect. It's a subtle yet elegant way to welcome the new season.

8. Bronzed Beauty
Bronze nails, especially with a metallic finish, are perfect for those who love a touch of luxury. This shade pairs beautifully with gold or copper accents.

9. Terracotta Touch
Terracotta nails offer a unique blend of orange and brown, creating a warm, earthy tone that’s perfect for fall.

10. Wine and Dine
Deep burgundy nails with a glossy finish are sophisticated and stylish. This shade complements the rich colors of fall fashion.

11. Spice Market Mosaic
Mix and match warm spice colors like saffron, turmeric, and paprika in a mosaic design for a vibrant and eclectic look.

12. Cozy Cable Knit
Replicate the texture of a cozy cable-knit sweater on your nails! Use neutral tones like beige or soft gray for a cozy September look.

13. Warm Taupe
For a minimalist yet chic look, opt for warm taupe nails. This neutral shade is perfect for any occasion and pairs well with both casual and formal outfits.

14. Woodland Creatures
Add a touch of whimsy to your nails with tiny woodland creatures like foxes, owls, or squirrels. Use earthy tones as the base for a cute and playful design.

15. Cranberry Crush
Deep cranberry nails are perfect for the transition from summer to fall. This rich color can stand alone or be paired with gold for added elegance.

16. Mocha Marble
Combine shades of mocha, cream, and chocolate in a marble effect for a sophisticated September manicure.

17. Rusty Rose
A rusty rose shade blends the warmth of autumn with the softness of summer, making it a versatile choice for September.

18. Harvest Gold
A rich, golden yellow is reminiscent of fall harvests and changing leaves. It’s a bold color choice that will make your nails stand out.

19. Tweed Texture
Mimic the texture of tweed fabric on your nails using a combination of warm fall colors and fine, detailed line work.

20. Maple Leaf Magic
Incorporate tiny maple leaf designs into your manicure for a subtle nod to the changing season. Use a deep red or burnt orange base for the ultimate fall feel.

21. Emerald Enchantment
Emerald green nails add a touch of luxury and mystery to your September look. This rich, jewel-toned shade is perfect for those who love to make a statement.

22. Sepia Tones
Capture the essence of vintage photographs with sepia-toned nails. This brownish-gold hue gives a nostalgic and warm vibe, perfect for autumn.

23. Chocolate Drizzle
A deep, chocolate brown with a glossy finish looks luxurious and is a great alternative to the usual black or red fall nails.

24. Autumn Ombre
Blend autumnal colors like burnt orange, mustard yellow, and deep red into a stunning ombre design. It’s a bold, yet wearable look.

25. Copper Crush
Copper nails with a metallic sheen are perfect for September. This warm, glowing color reflects the beauty of fall’s golden hour.

26. Speckled Stone
Create a natural stone effect on your nails using muted grays, browns, and whites. Add a speckled pattern for a touch of texture.

27. Burnt Sienna
Burnt sienna is a beautiful blend of orange and brown that embodies the spirit of fall. It’s a great choice for those who love earthy tones.

28. Smoky Quartz
This semi-transparent grayish-brown shade is inspired by smoky quartz crystals. It’s a subtle, sophisticated choice for September.

29. Auburn Allure
Auburn nails are the perfect blend of red and brown, offering a warm and inviting color that’s ideal for fall.

30. Plaid Perfection
Go full fall with a plaid pattern in classic autumn colors like red, black, and gold. It’s a cozy, stylish choice for your nails.

31. Amber Glow
Amber is a gorgeous, warm shade that captures the essence of fall. It looks particularly stunning with a glossy finish.

32. Rustic Red
A rustic red shade, slightly muted and earthy, is a great alternative to classic bright red nails for September.

33. Forest Ferns
Incorporate delicate fern designs onto a deep green base for a manicure that feels both fresh and fall-appropriate.

34. Mulled Wine
A deep, rich mulled wine color is perfect for those chilly September nights. It’s luxurious and pairs well with gold or bronze accents.

35. Butternut Squash
A warm, muted yellow reminiscent of butternut squash is a unique and trendy choice for September nails.

36. Carmine Kiss
Carmine, a deep red with hints of purple, offers a sophisticated and romantic touch to your fall manicure.

37. Golden Glitter Tips
For a subtle yet glamorous look, add gold glitter to the tips of your nails. Pair with a nude or taupe base for a chic contrast.

38. Earthy Hues
Combine different earthy tones like beige, olive, and terracotta in a color-blocked design for a trendy and natural look.

39. Ivory & Gold
Ivory nails with gold accents offer a clean, elegant look that’s perfect for any September occasion.

40. Dusky Rose
Dusky rose nails are soft, feminine, and perfect for transitioning from the bright colors of summer to the muted tones of fall.

41. Vintage Vibes
Embrace a vintage look with muted, dusty colors like mauve, mustard, and teal. Pair with simple, retro-inspired patterns.

42. Stormy Skies
Dark gray nails with a matte finish evoke the moodiness of a fall storm. Add a subtle shimmer for a touch of elegance.

43. Chili Pepper Red
For those who love a bold manicure, chili pepper red is a fiery, vibrant choice that adds a spicy touch to your September nails.

image
Giống
Bình luận
Đăng lại
Amelia's Stylish Spaces
1 Y ·Dịch

### Enchanting Plant Room Decor Ideas: Create a Serene and Stylish Green Oasis 💚🌿🤍

Incorporating plants into your home decor can transform any space into a vibrant, calming retreat. Whether you have a dedicated plant room or just want to add a touch of greenery to your existing decor, enchanting plant room ideas can elevate your space and foster a soothing atmosphere. This comprehensive guide explores creative ways to infuse your room with lush greenery, offering tips on arrangement, styling, and plant care to make your plant room a true sanctuary.

#### 1. **Choosing the Right Plants**

The foundation of an enchanting plant room starts with selecting the right plants. Consider factors such as light levels, maintenance requirements, and aesthetic preferences.

**1.1. **Low-Light Plants**

For rooms with limited natural light, choose plants that thrive in low-light conditions:

- **Snake Plant (Sansevieria)* Known for its resilience and air-purifying qualities.

- **Pothos (Epipremnum aureum)* Versatile and easy to care for, with trailing vines that add a lush touch.

- **ZZ Plant (Zamioculcas zamiifolia)* Tolerant of neglect and low light, perfect for busy households.

**1.2. **Bright-Light Plants**

For well-lit rooms, opt for plants that flourish in bright, indirect light:

- **Fiddle Leaf Fig (Ficus lyrata)* Adds a dramatic, sculptural element with its large, glossy leaves.

- **Bird of Paradise (Strelitzia reginae)* Features bold foliage and a tropical vibe.

- **Peace Lily (Spathiphyllum)* Known for its beautiful white blooms and air-purifying abilities.

**1.3. **Air Plants and Succulents**

These plants are ideal for adding unique textures and shapes to your decor:

- **Air Plants (Tillandsia)* Require minimal soil and can be displayed in creative ways, such as in hanging terrariums or mounted on wooden boards.

- **Succulents* Available in various shapes and sizes, they thrive on minimal water and are perfect for creating eye-catching arrangements.

#### 2. **Creative Plant Displays**

Once you’ve selected your plants, the next step is showcasing them in visually appealing ways. Here are some creative plant display ideas to consider:

**2.1. **Floating Shelves**

Install floating shelves to display an assortment of plants at different heights. This setup adds dimension to your room and allows you to showcase various plant sizes and types.

- **Styling Tips* Arrange plants with varying leaf shapes and colors to create visual interest. Add decorative elements like candles or small sculptures to enhance the display.

**2.2. **Hanging Planters**

Hanging planters can be a stylish way to incorporate plants without taking up floor space.

- **Types of Planters* Use macramé hangers for a bohemian touch or sleek, modern hanging pots for a contemporary look.

- **Placement* Hang plants at different heights to create a cascading effect. This is particularly effective for trailing plants like Pothos or String of Pearls.

**2.3. **Plant Stands and Pedestals**

Elevate your plants with stylish stands and pedestals. This not only highlights your greenery but also adds a decorative element to your space.

- **Materials and Styles* Choose from materials like wood, metal, or ceramic. Opt for stands with geometric designs for a modern touch or intricate patterns for a more traditional feel.

**2.4. **Terrariums**

Create mini ecosystems with glass terrariums. These are ideal for displaying succulents, air plants, or small ferns.

- **Design Tips* Layer different types of soil, stones, and moss to build depth. Add small figurines or decorative stones to enhance the terrarium’s visual appeal.

#### 3. **Incorporating Plants into Different Room Styles**

Tailor your plant decor to complement the overall style of your room. Here’s how to seamlessly integrate plants into various design aesthetics:

**3.1. **Bohemian Chic**

Embrace a relaxed, eclectic vibe with an abundance of plants and natural materials.

- **Decor Elements* Use macramé plant hangers, vintage pots, and woven baskets. Incorporate layered textiles like rugs and throws to enhance the cozy, boho feel.

**3.2. **Modern Minimalist**

Keep it sleek and simple with a focus on clean lines and monochromatic plant displays.

- **Decor Elements* Opt for minimalist planters in neutral tones or metallic finishes. Use geometric plant stands and arrange plants in a symmetrical pattern.

**3.3. **Tropical Oasis**

Create a lush, tropical retreat with bold foliage and vibrant colors.

- **Decor Elements* Choose large, statement plants like Monstera or Bird of Paradise. Use colorful pots and incorporate tropical-themed decor elements like rattan furniture and vibrant textiles.

**3.4. **Rustic Farmhouse**

Infuse a touch of charm with plants and accessories that complement a rustic, farmhouse style.

- **Decor Elements* Use wooden plant stands, galvanized metal pots, and vintage-style watering cans. Pair plants with rustic furniture and warm, earthy colors.

#### 4. **Plant Care and Maintenance**

To keep your plant room looking enchanting, proper plant care is essential. Follow these tips to maintain healthy, thriving plants:

**4.1. **Watering**

- **General Rule* Most indoor plants prefer to be on the drier side. Water when the top inch of soil feels dry.

- **Special Needs* Some plants, like succulents, require less frequent watering, while others, like ferns, need more consistent moisture.

**4.2. **Light Requirements**

- **Adjust Placement* Move plants around as needed to ensure they receive the appropriate amount of light. Rotate plants periodically to ensure even growth.

- **Supplemental Lighting* Use grow lights if natural light is insufficient, especially for plants that require bright, indirect light.

**4.3. **Fertilizing**

- **Frequency* Fertilize plants every 4-6 weeks during the growing season (spring and summer). Reduce feeding in the fall and winter.

- **Type of Fertilizer* Use a balanced, all-purpose fertilizer or one specifically formulated for your plant type.

**4.4. **Pruning and Cleaning**

- **Pruning* Regularly trim dead or yellowing leaves to encourage healthy growth and maintain an attractive appearance.

- **Cleaning* Dust plant leaves and clean pots to prevent pests and maintain a fresh look.

#### 5. **Enhancing Your Space with Plant-Inspired Decor**

To complete your plant room decor, consider adding complementary elements that enhance the overall ambiance:

**5.1. **Greenery-Themed Artwork**

Incorporate artwork featuring botanical prints or nature-inspired designs to complement your plant decor.

**5.2. **Natural Textiles**

Use textiles like linen or cotton with botanical patterns for cushions, rugs, or curtains. These add texture and reinforce the green theme.

**5.3. **Custom Planters and Pots**

Personalize your plant pots with DIY paint or decoration techniques. Customized planters can add a unique touch to your decor.

### Final Thoughts

Creating an enchanting plant room involves more than just adding a few potted plants; it’s about crafting a harmonious and inviting environment that celebrates nature. By choosing the right plants, employing creative display techniques, tailoring your decor to your room style, and maintaining your greenery, you can transform your space into a lush, tranquil retreat. Whether you’re a seasoned plant enthusiast or new to the world of indoor gardening, these ideas will help you build a plant room that is both beautiful and soothing. Embrace the beauty of nature and let your plant room become a serene oasis in your home.

#modernbedroomidea

image
Giống
Bình luận
Đăng lại
Seren's Urban Elegance
1 Y ·Dịch

Charming Cat: The Feline Who Captivates Hearts Cats have a unique ability to enchant us with their blend of grace, playfulness, and affectionate behavior. Among them, the “charming cat” stands out not only for its striking appearance but also for its captivating personality. This article delves into what makes a cat charming, explores the traits that endear them to us, and offers insights into how these delightful felines bring joy and warmth into our lives.

What Makes a Cat Charming?

**1. Elegant Appearance: Charm often begins with appearance. A cat’s sleek fur, expressive eyes, and graceful movements contribute to its allure. Whether it’s the sophisticated poise of a Siamese or the fluffy elegance of a Maine Coon, physical beauty adds to a cat’s charm.

**2. Playful Personality: A charming cat is rarely dull. They are known for their playful antics, from pouncing on toys to chasing shadows. This playful nature is not only entertaining but also highlights their curious and spirited demeanor, keeping us amused and engaged.

**3. Affectionate Behavior: One of the most endearing traits of a charming cat is its capacity for affection. Whether it’s curling up in your lap, nuzzling against your face, or following you around the house, their affectionate gestures create strong emotional bonds and add to their overall charm.

The Joy of Living with a Charming Cat

**1. Therapeutic Companionship: The presence of a charming cat can have therapeutic effects on their human companions. Their soothing purrs and gentle snuggles can alleviate stress, provide comfort, and enhance overall well-being. The calming effect of a cat’s presence is well-documented, offering emotional support and relaxation.

**2. Endless Entertainment: A charming cat brings a sense of joy and entertainment into the home. Their playful behavior, such as chasing laser pointers or batting at dangling toys, offers endless amusement. Watching a cat’s antics can be a delightful way to unwind and laugh.

**3. Social Connection: Cats often serve as social catalysts, drawing people together with their charming personalities. Whether they’re playfully interacting with visitors or nuzzling up to family members, their ability to connect with people strengthens social bonds and fosters a sense of community.

Essential Tips for Enhancing Your Cat’s Charm

**1. Engaging Activities: To keep your charming cat entertained and stimulated, provide a variety of toys and interactive play sessions. Puzzle feeders, wand toys, and cat trees can enhance their play experience and keep their curious minds active.

**2. Affection and Attention: Regularly engaging with your cat through petting, grooming, and playtime strengthens your bond and enhances their affectionate behavior. Cats thrive on positive interactions and the warmth of human companionship.

**3. Creating a Comfortable Environment: A charming cat enjoys a cozy and safe environment. Ensure they have access to comfortable resting spots, scratching posts, and a clean litter box. A well-cared-for cat feels more secure and relaxed, contributing to their overall charm.

Capturing the Charm of Your Cat

**1. Photography Tips: Capturing the essence of your charming cat can be both fun and rewarding. Use natural light to highlight their features, and experiment with close-ups to capture their expressive eyes and playful antics. Candid shots of them in their favorite spots can showcase their personality.

**2. Sharing Their Story: Sharing photos and stories of your charming cat on social media or pet forums can spread joy and connect you with fellow cat enthusiasts. Their unique traits and adorable moments make for engaging content that resonates with other cat lovers.

Conclusion

The allure of a charming cat lies in its combination of elegance, playfulness, and affection. These delightful felines enrich our lives with their unique personalities, providing joy, comfort, and endless entertainment. Whether they’re curling up beside you or entertaining you with their playful antics, charming cats have a special way of captivating hearts and making every day a little brighter.

As you experience the joy of living with a charming cat, you’ll find that their endearing qualities and loving behavior create a deep bond that enhances your life. Embrace their playful spirit and affectionate nature, and let the charm of your feline friend bring warmth and happiness to your home. 🌟🐱💕

Giống
Bình luận
Đăng lại
Pennys Pretty Projects
1 Y ·Dịch

The Ultimate Guide to Acrylic Nail Art: Trends, Techniques, and Tips for Stunning Nails

Acrylic nail art has evolved from a niche beauty trend to a global sensation, capturing the imagination of millions with its versatility, durability, and limitless design possibilities. Whether you're a seasoned nail artist or a newcomer looking to explore the vibrant world of acrylics, this comprehensive guide will take you through everything you need to know about acrylic nail art—from its history and benefits to the latest trends and techniques.

The History of Acrylic Nails
Acrylic nails, as we know them today, have their roots in the mid-20th century. The first acrylic nails were invented by a dentist, Frederick Slack, in 1954, who used dental acrylics to fix a broken nail. This sparked the development of acrylic nails, leading to the creation of a product that could be used by women everywhere. Over the decades, acrylic nails have evolved significantly, becoming a staple in the beauty industry and a canvas for intricate and creative designs.

Why Acrylic Nails?
Acrylic nails are loved for their durability and strength, making them an excellent choice for those who want long-lasting nails that can withstand daily wear and tear. They are also highly customizable, offering a range of shapes, lengths, and designs that can be tailored to individual preferences.

Benefits of Acrylic Nails:

Durability: Acrylic nails are known for their strength, making them ideal for those with weak or brittle nails.
Versatility: They can be shaped into various styles, including stiletto, coffin, square, or almond, and can be as long or short as desired.
Design Flexibility: The acrylic surface is perfect for intricate nail art, from simple patterns to elaborate 3D designs.
Long-Lasting: When properly maintained, acrylic nails can last up to six weeks before needing a fill.
Popular Acrylic Nail Art Trends
Acrylic nail art trends are constantly evolving, influenced by fashion, pop culture, and individual creativity. Here are some of the most popular trends currently making waves in the nail art world.

1. Ombré Nails Ombré nails have become a go-to style for many, offering a smooth gradient of colors that can be subtle or bold. This style works well with any color palette and can be enhanced with glitter or rhinestones for added flair.

2. 3D Embellishments 3D nail art has taken the world by storm, with artists creating intricate designs using acrylics, gems, pearls, and other embellishments. From delicate flowers to edgy spikes, the possibilities are endless.

3. French Tips with a Twist The classic French manicure has been reimagined in countless ways. Acrylics allow for a modern twist on this timeless style, with colorful tips, glittery edges, or even inverted designs.

4. Geometric Patterns Bold lines, shapes, and patterns are perfect for those looking to make a statement. Geometric nail art on acrylics offers a clean and modern look that can be personalized with different colors and shapes.

5. Matte Finish Matte acrylic nails offer a sophisticated and chic alternative to the traditional glossy finish. This trend is particularly popular in darker shades, giving nails a velvety appearance.

6. Metallics and Foils Metallic nails are all the rage, with shiny finishes and foil accents adding a touch of glamour. Gold, silver, and chrome are popular choices, often paired with minimalist designs for a luxurious look.

Essential Tools and Materials for Acrylic Nail Art
Creating beautiful acrylic nails requires the right tools and materials. Here’s a rundown of the essentials:

1. Acrylic Powder and Liquid Monomer The foundation of acrylic nails, these two components are mixed to form a malleable paste that hardens into a durable extension.

2. Nail Forms or Tips Nail forms are used to sculpt acrylic nails directly onto the natural nail, while tips are pre-made extensions that are glued onto the nail before applying acrylic.

3. Brushes A good quality acrylic brush is crucial for applying the acrylic mixture smoothly and precisely. Brushes come in various sizes, with Kolinsky sable brushes being the preferred choice among professionals.

4. Nail Files and Buffers These tools are used to shape the acrylic nails and smooth the surface before applying polish or other decorations.

5. UV/LED Lamp While acrylics themselves do not require a UV lamp, many nail artists use gel polish over acrylics, which needs to be cured under a UV or LED light.

6. Nail Art Supplies Depending on the design, you may need rhinestones, glitter, stickers, stamping tools, or 3D embellishments. Nail art pens and striping brushes are also useful for detailed work.

Step-by-Step Guide to Creating Acrylic Nails
Creating acrylic nails is a detailed process that requires patience and practice. Here's a basic step-by-step guide:

1. Prep the Nails Start by cleaning and sanitizing your hands and nails. Push back the cuticles and file the nails to your desired shape.

2. Apply the Tips or Forms If using tips, glue them to the natural nail and trim them to the desired length. If using forms, place them under the natural nail to create the base for the acrylic.

3. Mix Acrylic Powder and Liquid Dip your brush into the liquid monomer, then into the acrylic powder, forming a small bead. The consistency should be similar to wet dough.

4. Apply the Acrylic Apply the acrylic bead to the nail, starting near the cuticle and moving towards the tip. Shape and smooth the acrylic as you go, adding more beads as needed.

5. Shape and Buff Once the acrylic has hardened, file the nails to your desired shape and buff the surface to smooth out any imperfections.

6. Add Polish or Nail Art Apply your chosen nail polish or start creating your nail art. This is where you can get creative with colors, patterns, and decorations.

7. Seal and Finish Seal the design with a top coat to protect the artwork and add shine. If using gel polish, cure the nails under a UV or LED lamp.

Maintenance Tips for Acrylic Nails
To keep your acrylic nails looking their best, regular maintenance is essential. Here are some tips:

1. Avoid Excessive Water Exposure Prolonged exposure to water can weaken the adhesive bond of the acrylics, leading to lifting. Wear gloves when washing dishes or cleaning.

2. Moisturize Keep your cuticles and hands moisturized to prevent dryness and cracking around the nails.

3. Regular Fills As your natural nails grow, the gap between the cuticle and the acrylic will become visible. Schedule fills every 2-3 weeks to maintain a seamless look.

4. Be Gentle Avoid using your nails as tools to open or pry things, as this can cause breakage or lifting.

5. Visit a Professional If you're unsure about removing or repairing your acrylic nails, it's best to visit a professional to avoid damaging your natural nails.

Conclusion
Acrylic nail art is more than just a beauty trend—it's a form of self-expression that allows you to showcase your creativity and style. Whether you prefer a subtle design or something bold and eye-catching, acrylic nails offer endless possibilities. By understanding the techniques, trends, and maintenance involved, you can achieve stunning nails that make a statement. So, why not dive into the world of acrylic nail art and let your nails become your canvas?

image
Giống
Bình luận
Đăng lại
Rachaels Pin Realm
Rachaels Pin Realm
1 Y ·Dịch

**Kill Switch Aesthetic: Penelope Douglas' Dark and Thrilling Novel**

Penelope Douglas’ *Kill Switch* is a masterclass in crafting a dark, thrilling narrative that grips readers from the first page to the last. Known for her ability to blend suspense with deep emotional engagement, Douglas delivers a novel that not only entertains but also challenges its audience with a captivating and intense aesthetic. In this article, we explore the distinctive elements that define the *Kill Switch* aesthetic and why it resonates so powerfully with readers.

### **1. Intense, High-Stakes Plot**

At the heart of *Kill Switch* is a plot that pulses with tension and high stakes. The story revolves around a dangerous game of cat and mouse, with characters entangled in a web of intrigue, power struggles, and deep-seated secrets. Douglas creates a narrative filled with unexpected twists and turns, ensuring that readers are constantly on edge, eagerly turning pages to uncover what happens next.

**Narrative Style Tip* Douglas' skillful pacing and intricate plot development are crucial in building the novel's dark and suspenseful atmosphere. The constant tension and high stakes make *Kill Switch* an addictive read that keeps audiences engrossed.

### **2. Complex, Multi-Dimensional Characters**

Douglas’ characters in *Kill Switch* are anything but one-dimensional. Each character is intricately developed with a rich backstory, personal struggles, and moral ambiguities. The protagonist's journey is marked by intense personal conflict, inner turmoil, and a quest for justice, all of which add layers of depth to the narrative.

**Character Development Tip* To fully appreciate the *Kill Switch* aesthetic, readers should pay attention to the complex dynamics between characters. Their evolving relationships and hidden motivations add depth and intrigue to the story.

### **3. Dark and Atmospheric Setting**

The setting of *Kill Switch* plays a significant role in establishing its dark and thrilling atmosphere. From shadowy, urban landscapes to isolated, foreboding locations, Douglas creates an environment that mirrors the novel’s intense and suspenseful tone. The settings are not merely backdrops but integral to the story, contributing to the overall mood and tension.

**Setting Enhancement Tip* Douglas’ use of vivid, atmospheric descriptions helps immerse readers in the world of *Kill Switch*. The contrast between light and shadow, and the eerie details of each location, enhance the novel's dark aesthetic.

### **4. Themes of Power and Redemption**

Central themes in *Kill Switch* include power, control, and redemption. The characters grapple with their own moral choices, struggles for power, and the quest for personal redemption. These themes are explored through gripping dialogue and dramatic scenes, adding layers of complexity to the narrative.

**Theme Exploration Tip* Reflect on how the themes of power and redemption influence the characters' decisions and interactions. These themes drive the plot forward and contribute to the novel’s emotional depth.

### **5. Emotional and Psychological Depth**

Douglas excels in exploring the emotional and psychological dimensions of her characters. *Kill Switch* delves into the inner conflicts, fears, and desires of its characters, creating a narrative that is both emotionally charged and psychologically gripping. The exploration of these elements adds a layer of psychological intensity to the story.

**Emotional Insight Tip* Readers should engage with the psychological depth of the characters to fully appreciate the nuances of the *Kill Switch* aesthetic. Understanding their internal struggles enhances the emotional impact of the novel.

### **6. Riveting Romantic Tension**

In true Penelope Douglas fashion, *Kill Switch* features a romance that is both riveting and fraught with tension. The romantic elements are interwoven with the darker aspects of the plot, creating a dynamic and engaging love story that adds another layer of intrigue and emotional investment.

**Romantic Tension Tip* Pay attention to the development of the romantic relationships in the novel. The interplay between romance and suspense enhances the overall narrative experience.

### **7. Stylish and Suspenseful Narrative Voice**

Douglas’ narrative voice in *Kill Switch* is both stylish and suspenseful. Her writing style is characterized by sharp dialogue, vivid descriptions, and a compelling sense of urgency. The prose captures the dark, thrilling essence of the story, making it a memorable and impactful read.

**Narrative Style Tip* Enjoy the blend of stylish prose and suspenseful storytelling. Douglas’ distinctive voice adds to the immersive experience of the novel.

### **Conclusion**

Penelope Douglas’ *Kill Switch* is a standout example of dark, thrilling fiction that captivates with its intense plot, complex characters, and atmospheric setting. The novel’s aesthetic is defined by its rich textures of suspense, power dynamics, and emotional depth, making it a must-read for fans of the genre. Embrace the dark allure and gripping narrative of *Kill Switch*, and immerse yourself in a world where every page is filled with intrigue and intensity.

image
Giống
Bình luận
Đăng lại
Madison's Creative Pins
1 Y ·Dịch

**29 Clever Solutions for Couples in Small Bedrooms**

Living in a small bedroom can be a challenge, especially for couples trying to maximize their space while keeping it cozy and functional. If you’re looking for smart ways to make the most of your compact bedroom, here are 29 clever solutions to consider:

1. **Utilize Vertical Space**: Install shelves above your bed or along walls to store books, decor, and essentials.

2. **Opt for Multi-Functional Furniture**: Choose pieces like a bed with storage drawers or a desk that doubles as a vanity.

3. **Incorporate Under-Bed Storage**: Use bins or drawers to keep items out of sight but within easy reach.

4. **Select a Lofted Bed**: Elevate your bed to create additional space underneath for a small office or seating area.

5. **Use a Fold-Down Desk**: A wall-mounted desk that folds away when not in use helps save space.

6. **Choose a Compact Bed Frame**: Look for a low-profile frame to make the room appear larger and less crowded.

7. **Opt for a Sliding Door**: Replace traditional doors with sliding doors to save space and avoid swing door obstructions.

8. **Add Mirrors**: Large mirrors can make the room look bigger and reflect light to brighten up the space.

9. **Use Corner Shelves**: Make use of corner space with shelves to store items without taking up too much room.

10. **Invest in Stackable Furniture**: Stackable pieces, like modular storage cubes, can be rearranged as needed.

11. **Incorporate Light Colors**: Light-colored walls, bedding, and decor make the room feel more open and airy.

12. **Add Floating Nightstands**: Floating or wall-mounted nightstands take up less floor space than traditional ones.

13. **Create a Cozy Nook**: Use a corner of the room for a small seating area or reading nook.

14. **Opt for Built-In Storage**: Custom-built shelving and closets can help maximize every inch of space.

15. **Use Vertical Dividers**: Create separate areas for different functions with vertical room dividers.

16. **Choose a Wall-Mounted TV**: Save space by mounting your TV on the wall instead of using a bulky stand.

17. **Incorporate Hidden Storage**: Look for furniture that hides storage compartments, like ottomans or benches.

18. **Use Drawer Organizers**: Keep drawers tidy and maximize storage with drawer organizers.

19. **Go for a Platform Bed**: Platform beds often have built-in storage and provide a sleek, modern look.

20. **Add a Canopy**: A canopy can create a defined sleeping area and add a touch of elegance to a small room.

21. **Use a Room Divider Curtain**: A curtain can create a temporary division for privacy or separation.

22. **Incorporate Foldable Furniture**: Items like foldable chairs or tables can be stored away when not in use.

23. **Choose Multi-Use Bedding**: Bedding with built-in storage or multifunctional design can keep the room organized.

24. **Install Wall Hooks**: Use wall hooks for hanging bags, accessories, or clothes to free up closet space.

25. **Use a Hanging Organizer**: Keep small items organized and accessible with a hanging closet organizer.

26. **Invest in a Murphy Bed**: A Murphy bed can be folded up during the day to create more space.

27. **Add Smart Lighting**: Use compact, stylish lighting solutions like wall sconces or pendant lights.

28. **Create a Floating Vanity**: Install a floating vanity in place of a bulky dresser for a sleek, space-saving option.

29. **Keep Clutter Minimal**: Regularly declutter and keep only essential items to maintain an open and inviting space.

By incorporating these clever solutions, you can transform your small bedroom into a comfortable and functional retreat. Embrace these ideas to create a space that feels larger, more organized, and perfectly suited to your needs.

#smallbedroomsolutions #coupleliving #spacesaving #homedecor

image
Giống
Bình luận
Đăng lại
Amelia's Stylish Spaces
1 Y ·Dịch

### Ultimate Theater Room Seating Solutions: Elevate Your Movie-Watching Experience

Creating a home theater room is about more than just high-definition screens and state-of-the-art sound systems; the seating plays a pivotal role in ensuring an immersive and enjoyable viewing experience. The right theater room seating can enhance comfort, aesthetics, and functionality, turning your space into a cinematic retreat. This comprehensive guide explores the ultimate theater room seating solutions, offering insights into how to choose and arrange seating to achieve the perfect home theater setup.

#### 1. **Understanding Your Needs**

Before selecting seating for your home theater, it’s crucial to understand your specific needs and preferences. Consider the following factors:

- **Room Size* The dimensions of your theater room will influence the type and number of seats you can accommodate.

- **Seating Capacity* Determine how many people you want to seat comfortably. This will guide you in choosing between individual seats, rows, or sectional sofas.

- **Budget* Set a budget that aligns with your goals. Theater seating can range from budget-friendly options to high-end luxury models.

#### 2. **Types of Theater Room Seating**

The type of seating you choose can dramatically impact the comfort and style of your home theater. Here are some popular options:

**1. Recliners**

Recliners are a classic choice for home theaters, offering exceptional comfort and adjustability.

- **Features to Consider* Look for recliners with adjustable backrests, built-in footrests, and cup holders. Some models also include features like massage functions and heating.

- **Pros* Individual recliners provide personalized comfort and flexibility. They are ideal for dedicated theater rooms where each seat can be tailored to the occupant’s preferences.

- **Cons* Recliners can take up more space and might not be the best fit for smaller rooms.

**2. Sectional Sofas**

Sectional sofas are versatile and can accommodate multiple people in one piece of furniture.

- **Features to Consider* Choose sectionals with modular designs that allow for customization. Some sectionals come with built-in recliners, storage compartments, or adjustable headrests.

- **Pros* Sectionals are great for creating a cozy, communal space. They often come in various configurations to suit different room layouts.

- **Cons* They may be less adjustable than individual recliners and can dominate the space if not chosen carefully.

**3. Theater-Style Seats**

Theater-style seats are designed to mimic the experience of watching a movie in a cinema.

- **Features to Consider* Look for seats with features like cup holders, reclining options, and tiered seating for unobstructed views.

- **Pros* These seats offer a professional and immersive experience. They are often designed for high-density seating, making them ideal for larger rooms.

- **Cons* They can be more expensive and may not fit well in smaller or non-dedicated theater rooms.

**4. Bean Bags and Floor Seating**

For a relaxed and informal setup, bean bags and floor seating are unique options.

- **Features to Consider* Choose high-quality, durable materials for comfort and ease of cleaning. Some floor seating options come with supportive cushions and adjustable backs.

- **Pros* Bean bags and floor seating offer flexibility and a casual vibe. They are easy to move and rearrange.

- **Cons* They may lack the ergonomic support and structure of more traditional theater seating.

#### 3. **Arranging Your Seating**

Proper arrangement is key to maximizing comfort and viewing experience. Here are some tips:

**1. Optimal Viewing Angles**

Ensure that all seats have a clear view of the screen. The ideal angle is typically between 30 to 40 degrees from the screen.

- **Tiered Seating* In larger rooms, consider tiered seating to provide an unobstructed view for all viewers.

- **Screen Distance* Maintain an appropriate distance from the screen based on its size to avoid straining your eyes.

**2. Comfort and Spacing**

Comfort should be a priority. Allow enough space between seats for easy movement and avoid crowding.

- **Seat Spacing* Leave at least 24 to 30 inches between the back of one seat and the front of the next to ensure comfortable spacing.

- **Armrests and Legroom* Ensure ample legroom and comfortable armrests for each seat.

**3. Accessibility and Layout**

Consider the layout to facilitate easy access to seats and other amenities.

- **Aisles and Walkways* Provide clear aisles for easy movement in and out of the seating area. Ensure that walkways are wide enough to avoid congestion.

- **Accessibility* If you have guests with mobility issues, ensure that seating is accessible and comfortable for everyone.

#### 4. **Enhancing Comfort with Accessories**

Enhance your theater room seating with accessories that boost comfort and functionality.

**1. Pillows and Throws**

Add pillows and throws for added comfort and a touch of style. Choose fabrics that complement your décor and are easy to clean.

**2. Seat Cushions**

For extra comfort, especially on firmer seats, consider using seat cushions or pads. These can help improve posture and support.

**3. Side Tables and Cup Holders**

Incorporate side tables or armrest trays to hold snacks, drinks, and other essentials. Built-in cup holders in recliners or theater seats add convenience.

#### 5. **Choosing the Right Materials and Styles**

The material and style of your seating should align with your room’s décor and your personal taste.

**1. Leather vs. Fabric**

- **Leather* Offers a luxurious look and is easy to clean. It tends to be more durable but can be less breathable.

- **Fabric* Provides a wide range of colors and patterns. It’s often more comfortable but may require more maintenance.

**2. Color and Design**

Choose colors and designs that complement your room’s theme. Neutral colors can create a timeless look, while bold hues or patterns can make a statement.

#### 6. **Maintaining Your Seating**

To keep your theater room seating in top condition, regular maintenance is essential.

**1. Cleaning and Care**

- **Leather* Clean with a damp cloth and use a leather conditioner to maintain its luster.

- **Fabric* Vacuum regularly and spot clean stains promptly. Consider using professional cleaning services for deep cleans.

**2. Inspect and Repair**

Regularly inspect your seating for wear and tear. Repair any issues promptly to ensure longevity and comfort.

### Final Thoughts

Mastering theater room seating involves more than just picking out comfortable chairs; it’s about creating a cohesive and enjoyable viewing experience. By understanding your needs, exploring various seating options, arranging your space thoughtfully, and enhancing comfort with accessories, you can transform your home theater into a luxurious retreat. Whether you opt for plush recliners, versatile sectionals, or sleek theater-style seats, the right choices will elevate your movie nights and make your theater room the ultimate destination for entertainment.

#modernbedroomidea

image
Giống
Bình luận
Đăng lại
Madison's Creative Pins
1 Y ·Dịch

**Cozy Bedroom Ideas: Small Space Decorating Tips and Inspirations**

Creating a cozy and inviting bedroom in a small space can be a fun challenge. With the right decorating tips and a bit of creativity, you can transform your compact bedroom into a stylish retreat. Here are some ideas to maximize comfort and style in your small bedroom:

**1. Use Light Colors**

Opt for light and neutral colors on walls, bedding, and furniture. Shades like white, soft gray, or pastel hues can make a room feel larger and more open. Light colors reflect natural light and create a sense of calm.

**2. Maximize Vertical Space**

Take advantage of vertical space by using tall bookshelves, wall-mounted storage, and hanging shelves. This approach helps you keep the floor area clear while providing ample storage.

**3. Choose Multi-Functional Furniture**

Invest in furniture that serves multiple purposes. A bed with storage drawers underneath, a fold-out desk, or a bench that doubles as storage can help you save space and keep things organized.

**4. Add Mirrors**

Mirrors can create the illusion of more space and reflect light around the room. A large mirror on one wall or a series of smaller mirrors can enhance the feeling of openness.

**5. Incorporate Soft Textures**

Soft textures like plush rugs, fluffy throws, and cozy pillows add warmth and comfort to a small bedroom. Layering these elements creates a welcoming and relaxing atmosphere.

**6. Use Vertical Stripes**

Vertical stripes on the walls or bedding can visually elongate the space and make the room appear taller. This simple trick can help draw the eye upward and enhance the sense of space.

**7. Embrace Minimalism**

Keep your décor minimal to avoid clutter. Choose a few key decorative pieces that you love and avoid overcrowding the room. Minimalism can help maintain a serene and organized environment.

**8. Optimize Lighting**

Good lighting is essential in a small bedroom. Use a mix of ambient, task, and accent lighting to create a warm and inviting ambiance. Consider wall sconces or pendant lights to save on floor space.

**9. Personalize Your Space**

Add personal touches like favorite artwork, family photos, or cherished items to make the room feel uniquely yours. Personalization adds character and makes a small space feel more like home.

**10. Go Vertical with Storage**

Utilize wall-mounted storage solutions, such as floating shelves or hooks, to keep your belongings organized and off the floor. This approach helps maximize your limited space effectively.

With these cozy bedroom ideas, you can turn your small space into a comfortable and stylish haven. Embrace creativity and practicality to make the most of your bedroom, no matter its size.

#smallbedroomideas #cozyspaces #homedecor #interiordesign #spacesavingtips

image
Giống
Bình luận
Đăng lại
Amelia's Stylish Spaces
1 Y ·Dịch

### Mastering Bedroom Organization: Your Ultimate Guide to a Clutter-Free Sanctuary

A well-organized bedroom is more than just aesthetically pleasing; it’s crucial for your overall well-being and daily efficiency. An organized space promotes relaxation, reduces stress, and enhances productivity. If your bedroom is currently a disorganized mess, fear not! This comprehensive guide will walk you through everything you need to know to transform your bedroom into a serene and orderly sanctuary.

#### 1. **Declutter: The First Step to Organization**

Before diving into organization strategies, start with decluttering. Begin by evaluating each item in your bedroom and asking yourself if it’s necessary or if it brings you joy. Sort items into three categories: keep, donate, or discard. Be ruthless—less is often more when it comes to maintaining an organized space.

**Tips for Effective Decluttering*

- **Use the Four-Box Method* Label four boxes as “Keep,” “Donate,” “Sell,” and “Trash.” Sort items into these boxes as you go.

- **Tackle One Area at a Time* Focus on one section of your bedroom—such as the closet or nightstands—to avoid feeling overwhelmed.

- **Set Time Limits* Spend a specific amount of time on decluttering each day to make the process more manageable.

#### 2. **Maximize Storage Space**

Efficient storage is key to keeping your bedroom organized. Utilize every available space with creative storage solutions that fit your needs and style.

**Storage Solutions*

- **Under-Bed Storage* Utilize the space under your bed for storing seasonal clothing, shoes, or extra linens. Invest in rolling bins or storage drawers that can easily slide out.

- **Built-In Shelves and Cabinets* Incorporate built-in furniture to save space and keep your belongings neatly arranged. Consider a headboard with built-in storage or floating shelves above your bed.

- **Over-the-Door Organizers* Use door-mounted organizers for storing accessories, shoes, or toiletries. These are perfect for small items that tend to clutter countertops and closets.

- **Multi-Functional Furniture* Opt for furniture that doubles as storage, such as ottomans with hidden compartments, storage benches, or beds with built-in drawers.

#### 3. **Create Functional Zones**

Design your bedroom with functional zones to make your space more organized and practical. Each zone should serve a specific purpose, helping to keep items where they belong and enhancing the flow of the room.

**Functional Zones to Consider*

- **Sleeping Zone* This is your main area for rest. Keep bedside tables uncluttered, and store essentials like alarm clocks, lamps, and books within easy reach.

- **Dressing Zone* Designate a space for getting dressed, complete with a full-length mirror, and organized closet or wardrobe. Use drawer dividers and closet organizers to keep clothing, accessories, and shoes neatly arranged.

- **Relaxation Zone* If you have room, create a cozy nook for reading or lounging. Add a comfortable chair, a small side table, and some calming decor to make this area inviting.

#### 4. **Implement Organizational Systems**

Adopting organizational systems can help maintain order and make it easier to find what you need when you need it. Choose systems that fit your lifestyle and the specific needs of your bedroom.

**Effective Organizational Systems*

- **Drawer Dividers* Use dividers to separate items in drawers, such as socks, underwear, or makeup. This keeps everything in its place and prevents items from getting mixed up.

- **Labeling* Label storage bins, shelves, and boxes to make it easy to identify contents at a glance. This is particularly useful for items stored out of sight.

- **Seasonal Rotation* Store off-season clothing and bedding in vacuum-sealed bags or bins to free up space in your closet and drawers.

#### 5. **Maintain Regular Upkeep**

An organized bedroom requires ongoing maintenance to prevent clutter from creeping back in. Establish habits that will help you keep your space tidy and functional.

**Maintenance Tips*

- **Daily Tidying* Spend a few minutes each day tidying up your bedroom. Make your bed, put away clothes, and clear surfaces to keep things looking fresh.

- **Weekly Cleaning* Incorporate bedroom organization into your weekly cleaning routine. Dust surfaces, vacuum or sweep the floor, and reorganize items as needed.

- **Monthly Reviews* Regularly review your storage solutions and declutter as necessary. This helps prevent accumulation and ensures your organization systems continue to meet your needs.

#### 6. **Personalize Your Space**

An organized bedroom should also reflect your personal style. Add decorative elements that make the space feel uniquely yours while maintaining functionality.

**Personalization Ideas*

- **Artwork and Photos* Display framed art or personal photos that make you smile. Keep the number of frames manageable to avoid visual clutter.

- **Decorative Baskets and Boxes* Use stylish baskets and boxes to store items while adding a decorative touch. Choose designs that complement your bedroom décor.

- **Cozy Textiles* Incorporate textiles like throw blankets, pillows, and rugs to create a warm and inviting atmosphere. Opt for colors and patterns that enhance your bedroom’s overall look.

#### 7. **Create a Sleep-Friendly Environment**

Finally, ensure your bedroom is optimized for restful sleep. A well-organized space contributes to a calming environment, which is essential for good sleep quality.

**Sleep-Friendly Tips*

- **Invest in Quality Bedding* Choose comfortable and high-quality bedding that complements your bedroom’s design. Soft sheets and a supportive mattress contribute to a restful sleep experience.

- **Limit Electronic Devices* Keep electronic devices, like phones and tablets, out of the bedroom to reduce distractions and promote better sleep.

- **Manage Light and Noise* Use blackout curtains or shades to block out light and consider white noise machines or earplugs if noise is a concern.

### Final Thoughts

Mastering bedroom organization is a rewarding process that can transform your space into a functional, serene retreat. By decluttering, maximizing storage, creating functional zones, implementing organizational systems, and personalizing your space, you can achieve a clutter-free sanctuary that enhances your daily life. Remember, the key to lasting organization is consistency—maintain your systems and make your bedroom a place where you can truly unwind and relax.

#modernbedroomdesig

image
Giống
Bình luận
Đăng lại
Showing 7621 out of 10981
  • 7617
  • 7618
  • 7619
  • 7620
  • 7621
  • 7622
  • 7623
  • 7624
  • 7625
  • 7626
  • 7627
  • 7628
  • 7629
  • 7630
  • 7631
  • 7632
  • 7633
  • 7634
  • 7635
  • 7636

Chỉnh sửa phiếu mua hàng

Thêm bậc


Chọn một hình ảnh
Xóa bậc của bạn
Bạn có chắc chắn muốn xóa tầng này không?

Nhận xét

Để bán nội dung và bài đăng của bạn, hãy bắt đầu bằng cách tạo một vài gói. Kiếm tiền

Thanh toán bằng ví

Thông báo Thanh toán

Bạn sắp mua các mặt hàng, bạn có muốn tiếp tục không?

Yêu cầu hoàn lại