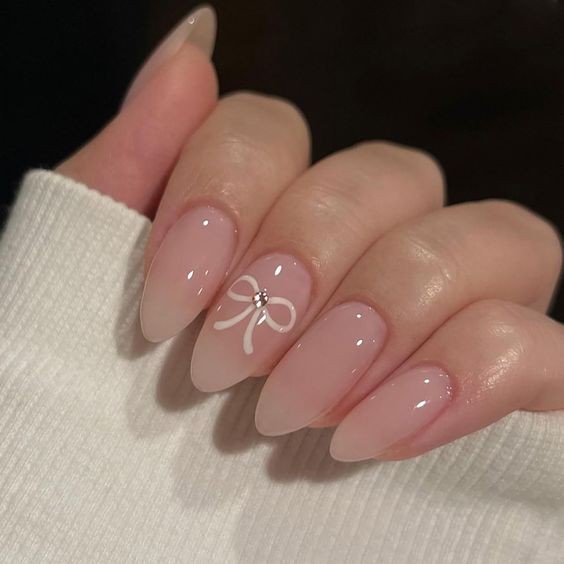
Good and Bad People Good and Bad People
    #socialmedia #usa #uk #contentwriter #ai
    Avanceret søgning
  • Log på
  • Tilmeld

  • Nattilstand
  • © 2025 Good and Bad People
    Om • Vejviser • Kontakt os • Udviklere • Fortrolighedspolitik • Vilkår for brug • Tilbagebetale • Referral Terms • Acceptable Use Policy • Community Guidelines • Write for Us

    Vælg Sprog

  • Arabic
  • Bengali
  • Chinese
  • Croatian
  • Danish
  • Dutch
  • English
  • Filipino
  • French
  • German
  • Hebrew
  • Hindi
  • Indonesian
  • Italian
  • Japanese
  • Korean
  • Persian
  • Portuguese
  • Russian
  • Spanish
  • Swedish
  • Turkish
  • Urdu
  • Vietnamese

Holde øje

Holde øje Hjul

Begivenheder

Gennemse begivenheder Mine begivenheder

Blog

Gennemse artikler

Marked

Seneste produkter

sider

Mine sider Synes godt om sider

Mere

Udforske Populære opslag Jobs Tilbud Finansiering
Hjul Holde øje Begivenheder Marked Blog Mine sider Se alt

Opdage indlæg

Posts

Brugere

sider

Gruppe

Blog

Marked

Begivenheder

Jobs

Finansiering

Violet Creative Pins
1 Y ·Oversætte

Top 40 Trending Ombre French Manicure Designs Right Now

Nail art trends are constantly evolving, but one style that has consistently captured attention is the ombre French manicure. This chic twist on the classic French manicure combines the timeless elegance of the French tip with the modern, gradient effect of ombre. Whether you’re preparing for a special occasion or simply want to refresh your everyday look, exploring the latest ombre French manicure designs can provide the perfect inspiration. Here’s a look at the top 40 trending ombre French manicure designs right now.

What is an Ombre French Manicure?

An ombre French manicure is a sophisticated variation of the traditional French manicure. It features a gradient effect where the color transitions smoothly from one shade to another, usually from a darker to a lighter tone, or vice versa. This gradient effect adds a modern and eye-catching twist to the classic French tip.

Top 40 Trending Designs

Classic Pink Ombre: A subtle transition from soft pink to clear, perfect for a timeless and elegant look.

Bold Red Ombre: Start with a deep red at the base and fade to a brighter red at the tips for a dramatic effect.

Pastel Ombre: Light pastel shades blend seamlessly for a soft and dreamy look.

Nude Ombre: Nude tones with a gradient effect provide a sophisticated, understated elegance.

Glitter Ombre: Add a touch of sparkle by blending glitter with your base color for a glamorous finish.

White Ombre: A crisp white gradient that offers a clean and classic look with a modern twist.

Pink and Gold Ombre: Combine soft pink with gold for a luxurious and festive design.

Purple Ombre: From lavender to deep purple, this ombre effect creates a rich and royal look.

Blue Ombre: Cool blue tones fading into a lighter blue or white create a refreshing and stylish manicure.

Green Ombre: Transition from a deep emerald to a mint green for a unique and eye-catching design.

Red and Black Ombre: Bold and dramatic, this design features a gradient from deep red to sleek black.

Orange Ombre: Bright and vibrant, this design blends different shades of orange for a warm and cheerful look.

Peach Ombre: Soft peach tones that transition smoothly create a delicate and feminine appearance.

Coral Ombre: Combining coral shades for a vibrant and tropical-inspired design.

Gray Ombre: A sleek gradient from light gray to dark gray offers a modern and minimalist style.

Turquoise Ombre: A blend of turquoise shades creates a stunning and eye-catching effect.

Metallic Ombre: Shine with a metallic gradient, from silver to gold or rose gold.

Marble Ombre: Incorporate marble patterns into the ombre effect for a sophisticated and unique look.

Black and White Ombre: Classic black and white create a striking and timeless design.

Pink and Purple Ombre: A playful blend of pink and purple tones for a fun and vibrant look.

Lime Green Ombre: Fresh and lively, this design transitions from a bright lime green to a softer shade.

Brown Ombre: Warm brown tones that fade into a lighter beige for a natural and earthy look.

Burgundy Ombre: Rich burgundy fading to a lighter shade for an elegant and luxurious manicure.

Mint Green Ombre: Cool mint green tones transitioning from dark to light for a refreshing style.

Lavender Ombre: Soft lavender shades that blend seamlessly for a delicate and calming design.

Copper Ombre: A gradient of copper tones for a warm and sophisticated appearance.

Rose Gold Ombre: Combining rose gold with a gradient effect for a chic and trendy look.

Lilac Ombre: Light lilac tones fading into a deeper shade for a romantic and soft design.

Seafoam Ombre: Blending seafoam green with a lighter shade for a serene and calming manicure.

Electric Blue Ombre: Bold electric blue fading into a lighter shade for a striking and vibrant look.

Burgundy and Gold Ombre: A luxurious combination of deep burgundy and gold for a glamorous finish.

Teal Ombre: Combining teal shades for a rich and unique gradient effect.

Pink and Silver Ombre: A blend of pink and silver for a modern and elegant design.

Red and Pink Ombre: Transition from a deep red to a soft pink for a playful and romantic look.

Yellow Ombre: Bright yellow tones fading into a softer shade for a cheerful and sunny design.

Dark Blue Ombre: Rich navy blue transitioning to a lighter blue for a sophisticated and stylish manicure.

Champagne Ombre: Soft champagne tones with a gradient effect for a subtle yet elegant look.

Aqua Ombre: Fresh aqua shades blending seamlessly for a cool and trendy appearance.

Fuchsia Ombre: Vibrant fuchsia transitioning to a lighter shade for a bold and fun design.

Classic Beige Ombre: Neutral beige tones blending from dark to light for a sophisticated and versatile look.

How to Achieve the Perfect Ombre French Manicure

Creating a flawless ombre French manicure requires some practice, but following these steps can help you achieve a professional-looking result:

Prep Your Nails: Start with clean, trimmed, and buffed nails. Apply a base coat to protect your natural nails and ensure a smooth surface for the polish.

Apply Base Color: Choose your base color for the French tips. Apply it to the tip of each nail and let it dry completely.

Create the Ombre Effect: Use a sponge to apply the gradient. Dip the sponge into the two colors you’re blending and gently press it onto your nails to create the ombre effect. Blend the colors together for a seamless transition.

Add French Tips: Once the ombre gradient is dry, apply white or your chosen French tip color along the edge of each nail.

Seal with Top Coat: Finish with a clear top coat to seal the design and add shine. This will also help the manicure last longer.

Conclusion

The ombre French manicure is a stylish and modern twist on the classic French manicure that continues to trend. With these top 40 designs, you can explore a wide range of looks from subtle gradients to bold contrasts. Whether you prefer soft pastels or vibrant hues, there’s an ombre French manicure design to suit every style and occasion. Embrace the trend and elevate your nail game with these stunning designs!

image
Synes godt om
Kommentar
Del
Madison's Creative Pins
1 Y ·Oversætte

**Elevate Your Wardrobe with the Cream Longline Cardigan by Landon**

When it comes to timeless fashion staples, the cardigan has always held a special place in the wardrobe. Whether for casual outings or a polished office look, a well-crafted cardigan can seamlessly blend comfort with style. The Cream Longline Cardigan by Landon is a perfect example of this, offering a versatile piece that enhances any outfit.

### A Versatile Wardrobe Essential

The Cream Longline Cardigan by Landon is designed with versatility in mind. Its elegant cream hue makes it a neutral piece that pairs effortlessly with various colors and patterns. Whether you’re dressing up for a day at work or looking for a cozy layer to throw over your weekend attire, this cardigan is your go-to option.

### Timeless Design Meets Modern Comfort

Crafted from high-quality, soft fabric, the Cream Longline Cardigan ensures you stay warm without compromising on style. The longline design adds a touch of sophistication, elongating your silhouette and providing that extra bit of coverage. It’s perfect for those cooler days when you want to stay comfortable yet chic.

### Effortless Styling

One of the standout features of the Landon cardigan is its ability to elevate even the simplest of outfits. Pair it with jeans and a t-shirt for a casual look, or drape it over a dress for an elegant finish. The open front design allows for easy layering, while the neutral color ensures it complements any ensemble. The cardigan’s lightweight material also makes it ideal for transitioning between seasons.

### A Must-Have for Any Fashion-Forward Wardrobe

The Cream Longline Cardigan by Landon is more than just a layering piece; it’s a fashion statement. Its blend of classic design and modern comfort makes it a must-have for anyone looking to build a versatile, stylish wardrobe.

Whether you’re shopping for a new staple or looking to add a touch of elegance to your existing collection, this cardigan is a perfect choice. #fashion #styleessentials #cardigan #landon #fallfashion #wardrobestaple

image
Synes godt om
Kommentar
Del
Violet Creative Pins
1 Y ·Oversætte

Transform Your Look with Short Almond Green Press-On Fake Nails

In the world of beauty, nails are more than just a finishing touch—they’re a form of self-expression. Whether you’re going for a bold, eye-catching look or something more understated, your nails can make a powerful statement. If you’re short on time but still want to keep your nails looking fresh and stylish, short almond green press-on fake nails are your new best friend.

Why Short Almond Nails?

Short nails are making a comeback, and it’s easy to see why. They’re practical, easy to maintain, and can still be incredibly stylish. The almond shape is particularly flattering because it elongates the fingers and adds a touch of elegance to any hand. Short almond nails offer a perfect balance between style and functionality—giving you a chic, sophisticated look without the hassle of longer nails.

The Allure of Green

Green nails are having a moment in the beauty world, and for good reason. This versatile color symbolizes growth, renewal, and a connection to nature. It’s a refreshing choice that can add a pop of color to your look without being too overpowering. Here’s why green is a must-try for your next manicure:

Versatile Shades: From soft pastels to deep forest greens, there’s a shade of green to suit every style and season.

Seasonal Appeal: Light green shades are perfect for spring and summer, while darker tones are ideal for fall and winter.

Complements Any Outfit: Green is surprisingly versatile and pairs well with a wide range of colors and styles, making it a great choice for any occasion.

Benefits of Press-On Nails

Gone are the days when press-on nails were considered a last resort. Today’s press-on nails are durable, reusable, and designed to look just as good as a salon manicure. Here are some of the top reasons to opt for press-on nails:

Quick and Easy: Applying press-on nails takes just minutes, making them perfect for anyone with a busy lifestyle.

Cost-Effective: At a fraction of the cost of a salon visit, press-on nails allow you to experiment with different styles without breaking the bank.

Damage-Free: Unlike acrylics or gels, press-ons don’t damage your natural nails. They’re easy to apply and remove, leaving your nails healthy and strong.

Versatile: With a wide range of shapes, lengths, and designs, press-on nails offer endless possibilities for customization.

How to Apply Short Almond Green Press-On Nails

Applying press-on nails is a breeze, but following these steps will ensure they look flawless and last longer:

Prep Your Nails: Start by cleaning your natural nails with a gentle nail polish remover to eliminate any oils or residue. Push back your cuticles and lightly buff the surface of your nails to help the adhesive stick better.

Select the Right Size: Choose the press-on nails that best fit your natural nail sizes. If necessary, file the sides of the press-ons for a perfect fit.

Apply Adhesive: Use either the adhesive tabs provided or a small amount of nail glue for a stronger hold. Apply the adhesive to the back of the press-on nail.

Press and Hold: Align the press-on nail with your cuticle and press down firmly, holding it in place for about 30 seconds to ensure it adheres securely.

Finish and Shape: Once all nails are applied, you can gently file the tips to perfect the shape or smooth any rough edges.

Tips for Making Your Press-On Nails Last

To get the most out of your press-on nails, avoid exposing them to water for extended periods in the first few hours after application. Wearing gloves while doing household chores can also help protect them from damage. Additionally, try to avoid using your nails as tools to prevent chipping or lifting.

Removal Process

When it’s time to take off your press-on nails, the process is simple and gentle on your natural nails. Soak your nails in warm, soapy water for about 10 minutes to soften the adhesive. Then, gently lift the edges of the press-on nails with a cuticle stick, and they should come off easily. Any leftover adhesive can be removed with a bit of acetone or nail polish remover.

Conclusion

Short almond green press-on fake nails are the perfect way to add a touch of elegance and style to your look without the time and expense of a salon visit. Whether you’re new to press-ons or a seasoned pro, these nails offer a quick, easy, and affordable way to keep your nails looking fabulous. With their versatile shade and flattering shape, they’re sure to become a staple in your beauty routine. So why wait? Try them out and enjoy a fresh, chic manicure in minutes!

image
Synes godt om
Kommentar
Del
Lyra's Glam Saga
Lyra's Glam Saga
1 Y ·Oversætte

### Bold Chocolate Chrome Long Nails: Luxe and Edgy Metallic Perfection

In the world of nail fashion, few trends have the power to make as bold a statement as the **chocolate chrome long nails** trend. Merging the opulence of chocolate tones with the modern flair of chrome, this nail style offers a strikingly sophisticated look that exudes both luxury and edge. This article delves into why this trend is capturing attention, how to achieve the perfect chocolate chrome nails, and styling tips to help you make the most of this chic trend.

#### Why Chocolate Chrome Long Nails Are a Must-Try

**1. **Luxurious Appeal*
Chocolate chrome nails bring a sense of luxury to the fingertips. The rich, deep brown hue reminiscent of high-quality chocolate, paired with the reflective chrome finish, creates a look that's both elegant and extravagant. This combination is ideal for those who want their nails to make a statement of refined sophistication.

**2. **Edgy and Modern*
The chrome finish adds an edgy, futuristic twist to the classic chocolate shade. It gives the nails a high-shine, mirror-like quality that stands out from traditional polish. This contrast between the classic and the contemporary makes chocolate chrome long nails a bold choice for anyone looking to experiment with their nail style.

**3. **Versatile Fashion Statement*
Chocolate chrome nails are incredibly versatile. The deep chocolate color is neutral enough to complement a wide range of outfits, while the chrome finish adds a modern touch that works for both formal events and casual outings. Whether you’re dressing up for a night out or keeping it chic for everyday wear, these nails fit seamlessly into any wardrobe.

#### How to Achieve the Perfect Chocolate Chrome Long Nails

**1. **Gather Your Supplies*
To create the perfect chocolate chrome long nails, you'll need the following:
- **Base Coat* To protect your natural nails and create a smooth surface for the polish.
- **Chocolate Gel Polish* A high-quality, deep chocolate gel polish for the base color.
- **Chrome Powder* Choose a chrome powder that complements the chocolate shade.
- **Top Coat* To seal the design and add shine.
- **Nail Tools* Applicators for the chrome powder, UV/LED lamp for curing, and nail brushes for precision.

**2. **Prepare Your Nails*
Start with clean, filed nails. Trim and shape your nails to the desired length, typically long and almond or stiletto for this style. Push back your cuticles and ensure your nails are free of oils or residues. Proper preparation is key to achieving a smooth and long-lasting manicure.

**3. **Apply the Base Coat*
Apply a thin layer of base coat to your nails. This helps protect your natural nails and provides a smooth surface for the color application. Cure the base coat under a UV or LED lamp as per the product’s instructions.

**4. **Apply the Chocolate Gel Polish*
Apply a thin layer of chocolate gel polish to your nails. Be sure to cover the entire nail evenly. Cure the polish under the UV or LED lamp. Depending on the opacity of the polish, you may need to apply a second coat to achieve a rich, deep color. Cure each coat thoroughly to ensure proper setting.

**5. **Apply the Chrome Powder*
Once the polish is fully cured, use a small applicator or sponge to rub the chrome powder onto the nails. The powder should adhere to the gel polish, creating a reflective, metallic finish. Apply the powder evenly to achieve a consistent look.

**6. **Seal with a Top Coat*
Apply a top coat over the chrome powder to seal the design and enhance the shine. Cure the top coat under the UV or LED lamp to set it properly. This step is crucial for adding durability and preventing chipping.

**7. **Maintain Your Manicure*
To keep your chocolate chrome long nails looking their best, avoid using your nails as tools and be mindful of activities that could cause damage. Regular touch-ups and proper nail care will help maintain the vibrant, glossy appearance of your manicure.

#### Styling Tips and Tricks

**1. **Complementary Fashion Choices*
Chocolate chrome nails are versatile and can complement a range of outfits. For a sophisticated look, pair them with neutral or earth-tone clothing. If you’re aiming for a bold statement, consider contrasting them with vibrant colors or metallic accessories.

**2. **Minimalistic Jewelry*
To let your chocolate chrome nails shine, opt for minimalistic jewelry. Simple gold or silver pieces can enhance the luxurious feel without overpowering the boldness of the nails.

**3. **Occasion Suitability*
These nails are suitable for various occasions. From formal events like weddings or galas to casual outings or parties, chocolate chrome long nails provide a touch of glamour that fits many settings. Adapt your outfit and accessories to match the sophistication of your nails.

**4. **Personalization Options*
If you want to add a personal touch, consider experimenting with nail art. Subtle designs like geometric patterns, stripes, or small gemstones can enhance the overall look while keeping the focus on the bold chocolate chrome finish.

#### Embracing the Trend

**1. **Trend Adaptation*
Chocolate chrome long nails are a testament to the blending of classic elegance with modern style. Embrace this trend by adapting it to suit your personal taste and preferences. Whether you opt for a traditional almond shape or a more dramatic stiletto, the key is to let the bold chrome finish shine.

**2. **DIY or Professional Application*
While achieving this look at home is possible with the right tools and techniques, you might prefer to visit a professional nail salon for a flawless finish. Professional nail technicians can ensure precise application and long-lasting results.

**3. **Stay Updated*
Nail trends are always evolving, so staying updated with the latest styles and techniques will help keep your look fresh. Chocolate chrome long nails may be a standout trend now, but exploring new trends will ensure your nail game remains on point.

#### Conclusion

**Bold Chocolate Chrome Long Nails** offer a unique blend of luxury and edge, combining rich chocolate tones with a striking chrome finish. This trend provides a chic, modern look that’s versatile enough for various occasions and outfits. By following the steps outlined and incorporating personalized styling tips, you can achieve a stunning manicure that exudes both sophistication and boldness. Embrace the trend, experiment with your style, and enjoy the elegant, edgy allure of chocolate chrome long nails.

image
Synes godt om
Kommentar
Del
Lyra's Glam Saga
Lyra's Glam Saga
1 Y ·Oversætte

### Blue Glazed Chrome Short Nails: Effortlessly Cool and Modern for a Chic Look

As nail trends continue to evolve, one design that has recently captured the spotlight is the blue glazed chrome short nail. Combining the sleekness of chrome with the tranquility of blue tones, this nail trend is a perfect blend of modern sophistication and chic style. Here's an in-depth look at why blue glazed chrome short nails are making waves and how you can achieve this stunning look.

#### The Allure of Blue Glazed Chrome Nails

**1. **Striking Aesthetic*
Blue glazed chrome nails offer a unique and captivating visual appeal. The glazed finish gives the nails a reflective, almost liquid-like quality that catches the light beautifully. This effect, combined with the deep blue hue, creates a striking and modern look that’s hard to ignore.

**2. **Versatile Style*
The cool blue tone of these nails can complement a wide range of outfits and occasions. Whether you’re heading to a formal event or a casual day out, blue glazed chrome nails can add a touch of sophistication to any look. Their versatility makes them an excellent choice for those who want a stylish and adaptable nail design.

**3. **Chic Modernity*
Short nails are having a moment, and the blue glazed chrome trend exemplifies this movement perfectly. The modern aesthetic of short nails paired with the high-shine chrome finish results in a chic, contemporary style that suits a variety of tastes and preferences.

#### Achieving the Perfect Blue Glazed Chrome Short Nails

**1. **Prepare Your Nails*
Start with clean, trimmed nails. If necessary, file your nails into a short, square or rounded shape to achieve the desired length. Push back the cuticles gently and ensure your nails are free from oils or residues. This preparation is crucial for a smooth and long-lasting manicure.

**2. **Choose the Right Products*
To achieve the blue glazed chrome look, you’ll need a few key products:
- **Base Coat* A base coat will help protect your natural nails and provide a smooth surface for the color application.
- **Blue Gel Polish* Opt for a high-quality blue gel polish that offers a deep, vibrant hue.
- **Chrome Powder* This powder is essential for creating the glazed, reflective finish. Make sure to choose a chrome powder that complements your chosen blue shade.
- **Top Coat* A top coat seals the design, adding shine and durability.

**3. **Apply the Base Coat*
Apply a thin layer of base coat to your nails and cure it under a UV or LED lamp according to the product instructions. This step ensures that your nails are properly prepared for the color application and helps the polish adhere better.

**4. **Apply the Blue Gel Polish*
Apply a thin, even layer of blue gel polish to your nails. Cure the polish under the UV or LED lamp. Depending on the opacity of the polish, you may need to apply a second coat to achieve a rich, even color. Be sure to cure each coat thoroughly.

**5. **Apply the Chrome Powder*
Using a small applicator or sponge, gently rub the chrome powder onto your cured blue gel polish. The powder should adhere to the surface, creating a glossy, reflective finish. Be sure to apply the powder evenly for a consistent look.

**6. **Seal with a Top Coat*
Finish the manicure by applying a top coat over the chrome powder. This step will seal the design, adding extra shine and protection. Cure the top coat under the lamp to ensure it is fully set.

**7. **Maintain Your Manicure*
To keep your blue glazed chrome short nails looking fresh, avoid using your nails as tools and be mindful of activities that could cause chipping. Regular touch-ups and proper nail care will help maintain the vibrant, glossy appearance of your nails.

#### Styling Tips and Tricks

**1. **Complementary Outfits*
Blue glazed chrome nails pair well with both neutral and bold outfits. For a sophisticated look, combine them with classic black or white attire. For a more vibrant style, match them with other blue tones or contrasting colors like orange or gold.

**2. **Minimalistic Jewelry*
To enhance the chic aesthetic of your blue glazed chrome nails, opt for minimalistic jewelry. Delicate silver or gold pieces can complement the sleekness of the nails without overshadowing them.

**3. **Occasion Versatility*
Blue glazed chrome nails are versatile enough to be worn for various occasions. Whether you’re attending a formal event, a casual outing, or a night out with friends, this nail design adds a touch of modern elegance to your look.

**4. **Experiment with Patterns*
If you want to add a personal touch to your manicure, consider experimenting with patterns or designs. Subtle accents like geometric shapes, stripes, or tiny gemstones can enhance the overall look while maintaining the chic essence of blue glazed chrome nails.

#### Embracing the Trend

**1. **Trend Adaptation*
Blue glazed chrome short nails are a reflection of current trends that favor sleek, modern designs. Embrace this trend and explore how it can be adapted to suit your personal style and preferences.

**2. **DIY or Professional*
If you’re confident in your nail art skills, you can achieve this look at home using gel polish and chrome powder. Alternatively, visit a professional nail salon for a flawless, salon-quality finish.

**3. **Stay Updated*
Nail trends are ever-evolving, so stay updated with the latest styles and techniques. Blue glazed chrome short nails may be a current favorite, but keeping an eye on emerging trends will ensure your nail game remains fresh and on point.

#### Conclusion

**Blue Glazed Chrome Short Nails** offer a perfect blend of modern sophistication and chic elegance. Their striking appearance, combined with the versatility of short nails, makes them an ideal choice for anyone looking to make a stylish statement. Whether you’re heading to a special event or simply want to elevate your everyday look, blue glazed chrome short nails provide a fresh and contemporary option that’s sure to turn heads. Embrace this trend and enjoy the effortless cool and modern charm of blue glazed chrome nails.

image
Synes godt om
Kommentar
Del
Siennas Crafted Nails
1 Y ·Oversætte

9 Trending Decor Styles You Need to Know and How to Perfectly Incorporate Them into Your Home

Are you looking to revamp your living space with the latest decor trends? Whether you're planning a complete overhaul or just a few updates, incorporating trending styles can breathe new life into your home. Here’s a guide to nine hot decor styles and tips on how to seamlessly integrate them into your space.

1. Sustainable Chic
What It Is: Sustainable Chic combines eco-friendly materials with stylish design, emphasizing sustainability without compromising on aesthetics. Think recycled materials, natural fibers, and energy-efficient solutions.

How to Incorporate It: Start with statement pieces made from reclaimed wood or bamboo. Opt for low-VOC paints and choose furniture from local artisans. Incorporate indoor plants to improve air quality and add a touch of nature.

2. Minimalist Modern
What It Is: Minimalist Modern is all about simplicity and functionality. Clean lines, neutral colors, and uncluttered spaces define this style.

How to Incorporate It: Choose furniture with sleek, geometric shapes and keep your color palette neutral. Invest in quality over quantity—less is more. Utilize hidden storage to maintain an open, airy feel.

3. Bohemian Vibes
What It Is: Bohemian, or Boho, style is eclectic and free-spirited, characterized by vibrant colors, mixed patterns, and a relaxed, inviting atmosphere.

How to Incorporate It: Layer rugs with different patterns, mix and match textiles, and use eclectic accessories like macramé wall hangings and vintage finds. Create cozy nooks with floor cushions and throws.

4. Industrial Elegance
What It Is: Industrial Elegance blends raw, unfinished elements with sophisticated, refined details. This style features exposed brick, metal accents, and reclaimed wood.

How to Incorporate It: Combine industrial fixtures like metal pendant lights and exposed pipes with elegant furnishings such as plush velvet sofas and polished marble tables. Contrast the rugged elements with softer textures.

5. Scandinavian Simplicity
What It Is: Scandinavian design focuses on minimalism, functionality, and natural elements. It’s known for its light color palette, simple lines, and cozy accents.

How to Incorporate It: Choose furniture with clean lines and neutral tones. Incorporate natural materials like wood and wool. Add cozy throws and pillows to create a warm, inviting atmosphere.

6. Mid-Century Modern
What It Is: Mid-Century Modern features retro designs from the 1950s and 60s, characterized by clean lines, organic shapes, and functional form.

How to Incorporate It: Opt for furniture with tapered legs and iconic designs like Eames chairs or teak coffee tables. Use bold, geometric patterns and add pops of color with accessories.

7. Transitional Elegance
What It Is: Transitional style blends traditional and contemporary elements, creating a balanced and timeless look.

How to Incorporate It: Mix classic furniture pieces with modern accents. Combine elegant fabrics like silk or linen with contemporary finishes. Use a neutral palette with occasional bold accents to create visual interest.

8. Coastal Comfort
What It Is: Coastal Comfort evokes a relaxed, beachy vibe with light, airy colors and natural textures. Think sea-inspired hues and easygoing decor.

How to Incorporate It: Use light, breezy fabrics and nautical motifs. Incorporate natural materials like rattan and driftwood. Keep the color scheme light and fresh with shades of blue, beige, and white.

9. Farmhouse Fresh
What It Is: Farmhouse Fresh combines rustic charm with modern comforts. It’s characterized by its warm, inviting feel and practical, functional design.

How to Incorporate It: Opt for farmhouse-style furniture like reclaimed wood tables and vintage-inspired décor. Use neutral tones with occasional pops of color. Add cozy elements such as woven baskets and patterned rugs.

Final Tips
When incorporating these trends, remember to stay true to your personal style. Trends can provide inspiration, but your home should reflect your tastes and needs. Mix and match styles to create a space that's uniquely yours, and enjoy the process of transforming your home!

Ready to dive into these trends? Start with one or two styles and gradually build your perfect space. Happy decorating!

image
Synes godt om
Kommentar
Del
Violet Creative Pins
1 Y ·Oversætte

Elevate Your Style with Medium Length Almond-Shaped Press-On Nails with Design

When it comes to beauty trends, nails are always at the forefront. Whether you’re scrolling through social media or flipping through a fashion magazine, you’re bound to see a wide variety of stunning nail designs. But what if you don’t have the time or budget for regular salon visits? That’s where medium length almond-shaped press-on nails with design come in—a chic, affordable, and convenient solution for achieving salon-quality nails at home.

The Appeal of Medium Length Nails

Medium length nails strike the perfect balance between style and functionality. They’re long enough to make a statement but short enough to be practical for everyday activities. Whether you’re typing away at your keyboard, cooking dinner, or hitting the gym, medium-length nails won’t get in your way. Plus, they’re incredibly versatile, offering a canvas for various nail designs without overwhelming your look.

Why Almond Shape?

The almond shape is one of the most popular nail shapes for a reason. It’s universally flattering, elongating the fingers and adding a touch of elegance to any hand. The tapered tip and slightly rounded edges give almond-shaped nails a sophisticated and feminine look that’s perfect for any occasion. Whether you’re dressing up for a special event or keeping it casual, almond-shaped nails will complement your style beautifully.

The Power of Design

Adding a design to your nails is a fantastic way to express your personality and creativity. With medium length almond-shaped press-on nails, the design possibilities are endless. From minimalist patterns to intricate artwork, there’s a style for everyone. Some popular design options include:

Geometric Patterns: Clean lines and shapes create a modern, edgy look.

Floral Designs: Perfect for a soft, romantic vibe.

Glitter Accents: Add a touch of sparkle for a glamorous finish.

Marble Effects: A chic and sophisticated option that’s always on-trend.

French Tips: A classic choice with a twist—try colored or ombre tips for a modern update.

These designs are pre-applied to the press-on nails, making it easy for you to achieve a flawless, professional look in minutes.

Benefits of Press-On Nails

Press-on nails have come a long way from the flimsy, easily breakable versions of the past. Today’s press-on nails are durable, reusable, and come in a wide range of shapes, lengths, and designs. Here are some key benefits:

Easy Application: Applying press-on nails takes just minutes. All you need to do is prep your natural nails, apply adhesive, and press the nails in place.

Affordable: Press-on nails are a fraction of the cost of salon manicures, allowing you to switch up your look as often as you like without breaking the bank.

Damage-Free: Unlike acrylics or gels, press-ons don’t damage your natural nails. They’re easy to remove and leave your nails healthy and strong.

Convenient: Press-on nails are perfect for those who don’t have time for regular salon visits. You can achieve a professional-looking manicure from the comfort of your home.

How to Apply Your Press-On Nails

Achieving a long-lasting and flawless finish with press-on nails is easy if you follow these steps:

Prepare Your Nails: Start with clean, dry nails. Push back your cuticles and lightly buff the surface of your nails to help the adhesive stick better.

Select the Right Size: Choose the press-on nails that best match your natural nail sizes. If needed, file the sides of the press-ons for a perfect fit.

Apply Adhesive: Depending on your preference, use either adhesive tabs or nail glue for a strong hold. Apply the adhesive to the back of the press-on nail.

Press and Hold: Align the press-on nail with your cuticle and press down firmly, holding it in place for about 30 seconds to ensure it adheres securely.

Finish and Shape: Once all nails are applied, you can gently file the tips to perfect the shape or smooth any rough edges.

Tips for Making Your Press-On Nails Last

To maximize the longevity of your press-on nails, avoid submerging them in water for extended periods within the first few hours after application. Wearing gloves while doing household chores can also help protect them from damage. Additionally, try to avoid using your nails as tools to prevent chipping or lifting.

Removal Process

When it’s time to take off your press-on nails, the process is simple and gentle on your natural nails. Soak your nails in warm, soapy water for about 10 minutes to soften the adhesive. Then, gently lift the edges of the press-on nails with a cuticle stick, and they should come off easily. Any leftover adhesive can be removed with a bit of acetone or nail polish remover.

Conclusion

Medium length almond-shaped press-on nails with design are a stylish, convenient, and affordable way to elevate your nail game. Whether you’re looking for a quick and easy manicure solution or want to experiment with different designs, press-on nails offer endless possibilities. With their easy application and damage-free removal, you can enjoy salon-quality nails without the hassle or expense. So why wait? Try them out and see how they can transform your look!

image
Synes godt om
Kommentar
Del
Lyra's Glam Saga
Lyra's Glam Saga
1 Y ·Oversætte

### Violet Luxury Nails: Stunning Purple Shades in Oval, Almond, Square, Coffin, and Stiletto Shapes for Fall

As the leaves turn and the air cools, fall offers the perfect opportunity to embrace new trends and elevate your style. This season, one trend that's making waves is the sophisticated allure of violet luxury nails. Combining rich purple shades with a variety of nail shapes—oval, almond, square, coffin, and stiletto—these nails are the ultimate accessory for a chic and modern look. Here’s why violet luxury nails are the perfect choice for fall and how you can make the most of this stunning trend.

#### The Allure of Violet Luxury Nails

**1. **Rich and Elegant Shades*
Purple is a color that exudes luxury and elegance. From deep, regal violets to softer, lavender hues, violet luxury nails offer a spectrum of shades that add a touch of sophistication to any look. The color's versatility allows it to seamlessly transition from day to night, making it an ideal choice for various occasions.

**2. **Seasonal Charm*
Fall is the perfect season to embrace deeper, more intense colors. Violet nails capture the essence of autumn with their rich tones, complementing the seasonal palette of warm, earthy hues. Whether you're attending a fall wedding or simply enjoying cozy evenings, violet nails add a seasonal touch that's both elegant and stylish.

**3. **Versatile Shapes*
One of the standout features of violet luxury nails is the variety of shapes available. Each shape offers a unique aesthetic, allowing you to choose the one that best suits your style and personality. From classic oval to edgy stiletto, there's a shape for every preference.

#### Nail Shapes and Their Impact

**1. **Oval*
The oval shape is a timeless classic that elongates the fingers and offers a feminine, elegant look. It's perfect for those who prefer a subtle and refined style. The gentle curves of oval nails provide a sophisticated backdrop for violet shades, enhancing the overall chicness of the manicure.

**2. **Almond*
Almond-shaped nails combine the elegance of oval nails with a slightly pointed tip, creating a more modern and trendy appearance. This shape is versatile and flattering on most hands, making it a popular choice for those who want a blend of classic and contemporary styles.

**3. **Square*
Square nails offer a bold, clean look that's both practical and stylish. The sharp edges of square nails provide a striking contrast to the rich violet color, making a strong fashion statement. This shape is ideal for those who prefer a more geometric and structured appearance.

**4. **Coffin*
Coffin-shaped nails, also known as ballerina nails, feature a tapered tip with a flat edge. This shape is perfect for those who want a dramatic and edgy look. The long, slender design of coffin nails allows for more creativity in nail art and makes the violet hue stand out even more.

**5. **Stiletto*
Stiletto nails are characterized by their sharp, pointed tips, creating a bold and fierce look. This shape is ideal for those who want to make a statement and showcase their edgy style. The dramatic silhouette of stiletto nails pairs beautifully with deep violet shades, adding a touch of glamour and sophistication.

#### How to Achieve the Perfect Violet Luxury Nails

**1. **Choose Your Shade*
Select the violet shade that best suits your style and skin tone. Rich, dark purples offer a dramatic and luxurious look, while lighter lilacs provide a softer, more delicate appearance. Consider the occasions you’ll be attending and choose a shade that complements your outfits.

**2. **Prepare Your Nails*
Start with clean, trimmed nails. If needed, file your nails into your desired shape and gently push back the cuticles. Applying a base coat will protect your natural nails and ensure a smooth application of the color.

**3. **Apply the Color*
Choose a high-quality nail polish or gel that offers a deep, vibrant violet color. Apply the polish in thin, even coats to avoid streaks and ensure a smooth finish. Depending on the opacity of the polish, you may need two to three coats. Allow each coat to dry completely before applying the next one.

**4. **Finish with a Top Coat*
A top coat will add shine and protect your manicure from chipping. Apply a generous layer of top coat over your violet nails to enhance the color and ensure a long-lasting finish.

**5. **Maintain Your Manicure*
To keep your violet luxury nails looking their best, avoid using them as tools and be mindful of activities that could cause chipping. Regular touch-ups and proper nail care can help maintain the vibrant appearance of your manicure.

#### Embracing the Trend

**1. **Accessorize Thoughtfully*
Violet luxury nails can be complemented with minimalistic or statement jewelry, depending on the occasion. For a sophisticated look, opt for delicate silver or gold pieces. For a bolder statement, consider chunky rings or statement earrings that enhance the luxurious feel of your nails.

**2. **Match with Outfits*
Violet nails pair well with a variety of outfits. For a classic look, match them with neutral tones or monochromatic ensembles. For a more daring style, contrast the violet with vibrant patterns or rich, complementary colors.

**3. **Personalize Your Look*
Consider adding subtle nail art or embellishments to personalize your violet luxury nails. Minimalistic designs, such as delicate gold accents or tiny gemstones, can enhance the overall elegance without overpowering the color.

**4. **Seasonal Adaptations*
Violet nails are versatile enough to adapt to different seasons. In fall, they can complement warm, earthy tones and cozy outfits. As the seasons change, you can experiment with different shades and nail art to keep your look fresh and on-trend.

#### Conclusion

**Violet Luxury Nails** offer a blend of sophistication and modernity that’s perfect for fall. The rich purple hues, combined with a variety of shapes, create a striking and elegant look that enhances any style. Whether you prefer the classic oval, trendy almond, bold square, dramatic coffin, or edgy stiletto shape, violet luxury nails are the ultimate accessory for those looking to make a chic and stylish statement. Embrace this trend and discover how violet luxury nails can elevate your overall look, adding a touch of glamour and sophistication to your fall wardrobe.

image
Synes godt om
Kommentar
Del
Madison's Creative Pins
1 Y ·Oversætte

### The Perfect Blend of Style and Comfort: Reversible Hooded Jacket in Teddy Wool

Looking to elevate your wardrobe with a versatile piece that offers both style and comfort? The Reversible Hooded Jacket in Teddy Wool is the ultimate solution. This jacket combines the plush warmth of teddy wool with the practicality of a reversible design, giving you two looks in one.

Whether you're braving the chilly morning air or adding a stylish layer to your outfit, this jacket is your go-to. The hood adds an extra layer of coziness, while the reversible feature means you can switch up your style depending on your mood. Pair it with jeans for a casual look or over a dress for a chic, layered outfit.

This jacket isn't just about warmth; it's about making a statement. The teddy wool texture is on-trend, offering a cozy and luxurious feel that’s perfect for the colder months.

Get ready to turn heads and stay warm with the Reversible Hooded Jacket in Teddy Wool. It’s the perfect addition to your fall and winter wardrobe.

#fallfashion #winteressentials #cozystyle

image
Synes godt om
Kommentar
Del
Violet Creative Pins
1 Y ·Oversætte

Medium Almond Press-On Fake Nails

In today’s fast-paced world, finding the time to visit a nail salon can be a challenge. Whether you're balancing work, family, or personal time, getting a professional manicure isn't always an option. That’s where press-on nails come to the rescue. Specifically, green medium almond press-on fake nails are a fantastic choice for anyone looking to add a touch of elegance and style to their look without the hassle of a salon visit.

Why Choose Press-On Nails?

Press-on nails have evolved significantly over the years. No longer are they the flimsy, easily breakable versions from the past. Today’s press-on nails are durable, stylish, and come in a wide variety of shapes, lengths, and designs. They’re a great alternative to traditional acrylics or gel nails, offering several benefits:

Time-Saving: Application takes just minutes, perfect for those with busy schedules.

Cost-Effective: At a fraction of the price of salon manicures, you can change your nail style as often as you like without breaking the bank.

Damage-Free: Unlike acrylics, press-ons do not damage your natural nails, making them a healthier option.

Versatile: Easily switch up your look for different occasions—whether it’s a casual day out or a formal event.

The Appeal of Medium Almond Shape

The almond shape is one of the most popular nail shapes for good reason. It elongates the fingers and provides a chic, feminine look that is universally flattering. Medium length is ideal for those who want a bit of length without the inconvenience that can come with longer nails. It’s perfect for everyday wear, offering a balance between style and practicality.

Why Green?

Green is a versatile color that can be both bold and subtle, depending on the shade. It’s a color that symbolizes growth, renewal, and energy, making it a great choice for those looking to refresh their look. The particular shade of green used in these press-on nails can range from a soft, pastel mint to a deep, forest green, each bringing its own unique vibe:

Mint Green: Perfect for a fresh, springtime look.

Olive Green: A great neutral that pairs well with both casual and formal outfits.

Emerald Green: Ideal for adding a touch of luxury and sophistication.

How to Apply Your Press-On Nails

Applying your press-on nails is quick and easy, but there are a few steps to ensure they look great and last longer:

Prep Your Nails: Start with clean, dry nails. Push back your cuticles and lightly buff your nails to create a smooth surface.

Choose the Right Size: Select the press-on nail that fits each of your natural nails best. If the nails don’t perfectly match your size, you can file the edges for a better fit.

Apply Adhesive: Use either the adhesive tabs provided or a small amount of nail glue for a stronger hold. Apply the adhesive to the back of the press-on nail.

Press and Hold: Align the press-on nail with your cuticle and press down firmly, holding for about 30 seconds to ensure it adheres well.

File and Shape: Once all nails are applied, you can gently file the edges to perfect the shape.

Tips for Long-Lasting Wear

To ensure your press-on nails last as long as possible, avoid prolonged exposure to water in the first few hours after application. Wearing gloves while doing chores and avoiding using your nails as tools will also help keep them intact for longer.

Removal Process

Removing press-on nails is simple and damage-free. Soak your nails in warm, soapy water for about 10 minutes to loosen the adhesive. Gently lift the edges with a cuticle stick, and they should come off easily. If there’s any adhesive residue left on your natural nails, you can remove it with a bit of acetone or nail polish remover.

Conclusion

Green medium almond press-on fake nails are a stylish, practical, and affordable way to elevate your look. Whether you’re looking to make a statement or just want a quick manicure solution, these press-on nails offer the perfect blend of elegance and convenience. With just a few minutes of application time, you can enjoy beautiful, salon-quality nails without ever leaving your home.

image
Synes godt om
Kommentar
Del
Showing 8275 out of 11722
  • 8271
  • 8272
  • 8273
  • 8274
  • 8275
  • 8276
  • 8277
  • 8278
  • 8279
  • 8280
  • 8281
  • 8282
  • 8283
  • 8284
  • 8285
  • 8286
  • 8287
  • 8288
  • 8289
  • 8290

Rediger tilbud

Tilføj niveau


Vælg et billede
Slet dit niveau
Er du sikker på, at du vil slette dette niveau?

Anmeldelser

For at sælge dit indhold og dine indlæg, start med at oprette et par pakker. Indtægtsgenerering

Betal med tegnebog

Betalingsadvarsel

Du er ved at købe varerne, vil du fortsætte?

Anmod om tilbagebetaling