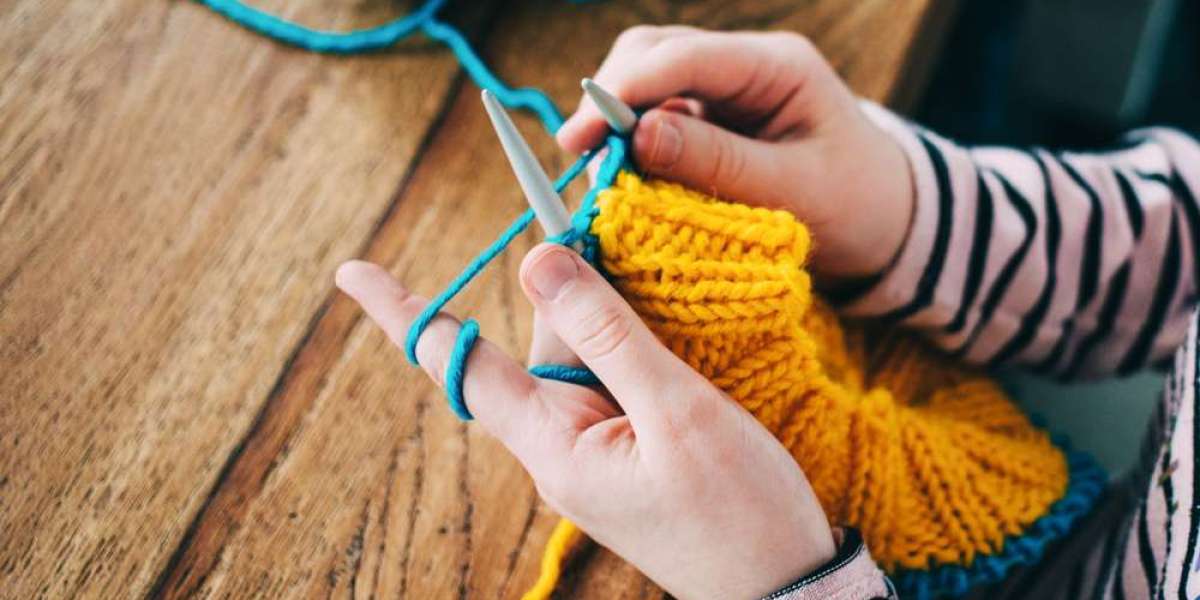
Are you planning a project requiring round knitting with colorwork but don't have much experience doing so? This article provides two straightforward approaches for switching colors without leaving too many tails for later weaving in.
Knitting projects that require multiple colors, like stripes and stranded knitting (intarsia, Fair Isle, and mosaic knitting), require knowing how to switch colors while knitting in the round. Knowing this skill is vitally important!
Many knitters feel intimidated when working stranded colorwork in the round. This is particularly true when changing colors without creating an obvious gap or "jog."
There are various methods for changing colors when knitting in the round. Below I’ve outlined several simple techniques for adding color on circular needles, making this perfect for stripes, entrelac, fair isle, or other projects where color changes regularly.
Jogless Joins
Switching colors in the round can be challenging due to an obvious jog that appears when you change hue. A jog occurs when one stitch meets another from the previous row to the next. A noticeable jog can make stripes look unfinished and messy; thankfully there are ways around this when knitting in rounds.
One approach involves purlwise-slipping the first stitch of each new row purlwise and knitting it and the following stitch together, known as the Helix method of jogless color changes.
Another technique, known as the Barber-pole technique, entails moving back three stitches each time with every color change and working a simple re-knit at the end of every row to produce what resembles spirals more reminiscent of barber pole stripes that leave more prominent jogs at their base than its helix technique does while leaving more abrupt color changes overall.
Helix techniques work best on projects with wide stripes or multiple rounds of the same hue project, such as multiple rounds of short-sleeved sweaters or tubular projects with closer spaces between stripes where its use becomes more noticeable. However, they should not be used when sewing sleeves closer together where their use could become visible more readily.
Steeking is another method for changing colors without jogs in the round; this involves cutting the circular fabric into flat pieces near where there's a jog, then using needles to knit them back together again. Unfortunately, this process takes more time and labor than needed and shouldn't be used on projects that will be worn directly against the skin.
Helix and barber-pole methods of jogless color change can both create smooth stripes but aren't suitable for all projects. Helix works great on socks but may be susceptible to water exposure in rainy environments; similarly, barber-pole cannot manage repeated untying of ends which makes managing them tricky.
To create a seamless jogless join by first adding your new color of yarn and knitting one round in its entirety. Once completed, slip the stitch marker that indicates its start.
Next, lift and knit one row beneath your new color's stitch (it should still be in your old color) together with what should now be your first stitch of the new round (that should still be the old color). Now continue knitting in your new color as usual until completing all remaining rounds of this round.
As soon as you near the end of your round, switch colors again and fasten off as usual. This will reduce any gaps between round ends and initial starting points as well as prevent new stitches from joining to old stitches via regular afterthought overlap joins. When it's time for another stripe, repeat this method for its initial row of the new color then proceed as instructed in your pattern.
This technique for working stripes in the round is an excellent method for quickly creating seamless, neat, professional-looking finishes with stripes. Plus, no tails to weave later - an added plus when dealing with stripes! Give this approach a try on your next circular stripes project and you will soon become hooked.
Jogless Stripes
Knitting in the round is an effective way to create projects incorporating stripes in multiple colors of yarn, from hats and socks to intarsia and fair isle knitting methods. No matter which knitting method is being employed (stranded, intarsia, or fair isle) when changing colors without creating visible jogs when knitting in the round - Mary Beth Temple offers this step-by-step tutorial showing how to achieve what is known as jogless striping.
To create a jogless stripe, start by knitting the first stitch in the new color and slipping over any remaining stitches of the old color as you knit, which creates an elongated stitch that effectively masks any potential jog at the start of the round. Continue knitting in this color until reaching the end of the row where knit the last stitch together with the first stitch to complete knitting in a new color and complete the row as normal.
Unfortunately, this technique doesn't always match up perfectly to the rows below it; especially if your stripes extend across several rows. As a result, the left and right fronts of your sweater may differ in length, or perhaps shoulder shaping is off by one row. To prevent this from happening again, consider trying an alternative method that maintains a jogless effect while not shifting stitches in its body.
This method is similar to the previous one but with subtler results. This approach works better for projects with narrow 2-row stripes. Instead of slipping one stitch of the old color over to its neighbor stitch, simply knit across with your new color as normal and leave behind any unintentionally dropped stitches at the end of a round.
Once you've knit the initial round with the new color, continue shaping your project as directed in your pattern. When it's time for another stripe addition, just slip one stitch of the new color over the old stitch and continue knitting with it!
If you're knitting stripes or patterns that require changing colors frequently, carrying the yarn up on the wrong side can be helpful to eliminate multiple loose tails that will need to be weaved in at the end of your project. Just be careful not to carry too high as this could create long floats that catch on other stitches and disrupt the finished fabric.
Although this method works well for most stripes and other forms of stranded colorwork, it does not apply as effectively for intarsia projects or other forms of knitting that require you to knit full rows in one color. When working on such projects, cutting the old color off before beginning with the new one can help ensure an easy transition.
One issue associated with working stranded colorwork in the round can be an obvious gap at the start of each round, caused by either how you join new colors or cast on and bind off. One strategy to address this problem would be using similar techniques for flat knitting - perhaps using double-pointed needles is helpful here?
As one way of joining your new color, twisting it around the back leg of a stitch from the previous round will form a twisted cord and help regulate any excessive tension or slack that might exist; after which, knit your first stitch of the next round as normal.
One option for joining reversible projects is the overlap join, which provides an effective method to change colors. To accomplish this step, mark where you wish to change, reverse knit three or four stitches, and slip the first stitch of the next round onto your left-hand needle for a nice, neat join that prevents any jogging that might occur with just slipping one stitch of each row onto one right-hand needle.
Avoiding the Jog
There are various strategies available for circular knitting that can eliminate the jog at the start of each round. One is to slip in one stitch of each new color on the last row before changing them, then knit this stitch with its neighbor in its old color (as if making K2togs). This gives new stitches an appearance similar to their counterparts yet still easily identifiable as stitch changes on fabric.
Another method for avoiding the jog is working in the round with shorter color changes - every other round instead of every row - to have more control over its appearance since you won't have to consider what happens between rows; however, this could create uneven length patterns over a short period.
If you are working in an intricate pattern such as stranded colorwork or Fair Isle, shifting the beginning of each round backward or forward may help disguise jogs by aligning motifs more smoothly. Meg Swansen provides an excellent article demonstrating this technique for knitting dolls; however, this can be applied to any project using this stitch type.
Some knitters attempt to even out the jog by slipping stitches from below onto their left needle and knitting those lifted stitches together with those already on their right needle (as though doing a regular K1tog). This doesn't require moving the start of their round backward but does create an irregular transition between rows.
Each of these techniques has its own set of advantages and disadvantages, so it is wise to test out each in a small project such as a swatch to find which best fits your knitting style and garment type. Once you find one that works, use it regularly when working stripes or other textured patterns in the round for professional-looking results.
Carrying Yarn
One of the major obstacles of stranded colorwork in the round can be dealing with jogs. Thankfully, there are various techniques available for concealing them - one being carrying the yarn up the side - which makes an excellent solution when working stripes and other patterns with short columns of one color, since you no longer have to cut and snip each time switching back.
To employ the carrying yarn technique, simply knit to the end of a round with one color before slipping its stitch back onto your left-hand needle and starting knitting in another with that color, using the same method to slip its first stitch over to your left-hand needle. When changing colors again is required by your pattern, simply knit across all stitches using your new color (called "Color A") before working into any slipped stitches with "Color A."
This technique makes for an effortless way of hiding jogs without knots or loose tails; ideal for projects such as socks, hats, and mittens that aren't reversible despite having multiple colors used. Unfortunately, however, it won't work with intarsia or any type of colorwork which requires that full rows are knit in each color separately.
However, one disadvantage of this method is that carrying yarn can get bulky quickly when working with thinner yarns and its tension should never become too tight; otherwise, it could cause stitches to bunch up and become knotted up. Therefore it is imperative that this yarn not be held too tightly when being carried along.
Another advantage to this method is that it works well when changing colors after every certain number of rows, such as when knitting a sweater with a colorwork chart that requires you to switch back after ten rows - this technique minimizes how often yarn needs to be cut and threaded back together again!
Looping yarn is the most commonly used technique, as shown in this video. I demonstrate two techniques - looping and using double strands - for carrying yarn. Both methods work equally well, although for me personally method two tends to provide smoother transitions without twisting carried strands together.
One way is to simply slide the new color onto the left needle like purling, then knit all stitches in that row with that color - perfect for reversible projects that leave no visible tails!
Finally, as an alternate option, you could try twisting each color strand together. This technique works particularly well when working in reverse; there won't be any visible tails left when done this way; however, it requires greater attention as you have to remember to twist each strand at the start of each row.
My preferred method for changing colors is the least noticeable of all three methods and also offers fast and easy results - simply ensure that the new hue is underneath its predecessor before knitting it!
Knitting In the Ends
If you're working on a striped sweater or blanket in the round, carrying yarn between rounds can help avoid those telltale two-color bumps. Unfortunately, when it's time to work another color you must either leave a tail behind and tie it off or use your darning needle to weave in its tail - both methods are both time-consuming and frustrating; so for projects requiring frequent color changes try as much as possible to eliminate these methods of transition.
There are various approaches to this task, but one of the simplest and easiest approaches is twist and weave knitting. This will leave you with minimal tails to deal with later. To use this method, simply knit a row or round in your desired color before cutting the yarn leaving a six-inch tail; when starting another round simply drop carried yarn and pick up another. When knitting this new color until reaching the end of the row simply twist both old and new tails together while knitting your new color row by row.
There are also some creative methods of joining new colors of yarn together, including the spit splice or magic knot. Both techniques leave loose tails on either side of a color change that could potentially expand as you work the next row or round and may eventually reach through to the front of your piece of knitwear.
An additional drawback with these methods is their incapability of handling projects that require specific numbers of stitches in particular colors, like an intarsia pattern or garter stitch sweater.
However, there's an easy and quick method for joining new colors to your projects that works with any yarn type and stitch type: the overlap join. Not only is this technique quick and effortless; but it is also extremely secure - ideal for joining together a range of yarn types.
Slipping Stitches
Slipping stitches is a useful technique used to move them between needles without actually knitting or purling them, creating an interesting two-row stretch effect and an attractive new stitch that can be integrated into many stitch patterns. Slipped stitches may also be used as stretchy bind-off edges instead of creating large loops like regular binding offs would do.
Slipping stitches is an invaluable technique when changing colors when knitting in the round; it can help eliminate those unattractive jogs at the transition point between two colors, especially if your project requires you to switch back and forth between them. Slipping stitch can come especially in handy when working stripes or other patterns that require frequent switching back and forth between them.
To slip a stitch, insert your right-hand needle as though you were going to purl into the first stitch on your left needle, moving that stitch onto its working needle without twisting it. Once that stitch has been slipped successfully, insert your left-hand needle as though knitting it into the next stitch in your pattern until all required stitches have been knit.
Your pattern may specify whether to slip your first stitch knitwise or purlwise; otherwise, a knitwise slip should be performed. Certain patterns also use terms like "with yarn in back" (wyib) and "with yarn in front" (wyif), with the latter denoting that long floats created by slipping stitches will be carried across to the front of your work as decorative elements.
When switching colors frequently in any pattern that requires back-and-forth work, this method should usually be employed when switching pink and blue yarns. After you have knitted some stitches in one color, use the tail of pink yarn to secure its position by wrapping it around the tip of a needle inserted in the first stitch of the new color; knit more stitches as necessary to secure the tail before continuing knitting normally while remembering to bring previous color forward with you.
Weaving In the Ends
As the final step of knitting, weaving in ends can often be the most frustrating part. Tails dangling from all the places where you joined or changed yarn, changed colors, or cast-on/cast-off must all be weaved in before wearing your finished garment!
There are various techniques for concealing those pesky tails, but all require having access to an invisible seam or part of fabric in which to hide them. Since working in the round lacks these options, tails will have to be tucked back into your knitted fabric by hand which can become time-consuming and irritating.
There's an easy and faster way to change colors in the round: bring the old color with you as you work, rather than hiding it away somewhere like seams or seams.
To achieve this effect, knit as many stitches or rows as necessary in your first color before switching over to your second one and gently tugging yarns to prevent too tight or large loops at the end of each row. When it's time for another row of pink with blue stripes (for instance), simply switch back by picking up pink yarn instead of blue as you knit along.
Just be careful not to tug too hard; overdriving may distort your fabric. Once you reach the end of that row or when your pattern calls for switching back to the original color, just pull on the tails slightly to tuck them back in and you're finished!
This technique works particularly well with slightly fuzzy yarns such as merino wool; however, it can be used with any type of knitting such as intarsia - just remember that your tails may come undone with each stretch; just take note when working these ends like normal methods would work when switching back over!
Changing Stitches
While knitting in the round is much simpler than flat stripe work, it takes some practice to develop your muscles and mind into new movements. Millions of knitters have managed to master it over time with patience - you just have to stick with it to see the rewards! There are some key considerations you'll want to bear in mind so your transition goes as smoothly as possible.
One key consideration when working in the round is that, unlike flat strips, there is no edge to your work. This means that switching colors using traditional methods such as tying knots at the end of each row simply isn't possible as this would leave holes in your work - instead, there are several techniques for changing color without needing to weave in tails later on.
The first method is the most basic and can work for any project where you knit all of one color at once and then change to another. To implement it, place a stitch marker on your right needle before beginning to work your first stitch in that color; when switching colors simply insert your needle under its original marker and lift that stitch onto your left needle before continuing knitting with that new color for as many rows as desired.
As another simple method for switching colors when knitting in the round, purlwise slipping of your first stitch is another simple way of changing hues. This works particularly well for patterns with frequent color changes but will not work for projects in stocking stitch. To use this method, take your left needle and pull out the first stitch of your current color before inserting your left needle into the first stitch of the new color and purlwise slipping your first stitch from there on out.
As an alternative to using yarnovers or knotting at the start of each row, an invisible joining technique provides another effective means of changing colors when knitting in the round. Ideal for projects like socks, hats, and mitts where two different colors need to be joined at different places simultaneously, an invisible joining allows you to change color seamlessly without using traditional methods such as knotting at row-ends before hiding yarn tails with yarnovers.
Simply mark where you wish to begin the new color by attaching a stitch marker or paper clip at their start point and knit the next row in its new color before joining and joining as usual!
Stranded colorwork requires you to alternate yarn colors on one base yarn and to carry them across the back (wrong side) of your work when changing colors seamlessly in the round. While this can be challenging when working in the round, these six techniques provide seamless solutions.
Before beginning knitting with your new color, another strategy could be slipping the first stitch purl-wise with it before commencing your work. This is particularly effective for creating single-colored rows such as those found around hats or sleeves.
Working in the round with stripes or patterns that call for multiple contrasting colors requires switching colors frequently, making the transition much less noticeable than if two separate colorways joined together directly. By opting for the jogless join technique when switching, your work won't show where two different hues meet up!
Many people prefer to keep their work more orderly by continuing the old color into their new one instead of cutting off at the end of a stripe, as this allows for fewer loose ends that need tying up later on.
To best implement this strategy, it is recommended that you knit several rows with your new color before switching back to your original hue. This will give it time to set before beginning again.
Depending upon the length of your project, this process may need to be repeated multiple times before starting on another row. Mark the point where each new row begins using a colored marker so you don't lose track of where this transition takes place.
When working thicker stripes, it may be necessary to cut the old color when transitioning to the next row. This will prevent long floats of yarn on the wrong side from catching on things and leading to loose or unattractive results in your finished piece.
Hope these tips have been useful. Feel free to reach out if there are any specific queries regarding changing colors in a round or other topics that should be covered on my blog!