Good and Bad People Good and Bad People
    #socialmedia #usa #uk #contentwriter #ai
    tìm kiếm nâng cao
  • Đăng nhập
  • Đăng ký

  • Chế độ ban ngày
  • © 2025 Good and Bad People
    Về • Danh mục • Liên hệ chúng tôi • Nhà phát triển • Chính sách bảo mật • Điều khoản sử dụng • Đền bù • Referral Terms • Acceptable Use Policy • Community Guidelines • Write for Us

    Lựa chọn Ngôn ngữ

  • Arabic
  • Bengali
  • Chinese
  • Croatian
  • Danish
  • Dutch
  • English
  • Filipino
  • French
  • German
  • Hebrew
  • Hindi
  • Indonesian
  • Italian
  • Japanese
  • Korean
  • Persian
  • Portuguese
  • Russian
  • Spanish
  • Swedish
  • Turkish
  • Urdu
  • Vietnamese

Đồng hồ

Đồng hồ cuộn phim

Sự kiện

Duyệt qua các sự kiện Sự kiện của tôi

Blog

Duyệt các bài báo

Thị trường

Sản phẩm mới nhất

Các trang

Trang của tôi Các trang được yêu thích

Hơn

Khám phá Bài viết phổ biến Việc làm Ưu đãi Kinh phí
cuộn phim Đồng hồ Sự kiện Thị trường Blog Trang của tôi Nhìn thấy tất cả

Phát hiện bài viết

Posts

Người dùng

Các trang

Tập đoàn

Blog

Thị trường

Sự kiện

Việc làm

Kinh phí

Henry Travel Dreamscapes
1 Y ·Dịch

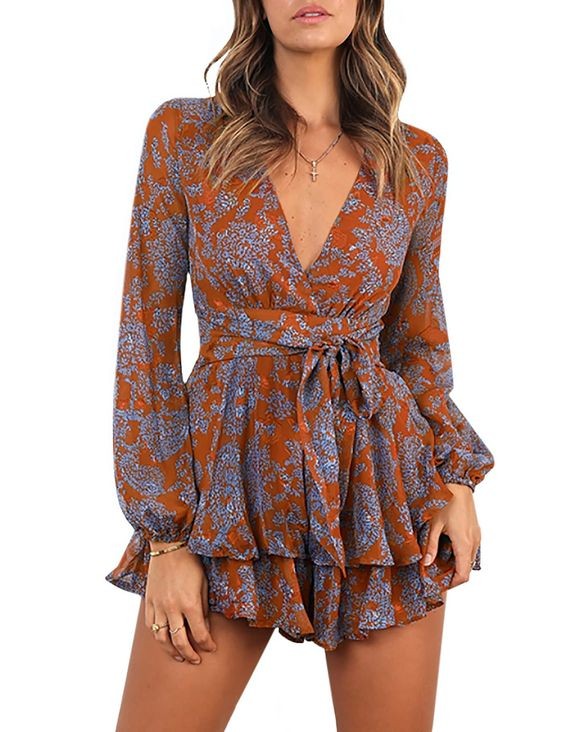
**Elevate Your Summer Wardrobe with the Bonkwa Women's Floral Print Romper**

As the days get warmer and summer approaches, it’s time to refresh your wardrobe with pieces that combine style, comfort, and a touch of whimsy. Enter the **Bonkwa Women's Summer Floral Print Romper**—a standout piece designed to make you look and feel fabulous for any occasion. With its deep V-neck, long baggy sleeves, and double-layer ruffle hem, this romper promises to be a versatile and eye-catching addition to your summer collection.

### **A Bold and Elegant Design**

The Bonkwa Floral Print Romper is crafted to blend elegance with playful charm. The deep V-neckline adds a touch of sophistication while showcasing a hint of your neckline in a flattering way. This design element is perfect for those who love a bit of glamour in their casual wear.

The long baggy sleeves provide a relaxed, flowing silhouette that contrasts beautifully with the structured waist, adding an element of drama without compromising on comfort. This design is particularly great for transitioning from day to night, allowing you to feel stylish and at ease no matter the occasion.

### **Playful Ruffle Hem**

One of the standout features of this romper is the double-layer ruffle hem. This detail adds a playful and feminine touch, making it perfect for everything from beach outings to summer parties. The ruffles move gracefully with every step, creating a fun and flirty look that’s sure to turn heads.

### **Flattering and Functional**

The cinched belt not only defines your waist but also adds a chic element to the romper. This adjustable feature allows for a customizable fit, ensuring that the romper enhances your natural shape while providing comfort and support. The short length of the jumpsuit keeps it cool and breezy, ideal for hot summer days or evening outings.

### **Versatile for Any Occasion**

The Bonkwa Floral Print Romper is as versatile as it is stylish. Whether you’re heading to a beach party, a casual brunch, or a summer festival, this romper fits the bill. Pair it with sandals for a laid-back look, or dress it up with wedges and statement accessories for a more polished appearance.

- **Beach Days* The lightweight fabric and playful design make it a perfect choice for lounging by the shore or strolling along the boardwalk.
- **Brunch with Friends* The chic ruffle hem and elegant V-neck make it a great option for catching up with friends over a meal.
- **Evening Events* Add some jewelry and heeled sandals for an effortlessly glamorous evening look.

### **Easy Care for Busy Lives**

Made from high-quality materials, this romper is not only stylish but also practical. It’s designed to be easy to care for, allowing you to enjoy your summer activities without worrying about complicated laundry instructions. Simply machine wash and hang to dry, and it will be ready for your next adventure.

### **Why You’ll Love It**

- **Stunning Design* Features a deep V-neck, long baggy sleeves, and a playful double-layer ruffle hem.
- **Flattering Fit* Cinched belt enhances your waist and complements your silhouette.
- **Versatile* Perfect for a range of summer activities, from casual to dressy.
- **Comfortable and Easy Care* Designed for all-day wear and simple maintenance.

### **Make a Statement This Summer**

The Bonkwa Women's Summer Floral Print Romper is more than just a jumpsuit—it’s a fashion statement. With its elegant design, playful ruffles, and flattering fit, it’s sure to become a favorite in your summer wardrobe.

**Don’t wait—add this must-have romper to your collection and enjoy effortless style all season long!** 🌟👗💖

image
Giống
Bình luận
Đăng lại
Madison's Creative Pins
1 Y ·Dịch

**Exploring ZG54 by Ziad Germanos: A Fusion of Modern Elegance**

The ZG54 by Ziad Germanos stands out as a quintessential example of modern sophistication intertwined with classic charm. Renowned for his innovative designs and meticulous craftsmanship, Ziad Germanos has once again captivated the fashion world with this remarkable piece.

ZG54 is more than just an accessory—it's a statement of style and luxury. The design seamlessly integrates contemporary trends with timeless elegance, making it a versatile addition to any wardrobe. Its refined details and high-quality materials reflect Germanos's dedication to excellence and his deep understanding of fashion aesthetics.

The piece is crafted with an eye for detail, showcasing intricate patterns and a flawless finish. Whether you're dressing up for a special occasion or adding a touch of elegance to your everyday look, ZG54 is designed to impress.

Elevate your fashion game and embrace the elegance of ZG54 by Ziad Germanos. Experience the perfect blend of modern design and classic sophistication.

#zg54 #ziadgermanos #luxuryfashion #modernelegance

image
Giống
Bình luận
Đăng lại
Lunas Luxe Travel
Lunas Luxe Travel
1 Y ·Dịch

Indulge in the Ultimate Creamy Macaroni and Cheese 🧀🍲

When it comes to comfort food, few dishes can rival the creamy, cheesy goodness of macaroni and cheese. It’s a dish that evokes nostalgia, warmth, and satisfaction with every bite. If you’re on a quest for the ultimate macaroni and cheese recipe that delivers on creaminess, flavor, and indulgence, look no further. This Ultimate Creamy Macaroni and Cheese is designed to be the creamiest, most flavorful version you’ve ever tasted. Here’s how to make this irresistible comfort food that’s sure to delight everyone at your table.

Why This Macaroni and Cheese Recipe is a Must-Try

This recipe stands out because it combines rich, velvety cheese sauce with perfectly cooked pasta to create a dish that’s truly special. Here’s what makes it the ultimate choice:

Luxuriously Creamy: A blend of cheeses and a touch of cream make for an incredibly rich and smooth sauce.

Flavorful: The recipe features a mix of cheeses that melt beautifully together, creating layers of savory, cheesy goodness.

Comforting: It’s the perfect dish for cozy family dinners, holiday gatherings, or any time you need a little extra comfort.

Customizable: Add-ins like crispy bacon, caramelized onions, or a crunchy topping can elevate the dish to your liking.

Ingredients You’ll Need

To prepare this indulgent macaroni and cheese, gather the following ingredients:

8 oz (225 g) elbow macaroni

2 tablespoons unsalted butter

2 tablespoons all-purpose flour

1 1/2 cups whole milk

1/2 cup heavy cream

2 cups shredded sharp cheddar cheese

1 cup shredded mozzarella cheese

1/2 cup grated Parmesan cheese

1 teaspoon Dijon mustard

1/2 teaspoon garlic powder

1/2 teaspoon onion powder

1/4 teaspoon paprika

Salt and black pepper, to taste

1/2 cup breadcrumbs (optional, for topping)

2 tablespoons melted butter (optional, for topping)

Step-by-Step Instructions

Step 1: Cook the Pasta

Start by bringing a large pot of salted water to a boil. Add the elbow macaroni and cook according to the package instructions until al dente. Drain and set aside.

Step 2: Prepare the Cheese Sauce

In a large saucepan, melt 2 tablespoons of butter over medium heat. Add the flour and whisk continuously for about 1-2 minutes to form a roux (a thickening agent). Gradually whisk in the whole milk and heavy cream, continuing to stir until the mixture is smooth and starts to thicken.

Step 3: Add the Cheese

Reduce the heat to low and begin adding the shredded cheddar, mozzarella, and grated Parmesan cheese, one handful at a time. Stir until each addition is fully melted and the sauce is creamy. Add the Dijon mustard, garlic powder, onion powder, paprika, salt, and black pepper, mixing well to incorporate.

Step 4: Combine Pasta and Sauce

Add the cooked macaroni to the cheese sauce, stirring until the pasta is evenly coated with the creamy mixture.

Step 5: Bake (Optional)

For a crispy topping, preheat your oven to 375°F (190°C). Transfer the macaroni and cheese to a baking dish. Mix the breadcrumbs with melted butter and sprinkle over the top. Bake for 20-25 minutes, or until the topping is golden brown and the cheese sauce is bubbly.

Step 6: Serve and Enjoy

Let the macaroni and cheese sit for a few minutes before serving. This allows the sauce to set slightly, making it easier to serve.

Serving Suggestions

Classic Side: Serve with a side of steamed vegetables or a fresh salad for a balanced meal.

Toppings: Add extras like crispy bacon bits, sautéed mushrooms, or caramelized onions to enhance the flavor.

For a Twist: Try different cheese combinations, such as Gouda, fontina, or Monterey Jack, for a unique spin on the classic dish.

Tips for the Perfect Macaroni and Cheese

Cheese Selection: Using a blend of cheeses ensures a rich, complex flavor. Sharp cheddar provides a strong cheese flavor, while mozzarella adds creaminess.

Sauce Consistency: If the cheese sauce is too thick, add a splash of milk to reach your desired consistency. If it’s too thin, let it cook a little longer to thicken.

Prevent Clumping: Make sure to add cheese gradually and stir constantly to avoid clumps and ensure a smooth sauce.

Final Thoughts

Indulge in the Ultimate Creamy Macaroni and Cheese for a comforting, delicious meal that will satisfy even the biggest comfort food cravings. This recipe combines a rich, creamy cheese sauce with perfectly cooked pasta for a dish that’s sure to impress family and friends. Whether served as a side or the main event, this macaroni and cheese will become a beloved favorite in your culinary repertoire. Try it tonight and experience the ultimate in cheesy comfort!

image
Giống
Bình luận
Đăng lại
Lunas Luxe Travel
Lunas Luxe Travel
1 Y ·Dịch

Perfectly Crispy & Irresistibly Delicious Fried Chicken Recipe 🍗✨

Few dishes can match the comfort and satisfaction of perfectly fried chicken. Crispy on the outside, tender and juicy on the inside, this fried chicken recipe is a game-changer for any meal. Whether you’re hosting a family gathering or simply craving a nostalgic treat, this recipe delivers golden, crunchy perfection every time. Here’s how to make fried chicken that’s sure to become your go-to comfort food.

Why This Fried Chicken Recipe Stands Out

This recipe isn’t just about fried chicken; it’s about achieving the perfect balance of crispy coating and juicy meat. Here’s why it’s a must-try:

Crispy Coating: The secret to the ultimate crunch lies in a double-dipping technique that ensures a thick, crispy crust.

Juicy Meat: Proper marinating and frying techniques keep the chicken tender and flavorful.

Simple Ingredients: Using basic pantry staples, this recipe is both accessible and delicious.

Versatile: Great for family dinners, picnics, or any occasion where comfort food is on the menu.

Ingredients You’ll Need

For this fried chicken recipe, gather the following ingredients:

4 bone-in, skin-on chicken thighs and drumsticks

1 cup buttermilk

1 teaspoon hot sauce (optional, for extra flavor)

2 cups all-purpose flour

1 tablespoon paprika

1 teaspoon garlic powder

1 teaspoon onion powder

1 teaspoon dried thyme

1 teaspoon dried basil

1 teaspoon salt

1/2 teaspoon black pepper

1/2 teaspoon baking powder

Vegetable oil (for frying)

Step-by-Step Instructions

Step 1: Marinate the Chicken

In a large bowl, combine the buttermilk and hot sauce (if using). Submerge the chicken pieces in the mixture, ensuring they are fully covered. Cover the bowl and refrigerate for at least 2 hours, or overnight for best results. This step helps tenderize the chicken and adds flavor.

Step 2: Prepare the Coating

In a separate bowl, whisk together the flour, paprika, garlic powder, onion powder, dried thyme, dried basil, salt, pepper, and baking powder. This seasoned flour mixture will give the chicken its crispy, flavorful coating.

Step 3: Dredge the Chicken

Remove the chicken from the buttermilk, allowing any excess to drip off. Dredge each piece thoroughly in the seasoned flour mixture, pressing the flour onto the chicken to ensure it sticks. For an extra-crispy coating, dip the floured chicken back into the buttermilk and then coat again with flour.

Step 4: Heat the Oil

In a large skillet or Dutch oven, heat about 2 inches of vegetable oil over medium-high heat to 350°F (175°C). You can test the oil temperature by dropping a small piece of flour into the oil; if it sizzles and bubbles, the oil is ready.

Step 5: Fry the Chicken

Carefully place the chicken pieces into the hot oil, avoiding overcrowding the pan. Fry the chicken in batches if necessary. Cook for about 10-12 minutes per side, or until the chicken is golden brown and the internal temperature reaches 165°F (74°C). Adjust the heat as needed to maintain the oil temperature and ensure even cooking.

Step 6: Drain and Serve

Once cooked, remove the chicken from the oil and place it on a wire rack set over a baking sheet to drain excess oil. Allow the chicken to rest for a few minutes before serving to maintain its crispiness.

Serving Suggestions

Classic Sides: Pair with mashed potatoes, coleslaw, and cornbread for a classic Southern meal.

Dipping Sauces: Serve with a variety of dipping sauces, such as ranch, honey mustard, or BBQ sauce.

Sandwiches: Use the fried chicken in sandwiches with pickles and your favorite condiments for a tasty twist.

Tips for Perfect Fried Chicken

Oil Temperature: Maintaining the right oil temperature is crucial for crispy chicken. Too hot and the coating will burn; too cool and it will become greasy.

Avoid Overcrowding: Fry in batches to avoid lowering the oil temperature and to ensure even cooking.

Rest the Chicken: Let the chicken rest on a wire rack rather than paper towels to keep the coating crispy.

Final Thoughts

This Perfectly Crispy & Irresistibly Delicious Fried Chicken Recipe brings the ultimate comfort food right to your table. With a crunchy, flavorful coating and tender, juicy meat, it’s sure to impress family and friends alike. Whether you’re serving it for a special occasion or just a weeknight treat, this fried chicken is a surefire hit. Try it today and enjoy the crispy perfection of homemade fried chicken!

image
Giống
Bình luận
Đăng lại
Amelia's Stylish Spaces
1 Y ·Dịch

**Sparkling Eye Glitter ✨: A Comprehensive Guide to Dazzling Eye Looks**

In the realm of beauty, sparkling eye glitter is a game-changer that adds a touch of magic and glamour to any makeup look. Whether you're preparing for a night out, a special event, or simply want to elevate your everyday makeup, eye glitter can transform your eyes into a stunning focal point. This article explores everything you need to know about sparkling eye glitter—from its history and benefits to application techniques and product recommendations.

### **1. The Magic of Sparkling Eye Glitter**

**1.1 The Appeal of Eye Glitter**

Eye glitter has a unique ability to catch light and create a dazzling effect that’s hard to achieve with traditional eyeshadows alone. It adds dimension and drama to your eye makeup, making it perfect for special occasions, festivals, and nights out. The shimmering particles reflect light, creating a sparkling effect that can make your eyes appear larger and more vibrant.

**1.2 Historical Context**

The use of glitter in makeup can be traced back to ancient civilizations, where various forms of shimmer were used for ceremonial purposes. In modern times, glitter has become a staple in the beauty industry, popularized by its use in high-fashion runways and pop culture. Its resurgence in recent years has been driven by social media trends and the influence of beauty influencers.

### **2. Benefits of Using Eye Glitter**

**2.1 Enhanced Aesthetic Appeal**

- **Dramatic Effect* Eye glitter creates a bold, eye-catching look that enhances the overall impact of your makeup.

- **Versatility* It can be used in various ways, from subtle highlights to full-on glittery lids, allowing for endless creativity.

**2.2 Longevity and Durability**

- **Long-Lasting* High-quality eye glitters are formulated to stay in place without flaking, providing a long-lasting sparkle.

- **Resistant to Smudging* Properly applied glitter stays put, reducing the need for constant touch-ups.

**2.3 Easy to Remove**

- **Gentle Removal* Many glitter products are designed to be easily removed with makeup remover or micellar water, minimizing irritation to the delicate eye area.

### **3. Types of Eye Glitter**

**3.1 Loose Glitter**

- **Description* Loose glitter comes in a jar or pot and requires an adhesive to stay in place. It offers a high-impact, customizable shine.

- **Application Tips* Use a glitter primer or adhesive to ensure the glitter adheres well and stays in place throughout the day.

**3.2 Pressed Glitter**

- **Description* Pressed glitter is formulated into a compact and can be applied directly from the pan. It often has a finer texture compared to loose glitter.

- **Application Tips* Use your fingers or a dense brush to apply pressed glitter, and it generally requires less adhesive.

**3.3 Glitter Gel**

- **Description* Glitter gel combines glitter with a gel base, making it easy to apply and blend. It often comes in tubes or pots.

- **Application Tips* Apply glitter gel with a brush or your fingers for a quick and even application. It’s ideal for a more subtle, all-over shimmer.

### **4. Application Techniques**

**4.1 Preparation**

- **Eye Primer* Apply an eye primer to create a smooth base and ensure that the glitter adheres well.

- **Concealer* Use concealer on your eyelids to neutralize any discoloration and enhance the vibrancy of the glitter.

**4.2 Applying Glitter**

- **Adhesive* For loose glitter, use a glitter primer or adhesive to ensure it sticks and doesn’t fall out. Apply a thin layer to the area where you plan to apply the glitter.

- **Application* Gently pat or press the glitter onto the adhesive using a flat brush or your fingertips. Avoid rubbing to prevent fallout.

- **Blending* Blend the edges of the glitter with your eyeshadow to create a seamless transition.

**4.3 Finishing Touches**

- **Mascara and Liner* Apply mascara and eyeliner to complete your eye look. Waterproof formulas can help prevent glitter from smudging.

- **Setting Spray* Use a setting spray to lock in your makeup and reduce glitter fallout.

### **5. Tips for a Glittery Eye Look**

**5.1 Choosing the Right Glitter**

- **Color and Size* Select glitter that complements your overall makeup look. Smaller particles provide a more subtle shimmer, while larger particles create a bolder effect.

- **Quality* Invest in high-quality glitter to ensure it’s safe for eye use and has minimal fallout.

**5.2 Avoiding Common Mistakes**

- **Avoid Overuse* A little goes a long way with glitter. Use it sparingly to avoid overwhelming your look.

- **Prevent Fallout* Apply glitter in small amounts and use a setting spray to minimize fallout.

### **6. Product Recommendations**

**6.1 Popular Brands and Products**

- **Urban Decay Heavy Metal Glitter Eyeliner* Offers a range of glittery shades in a convenient liner format for precise application.

- **Too Faced Glitter Pop! Peel-Off Eyeliner* Features a peel-off formula for easy removal and intense glitter payoff.

- **Stila Glitter & Glow Liquid Eye Shadow* Provides a high-shine, long-lasting glitter effect with easy application.

**6.2 DIY Options**

- **Homemade Glitter* If you’re feeling creative, you can make your own glitter by mixing loose cosmetic glitter with a bit of aloe vera gel or coconut oil for a custom glitter gel.

### **7. Removing Glitter**

**7.1 Gentle Removal**

- **Makeup Remover* Use a gentle eye makeup remover or micellar water to dissolve and remove glitter. Avoid harsh scrubbing to protect your delicate eye area.

- **Cotton Pads* Soak a cotton pad in remover and gently press it onto your eyelids to break down the glitter. Wipe away gently.

**7.2 Skin Care**

- **Hydration* After removing glitter, apply an eye cream or moisturizer to soothe and hydrate the area.

### **8. Embracing the Glitter Trend**

**8.1 Experimenting with Looks**

- **Day vs. Night* Adjust the intensity of your glitter look based on the occasion. For daytime, opt for a subtle shimmer, while evening events allow for bolder applications.

- **Mix and Match* Combine glitter with other makeup trends, such as graphic eyeliner or colorful eyeshadows, for a unique and personalized look.

**8.2 Confidence and Style**

- **Express Yourself* Glitter makeup is all about having fun and expressing your personal style. Embrace the sparkle and let it enhance your confidence and creativity.

### **Conclusion**

**Sparkling Eye Glitter ✨** is more than just a beauty trend; it’s a versatile tool for creating mesmerizing eye looks that captivate and dazzle. With the right techniques and products, you can incorporate glitter into your makeup routine to add a touch of glamour and excitement. Whether you’re preparing for a special event or simply want to elevate your everyday makeup, eye glitter offers endless possibilities for creativity and self-expression. So, get ready to shine and let your eyes sparkle with the magic of glitter!

#datenightbeauty

image
Giống
Bình luận
Đăng lại
Seren's Urban Elegance
1 Y ·Dịch

Foto do Álbum 'ЧЕРНЫЙ: Идеи Ногтей' – Inspire-se na Nossa Coleção de Manicure no OK

Se você é apaixonada por design de unhas e está em busca de novas ideias para transformar seu visual, o álbum 'ЧЕРНЫЙ: Идеи Ногтей' na nossa página do OK é o lugar perfeito para você. Este álbum apresenta uma variedade de designs impressionantes com a cor preta, uma escolha clássica e sofisticada que nunca sai de moda. Neste artigo, exploraremos o que torna essas ideias de manicure tão especiais e como você pode se inspirar para criar seus próprios looks deslumbrantes.

A Elegância do Preto nas Unhas

O preto é uma cor atemporal que transmite sofisticação e elegância. Em design de unhas, ele oferece uma base perfeita para criar diversos estilos, desde o minimalista até o mais ousado. No álbum 'ЧЕРНЫЙ: Идеи Ногтей', você encontrará uma seleção cuidadosa de designs que mostram a versatilidade e o impacto visual do preto.

1. Versatilidade do Preto

Uma das maiores vantagens do preto é sua versatilidade. Ele pode ser combinado com quase todas as outras cores e estilos, permitindo uma infinidade de possibilidades criativas. Seja para um look elegante e discreto ou um design mais ousado e moderno, o preto é a escolha perfeita para qualquer ocasião.

2. Estilos Diversos

No álbum, você encontrará designs que vão desde o clássico esmalte preto puro até estilos mais elaborados com detalhes em glitter, metálicos e padrões geométricos. Esses designs são ideais para qualquer ocasião, seja para um evento formal, uma noite com amigos ou até mesmo para o dia a dia.

Destaques do Álbum 'ЧЕРНЫЙ: Идеи Ногтей'

1. Design com Glitter

Os designs com glitter preto adicionam um toque de glamour às suas unhas. O brilho sutil combina perfeitamente com o fundo preto, criando um efeito de sofisticação e elegância. Estes designs são perfeitos para festas e eventos especiais.

2. Acabamento Matte

O acabamento matte em preto oferece um visual moderno e chique. É uma ótima alternativa ao acabamento brilhante e adiciona um toque de sofisticação ao seu look. Experimente combinar o acabamento matte com detalhes sutis para um design discreto e elegante.

3. Padrões Geométricos

Os padrões geométricos em preto são uma maneira excelente de adicionar um toque de criatividade às suas unhas. Linhas finas, formas assimétricas e contrastes sutis podem transformar um simples esmalte preto em uma verdadeira obra de arte.

4. Combinações de Cores

Embora o preto seja a estrela principal, ele pode ser combinado com outras cores para criar designs únicos e atraentes. Cores metálicas, tons de cinza ou até mesmo toques de cor vibrante podem complementar o preto e criar um look sofisticado e moderno.

Como Criar Seus Próprios Designs de Unhas

1. Preparação das Unhas

Antes de começar a aplicar qualquer design, prepare suas unhas. Certifique-se de que estão limpas, bem lixadas e hidratadas. A aplicação de uma base protetora é fundamental para garantir a durabilidade do esmalte e proteger suas unhas naturais.

2. Escolha do Design

Escolha um design que se adeque ao seu estilo e à ocasião. Se você está se inspirando no álbum, selecione um ou mais designs que você gostaria de experimentar e planeje como irá replicá-los.

3. Aplicação do Esmalte

Aplique o esmalte preto como base e deixe secar completamente. Use um pincel fino ou ferramentas de nail art para adicionar os detalhes adicionais, como glitter, padrões ou acabamentos especiais.

4. Finalização

Finalize o design com um top coat para garantir que o esmalte fique brilhante e protegido. Isso também ajudará a prolongar a durabilidade do seu design.

Conclusão

O álbum 'ЧЕРНЫЙ: Идеи Ногтей' é uma excelente fonte de inspiração para quem busca criar designs de unhas sofisticados e modernos. Com uma ampla gama de estilos e ideias, você pode facilmente encontrar o design perfeito que combina com sua personalidade e estilo. Explore as fotos, inspire-se e experimente novas técnicas para transformar suas unhas em uma verdadeira obra de arte. Não perca a chance de brilhar com os designs mais elegantes e criativos – visite nossa página no OK e descubra seu novo look favorito! 💅🏼🖤

image
Giống
Bình luận
Đăng lại
Lunas Luxe Travel
Lunas Luxe Travel
1 Y ·Dịch

Delicious Chicken Pasta: A Quick and Flavorful Meal

In the world of quick and satisfying meals, chicken pasta is a standout favorite. It combines tender chicken with creamy pasta and a variety of savory ingredients to create a dish that's both flavorful and comforting. Whether you're rushing to get dinner on the table after a long day or preparing a meal for friends, this Delicious Chicken Pasta recipe is your go-to for a meal that's as simple as it is scrumptious.

Why You'll Love This Chicken Pasta Recipe

Chicken pasta is not only a crowd-pleaser but also incredibly versatile. Here’s why this recipe is a winner:

Speedy Preparation: Ready in about 30 minutes, it’s perfect for busy weeknights or last-minute gatherings.

Full of Flavor: With a blend of herbs, garlic, and a creamy sauce, this dish is bursting with taste.

Versatile Ingredients: Customize with your favorite vegetables or pasta shapes to suit your taste.

Comfort Food: Creamy and hearty, it’s a dish that satisfies both the stomach and the soul.

Ingredients You’ll Need

To make this Delicious Chicken Pasta, gather the following ingredients:

2 boneless, skinless chicken breasts

8 oz (225 g) pasta (penne, fettuccine, or your choice)

2 tablespoons olive oil

3 cloves garlic, minced

1/2 cup onion, finely chopped

1 cup heavy cream

1/2 cup chicken broth

1/2 cup grated Parmesan cheese

1 cup baby spinach (optional)

1/2 cup sun-dried tomatoes, chopped (optional)

1 teaspoon dried basil

1 teaspoon dried oregano

Salt and pepper, to taste

Fresh basil or parsley, for garnish

Step-by-Step Instructions

Step 1: Cook the Pasta

Start by cooking the pasta according to the package instructions until al dente. Drain and set aside.

Step 2: Prepare the Chicken

While the pasta is cooking, season the chicken breasts with salt, pepper, dried basil, and oregano. Heat olive oil in a large skillet over medium heat. Add the chicken breasts and cook for about 6-8 minutes per side, or until they are cooked through and have a golden brown exterior. Remove the chicken from the skillet and let it rest for a few minutes before slicing into strips or cubes.

Step 3: Make the Sauce

In the same skillet, add a bit more olive oil if needed, and sauté the garlic and onion until fragrant and translucent, about 2-3 minutes. Pour in the chicken broth and bring to a simmer. Reduce heat and stir in the heavy cream, allowing it to cook for a few minutes until it starts to thicken.

Step 4: Combine Ingredients

Add the cooked pasta to the skillet and toss to coat in the creamy sauce. Stir in the grated Parmesan cheese, and cook for an additional 1-2 minutes until the cheese is melted and the pasta is well-coated. If using, add the baby spinach and sun-dried tomatoes at this point, stirring until the spinach is wilted and the tomatoes are warmed through.

Step 5: Serve and Garnish

Add the sliced or cubed chicken to the pasta and mix to combine. Serve the chicken pasta hot, garnished with fresh basil or parsley, and additional Parmesan cheese if desired.

Variations and Add-Ins

Vegetable Options: Customize your pasta with your favorite vegetables, such as bell peppers, mushrooms, or cherry tomatoes.

Protein Alternatives: Swap the chicken for shrimp, sausage, or tofu for a different twist.

Spicy Kick: Add a pinch of red pepper flakes to the sauce for a bit of heat.

Tips for Perfect Chicken Pasta

Pasta Cooking: Make sure not to overcook the pasta; it should be firm to the bite to hold up well in the dish.

Sauce Consistency: If the sauce is too thick, you can add a bit more chicken broth or pasta water to reach your desired consistency.

Resting Time: Letting the chicken rest before slicing helps retain its juices and keep it tender.

Final Thoughts

Delicious Chicken Pasta is a fantastic recipe that delivers on taste, convenience, and comfort. With its creamy sauce, tender chicken, and flavorful pasta, it’s sure to become a favorite in your meal rotation. Perfect for busy weeknights or casual dinners with friends, this dish is a true winner. Try it tonight and enjoy a meal that’s quick to prepare and full of satisfying flavors!

image
Giống
Bình luận
Đăng lại
Lunas Luxe Travel
Lunas Luxe Travel
1 Y ·Dịch

Jiacheng’s Savory Chicken Recipe: A Flavorful Delight for Every Meal

If you’re on the hunt for a chicken recipe that’s both simple and spectacular, look no further than Jiacheng’s Savory Chicken Recipe. This dish combines tender chicken with a medley of savory seasonings and ingredients, creating a flavorful meal that’s perfect for any occasion. Whether you’re preparing a weeknight dinner or hosting a special gathering, this recipe will become a fast favorite in your culinary repertoire.

Why Jiacheng’s Savory Chicken Recipe Stands Out

Jiacheng’s Savory Chicken Recipe is more than just a meal—it’s a testament to how simple ingredients can come together to create something truly special. Here’s why you’ll love this recipe:

Easy to Make: With straightforward steps and common ingredients, this recipe is accessible for cooks of all skill levels.

Versatile: It pairs beautifully with a variety of sides, from steamed rice to roasted vegetables, making it adaptable for different tastes and occasions.

Flavor-Packed: The combination of savory spices and herbs ensures that each bite is bursting with flavor.

Family-Friendly: This dish is a hit with both kids and adults, making it perfect for family dinners or casual gatherings.

Ingredients You’ll Need

To prepare Jiacheng’s Savory Chicken Recipe, gather the following ingredients:

4 boneless, skinless chicken breasts

2 tablespoons olive oil

3 cloves garlic, minced

1 tablespoon fresh ginger, minced

1 tablespoon soy sauce

1 tablespoon oyster sauce

1 tablespoon hoisin sauce

1 teaspoon sesame oil

1 teaspoon ground black pepper

1/2 teaspoon salt

1/2 teaspoon paprika

1/2 teaspoon dried thyme

1/2 teaspoon dried basil

2 green onions, sliced (for garnish)

Sesame seeds (optional, for garnish)

Step-by-Step Instructions

Step 1: Prepare the Chicken

Start by flattening the chicken breasts slightly to ensure even cooking. You can use a meat mallet or rolling pin to gently pound the chicken between two sheets of plastic wrap.

Step 2: Make the Marinade

In a small bowl, mix together the minced garlic, minced ginger, soy sauce, oyster sauce, hoisin sauce, sesame oil, ground black pepper, salt, paprika, dried thyme, and dried basil. This mixture will act as both a marinade and a cooking sauce.

Step 3: Marinate the Chicken

Place the chicken breasts in a resealable plastic bag or shallow dish. Pour the marinade over the chicken, ensuring that each piece is well-coated. Seal the bag or cover the dish and refrigerate for at least 30 minutes, or up to 2 hours for more intense flavor.

Step 4: Cook the Chicken

Heat olive oil in a large skillet over medium-high heat. Remove the chicken from the marinade and cook in the hot skillet for about 6-8 minutes per side, or until the chicken is cooked through and reaches an internal temperature of 165°F (74°C). The chicken should be golden brown and slightly caramelized.

Step 5: Garnish and Serve

Remove the chicken from the skillet and let it rest for a few minutes before slicing. Garnish with sliced green onions and sesame seeds if desired. Serve with your favorite sides, such as steamed rice, sautéed vegetables, or a fresh salad.

Serving Suggestions

Over Rice: Serve the chicken sliced over a bed of steamed jasmine or brown rice for a complete meal.

With Vegetables: Pair with sautéed bell peppers, snap peas, or broccoli for a balanced, nutritious plate.

In a Wrap: Slice the chicken thinly and use it in a wrap or sandwich with fresh vegetables and a drizzle of extra hoisin sauce.

Tips for Perfect Chicken

Even Cooking: Flattening the chicken breasts ensures that they cook evenly and remain juicy.

Marinate Time: Marinating the chicken for a longer period allows the flavors to penetrate more deeply, but even a short marinate time will yield delicious results.

Resting Time: Let the chicken rest after cooking to retain its juices and enhance the flavor.

Final Thoughts

Jiacheng’s Savory Chicken Recipe is a delightful blend of savory flavors and tender chicken that will elevate any meal. Easy to prepare and full of taste, it’s perfect for busy weeknights or special occasions. Whether you’re cooking for family or friends, this recipe is sure to impress and satisfy. Try it out tonight and enjoy a flavorful chicken dish that’s sure to become a staple in your kitchen!

image
Giống
Bình luận
Đăng lại
Amelia's Stylish Spaces
1 Y ·Dịch

**E-Girl Makeup: A Comprehensive Guide to Achieving the Trendy Look**

The e-girl makeup trend has surged in popularity, captivating beauty enthusiasts with its bold, edgy, and creative aesthetic. Originating from online platforms like TikTok and Instagram, the e-girl look is characterized by vibrant colors, distinctive eyeliner styles, and playful elements that set it apart from traditional makeup trends. This article will delve into the key components of e-girl makeup, offering a detailed guide on how to achieve this striking look.

### **1. Understanding the E-Girl Aesthetic**

**1.1 Origins and Evolution**

The e-girl look emerged as a digital fashion trend, heavily influenced by internet culture, gaming, and K-pop aesthetics. It blends elements of punk, emo, and anime-inspired styles, creating a unique and eye-catching appearance that resonates with a younger, digital-savvy audience. The term "e-girl" is short for "electronic girl," reflecting its roots in online communities and social media platforms.

**1.2 Key Characteristics**

E-girl makeup is known for its:

- **Bold Color Choices* Bright and unconventional colors are used to create striking contrasts.

- **Graphic Eyeliner* Unique eyeliner designs that often include sharp lines and geometric shapes.

- **Playful Elements* Features like heart stamps, glitter, and playful blush applications that add a whimsical touch.

### **2. Essential Components of E-Girl Makeup**

**2.1 Flawless Skin Base**

A perfect base is crucial for setting the stage for e-girl makeup:

- **Primer* Begin with a smoothing primer to create an even canvas. This helps your makeup stay in place and look flawless.

- **Foundation* Choose a foundation that matches your skin tone and provides good coverage. Opt for a matte or dewy finish based on your preference.

- **Concealer* Use concealer to cover blemishes, dark circles, and any uneven areas. Make sure to blend it seamlessly into your foundation.

- **Powder* Set your base with a translucent powder to prevent shine and ensure your makeup stays put throughout the day.

**2.2 Eye Makeup**

Eye makeup is the centerpiece of the e-girl look, characterized by its dramatic and artistic flair:

- **Eyeshadow* E-girl makeup often features vibrant eyeshadow colors. Popular shades include pastel pinks, electric blues, and bright purples. Apply a base color over the lid and use contrasting shades in the crease to add depth.

- **Eyeliner* Graphic eyeliner is a signature element. Experiment with bold lines, winged tips, and geometric shapes. You can use gel, liquid, or pencil liners to achieve the desired effect.

- **Mascara and Lashes* Apply mascara to both the upper and lower lashes for a fuller look. For added drama, consider using false lashes or lash extensions.

**2.3 Blush and Highlighter**

Blush and highlighter add a playful and radiant touch to the e-girl look:

- **Blush* Apply blush generously on the apples of your cheeks, extending it towards your temples for a youthful, doll-like effect. Bright pink or peach shades work well for this style.

- **Highlighter* Apply highlighter to the high points of your face, such as the cheekbones, brow bones, and the bridge of your nose. Choose a shimmer that complements your eyeshadow and adds a glowing finish.

**2.4 Lip Makeup**

E-girl lip makeup can range from understated to bold, depending on your preference:

- **Lip Liner* Define your lips with a lip liner that matches your lipstick. Overlining slightly can create a fuller look.

- **Lipstick* Opt for bold and unconventional colors such as bright red, deep plum, or even pastel shades. Glosses and matte formulas are both popular choices.

- **Gloss and Highlights* Add a touch of gloss to your lips for extra shine and dimension.

### **3. Incorporating Fun and Unique Elements**

**3.1 Heart Stamps and Other Embellishments**

Heart stamps and other small embellishments are a hallmark of e-girl makeup:

- **Heart Stamps* Use a heart-shaped stamp or a small brush to apply heart designs under your eyes or on your cheeks. You can use eyeliner or face paint for precision.

- **Glitter* Add glitter to your eyelids, cheekbones, or lips for an extra pop of sparkle. Ensure it’s safe for use on the skin and remove it gently.

**3.2 Hair and Accessories**

To complete the e-girl look, consider incorporating these additional elements:

- **Hair* E-girl hairstyles often feature bold colors, streaks, or accessories like hair clips and headbands. Consider adding temporary hair dye or using hair chalk for a vibrant touch.

- **Accessories* Chokers, layered necklaces, and quirky earrings can complement the e-girl makeup look. Choose pieces that add to the overall edgy and playful aesthetic.

### **4. Tips for Mastering the E-Girl Makeup Look**

**4.1 Practice Makes Perfect**

- **Experiment* Don’t be afraid to experiment with different colors, shapes, and techniques. The e-girl look is all about creativity and self-expression.

- **Practice* Practice your eyeliner designs and eyeshadow blending to achieve precision and confidence.

**4.2 Product Recommendations**

- **Eyeliner* Try products like the NYX Epic Ink Liner or Stila Stay All Day Waterproof Liquid Eyeliner for bold lines and long-lasting wear.

- **Eyeshadow* The Urban Decay Naked Ultraviolet Palette or ColourPop’s Fade Into Hue Palette offer vibrant and versatile shades.

- **Blush and Highlighter* For blush, the Milani Baked Blush in “Luminoso” is a great option. For highlighter, consider the Becca Shimmering Skin Perfector Pressed Highlighter in “Champagne Pop.”

### **5. Embracing the E-Girl Makeup Trend**

**5.1 Confidence and Expression**

The e-girl makeup look is about embracing boldness and having fun with your appearance. Confidence is key to pulling off this trend, so wear it with pride and let your personality shine through.

**5.2 Adaptation and Personalization**

While the e-girl makeup style has distinctive elements, you can personalize it to suit your tastes and preferences. Incorporate elements that resonate with you and adjust the look to fit different occasions and moods.

### **Conclusion**

The e-girl makeup trend offers a dynamic and creative approach to beauty, combining bold colors, graphic designs, and playful elements. By understanding the essential components and practicing various techniques, you can master this look and make it your own. Whether you’re aiming for a dramatic transformation or just a touch of e-girl flair, embracing this trend allows you to express your individuality and experiment with innovative beauty ideas. So, dive into the world of e-girl makeup and let your creativity take center stage!

#datenightbeauty

image
Giống
Bình luận
Đăng lại
Lunas Luxe Travel
Lunas Luxe Travel
1 Y ·Dịch

Game Day Delights: Super Bowl Party Treats and Football-Themed Chocolate Cookies

The Super Bowl is more than just a game; it’s an event that brings friends and family together to celebrate, cheer, and of course, eat! Whether you’re hosting a big bash or a cozy gathering, having the right snacks is essential. This year, elevate your Super Bowl party with a lineup of delicious treats and football-themed chocolate cookies that will be a hit with everyone—from die-hard football fans to those just there for the food.

Why You’ll Love These Game Day Treats

These Super Bowl treats are designed to be as exciting as the game itself. Here’s why they’ll be the star of your party:

Easy to Make: No need to spend hours in the kitchen. These treats are simple to prepare, leaving you more time to enjoy the game.

Perfect for Sharing: With a mix of sweet and savory options, there’s something for everyone. These bite-sized treats are ideal for mingling and munching.

Football-Themed Fun: The football-shaped chocolate cookies add a festive touch that’s sure to impress your guests.

Crowd-Pleasing Flavors: From cheesy dips to chocolatey cookies, these recipes are packed with flavors that everyone will love.

Must-Have Super Bowl Party Treats

1. Buffalo Chicken Dip

No Super Bowl party is complete without this crowd-pleaser. This creamy, spicy dip combines shredded chicken, cream cheese, hot sauce, and cheddar, all baked to bubbly perfection. Serve with tortilla chips, celery sticks, or crackers for a winning snack.

2. Loaded Nachos

Pile on the toppings for these irresistible nachos! Layer tortilla chips with seasoned ground beef, melted cheese, jalapeños, sour cream, and guacamole. They’re perfect for sharing and can be customized to suit your guests’ tastes.

3. Pretzel Bites with Beer Cheese Dip

Soft, salty pretzel bites paired with a rich, cheesy beer dip make for a snack that’s hard to resist. The combination of warm pretzels and tangy cheese is a game day classic.

4. Mini BBQ Pulled Pork Sliders

These bite-sized sliders are packed with flavor. Tender pulled pork, smothered in BBQ sauce and topped with coleslaw, is sandwiched between soft buns for a delicious and satisfying treat.

5. Bacon-Wrapped Jalapeño Poppers

These spicy, cheesy jalapeño poppers are wrapped in crispy bacon, making them the ultimate finger food. They’re easy to make and always a hit with guests.

6. Football-Shaped Chocolate Cookies

Add a sweet touch to your Super Bowl spread with these adorable football-shaped chocolate cookies. They’re fun to make and even more fun to eat!

How to Make Football-Themed Chocolate Cookies

These football-shaped cookies are not only delicious but also add a festive element to your Super Bowl party. Here’s how to make them:

Ingredients:

1 cup unsalted butter, softened

1 cup granulated sugar

1 large egg

1 tsp vanilla extract

2 cups all-purpose flour

1/2 cup cocoa powder

1/2 tsp baking powder

1/4 tsp salt

White icing for decorating

Instructions:

Prepare the Dough: In a large bowl, cream together the butter and sugar until light and fluffy. Beat in the egg and vanilla extract. In a separate bowl, whisk together the flour, cocoa powder, baking powder, and salt. Gradually add the dry ingredients to the wet ingredients, mixing until combined.

Chill the Dough: Divide the dough into two portions, wrap them in plastic wrap, and refrigerate for at least 30 minutes.

Shape the Cookies: Preheat your oven to 350°F (175°C). Roll out the chilled dough on a lightly floured surface to about 1/4-inch thickness. Use a football-shaped cookie cutter to cut out the cookies, and place them on a parchment-lined baking sheet.

Bake: Bake the cookies for 10-12 minutes, or until the edges are firm. Allow the cookies to cool on the baking sheet for a few minutes before transferring them to a wire rack to cool completely.

Decorate: Once the cookies are fully cooled, use white icing to draw the laces of the footballs. Let the icing set before serving or packaging.

Serving Suggestions and Tips

Set Up a Snack Bar: Arrange your Super Bowl treats on a buffet table for easy access. Label each item and provide plenty of plates, napkins, and utensils.

Get Creative with Presentation: Use football-themed plates, napkins, and decorations to enhance the festive atmosphere.

Make-Ahead Options: Many of these treats, including the cookies, can be made ahead of time. Prepare them the day before and store them in an airtight container until the big day.

Offer a Variety: Ensure you have a mix of sweet, savory, hot, and cold options to cater to all taste preferences.

Final Thoughts

Hosting a Super Bowl party is all about having fun and enjoying great food with friends and family. With these Game Day Delights, you’ll have a winning spread that’s sure to please. The football-themed chocolate cookies are not only a tasty treat but also a fun way to show off your game day spirit. So, get ready to cheer on your favorite team and enjoy these delicious Super Bowl party treats!

image
Giống
Bình luận
Đăng lại
Showing 8767 out of 11864
  • 8763
  • 8764
  • 8765
  • 8766
  • 8767
  • 8768
  • 8769
  • 8770
  • 8771
  • 8772
  • 8773
  • 8774
  • 8775
  • 8776
  • 8777
  • 8778
  • 8779
  • 8780
  • 8781
  • 8782

Chỉnh sửa phiếu mua hàng

Thêm bậc


Chọn một hình ảnh
Xóa bậc của bạn
Bạn có chắc chắn muốn xóa tầng này không?

Nhận xét

Để bán nội dung và bài đăng của bạn, hãy bắt đầu bằng cách tạo một vài gói. Kiếm tiền

Thanh toán bằng ví

Thông báo Thanh toán

Bạn sắp mua các mặt hàng, bạn có muốn tiếp tục không?

Yêu cầu hoàn lại