Good and Bad People Good and Bad People
    #socialmedia #usa #uk #contentwriter #ai
    جستجوی پیشرفته
  • وارد شدن
  • ثبت نام

  • حالت روز
  • © 2025 Good and Bad People
    در باره • فهرست راهنما • با ما تماس بگیرید • توسعه دهندگان • سیاست حفظ حریم خصوصی • شرایط استفاده • بازپرداخت • Referral Terms • Acceptable Use Policy • Community Guidelines • Write for Us

    انتخاب کنید زبان

  • Arabic
  • Bengali
  • Chinese
  • Croatian
  • Danish
  • Dutch
  • English
  • Filipino
  • French
  • German
  • Hebrew
  • Hindi
  • Indonesian
  • Italian
  • Japanese
  • Korean
  • Persian
  • Portuguese
  • Russian
  • Spanish
  • Swedish
  • Turkish
  • Urdu
  • Vietnamese

تماشا کردن

تماشا کردن قرقره ها

مناسبت ها

مرور رویدادها رویدادهای من

وبلاگ

مقالات را مرور کنید

بازار

آخرین محصولات

صفحات

صفحات من صفحات لایک شده

بیشتر

کاوش کنید پست های محبوب شغل ها ارائه می دهد بودجه
قرقره ها تماشا کردن مناسبت ها بازار وبلاگ صفحات من همه را ببین

کشف کردن نوشته ها

Posts

کاربران

صفحات

گروه

وبلاگ

بازار

مناسبت ها

شغل ها

بودجه

Amelia's Stylish Spaces
1 Y ·ترجمه کردن

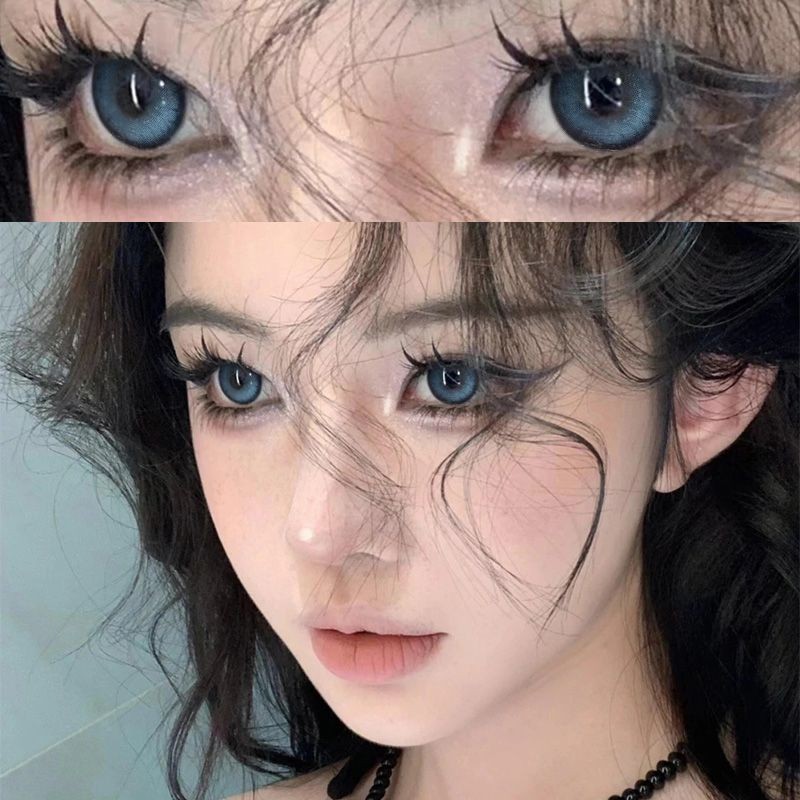
**Exploring the World of New Blue Contact Lenses for 1-Day Wear -2.75**

In the realm of eye fashion and corrective lenses, blue contact lenses offer a unique way to enhance your look or correct vision, even for a single day. For those seeking a fresh, vibrant change without the commitment of extended wear, new blue contact lenses for 1-day wear in a -2.75 prescription might just be the perfect solution. This article provides a comprehensive look at these lenses, including their benefits, how to use them, and tips for getting the most out of your one-day wear experience.

### **1. The Appeal of Blue Contact Lenses**

**1.1 Why Choose Blue Contact Lenses?**

Blue contact lenses have become increasingly popular for their ability to dramatically alter eye color, offering a striking contrast to natural hues. They provide a captivating and eye-catching look that can enhance your overall appearance for various occasions.

- **Aesthetic Enhancement* Blue lenses can create a bold and dynamic change in your eye color, making your eyes stand out and adding an extra layer of allure to your look.

- **Special Occasions* Ideal for events, photoshoots, or themed parties, blue contact lenses can complement your outfit and make a memorable impression.

**1.2 The Convenience of 1-Day Wear**

1-day contact lenses are designed for single-use, offering several advantages:

- **Hygiene* They eliminate the need for cleaning and storing lenses, reducing the risk of infections and complications.

- **Comfort* Fresh lenses every day provide optimal comfort and clarity, as there is no build-up of deposits or dryness that can occur with extended wear lenses.

- **Convenience* Perfect for those who prefer not to deal with the daily maintenance of reusable lenses.

### **2. Understanding the Prescription -2.75**

**2.1 Prescription Basics**

The -2.75 indicates the power of the lenses required to correct nearsightedness (myopia). Here’s what this means for users:

- **Nearsightedness Correction* A -2.75 prescription helps individuals who struggle to see distant objects clearly, making it easier to focus on faraway details.

- **Personalized Fit* This prescription is tailored to individual visual needs, ensuring that the lenses provide the correct level of magnification for improved vision.

**2.2 Choosing the Right Prescription**

Ensure you have an up-to-date prescription from an eye care professional before purchasing contact lenses. Your prescription should include not only the power but also other measurements such as the curvature and diameter of your eye to ensure a proper fit.

### **3. How to Use 1-Day Blue Contact Lenses**

**3.1 Application Tips**

Applying contact lenses, even for a single day, requires careful handling:

- **Wash Your Hands* Always start by washing and drying your hands thoroughly to avoid introducing any contaminants.

- **Lens Handling* Use your index finger and thumb to gently place the lens on your eye. Look straight ahead, and avoid blinking until the lens is securely in place.

- **Check Placement* Ensure the lens is centered on your eye for optimal comfort and vision. You can use a mirror to check that it is not folded or misplaced.

**3.2 Removal and Disposal**

At the end of the day, removing and disposing of your 1-day lenses is straightforward:

- **Remove Lenses* Use clean fingers to pinch the lens gently from your eye. Avoid using nails or any sharp objects.

- **Dispose Properly* Place the used lenses in a trash bin. Since these lenses are for single use, do not attempt to clean or reuse them.

### **4. Benefits and Considerations**

**4.1 Benefits**

- **Fresh and Clear Vision* Each pair of 1-day lenses is new, providing clear vision and a comfortable fit without residue from previous wear.

- **Reduced Maintenance* No need for cleaning solutions or lens cases, making them ideal for busy lifestyles or occasional use.

- **Hygienic and Safe* Minimizes the risk of infections associated with prolonged contact lens use.

**4.2 Considerations**

- **Cost* 1-day lenses can be more expensive per lens compared to monthly or bi-weekly options. However, their convenience and hygiene benefits often justify the cost for many users.

- **Sensitivity* If you have sensitive eyes, ensure that the lenses you choose are compatible with your eye health and comfort.

### **5. Where to Purchase**

**5.1 Authorized Retailers**

Purchase your contact lenses from reputable sources to ensure you receive authentic, high-quality products. Look for:

- **Optical Stores* Local or online optical retailers often offer a range of contact lenses, including 1-day options.

- **Eye Care Professionals* Optometrists and ophthalmologists can provide lenses directly or recommend trusted suppliers.

**5.2 Online Shopping**

Many online retailers offer a wide selection of contact lenses. Ensure you:

- **Verify Authenticity* Purchase from well-known, authorized sellers to avoid counterfeit products.

- **Check Reviews* Read customer reviews and ratings to gauge the quality and reliability of the product.

### **6. Tips for a Successful Experience**

**6.1 Follow Instructions**

Always follow the manufacturer’s instructions for wearing and caring for your contact lenses. Adhering to these guidelines ensures the best possible experience and maintains eye health.

**6.2 Monitor Eye Health**

Pay attention to how your eyes feel while wearing the lenses. If you experience any discomfort, redness, or vision problems, remove the lenses and consult with your eye care professional.

**6.3 Plan Ahead**

If you have a special event or trip planned, make sure to purchase your lenses in advance and test them beforehand to ensure they meet your needs.

### **Conclusion**

**[Try On] New Blue Contact Lenses for 1-Day Wear -2.75** offer a fantastic way to enjoy a vibrant change in your eye color while benefiting from the convenience and hygiene of single-use lenses. Whether you’re looking to make a statement at a special event or simply want to try something new, these lenses provide a stylish and practical option. By following the tips and recommendations in this guide, you can make the most of your blue contact lenses and enjoy a dazzling, clear-eyed look.

#datenightbeauty

image
پسندیدن
اظهار نظر
اشتراک گذاری
Lunas Luxe Travel
Lunas Luxe Travel
1 Y ·ترجمه کردن

3 Quick and Delicious Zucchini Dishes to Make Tonight 🥒🍽️

Zucchini is a versatile vegetable that can transform into a variety of delicious dishes with minimal effort. If you’re looking for quick and tasty meal ideas to make tonight, zucchini is your answer. Whether you’re aiming for a light dinner or a hearty side, these three recipes are not only easy to prepare but also packed with flavor. Here’s how to make the most of this nutritious vegetable in just a few simple steps.

1. Zucchini Noodles with Garlic Parmesan Sauce

Why You’ll Love It: This dish offers a healthier twist on traditional pasta with zucchini noodles. The garlic Parmesan sauce adds a rich, savory flavor that pairs perfectly with the tender zucchini.

Ingredients:

2 large zucchinis

2 tablespoons olive oil

3 cloves garlic, minced

1/2 cup grated Parmesan cheese

Salt and black pepper, to taste

1/4 teaspoon red pepper flakes (optional)

Chopped parsley for garnish (optional)

Instructions:

Spiralize the Zucchini: Use a spiralizer or a vegetable peeler to create zucchini noodles. If you don’t have a spiralizer, simply slice the zucchini into thin strips.

Cook the Zucchini: Heat olive oil in a large skillet over medium heat. Add the zucchini noodles and cook for 2-3 minutes, just until they start to soften.

Add Garlic and Sauce: Push the zucchini to one side of the skillet and add minced garlic to the empty side. Cook for about 1 minute until fragrant. Mix the garlic into the zucchini noodles.

Finish the Dish: Stir in the grated Parmesan cheese, salt, pepper, and red pepper flakes if using. Cook for another 1-2 minutes until the cheese is melted and the noodles are coated with the sauce.

Serve: Garnish with chopped parsley if desired and serve immediately.

2. Cheesy Baked Zucchini Casserole

Why You’ll Love It: This baked casserole combines zucchini with a cheesy topping for a comforting, satisfying dish that’s easy to prepare and perfect as a side or main course.

Ingredients:

4 medium zucchinis, sliced

1 cup shredded mozzarella cheese

1/2 cup grated Parmesan cheese

1/2 cup breadcrumbs

2 tablespoons olive oil

1 teaspoon dried oregano

1 teaspoon dried basil

Salt and black pepper, to taste

Instructions:

Preheat Oven: Preheat your oven to 375°F (190°C).

Prepare Zucchini: In a large bowl, toss the zucchini slices with olive oil, salt, and pepper. Spread them out in a single layer in a baking dish.

Add Toppings: Sprinkle the shredded mozzarella and grated Parmesan cheese over the zucchini. In a separate bowl, mix the breadcrumbs with dried oregano and basil, then sprinkle the mixture over the cheese.

Bake: Bake in the preheated oven for 20-25 minutes, or until the zucchini is tender and the cheese is melted and bubbly.

Serve: Let the casserole cool slightly before serving. Enjoy as a side dish or a main course.

3. Zucchini and Tomato Stir-Fry

Why You’ll Love It: This stir-fry is a quick and vibrant dish that combines zucchini with juicy tomatoes and fresh herbs. It’s perfect for a light and flavorful dinner.

Ingredients:

2 large zucchinis, sliced

1 cup cherry tomatoes, halved

2 tablespoons olive oil

1 small onion, diced

2 cloves garlic, minced

1/2 teaspoon dried thyme

Salt and black pepper, to taste

Fresh basil for garnish (optional)

Instructions:

Heat Oil: Heat olive oil in a large skillet or wok over medium-high heat. Add diced onion and cook for 2-3 minutes until softened.

Add Garlic and Zucchini: Add minced garlic and sliced zucchini to the skillet. Cook for 5-7 minutes, stirring occasionally, until the zucchini is tender and slightly caramelized.

Add Tomatoes and Seasoning: Stir in the cherry tomatoes, dried thyme, salt, and pepper. Cook for an additional 2-3 minutes until the tomatoes are just softened.

Garnish and Serve: Garnish with fresh basil if desired. Serve the stir-fry warm as a side dish or over cooked quinoa or rice for a complete meal.

Tips for Perfect Zucchini Dishes

Choosing Zucchini: Look for small to medium-sized zucchinis, which tend to be more tender and flavorful.

Avoid Overcooking: Zucchini cooks quickly, so keep an eye on it to avoid mushiness.

Enhance Flavors: Experiment with additional herbs and spices to customize these dishes to your taste.

Final Thoughts

These three quick and delicious zucchini dishes are perfect for any night of the week. From a light and healthy pasta alternative to a cheesy, comforting casserole, and a fresh stir-fry, zucchini proves to be a versatile ingredient that can easily elevate your meals. Try these recipes tonight and enjoy the simplicity and flavor of zucchini in a whole new way!

image
پسندیدن
اظهار نظر
اشتراک گذاری
Lunas Luxe Travel
Lunas Luxe Travel
1 Y ·ترجمه کردن

Effortless One-Pot Chicken Alfredo: Quick and Delicious

When life gets busy, the last thing you want is to spend hours in the kitchen preparing a meal. That’s where the Effortless One-Pot Chicken Alfredo comes to the rescue. This recipe delivers the creamy, comforting flavors of classic Alfredo pasta with minimal fuss and cleanup. Perfect for busy weeknights or a cozy family dinner, this dish combines tender chicken with a rich Alfredo sauce, all made in one pot. Here’s how to whip up this quick and delicious meal with ease.

Why You'll Love This One-Pot Chicken Alfredo

This recipe stands out because it’s not only quick and easy but also packed with flavor. Here’s what makes it a winner:

Minimal Cleanup: With everything cooked in one pot, cleanup is a breeze.

Rich and Creamy: The Alfredo sauce is luxuriously creamy, making each bite comforting and satisfying.

Speedy Preparation: Ready in about 30 minutes, it’s ideal for busy weeknights.

Family-Friendly: The flavors are universally loved, making it a hit with both kids and adults.

Ingredients You’ll Need

To make this Effortless One-Pot Chicken Alfredo, gather the following ingredients:

2 tablespoons olive oil

1 pound (450 g) boneless, skinless chicken breasts or thighs, cut into bite-sized pieces

Salt and black pepper, to taste

2 cloves garlic, minced

1 cup chicken broth

1 cup heavy cream

8 oz (225 g) fettuccine pasta (or any pasta of your choice)

1 cup grated Parmesan cheese

1/2 teaspoon dried Italian seasoning (optional)

Chopped parsley or basil, for garnish (optional)

Step-by-Step Instructions

Step 1: Cook the Chicken

In a large, deep skillet or Dutch oven, heat the olive oil over medium heat. Add the chicken pieces, seasoning with salt and black pepper. Cook until the chicken is browned and cooked through, about 5-7 minutes. Remove the chicken from the skillet and set aside.

Step 2: Sauté the Garlic

In the same skillet, add the minced garlic and cook for about 1 minute, until fragrant. Be careful not to burn it.

Step 3: Prepare the Sauce

Pour in the chicken broth and bring to a simmer, scraping up any browned bits from the bottom of the pan. Stir in the heavy cream and bring the mixture back to a simmer.

Step 4: Cook the Pasta

Add the fettuccine (or your choice of pasta) to the skillet. Stir to combine and ensure the pasta is submerged in the liquid. Cover and cook for 10-12 minutes, or until the pasta is tender and has absorbed most of the liquid, stirring occasionally.

Step 5: Add the Cheese and Chicken

Once the pasta is cooked, stir in the grated Parmesan cheese until melted and the sauce is creamy. Add the cooked chicken back into the skillet and mix well to combine. If desired, stir in dried Italian seasoning for extra flavor.

Step 6: Garnish and Serve

Serve the Chicken Alfredo hot, garnished with chopped parsley or basil if desired. Enjoy a meal that's both comforting and effortless!

Serving Suggestions

Side Salad: Pair with a fresh green salad for a balanced meal.

Garlic Bread: Serve with garlic bread or crusty rolls to soak up the delicious Alfredo sauce.

Vegetables: Add steamed or sautéed vegetables like broccoli or spinach for extra nutrition and flavor.

Tips for Perfect One-Pot Chicken Alfredo

Pasta Cooking: Ensure the pasta is cooked al dente; it will continue to cook slightly in the residual heat and absorb more of the sauce.

Creaminess: For an extra creamy sauce, use full-fat heavy cream and make sure to stir the cheese in slowly to avoid clumping.

Chicken Cooking: If using chicken thighs, they add a richer flavor and stay juicier compared to chicken breasts.

Final Thoughts

Effortless One-Pot Chicken Alfredo is the perfect solution for a quick, delicious, and comforting meal. With its creamy sauce and tender chicken, it delivers all the flavor of traditional Alfredo without the extra effort. Ideal for busy nights or when you want something special with minimal cleanup, this recipe is sure to become a family favorite. Try it out and enjoy a delectable meal with ease!

image
پسندیدن
اظهار نظر
اشتراک گذاری
Henry Travel Dreamscapes
1 Y ·ترجمه کردن

**Elevate Your Summer Wardrobe with the Bonkwa Women's Floral Print Romper**

As the days get warmer and summer approaches, it’s time to refresh your wardrobe with pieces that combine style, comfort, and a touch of whimsy. Enter the **Bonkwa Women's Summer Floral Print Romper**—a standout piece designed to make you look and feel fabulous for any occasion. With its deep V-neck, long baggy sleeves, and double-layer ruffle hem, this romper promises to be a versatile and eye-catching addition to your summer collection.

### **A Bold and Elegant Design**

The Bonkwa Floral Print Romper is crafted to blend elegance with playful charm. The deep V-neckline adds a touch of sophistication while showcasing a hint of your neckline in a flattering way. This design element is perfect for those who love a bit of glamour in their casual wear.

The long baggy sleeves provide a relaxed, flowing silhouette that contrasts beautifully with the structured waist, adding an element of drama without compromising on comfort. This design is particularly great for transitioning from day to night, allowing you to feel stylish and at ease no matter the occasion.

### **Playful Ruffle Hem**

One of the standout features of this romper is the double-layer ruffle hem. This detail adds a playful and feminine touch, making it perfect for everything from beach outings to summer parties. The ruffles move gracefully with every step, creating a fun and flirty look that’s sure to turn heads.

### **Flattering and Functional**

The cinched belt not only defines your waist but also adds a chic element to the romper. This adjustable feature allows for a customizable fit, ensuring that the romper enhances your natural shape while providing comfort and support. The short length of the jumpsuit keeps it cool and breezy, ideal for hot summer days or evening outings.

### **Versatile for Any Occasion**

The Bonkwa Floral Print Romper is as versatile as it is stylish. Whether you’re heading to a beach party, a casual brunch, or a summer festival, this romper fits the bill. Pair it with sandals for a laid-back look, or dress it up with wedges and statement accessories for a more polished appearance.

- **Beach Days* The lightweight fabric and playful design make it a perfect choice for lounging by the shore or strolling along the boardwalk.
- **Brunch with Friends* The chic ruffle hem and elegant V-neck make it a great option for catching up with friends over a meal.
- **Evening Events* Add some jewelry and heeled sandals for an effortlessly glamorous evening look.

### **Easy Care for Busy Lives**

Made from high-quality materials, this romper is not only stylish but also practical. It’s designed to be easy to care for, allowing you to enjoy your summer activities without worrying about complicated laundry instructions. Simply machine wash and hang to dry, and it will be ready for your next adventure.

### **Why You’ll Love It**

- **Stunning Design* Features a deep V-neck, long baggy sleeves, and a playful double-layer ruffle hem.
- **Flattering Fit* Cinched belt enhances your waist and complements your silhouette.
- **Versatile* Perfect for a range of summer activities, from casual to dressy.
- **Comfortable and Easy Care* Designed for all-day wear and simple maintenance.

### **Make a Statement This Summer**

The Bonkwa Women's Summer Floral Print Romper is more than just a jumpsuit—it’s a fashion statement. With its elegant design, playful ruffles, and flattering fit, it’s sure to become a favorite in your summer wardrobe.

**Don’t wait—add this must-have romper to your collection and enjoy effortless style all season long!** 🌟👗💖

image
پسندیدن
اظهار نظر
اشتراک گذاری
Madison's Creative Pins
1 Y ·ترجمه کردن

**Exploring ZG54 by Ziad Germanos: A Fusion of Modern Elegance**

The ZG54 by Ziad Germanos stands out as a quintessential example of modern sophistication intertwined with classic charm. Renowned for his innovative designs and meticulous craftsmanship, Ziad Germanos has once again captivated the fashion world with this remarkable piece.

ZG54 is more than just an accessory—it's a statement of style and luxury. The design seamlessly integrates contemporary trends with timeless elegance, making it a versatile addition to any wardrobe. Its refined details and high-quality materials reflect Germanos's dedication to excellence and his deep understanding of fashion aesthetics.

The piece is crafted with an eye for detail, showcasing intricate patterns and a flawless finish. Whether you're dressing up for a special occasion or adding a touch of elegance to your everyday look, ZG54 is designed to impress.

Elevate your fashion game and embrace the elegance of ZG54 by Ziad Germanos. Experience the perfect blend of modern design and classic sophistication.

#zg54 #ziadgermanos #luxuryfashion #modernelegance

image
پسندیدن
اظهار نظر
اشتراک گذاری
Lunas Luxe Travel
Lunas Luxe Travel
1 Y ·ترجمه کردن

Indulge in the Ultimate Creamy Macaroni and Cheese 🧀🍲

When it comes to comfort food, few dishes can rival the creamy, cheesy goodness of macaroni and cheese. It’s a dish that evokes nostalgia, warmth, and satisfaction with every bite. If you’re on a quest for the ultimate macaroni and cheese recipe that delivers on creaminess, flavor, and indulgence, look no further. This Ultimate Creamy Macaroni and Cheese is designed to be the creamiest, most flavorful version you’ve ever tasted. Here’s how to make this irresistible comfort food that’s sure to delight everyone at your table.

Why This Macaroni and Cheese Recipe is a Must-Try

This recipe stands out because it combines rich, velvety cheese sauce with perfectly cooked pasta to create a dish that’s truly special. Here’s what makes it the ultimate choice:

Luxuriously Creamy: A blend of cheeses and a touch of cream make for an incredibly rich and smooth sauce.

Flavorful: The recipe features a mix of cheeses that melt beautifully together, creating layers of savory, cheesy goodness.

Comforting: It’s the perfect dish for cozy family dinners, holiday gatherings, or any time you need a little extra comfort.

Customizable: Add-ins like crispy bacon, caramelized onions, or a crunchy topping can elevate the dish to your liking.

Ingredients You’ll Need

To prepare this indulgent macaroni and cheese, gather the following ingredients:

8 oz (225 g) elbow macaroni

2 tablespoons unsalted butter

2 tablespoons all-purpose flour

1 1/2 cups whole milk

1/2 cup heavy cream

2 cups shredded sharp cheddar cheese

1 cup shredded mozzarella cheese

1/2 cup grated Parmesan cheese

1 teaspoon Dijon mustard

1/2 teaspoon garlic powder

1/2 teaspoon onion powder

1/4 teaspoon paprika

Salt and black pepper, to taste

1/2 cup breadcrumbs (optional, for topping)

2 tablespoons melted butter (optional, for topping)

Step-by-Step Instructions

Step 1: Cook the Pasta

Start by bringing a large pot of salted water to a boil. Add the elbow macaroni and cook according to the package instructions until al dente. Drain and set aside.

Step 2: Prepare the Cheese Sauce

In a large saucepan, melt 2 tablespoons of butter over medium heat. Add the flour and whisk continuously for about 1-2 minutes to form a roux (a thickening agent). Gradually whisk in the whole milk and heavy cream, continuing to stir until the mixture is smooth and starts to thicken.

Step 3: Add the Cheese

Reduce the heat to low and begin adding the shredded cheddar, mozzarella, and grated Parmesan cheese, one handful at a time. Stir until each addition is fully melted and the sauce is creamy. Add the Dijon mustard, garlic powder, onion powder, paprika, salt, and black pepper, mixing well to incorporate.

Step 4: Combine Pasta and Sauce

Add the cooked macaroni to the cheese sauce, stirring until the pasta is evenly coated with the creamy mixture.

Step 5: Bake (Optional)

For a crispy topping, preheat your oven to 375°F (190°C). Transfer the macaroni and cheese to a baking dish. Mix the breadcrumbs with melted butter and sprinkle over the top. Bake for 20-25 minutes, or until the topping is golden brown and the cheese sauce is bubbly.

Step 6: Serve and Enjoy

Let the macaroni and cheese sit for a few minutes before serving. This allows the sauce to set slightly, making it easier to serve.

Serving Suggestions

Classic Side: Serve with a side of steamed vegetables or a fresh salad for a balanced meal.

Toppings: Add extras like crispy bacon bits, sautéed mushrooms, or caramelized onions to enhance the flavor.

For a Twist: Try different cheese combinations, such as Gouda, fontina, or Monterey Jack, for a unique spin on the classic dish.

Tips for the Perfect Macaroni and Cheese

Cheese Selection: Using a blend of cheeses ensures a rich, complex flavor. Sharp cheddar provides a strong cheese flavor, while mozzarella adds creaminess.

Sauce Consistency: If the cheese sauce is too thick, add a splash of milk to reach your desired consistency. If it’s too thin, let it cook a little longer to thicken.

Prevent Clumping: Make sure to add cheese gradually and stir constantly to avoid clumps and ensure a smooth sauce.

Final Thoughts

Indulge in the Ultimate Creamy Macaroni and Cheese for a comforting, delicious meal that will satisfy even the biggest comfort food cravings. This recipe combines a rich, creamy cheese sauce with perfectly cooked pasta for a dish that’s sure to impress family and friends. Whether served as a side or the main event, this macaroni and cheese will become a beloved favorite in your culinary repertoire. Try it tonight and experience the ultimate in cheesy comfort!

image
پسندیدن
اظهار نظر
اشتراک گذاری
Lunas Luxe Travel
Lunas Luxe Travel
1 Y ·ترجمه کردن

Perfectly Crispy & Irresistibly Delicious Fried Chicken Recipe 🍗✨

Few dishes can match the comfort and satisfaction of perfectly fried chicken. Crispy on the outside, tender and juicy on the inside, this fried chicken recipe is a game-changer for any meal. Whether you’re hosting a family gathering or simply craving a nostalgic treat, this recipe delivers golden, crunchy perfection every time. Here’s how to make fried chicken that’s sure to become your go-to comfort food.

Why This Fried Chicken Recipe Stands Out

This recipe isn’t just about fried chicken; it’s about achieving the perfect balance of crispy coating and juicy meat. Here’s why it’s a must-try:

Crispy Coating: The secret to the ultimate crunch lies in a double-dipping technique that ensures a thick, crispy crust.

Juicy Meat: Proper marinating and frying techniques keep the chicken tender and flavorful.

Simple Ingredients: Using basic pantry staples, this recipe is both accessible and delicious.

Versatile: Great for family dinners, picnics, or any occasion where comfort food is on the menu.

Ingredients You’ll Need

For this fried chicken recipe, gather the following ingredients:

4 bone-in, skin-on chicken thighs and drumsticks

1 cup buttermilk

1 teaspoon hot sauce (optional, for extra flavor)

2 cups all-purpose flour

1 tablespoon paprika

1 teaspoon garlic powder

1 teaspoon onion powder

1 teaspoon dried thyme

1 teaspoon dried basil

1 teaspoon salt

1/2 teaspoon black pepper

1/2 teaspoon baking powder

Vegetable oil (for frying)

Step-by-Step Instructions

Step 1: Marinate the Chicken

In a large bowl, combine the buttermilk and hot sauce (if using). Submerge the chicken pieces in the mixture, ensuring they are fully covered. Cover the bowl and refrigerate for at least 2 hours, or overnight for best results. This step helps tenderize the chicken and adds flavor.

Step 2: Prepare the Coating

In a separate bowl, whisk together the flour, paprika, garlic powder, onion powder, dried thyme, dried basil, salt, pepper, and baking powder. This seasoned flour mixture will give the chicken its crispy, flavorful coating.

Step 3: Dredge the Chicken

Remove the chicken from the buttermilk, allowing any excess to drip off. Dredge each piece thoroughly in the seasoned flour mixture, pressing the flour onto the chicken to ensure it sticks. For an extra-crispy coating, dip the floured chicken back into the buttermilk and then coat again with flour.

Step 4: Heat the Oil

In a large skillet or Dutch oven, heat about 2 inches of vegetable oil over medium-high heat to 350°F (175°C). You can test the oil temperature by dropping a small piece of flour into the oil; if it sizzles and bubbles, the oil is ready.

Step 5: Fry the Chicken

Carefully place the chicken pieces into the hot oil, avoiding overcrowding the pan. Fry the chicken in batches if necessary. Cook for about 10-12 minutes per side, or until the chicken is golden brown and the internal temperature reaches 165°F (74°C). Adjust the heat as needed to maintain the oil temperature and ensure even cooking.

Step 6: Drain and Serve

Once cooked, remove the chicken from the oil and place it on a wire rack set over a baking sheet to drain excess oil. Allow the chicken to rest for a few minutes before serving to maintain its crispiness.

Serving Suggestions

Classic Sides: Pair with mashed potatoes, coleslaw, and cornbread for a classic Southern meal.

Dipping Sauces: Serve with a variety of dipping sauces, such as ranch, honey mustard, or BBQ sauce.

Sandwiches: Use the fried chicken in sandwiches with pickles and your favorite condiments for a tasty twist.

Tips for Perfect Fried Chicken

Oil Temperature: Maintaining the right oil temperature is crucial for crispy chicken. Too hot and the coating will burn; too cool and it will become greasy.

Avoid Overcrowding: Fry in batches to avoid lowering the oil temperature and to ensure even cooking.

Rest the Chicken: Let the chicken rest on a wire rack rather than paper towels to keep the coating crispy.

Final Thoughts

This Perfectly Crispy & Irresistibly Delicious Fried Chicken Recipe brings the ultimate comfort food right to your table. With a crunchy, flavorful coating and tender, juicy meat, it’s sure to impress family and friends alike. Whether you’re serving it for a special occasion or just a weeknight treat, this fried chicken is a surefire hit. Try it today and enjoy the crispy perfection of homemade fried chicken!

image
پسندیدن
اظهار نظر
اشتراک گذاری
Amelia's Stylish Spaces
1 Y ·ترجمه کردن

**Sparkling Eye Glitter ✨: A Comprehensive Guide to Dazzling Eye Looks**

In the realm of beauty, sparkling eye glitter is a game-changer that adds a touch of magic and glamour to any makeup look. Whether you're preparing for a night out, a special event, or simply want to elevate your everyday makeup, eye glitter can transform your eyes into a stunning focal point. This article explores everything you need to know about sparkling eye glitter—from its history and benefits to application techniques and product recommendations.

### **1. The Magic of Sparkling Eye Glitter**

**1.1 The Appeal of Eye Glitter**

Eye glitter has a unique ability to catch light and create a dazzling effect that’s hard to achieve with traditional eyeshadows alone. It adds dimension and drama to your eye makeup, making it perfect for special occasions, festivals, and nights out. The shimmering particles reflect light, creating a sparkling effect that can make your eyes appear larger and more vibrant.

**1.2 Historical Context**

The use of glitter in makeup can be traced back to ancient civilizations, where various forms of shimmer were used for ceremonial purposes. In modern times, glitter has become a staple in the beauty industry, popularized by its use in high-fashion runways and pop culture. Its resurgence in recent years has been driven by social media trends and the influence of beauty influencers.

### **2. Benefits of Using Eye Glitter**

**2.1 Enhanced Aesthetic Appeal**

- **Dramatic Effect* Eye glitter creates a bold, eye-catching look that enhances the overall impact of your makeup.

- **Versatility* It can be used in various ways, from subtle highlights to full-on glittery lids, allowing for endless creativity.

**2.2 Longevity and Durability**

- **Long-Lasting* High-quality eye glitters are formulated to stay in place without flaking, providing a long-lasting sparkle.

- **Resistant to Smudging* Properly applied glitter stays put, reducing the need for constant touch-ups.

**2.3 Easy to Remove**

- **Gentle Removal* Many glitter products are designed to be easily removed with makeup remover or micellar water, minimizing irritation to the delicate eye area.

### **3. Types of Eye Glitter**

**3.1 Loose Glitter**

- **Description* Loose glitter comes in a jar or pot and requires an adhesive to stay in place. It offers a high-impact, customizable shine.

- **Application Tips* Use a glitter primer or adhesive to ensure the glitter adheres well and stays in place throughout the day.

**3.2 Pressed Glitter**

- **Description* Pressed glitter is formulated into a compact and can be applied directly from the pan. It often has a finer texture compared to loose glitter.

- **Application Tips* Use your fingers or a dense brush to apply pressed glitter, and it generally requires less adhesive.

**3.3 Glitter Gel**

- **Description* Glitter gel combines glitter with a gel base, making it easy to apply and blend. It often comes in tubes or pots.

- **Application Tips* Apply glitter gel with a brush or your fingers for a quick and even application. It’s ideal for a more subtle, all-over shimmer.

### **4. Application Techniques**

**4.1 Preparation**

- **Eye Primer* Apply an eye primer to create a smooth base and ensure that the glitter adheres well.

- **Concealer* Use concealer on your eyelids to neutralize any discoloration and enhance the vibrancy of the glitter.

**4.2 Applying Glitter**

- **Adhesive* For loose glitter, use a glitter primer or adhesive to ensure it sticks and doesn’t fall out. Apply a thin layer to the area where you plan to apply the glitter.

- **Application* Gently pat or press the glitter onto the adhesive using a flat brush or your fingertips. Avoid rubbing to prevent fallout.

- **Blending* Blend the edges of the glitter with your eyeshadow to create a seamless transition.

**4.3 Finishing Touches**

- **Mascara and Liner* Apply mascara and eyeliner to complete your eye look. Waterproof formulas can help prevent glitter from smudging.

- **Setting Spray* Use a setting spray to lock in your makeup and reduce glitter fallout.

### **5. Tips for a Glittery Eye Look**

**5.1 Choosing the Right Glitter**

- **Color and Size* Select glitter that complements your overall makeup look. Smaller particles provide a more subtle shimmer, while larger particles create a bolder effect.

- **Quality* Invest in high-quality glitter to ensure it’s safe for eye use and has minimal fallout.

**5.2 Avoiding Common Mistakes**

- **Avoid Overuse* A little goes a long way with glitter. Use it sparingly to avoid overwhelming your look.

- **Prevent Fallout* Apply glitter in small amounts and use a setting spray to minimize fallout.

### **6. Product Recommendations**

**6.1 Popular Brands and Products**

- **Urban Decay Heavy Metal Glitter Eyeliner* Offers a range of glittery shades in a convenient liner format for precise application.

- **Too Faced Glitter Pop! Peel-Off Eyeliner* Features a peel-off formula for easy removal and intense glitter payoff.

- **Stila Glitter & Glow Liquid Eye Shadow* Provides a high-shine, long-lasting glitter effect with easy application.

**6.2 DIY Options**

- **Homemade Glitter* If you’re feeling creative, you can make your own glitter by mixing loose cosmetic glitter with a bit of aloe vera gel or coconut oil for a custom glitter gel.

### **7. Removing Glitter**

**7.1 Gentle Removal**

- **Makeup Remover* Use a gentle eye makeup remover or micellar water to dissolve and remove glitter. Avoid harsh scrubbing to protect your delicate eye area.

- **Cotton Pads* Soak a cotton pad in remover and gently press it onto your eyelids to break down the glitter. Wipe away gently.

**7.2 Skin Care**

- **Hydration* After removing glitter, apply an eye cream or moisturizer to soothe and hydrate the area.

### **8. Embracing the Glitter Trend**

**8.1 Experimenting with Looks**

- **Day vs. Night* Adjust the intensity of your glitter look based on the occasion. For daytime, opt for a subtle shimmer, while evening events allow for bolder applications.

- **Mix and Match* Combine glitter with other makeup trends, such as graphic eyeliner or colorful eyeshadows, for a unique and personalized look.

**8.2 Confidence and Style**

- **Express Yourself* Glitter makeup is all about having fun and expressing your personal style. Embrace the sparkle and let it enhance your confidence and creativity.

### **Conclusion**

**Sparkling Eye Glitter ✨** is more than just a beauty trend; it’s a versatile tool for creating mesmerizing eye looks that captivate and dazzle. With the right techniques and products, you can incorporate glitter into your makeup routine to add a touch of glamour and excitement. Whether you’re preparing for a special event or simply want to elevate your everyday makeup, eye glitter offers endless possibilities for creativity and self-expression. So, get ready to shine and let your eyes sparkle with the magic of glitter!

#datenightbeauty

image
پسندیدن
اظهار نظر
اشتراک گذاری
Seren's Urban Elegance
1 Y ·ترجمه کردن

Foto do Álbum 'ЧЕРНЫЙ: Идеи Ногтей' – Inspire-se na Nossa Coleção de Manicure no OK

Se você é apaixonada por design de unhas e está em busca de novas ideias para transformar seu visual, o álbum 'ЧЕРНЫЙ: Идеи Ногтей' na nossa página do OK é o lugar perfeito para você. Este álbum apresenta uma variedade de designs impressionantes com a cor preta, uma escolha clássica e sofisticada que nunca sai de moda. Neste artigo, exploraremos o que torna essas ideias de manicure tão especiais e como você pode se inspirar para criar seus próprios looks deslumbrantes.

A Elegância do Preto nas Unhas

O preto é uma cor atemporal que transmite sofisticação e elegância. Em design de unhas, ele oferece uma base perfeita para criar diversos estilos, desde o minimalista até o mais ousado. No álbum 'ЧЕРНЫЙ: Идеи Ногтей', você encontrará uma seleção cuidadosa de designs que mostram a versatilidade e o impacto visual do preto.

1. Versatilidade do Preto

Uma das maiores vantagens do preto é sua versatilidade. Ele pode ser combinado com quase todas as outras cores e estilos, permitindo uma infinidade de possibilidades criativas. Seja para um look elegante e discreto ou um design mais ousado e moderno, o preto é a escolha perfeita para qualquer ocasião.

2. Estilos Diversos

No álbum, você encontrará designs que vão desde o clássico esmalte preto puro até estilos mais elaborados com detalhes em glitter, metálicos e padrões geométricos. Esses designs são ideais para qualquer ocasião, seja para um evento formal, uma noite com amigos ou até mesmo para o dia a dia.

Destaques do Álbum 'ЧЕРНЫЙ: Идеи Ногтей'

1. Design com Glitter

Os designs com glitter preto adicionam um toque de glamour às suas unhas. O brilho sutil combina perfeitamente com o fundo preto, criando um efeito de sofisticação e elegância. Estes designs são perfeitos para festas e eventos especiais.

2. Acabamento Matte

O acabamento matte em preto oferece um visual moderno e chique. É uma ótima alternativa ao acabamento brilhante e adiciona um toque de sofisticação ao seu look. Experimente combinar o acabamento matte com detalhes sutis para um design discreto e elegante.

3. Padrões Geométricos

Os padrões geométricos em preto são uma maneira excelente de adicionar um toque de criatividade às suas unhas. Linhas finas, formas assimétricas e contrastes sutis podem transformar um simples esmalte preto em uma verdadeira obra de arte.

4. Combinações de Cores

Embora o preto seja a estrela principal, ele pode ser combinado com outras cores para criar designs únicos e atraentes. Cores metálicas, tons de cinza ou até mesmo toques de cor vibrante podem complementar o preto e criar um look sofisticado e moderno.

Como Criar Seus Próprios Designs de Unhas

1. Preparação das Unhas

Antes de começar a aplicar qualquer design, prepare suas unhas. Certifique-se de que estão limpas, bem lixadas e hidratadas. A aplicação de uma base protetora é fundamental para garantir a durabilidade do esmalte e proteger suas unhas naturais.

2. Escolha do Design

Escolha um design que se adeque ao seu estilo e à ocasião. Se você está se inspirando no álbum, selecione um ou mais designs que você gostaria de experimentar e planeje como irá replicá-los.

3. Aplicação do Esmalte

Aplique o esmalte preto como base e deixe secar completamente. Use um pincel fino ou ferramentas de nail art para adicionar os detalhes adicionais, como glitter, padrões ou acabamentos especiais.

4. Finalização

Finalize o design com um top coat para garantir que o esmalte fique brilhante e protegido. Isso também ajudará a prolongar a durabilidade do seu design.

Conclusão

O álbum 'ЧЕРНЫЙ: Идеи Ногтей' é uma excelente fonte de inspiração para quem busca criar designs de unhas sofisticados e modernos. Com uma ampla gama de estilos e ideias, você pode facilmente encontrar o design perfeito que combina com sua personalidade e estilo. Explore as fotos, inspire-se e experimente novas técnicas para transformar suas unhas em uma verdadeira obra de arte. Não perca a chance de brilhar com os designs mais elegantes e criativos – visite nossa página no OK e descubra seu novo look favorito! 💅🏼🖤

image
پسندیدن
اظهار نظر
اشتراک گذاری
Lunas Luxe Travel
Lunas Luxe Travel
1 Y ·ترجمه کردن

Delicious Chicken Pasta: A Quick and Flavorful Meal

In the world of quick and satisfying meals, chicken pasta is a standout favorite. It combines tender chicken with creamy pasta and a variety of savory ingredients to create a dish that's both flavorful and comforting. Whether you're rushing to get dinner on the table after a long day or preparing a meal for friends, this Delicious Chicken Pasta recipe is your go-to for a meal that's as simple as it is scrumptious.

Why You'll Love This Chicken Pasta Recipe

Chicken pasta is not only a crowd-pleaser but also incredibly versatile. Here’s why this recipe is a winner:

Speedy Preparation: Ready in about 30 minutes, it’s perfect for busy weeknights or last-minute gatherings.

Full of Flavor: With a blend of herbs, garlic, and a creamy sauce, this dish is bursting with taste.

Versatile Ingredients: Customize with your favorite vegetables or pasta shapes to suit your taste.

Comfort Food: Creamy and hearty, it’s a dish that satisfies both the stomach and the soul.

Ingredients You’ll Need

To make this Delicious Chicken Pasta, gather the following ingredients:

2 boneless, skinless chicken breasts

8 oz (225 g) pasta (penne, fettuccine, or your choice)

2 tablespoons olive oil

3 cloves garlic, minced

1/2 cup onion, finely chopped

1 cup heavy cream

1/2 cup chicken broth

1/2 cup grated Parmesan cheese

1 cup baby spinach (optional)

1/2 cup sun-dried tomatoes, chopped (optional)

1 teaspoon dried basil

1 teaspoon dried oregano

Salt and pepper, to taste

Fresh basil or parsley, for garnish

Step-by-Step Instructions

Step 1: Cook the Pasta

Start by cooking the pasta according to the package instructions until al dente. Drain and set aside.

Step 2: Prepare the Chicken

While the pasta is cooking, season the chicken breasts with salt, pepper, dried basil, and oregano. Heat olive oil in a large skillet over medium heat. Add the chicken breasts and cook for about 6-8 minutes per side, or until they are cooked through and have a golden brown exterior. Remove the chicken from the skillet and let it rest for a few minutes before slicing into strips or cubes.

Step 3: Make the Sauce

In the same skillet, add a bit more olive oil if needed, and sauté the garlic and onion until fragrant and translucent, about 2-3 minutes. Pour in the chicken broth and bring to a simmer. Reduce heat and stir in the heavy cream, allowing it to cook for a few minutes until it starts to thicken.

Step 4: Combine Ingredients

Add the cooked pasta to the skillet and toss to coat in the creamy sauce. Stir in the grated Parmesan cheese, and cook for an additional 1-2 minutes until the cheese is melted and the pasta is well-coated. If using, add the baby spinach and sun-dried tomatoes at this point, stirring until the spinach is wilted and the tomatoes are warmed through.

Step 5: Serve and Garnish

Add the sliced or cubed chicken to the pasta and mix to combine. Serve the chicken pasta hot, garnished with fresh basil or parsley, and additional Parmesan cheese if desired.

Variations and Add-Ins

Vegetable Options: Customize your pasta with your favorite vegetables, such as bell peppers, mushrooms, or cherry tomatoes.

Protein Alternatives: Swap the chicken for shrimp, sausage, or tofu for a different twist.

Spicy Kick: Add a pinch of red pepper flakes to the sauce for a bit of heat.

Tips for Perfect Chicken Pasta

Pasta Cooking: Make sure not to overcook the pasta; it should be firm to the bite to hold up well in the dish.

Sauce Consistency: If the sauce is too thick, you can add a bit more chicken broth or pasta water to reach your desired consistency.

Resting Time: Letting the chicken rest before slicing helps retain its juices and keep it tender.

Final Thoughts

Delicious Chicken Pasta is a fantastic recipe that delivers on taste, convenience, and comfort. With its creamy sauce, tender chicken, and flavorful pasta, it’s sure to become a favorite in your meal rotation. Perfect for busy weeknights or casual dinners with friends, this dish is a true winner. Try it tonight and enjoy a meal that’s quick to prepare and full of satisfying flavors!

image
پسندیدن
اظهار نظر
اشتراک گذاری
Showing 8768 out of 11866
  • 8764
  • 8765
  • 8766
  • 8767
  • 8768
  • 8769
  • 8770
  • 8771
  • 8772
  • 8773
  • 8774
  • 8775
  • 8776
  • 8777
  • 8778
  • 8779
  • 8780
  • 8781
  • 8782
  • 8783

ویرایش پیشنهاد

افزودن ردیف


یک تصویر را انتخاب کنید
لایه خود را حذف کنید
آیا مطمئن هستید که می خواهید این ردیف را حذف کنید؟

بررسی ها

برای فروش محتوا و پست های خود، با ایجاد چند بسته شروع کنید. کسب درآمد

پرداخت با کیف پول

هشدار پرداخت

شما در حال خرید اقلام هستید، آیا می خواهید ادامه دهید؟

درخواست بازپرداخت