Good and Bad People Good and Bad People
    #socialmedia #usa #uk #contentwriter #ai
    Gelişmiş Arama
  • Giriş
  • Kayıt

  • Gece modu
  • © 2025 Good and Bad People
    Yaklaşık • Rehber • Bize Ulaşın • Geliştiriciler • Gizlilik Politikası • Kullanım Şartları • Geri ödeme • Referral Terms • Acceptable Use Policy • Community Guidelines • Write for Us

    Seç Dil

  • Arabic
  • Bengali
  • Chinese
  • Croatian
  • Danish
  • Dutch
  • English
  • Filipino
  • French
  • German
  • Hebrew
  • Hindi
  • Indonesian
  • Italian
  • Japanese
  • Korean
  • Persian
  • Portuguese
  • Russian
  • Spanish
  • Swedish
  • Turkish
  • Urdu
  • Vietnamese

Kol saati

Kol saati Makaralar

Olaylar

Etkinliklere Göz At Etkinliklerim

Blog

Makalelere göz at

Piyasa

Yeni ürünler

Sayfalar

Benim Sayfalar Beğenilen Sayfalar

daha

Keşfetmek popüler gönderiler Meslekler Teklifler Fonlar
Makaralar Kol saati Olaylar Piyasa Blog Benim Sayfalar Hepsini gör

Keşfedin Mesajları

Posts

Kullanıcılar

Sayfalar

grup

Blog

Piyasa

Olaylar

Meslekler

Fonlar

Grace's Gorgeous Pins
1 y ·çevirmek

Creative DIY Ideas for Small Backyards

Transforming a small backyard into a charming, functional space can be a delightful project. Even with limited space, you can create a cozy retreat or an inviting entertainment area with some creative DIY ideas. Here’s a guide to making the most of your small backyard with easy, budget-friendly projects.

1. Vertical Gardens

When space is tight, think upwards. Vertical gardens are a fantastic way to grow plants and add greenery without taking up precious ground space. Install wall-mounted planters, hanging pots, or trellises to showcase climbing plants. You can even repurpose old pallets or wooden crates to create a stylish vertical garden. Herbs, succulents, and flowering vines work well in these setups.

2. Multi-Functional Furniture

Opt for furniture that serves more than one purpose. A bench with storage underneath or a table that converts into seating can save space and add functionality. You can build your own from pallets or purchase compact, foldable options. Look for pieces that can be easily moved or rearranged to adapt to different needs.
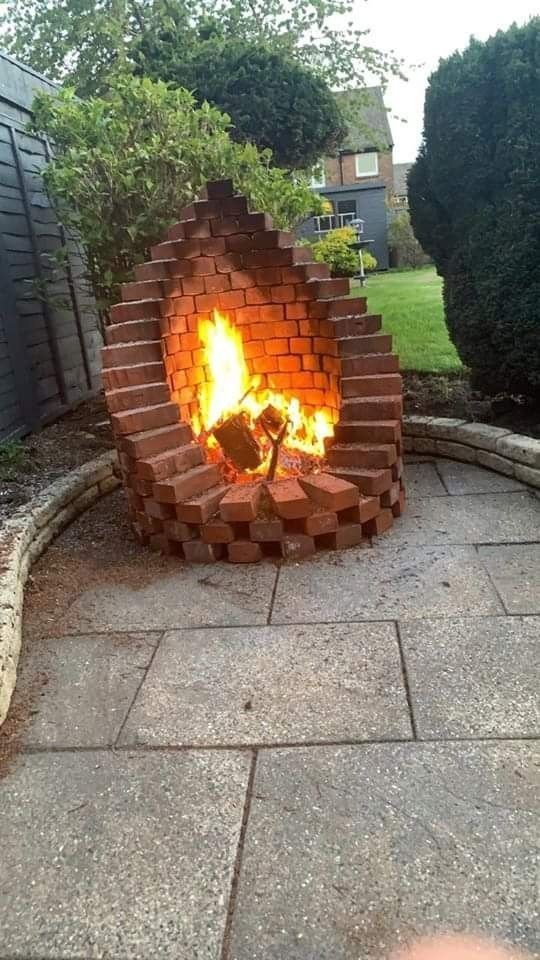
3. DIY Fire Pit

A small backyard doesn’t mean you have to miss out on cozy evenings by the fire. Construct a simple DIY fire pit using stone or brick. There are plenty of tutorials online to guide you through the process. A fire pit adds warmth and ambiance, making your outdoor space usable even on cooler nights.
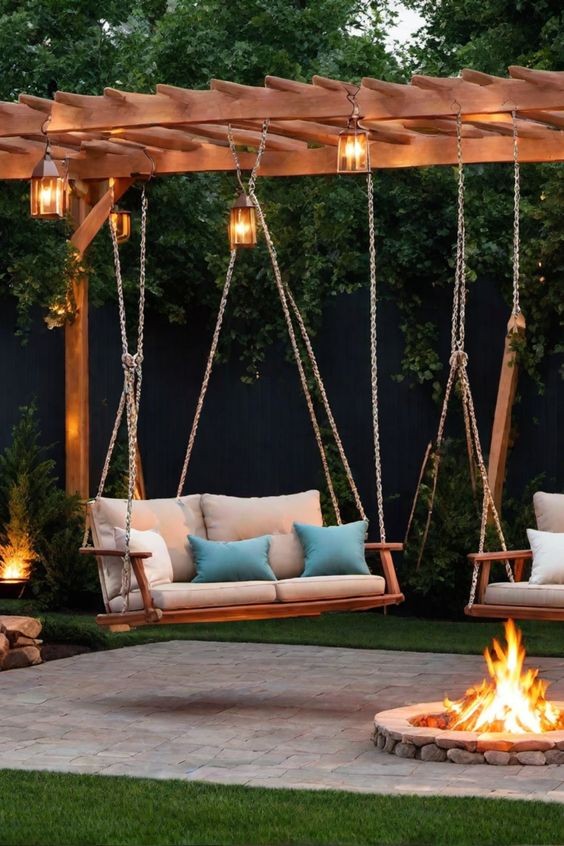
4. Outdoor Lighting

Good lighting can transform your backyard into a magical retreat. String lights, lanterns, and solar-powered garden lights can create a warm, inviting atmosphere. Hang string lights around your patio or use lanterns to highlight pathways. Solar lights are especially handy as they require no wiring and are easy to install.

5. Compact Outdoor Dining Area

Make the most of your space by creating a compact outdoor dining area. Use foldable or stackable chairs and a small table that can be moved or stored when not in use. You can also build a built-in bench along a wall or fence with a table that folds down when needed. Adding some cushions and a tablecloth can make it feel like a special place.

6. DIY Planter Boxes

Planter boxes can be customized to fit any space and can be made from various materials such as wood, metal, or plastic. Position them along fences, walls, or even create a tiered planter system to save ground space. These boxes can house flowers, herbs, or vegetables, adding both beauty and functionality to your backyard.
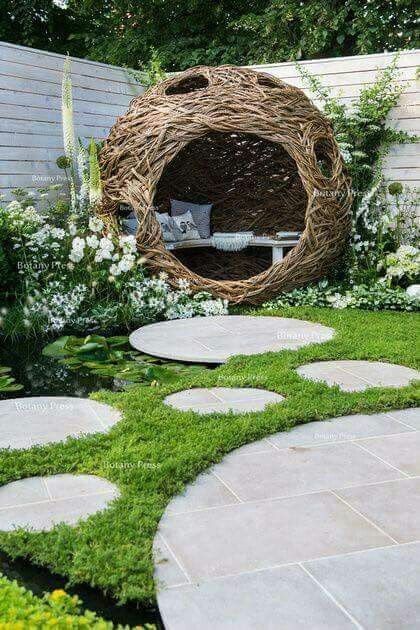
7. Garden Pathways

Create defined pathways using stepping stones, gravel, or wood planks. Pathways can lead to different areas of your garden, making it feel more expansive. Use materials that complement your overall design and ensure that the pathways are wide enough for comfortable walking.

8. Outdoor Rugs and Textiles

Add warmth and color to your small backyard with outdoor rugs and textiles. An outdoor rug can define your seating area and make it feel more like a room. Throw pillows and outdoor blankets can also add comfort and style. Choose fabrics that are weather-resistant to ensure they last through various seasons.

9. Small Water Features

Incorporate a small water feature to bring a sense of tranquility to your backyard. Options include mini fountains, birdbaths, or even a small pond. These can be purchased pre-made or built with DIY kits, adding a soothing sound and a touch of nature.

10. Upcycled Decor

Give new life to old items with upcycling. Use vintage crates as plant stands, old ladders as trellises, or repurpose wooden shutters as garden art. Upcycling not only saves money but also adds unique character to your space.

Final Thoughts

With a bit of creativity and DIY spirit, you can turn your small backyard into a versatile and charming space. Focus on making the most of every square inch and choose projects that reflect your personal style and needs. Whether you’re creating a tranquil garden retreat or a lively entertainment area, these ideas can help you make your small backyard feel big on charm and function.

image
Beğen
Yorum Yap
Paylaş
Grace's Gorgeous Pins
1 y ·çevirmek

Backyard Landscaping Designs: Trends and DIY Tips for 2022

Backyard landscaping has evolved significantly, with homeowners increasingly focusing on creating functional and aesthetically pleasing outdoor spaces. In 2022, backyard landscaping trends emphasize integrating natural elements, enhancing outdoor living areas, and incorporating DIY projects like fire pits. Here’s a comprehensive guide to the latest trends and practical tips for designing your dream backyard.

1. Natural Elements and Eco-Friendly Designs

One of the top trends in 2022 is the incorporation of natural elements. This trend is driven by a growing desire to connect with nature and create environmentally friendly spaces. Key features include:

Native Plants: Opting for native plants helps conserve water and supports local wildlife. They are well-suited to the local climate and require less maintenance.

Sustainable Materials: Use eco-friendly materials such as reclaimed wood, bamboo, or recycled glass for paths, decking, and garden structures.

Rain Gardens: Incorporating rain gardens can help manage stormwater runoff while providing a lush, attractive addition to your landscape.

2. Outdoor Living Spaces

Transforming your backyard into a multi-functional outdoor living area remains a significant trend. Homeowners are creating spaces that extend their indoor living areas and cater to various activities. Consider the following additions:

Outdoor Kitchens: Equipped with grills, countertops, and storage, outdoor kitchens make entertaining and cooking outdoors a breeze.

Dining Areas: A well-designed dining area with comfortable seating and a sturdy table encourages outdoor meals and social gatherings.

Lounging Zones: Include comfortable outdoor furniture, such as sectional sofas and lounge chairs, for relaxation and enjoyment.

3. DIY Fire Pits: A Popular and Practical Addition

A DIY fire pit is a fantastic project that adds warmth, ambiance, and functionality to your backyard. Here’s a simple guide to creating your own fire pit:

Materials Needed:

Fire pit kit or stones/bricks

Fire-resistant adhesive or mortar

Gravel or sand

Fire pit ring (optional but recommended for safety)

Steps:

Choose a Location: Select a flat, open area away from structures and flammable materials.

Prepare the Base: Excavate the area and create a base with gravel or sand to ensure proper drainage.

Assemble the Fire Pit: Follow the instructions provided with your fire pit kit or stack stones/bricks in a circular pattern. Secure with adhesive or mortar.

Install a Fire Pit Ring: For added safety and durability, consider installing a fire pit ring inside the stone structure.

Add Seating: Arrange seating around the fire pit to create a cozy gathering spot.

4. Modern Design Elements

Incorporate modern design elements to give your backyard a fresh and contemporary look:

Minimalist Gardens: Embrace clean lines and simple plantings. Use geometric shapes for garden beds and pathways to achieve a minimalist aesthetic.

Water Features: Modern water features, like sleek fountains or reflecting pools, can create a calming ambiance and become focal points in your landscape.

Lighting: LED lighting, especially in creative and hidden placements, enhances the nighttime appeal of your outdoor spaces. Use uplights for trees, pathway lights for safety, and accent lighting for key features.

5. Multi-Functional Spaces

Creating spaces that serve multiple purposes can maximize the use of your backyard. Consider these ideas:

Garden Rooms: Install a pergola or gazebo to create an outdoor room that can serve as a dining area, lounge, or even a small home office.

Play Areas: Designate space for children’s play equipment or a sandpit, making your backyard enjoyable for all family members.

Vegetable Gardens: Incorporate raised beds or container gardens for growing vegetables and herbs, adding both beauty and functionality to your outdoor space.

Conclusion

In 2022, backyard landscaping designs focus on blending natural elements with modern conveniences. By integrating sustainable practices, enhancing outdoor living areas, and tackling DIY projects like fire pits, you can create a backyard that is both beautiful and functional. Embrace these trends to design a space that suits your lifestyle and brings enjoyment for years to come.

image
Beğen
Yorum Yap
Paylaş
Grace's Gorgeous Pins
1 y ·çevirmek

Backyard Swing Inspiration: Transforming Your Outdoor Space

In the quest to create a perfect backyard oasis, a swing can be a delightful centerpiece. It's more than just a seat; it's a symbol of relaxation, playfulness, and a way to enjoy the beauty of your outdoor space. Whether you’re looking to create a serene retreat or a lively play area for the kids, incorporating a swing into your backyard can be both practical and enchanting. Here’s some inspiration to help you get started.

1. Classic Porch Swing

A classic porch swing is a timeless choice that can add a touch of nostalgia and charm to your backyard. These swings, often made of wood, can be painted or stained to match your home’s exterior. They are perfect for relaxing on warm summer evenings, and you can add cushions or throws for extra comfort. To enhance the ambiance, consider hanging fairy lights around the swing or placing potted plants nearby.

2. Modern Hanging Chair

For a more contemporary look, a modern hanging chair could be the ideal choice. These chairs often feature sleek, minimalist designs and are made from materials like rattan or metal. They can be suspended from a single point or mounted on a stand, making them versatile for various spaces. Pairing the chair with a cozy blanket and a side table for your favorite beverage can create a chic and relaxing corner.

3. Bohemian Hammock Swing

If you’re aiming for a bohemian vibe, a hammock swing can be a great addition. These swings, typically made from fabric or macramé, offer a laid-back, cozy feel. They can be hung from a sturdy tree branch or a purpose-built frame. Decorate with vibrant cushions, a fringed throw, and a few string lights to create an inviting retreat.

4. Playful Tree Swing

For families with children, a traditional tree swing can provide endless fun. Made from durable materials and securely fastened to a strong tree branch, these swings offer a nostalgic touch. Opt for a classic wooden seat or a brightly colored plastic swing to appeal to younger kids. Adding a small climbing structure or a sandbox nearby can turn the swing area into a full-fledged play zone.

5. Swing Set with a Twist

A swing set doesn’t have to be just for kids. Modern swing sets come in various designs that include multiple swings, slides, and climbing features, making them suitable for all ages. Some even come with built-in playhouses or picnic tables. If you have space, a multi-functional swing set can provide hours of entertainment for the whole family.

6. Swing Bed for Lounging

If relaxation is your goal, consider a swing bed. These large, cushioned swings are designed for lounging and can be draped with canopies or curtains for added privacy. They’re perfect for napping or reading a book on lazy afternoons. Position the swing bed in a shaded corner of your yard or under a pergola for maximum comfort.

7. Rustic Wooden Swing

A rustic wooden swing can bring a natural, earthy feel to your backyard. Made from reclaimed wood or timber, these swings blend seamlessly with garden landscapes. To add to the rustic charm, pair the swing with a wooden swing frame and surrounding elements like stone pathways or flower beds.

8. Swing and Dining Combo

For a unique touch, consider incorporating swings into your dining area. Some outdoor furniture designers have created swing dining sets, where swings replace traditional chairs around a table. This setup can add a playful yet sophisticated element to your outdoor dining experiences.

Final Touches

No matter which swing style you choose, there are a few final touches that can enhance your setup:

Safety First: Ensure that the swing is securely installed and that all hardware is in good condition.

Comfort and Style: Add cushions, throws, and outdoor rugs to make the area more inviting.

Lighting: Incorporate outdoor lighting to create a magical atmosphere in the evening.

Landscaping: Surround your swing with lush greenery, flowers, or decorative elements to integrate it beautifully into your backyard.

Incorporating a swing into your backyard can transform your outdoor space into a haven of relaxation and joy. Whether you opt for a classic design or a modern twist, a swing adds a special touch that enhances both functionality and aesthetics. Embrace your creativity and enjoy the process of making your backyard a place where you can truly unwind and have fun.

image
Beğen
Yorum Yap
Paylaş
Grace's Gorgeous Pins
1 y ·çevirmek

200+ Cute Drawings & Free Printable Drawing Templates to Help You Get Started!

Whether you're a budding artist or just looking for a fun and relaxing hobby, drawing is a fantastic way to express yourself and unwind. Artsydee has compiled an extensive collection of over 200 cute drawings and free printable drawing templates that are perfect for anyone looking to dive into the world of art. From whimsical creatures to charming patterns, these resources are designed to inspire creativity and help you get started on your artistic journey.

Discover a World of Adorable Drawings

Artsydee's collection features a wide array of cute drawings that cater to various tastes and skill levels. Here’s a glimpse of what you can find:

Cute Animals: From fluffy kittens and playful puppies to majestic unicorns and friendly dragons, these animal-themed drawings are sure to capture your heart. Perfect for both beginners and more advanced artists, these templates make it easy to create delightful artworks.

Charming Characters: Explore a range of endearing characters, including fairy tale figures, cartoonish creatures, and whimsical personas. These drawings provide a great starting point for creating personalized art or for adding your own unique flair.

Nature-Inspired Designs: Dive into nature with drawings of blooming flowers, enchanting trees, and serene landscapes. These templates are ideal for practicing your skills and adding a touch of nature’s beauty to your artwork.

Fun Patterns and Doodles: For those who enjoy intricate designs, Artsydee offers a variety of patterns and doodles. From geometric shapes to abstract designs, these templates are perfect for relaxing and honing your drawing techniques.

How to Use Printable Drawing Templates

Artsydee’s free printable drawing templates are easy to access and use. Here’s a simple guide to get you started:

Choose Your Template: Browse through the extensive collection and select a drawing that resonates with you. Whether you’re in the mood for something cute and simple or more detailed, there’s something for everyone.

Print Your Template: Download the template and print it out on your preferred paper. For the best results, use a good quality paper that suits your medium—whether it’s pencil, ink, or markers.

Start Drawing: Use the printed template as a guide. Feel free to add your own artistic touches, experiment with colors, and make the drawing uniquely yours. The templates provide a framework, but your creativity will bring the artwork to life.

Share and Enjoy: Once your masterpiece is complete, share it with friends and family, or display it proudly in your home. Enjoy the process and take pride in your artistic accomplishments.

Why Printable Templates Are Great for Beginners

Printable drawing templates are an excellent resource for those just starting out. They provide:

Guidance and Structure: Templates offer a clear outline and structure, making it easier to learn basic drawing techniques and build confidence.

Reduced Pressure: With a template, you don’t have to worry about creating a drawing from scratch. This allows you to focus on improving your skills and experimenting with different styles.

Inspiration: If you're ever stuck in a creative rut, having a variety of templates on hand can spark new ideas and keep your artistic motivation high.

Expand Your Artistic Horizons

In addition to the free printable templates, Artsydee offers various resources and tips to help you enhance your drawing skills. Explore tutorials, join art communities, and take advantage of online courses to continue growing as an artist.

With over 200 cute drawings and free printable templates at your disposal, there’s no limit to the creativity you can unleash. Whether you're looking to relax with some light doodling or embark on a more detailed art project, Artsydee has you covered. Dive in, have fun, and let your imagination run wild!

Happy drawing!

image
Beğen
Yorum Yap
Paylaş
Grace's Gorgeous Pins
1 y ·çevirmek

The Art of Capturing a Cute Girl Face in Sketch: A Quick Guide

Sketching a cute girl’s face can be a delightful way to express creativity and practice your drawing skills. Whether you’re a beginner or an experienced artist, capturing the essence of cuteness in a sketch requires a blend of technique and artistic flair. Here’s a comprehensive guide to help you create an endearing sketch of a cute girl’s face, all while keeping the process quick and enjoyable.

1. Gather Your Materials

Before you start sketching, make sure you have the right tools. For a simple and quick sketch, you’ll need:

A pencil (preferably HB or 2B for lighter lines)

An eraser

Paper (any type will do, but sketch paper is ideal)

2. Start with Basic Shapes

Begin by sketching the basic shapes that will form the structure of the face. Draw a large circle for the head and add a vertical line down the center. This line will help you align the facial features symmetrically. Draw a horizontal line across the middle of the circle to position the eyes.

3. Outline the Face Shape

Refine the circle into a more realistic face shape by adding the jawline and chin. A cute face often has a soft, rounded chin and slightly plump cheeks. Think of a gentle curve for the sides of the face, with the chin tapering to a small point.

4. Place the Facial Features

Now, it’s time to position the facial features:

Eyes: Draw two large, oval shapes along the horizontal line. Cute faces typically have bigger, round eyes with a lot of space between them. Add small circles inside the ovals for the pupils and highlight.

Nose: Place the nose slightly below the eye line. For a cute look, keep the nose small and simple—a small curved line or dot works well.

Mouth: Draw a small, gentle smile below the nose. The mouth should be placed about halfway between the nose and chin. A cute smile is usually slightly curved and not too wide.

5. Add the Hair

For a cute hairstyle, opt for something playful and lively. You can sketch out pigtails, a bob, or loose, wavy hair. Use soft, flowing lines to give the hair volume and texture. Remember, the hair should frame the face and enhance the overall cuteness.

6. Refine the Details

Go over your sketch and refine the details. Add eyelashes, eyebrows, and any additional features like freckles or blush marks. Keep the lines soft and light to maintain the gentle, cute appearance.

7. Erase Unnecessary Lines

Carefully erase any extra lines or guidelines that are no longer needed. This will help clean up the sketch and make the final drawing look polished.

8. Add Final Touches

To complete your sketch, you can add some light shading to give dimension to the face. Focus on areas like the cheeks and under the chin for subtle shading. If you’re feeling adventurous, add a few accessories like bows or headbands for extra charm.

Conclusion

Sketching a cute girl’s face is not just about technical skill; it’s also about capturing a certain expression and personality. By focusing on simple shapes and gentle lines, you can create an endearing sketch that radiates cuteness. Practice regularly, and don’t be afraid to experiment with different hairstyles and expressions. Most importantly, have fun with your artistic journey!

image
Beğen
Yorum Yap
Paylaş
Chloe Cozy Corners
Chloe Cozy Corners
1 y ·çevirmek

Grow Your Nails Fast: Achieve Longer, Stronger Nails in Just 2 Weeks! We all dream of having long, strong, and healthy nails that can withstand daily wear and tear. But if your nails are brittle, break easily, or just don’t seem to grow as fast as you’d like, you’re not alone. The good news is that with a few simple changes to your nail care routine, you can significantly improve the health and length of your nails in just two weeks! Here’s how to achieve those nail goals quickly and effectively.

#### **1. Hydrate Your Nails**
Just like your skin, your nails need moisture to stay healthy. Dry, brittle nails are more prone to breaking, which can hinder growth. To keep your nails hydrated:
- **Use Cuticle Oil* Apply a nourishing cuticle oil daily to keep your nails and cuticles moisturized. Look for oils that contain ingredients like vitamin E, jojoba oil, or almond oil.
- **Moisturize After Washing* Always apply hand cream after washing your hands to prevent your nails from drying out.

#### **2. Strengthen with a Nail Hardener**
If your nails are weak or prone to breaking, a nail hardener can be a game-changer. These products work by reinforcing your nails with proteins and other strengthening ingredients.
- **Apply Regularly* Use a nail hardener every other day, but be cautious not to overuse it, as this can make your nails too rigid and lead to breakage.

#### **3. Avoid Harsh Chemicals**
Exposure to harsh chemicals can weaken your nails and slow down growth. To protect your nails:
- **Wear Gloves* When cleaning, gardening, or doing any activity that involves harsh chemicals, always wear gloves.
- **Use Acetone-Free Polish Removers* Acetone can dry out your nails, so opt for acetone-free polish removers to keep them healthy.

#### **4. Eat a Nail-Friendly Diet**
What you eat can directly affect the health of your nails. Incorporating certain nutrients into your diet can promote faster and stronger nail growth.
- **Biotin-Rich Foods* Foods like eggs, nuts, seeds, and leafy greens are rich in biotin, a B vitamin that’s essential for nail growth.
- **Omega-3 Fatty Acids* Found in fish, walnuts, and flaxseeds, omega-3s can help keep your nails hydrated and strong.
- **Protein* Since nails are made of keratin, a type of protein, make sure you’re getting enough protein in your diet from sources like meat, beans, and dairy.

#### **5. Be Gentle with Your Nails**
Rough treatment can lead to breakage and slow down nail growth. To keep your nails in the best shape:
- **Avoid Using Nails as Tools* Don’t use your nails to open cans, scrape off stickers, or perform other tasks that could lead to breakage.
- **File Gently* When filing your nails, always go in one direction and avoid using a back-and-forth sawing motion, which can weaken them.

#### **6. Keep Your Nails Trimmed**
It might seem counterintuitive, but keeping your nails trimmed can actually help them grow faster in the long run by preventing breakage and splitting.
- **Trim Regularly* Use a good quality nail clipper to keep your nails at a manageable length, especially if they’re prone to breaking.
- **Shape with Care* Gently file the edges to prevent snags and splits that can lead to breakage.

#### **7. Protect Your Nails with Polish**
A coat of nail polish can act as a barrier, protecting your nails from daily wear and tear. Opt for strengthening or growth-promoting nail polishes that provide an extra layer of protection while nourishing your nails.
- **Choose a Growth Formula* Look for polishes that specifically target nail growth, often containing ingredients like biotin, keratin, or calcium.

#### **8. Consider a Nail Growth Supplement**
Sometimes, a little extra help from a supplement can make all the difference. Nail growth supplements, often containing biotin, collagen, and other essential nutrients, can give your nails the boost they need.
- **Consult a Professional* Before starting any supplement, consult with a healthcare provider to ensure it’s right for you.

### **Conclusion**
Growing longer, stronger nails doesn’t have to take months. With these simple yet effective tips, you can see a noticeable difference in just two weeks. Whether it’s through hydrating your nails, strengthening with the right products, or eating a nail-friendly diet, the key is consistency. Stick to these habits, and you’ll be flaunting beautiful, healthy nails in no time!

#nailgrowth #healthynails #nailcare #beautytips #fastresults #longnails #nailgoals #manicuremagic

Beğen
Yorum Yap
Paylaş
Grace's Gorgeous Pins
1 y ·çevirmek

The Art of Drawing an Amazing Girl’s Face: A Quick Guide

Drawing a captivating girl’s face can be a rewarding endeavor for artists of all levels. Whether you’re a beginner or an experienced artist looking to refine your skills, capturing the essence of a girl’s face involves understanding proportions, expressions, and details. This quick guide will walk you through the essential steps to create an amazing drawing.

1. Start with Basic Shapes

Begin your drawing with simple shapes to outline the face. Draw an oval for the head and use guidelines to map out the features. A vertical line down the center of the face helps in aligning the features symmetrically, while horizontal lines can denote the positions of the eyes, nose, and mouth.

2. Define Facial Proportions

Facial proportions are crucial for realism. The general rule is that the eyes are positioned halfway down the head. The space between the eyes is roughly the width of one eye. The bottom of the nose is usually halfway between the eyes and the chin, and the mouth sits about a third of the way down from the nose to the chin. Use these guidelines to place the features accurately.

3. Sketch the Features

Eyes: Start by drawing the eyes along the horizontal guideline. The shape can vary from almond to round, depending on the desired expression. Add details like the iris, pupil, and eyelashes.

Nose: The nose can be sketched with a simple curve or a more detailed shape depending on your style. Pay attention to the nostrils and the bridge of the nose.

Mouth: Draw the mouth slightly above the chin. The shape can range from a simple line to a more expressive curve. Ensure that the corners of the mouth align with the pupils of the eyes.

4. Refine the Outline

Once the basic features are in place, refine the outline of the face. Smooth out the jawline, add the ears, and adjust the hairline. Incorporate details such as the cheekbones and chin to add depth and dimension.

5. Add Details and Expression

Enhance your drawing by adding details like eyebrows, wrinkles, and shading. Expressions can significantly alter the mood of the portrait. Experiment with different mouth shapes and eyebrow positions to convey various emotions.

6. Incorporate Hair and Accessories

Hair adds personality to your drawing. Whether it's long and flowing or short and stylish, use flowing lines to sketch the hair. Consider adding accessories like earrings or headbands to give your drawing more character.

7. Shading and Texturing

To add realism, use shading to highlight and shadow different areas of the face. This helps to create a three-dimensional effect. Pay attention to light sources and use a range of pencils or digital tools to achieve smooth gradients.

8. Final Touches

Review your drawing for any final adjustments. Erase unnecessary lines and sharpen the details where needed. Adding a subtle background or texture can further enhance the overall appearance.

9. Practice and Experiment

Drawing an amazing girl’s face requires practice. Don’t be afraid to experiment with different styles and techniques. Study real-life references and practice regularly to improve your skills.

Conclusion

Drawing a girl’s face can be a fulfilling artistic challenge. By following these steps and continuously practicing, you’ll develop the skills needed to create expressive and captivating portraits. Remember, the key is to enjoy the process and let your creativity shine through every stroke of your pencil or brush.

image
Beğen
Yorum Yap
Paylaş
Grace's Gorgeous Pins
1 y ·çevirmek

Unleashing Creativity: Amazing Drawing Ideas to Inspire Your Artistic Journey

Drawing is a powerful medium that allows you to express your innermost thoughts and emotions through lines, shapes, and colors. Whether you're an aspiring artist or a seasoned creator, finding fresh and exciting drawing ideas can invigorate your practice and push your skills to new heights. Here are some amazing drawing ideas to spark your creativity and inspire your next masterpiece.

1. Surreal Landscapes

Combine elements of the real and the fantastical to create surreal landscapes. Imagine a world where floating islands drift above a serene ocean, or where trees have glowing, bioluminescent leaves. By merging everyday scenes with dreamlike elements, you can create a drawing that is both captivating and thought-provoking.

2. Portraits with a Twist

Portraits are a classic subject, but you can put a unique spin on them. Try drawing a portrait with elements of nature woven into the hair, or depict your subject as a mythical creature. Experiment with different styles, such as cubism or abstract, to add a fresh perspective to your portrait work.

3. Animal Hybrids

Let your imagination run wild by combining features of different animals to create unique hybrids. Imagine a creature with the wings of an eagle, the body of a lion, and the tail of a serpent. This exercise can help you practice anatomical accuracy while also allowing for creative freedom.

4. Fantasy Architecture

Design your own fantastical buildings and structures. Think of castles floating in the sky, ancient temples buried in the jungle, or futuristic skyscrapers with organic designs. This type of drawing challenges you to think about perspective, scale, and imaginative design.

5. Everyday Objects with Personality

Bring everyday objects to life by giving them personalities and emotions. Draw a teapot with a cheerful face, a pair of glasses that look inquisitive, or a book that seems contemplative. Adding character to ordinary items can make them more engaging and fun to draw.

6. Time Travel Scenes

Explore different eras and future possibilities by drawing time travel scenes. Imagine what a historical event might look like with futuristic technology, or how a contemporary scene would appear if it were set in a bygone era. This approach allows you to experiment with different styles and settings.

7. Abstract Emotions

Translate emotions into abstract art by using shapes, colors, and textures. For example, you might use jagged lines and dark colors to express anger, or smooth curves and pastel hues to depict calm. This type of drawing can help you connect with your emotions on a deeper level and improve your understanding of visual expression.

8. Underwater Worlds

Create intricate drawings of underwater worlds teeming with marine life. Picture colorful coral reefs, schools of exotic fish, and mysterious sea creatures. This theme offers endless opportunities for detail and vibrant color use.

9. Retro Futurism

Imagine how the future was envisioned in the past. Draw futuristic technology and spaceships with a retro twist, reflecting the style of mid-20th-century sci-fi. This can be a fun way to explore nostalgic elements while creating something entirely new.

10. Mixed Media Mashups

Combine different drawing materials and techniques to create a mixed media masterpiece. Use pencils, ink, watercolor, and digital tools to experiment with textures and effects. This approach can help you discover new methods and expand your artistic range.

Conclusion

Drawing is a dynamic and versatile form of art, and exploring various themes and ideas can keep your practice exciting and fulfilling. Whether you’re depicting surreal landscapes or reimagining everyday objects, the key is to embrace creativity and experiment with different techniques. So grab your pencils, set your imagination free, and let these amazing drawing ideas guide you on your artistic journey.

image
Beğen
Yorum Yap
Paylaş
Grace's Gorgeous Pins
1 y ·çevirmek

The Art of a Bug on Your Nose: A Playful Drawing Adventure

Drawing a whimsical bug on your nose might sound like an odd endeavor, but it's a delightful exercise in creativity and fun! This playful activity combines art and humor, resulting in a unique and personal expression that’s sure to spark joy and laughter. Here’s a step-by-step guide to help you create a charming bug design that will turn your nose into a tiny canvas of whimsy.

Step 1: Gather Your Supplies

To begin your bug-drawing adventure, you’ll need some basic materials:

Face-safe markers or face paints: Opt for non-toxic and dermatologically tested products.

Cotton swabs: Useful for touch-ups and blending.

Mirror: A handheld or wall mirror will help you see what you’re doing.

Wipes: For any necessary clean-ups.

Step 2: Choose Your Bug

Pick a bug that sparks your interest. It could be a ladybug, butterfly, dragonfly, or even a tiny ant. The simpler the design, the easier it will be to draw on such a small canvas.

Step 3: Prepare Your Canvas

Make sure your face is clean and dry before you start. Lightly moisturize if your skin is dry, but avoid heavy creams that could affect the paint’s adherence.

Step 4: Draw the Outline

Using your face-safe marker or paint, gently sketch the outline of your chosen bug on your nose. Start with the basic shapes—such as the body and wings of a butterfly or the shell and spots of a ladybug. Keep your lines light and avoid pressing too hard to ensure you can easily correct any mistakes.

Step 5: Add Details

Once you have the basic outline, add details like eyes, legs, and intricate wing patterns. For a ladybug, add black spots and small antennae. For a butterfly, create colorful patterns on the wings. If you’re drawing a dragonfly, include delicate wing veins.

Step 6: Perfect the Design

Step back and check your work in the mirror. Use a cotton swab to correct any uneven lines or smudges. Add any finishing touches to enhance your design. If you’re using paint, you might need to let it dry for a few minutes before applying any additional details.

Step 7: Enjoy the Moment

Once you’re satisfied with your bug drawing, take a moment to enjoy your creation. Show it off to friends and family, and take a few selfies to capture the fun. Remember, this is all about having a good time and embracing your playful side.

Step 8: Clean Up

When you’re ready to remove the drawing, use face wipes or a gentle cleanser to wash off the marker or paint. Ensure you’re thorough but gentle to avoid irritating your skin.

Conclusion

Drawing a bug on your nose is a delightful way to express your creativity and bring a smile to your face. It’s a simple activity that requires minimal supplies but offers maximum fun. So next time you’re looking for a light-hearted art project, grab some face-safe markers and let your imagination take flight. Your nose is a perfect canvas for this charming and playful artistic expression!

Feel free to experiment with different designs and techniques, and most importantly, enjoy the whimsical process of turning your nose into a bug’s playground!

image
Beğen
Yorum Yap
Paylaş
Grace's Gorgeous Pins
1 y ·çevirmek

The Incredible Journey from Blank Page to Masterpiece: A Creative Odyssey

The creative process is often romanticized as a mystical journey, where inspiration flows effortlessly, and genius strikes in a moment of clarity. However, the reality of transforming a blank page into a masterpiece is far more complex, involving a blend of discipline, perseverance, and a touch of serendipity. This journey is an odyssey that every artist, writer, and creator undertakes, facing challenges, self-doubt, and moments of exhilaration along the way.

The Blank Page: A Canvas of Possibilities

The journey begins with the blank page, an empty canvas that simultaneously represents infinite possibilities and a daunting challenge. This moment can be exhilarating or terrifying, depending on the creator's mindset. For some, the blank page is an invitation to explore new ideas and push boundaries. For others, it may induce a sense of paralysis, as the pressure to create something meaningful weighs heavily.

Starting can be the hardest part. The blank page stares back, challenging the creator to take the first step. This initial phase is often marked by uncertainty and fear of failure. However, it is essential to embrace this fear, understanding that the first words or strokes are not final but a foundation upon which to build.

The Spark of Inspiration: Capturing the Muse

Inspiration often strikes at unexpected moments, a fleeting thought, a vivid dream, or a conversation overheard in a café. It is the muse that whispers in the ear, urging the creator to take action. However, inspiration alone is not enough to complete the journey. It must be captured and nurtured before it fades away.

Many creators develop rituals or habits to invite inspiration, such as journaling, walking, or simply allowing their minds to wander. Once inspiration strikes, the key is to act quickly. Whether jotting down notes, sketching ideas, or writing the first few lines, capturing the essence of the idea before it dissipates is crucial.

The Drafting Phase: Building the Framework

With inspiration in hand, the next phase involves drafting—where ideas are transformed into tangible form. This stage is marked by exploration, where creators test different approaches, experiment with styles, and allow their work to evolve organically.

Drafting is often messy. It’s a process of trial and error, where initial attempts may fall short of the envisioned masterpiece. However, this phase is essential for laying the groundwork. It is a time to embrace imperfection, understanding that the first draft is not the final product but a stepping stone toward something greater.

During this stage, creators must resist the urge to edit excessively. The goal is to get ideas down on paper, no matter how rough or unpolished. This phase is about quantity over quality, creating a body of work that can later be refined and perfected.

The Revision Process: Refining the Rough

Once the draft is complete, the journey enters the revision phase, where the rough edges are smoothed, and the work begins to take shape. This stage requires a critical eye, as creators must evaluate their work honestly, identifying strengths and weaknesses.

Revision is where the real magic happens. It involves rethinking, reworking, and sometimes completely overhauling the initial draft. This phase can be grueling, requiring patience and attention to detail. However, it is also where the work transforms from a rough concept to a polished piece.

During revision, creators often seek feedback from trusted peers or mentors. Fresh perspectives can provide valuable insights and highlight areas that may have been overlooked. This feedback loop is crucial for growth, allowing the creator to see their work through the eyes of others.

Overcoming Obstacles: The Struggle for Perfection

Throughout the creative journey, obstacles are inevitable. Self-doubt, creative blocks, and the pursuit of perfection can hinder progress. It is easy to become discouraged when the work doesn’t align with the initial vision or when the process takes longer than expected.

However, these challenges are an integral part of the journey. Overcoming them requires resilience and a willingness to push through discomfort. Perfection is an elusive goal, and creators must learn to accept that their work may never be perfect. Instead, the focus should be on growth, learning, and the satisfaction of having created something unique.

The Final Touch: Polishing the Masterpiece

As the journey nears its end, the work enters the final phase of polishing. This stage involves fine-tuning details, ensuring consistency, and adding finishing touches that elevate the work to its highest potential.

Polishing requires a meticulous approach, where every element is carefully considered. It’s about refining the work to its essence, removing unnecessary elements, and enhancing what remains. This stage can be time-consuming, but it is essential for achieving a level of craftsmanship that distinguishes a masterpiece.

The Masterpiece: A Reflection of the Journey

Finally, the blank page is no longer blank. It has been transformed into a masterpiece, a reflection of the creator’s journey from uncertainty to clarity, from inspiration to realization. The finished work is more than just a product; it is a testament to the creative process and the challenges overcome along the way.

However, the journey doesn’t end here. Every masterpiece is the beginning of a new adventure, as creators continue to evolve and explore new ideas. The process of creation is a never-ending cycle, where each completed work fuels the desire to create again.

Conclusion: Embracing the Journey

The journey from a blank page to a masterpiece is one of growth, discovery, and transformation. It is a path filled with challenges, but also with moments of profound satisfaction. Every creator’s journey is unique, but the common thread is the courage to begin, the perseverance to continue, and the dedication to see it through to the end.

In the end, the journey itself is as valuable as the masterpiece it produces. It is through this journey that creators learn, grow, and ultimately leave their mark on the world. Whether it’s a painting, a novel, a symphony, or any other form of creative expression, the masterpiece is a celebration of the incredible journey that began with a single blank page.

image
Beğen
Yorum Yap
Paylaş
Showing 8792 out of 11874
  • 8788
  • 8789
  • 8790
  • 8791
  • 8792
  • 8793
  • 8794
  • 8795
  • 8796
  • 8797
  • 8798
  • 8799
  • 8800
  • 8801
  • 8802
  • 8803
  • 8804
  • 8805
  • 8806
  • 8807

Teklifi Düzenle

Katman eklemek


Bir resim seçin
Seviyeni sil
Bu kademeyi silmek istediğinize emin misiniz?

yorumlar

İçeriğinizi ve gönderilerinizi satmak için birkaç paket oluşturarak başlayın. Para kazanma

Cüzdan tarafından ödeme

Ödeme uyarısı

Öğeleri satın almak üzeresiniz, devam etmek ister misiniz?

Geri ödeme istemek