Good and Bad People Good and Bad People
    #socialmedia #usa #uk #contentwriter #ai
    جستجوی پیشرفته
  • وارد شدن
  • ثبت نام

  • حالت روز
  • © 2025 Good and Bad People
    در باره • فهرست راهنما • با ما تماس بگیرید • توسعه دهندگان • سیاست حفظ حریم خصوصی • شرایط استفاده • بازپرداخت • Referral Terms • Acceptable Use Policy • Community Guidelines • Write for Us

    انتخاب کنید زبان

  • Arabic
  • Bengali
  • Chinese
  • Croatian
  • Danish
  • Dutch
  • English
  • Filipino
  • French
  • German
  • Hebrew
  • Hindi
  • Indonesian
  • Italian
  • Japanese
  • Korean
  • Persian
  • Portuguese
  • Russian
  • Spanish
  • Swedish
  • Turkish
  • Urdu
  • Vietnamese

تماشا کردن

تماشا کردن قرقره ها

مناسبت ها

مرور رویدادها رویدادهای من

وبلاگ

مقالات را مرور کنید

بازار

آخرین محصولات

صفحات

صفحات من صفحات لایک شده

بیشتر

کاوش کنید پست های محبوب شغل ها ارائه می دهد بودجه
قرقره ها تماشا کردن مناسبت ها بازار وبلاگ صفحات من همه را ببین

کشف کردن نوشته ها

Posts

کاربران

صفحات

گروه

وبلاگ

بازار

مناسبت ها

شغل ها

بودجه

Zoey Enchanted Pins
Zoey Enchanted Pins
1 Y ·ترجمه کردن

40 Stunning Coastal Decor Ideas to Make Your Space Feel Like a Breezy Beach Getaway

If you're dreaming of turning your home into a serene, breezy beach retreat, coastal decor is the perfect way to bring that vision to life. Coastal design is all about capturing the relaxed, airy vibe of the seaside, incorporating elements of nature, and creating a space that feels both refreshing and comfortable. Whether you live by the coast or simply want to evoke the feeling of a beach vacation, these 40 stunning coastal decor ideas will transform your space into a tranquil seaside escape.

#### 1. **Light and Airy Color Palette**

Start with a light, neutral color palette. Whites, soft blues, sandy beiges, and pale grays mimic the natural colors of the coast and create an open, airy feel.

#### 2. **Natural Materials**

Incorporate natural materials like rattan, wicker, and jute. These materials add texture and warmth, while also reinforcing the connection to nature.

#### 3. **Nautical Stripes**

Stripes, especially in blue and white, are a coastal decor staple. Use them in throw pillows, rugs, or even wallpaper for a classic beachy look.

#### 4. **Weathered Wood**

Embrace weathered, driftwood-style finishes on furniture and decor pieces. This adds an authentic, lived-in feel to your space.

#### 5. **Shell Accents**

Decorate with seashells, either in small decorative bowls, as part of a centerpiece, or framed as wall art. They instantly evoke the sea and add a touch of whimsy.

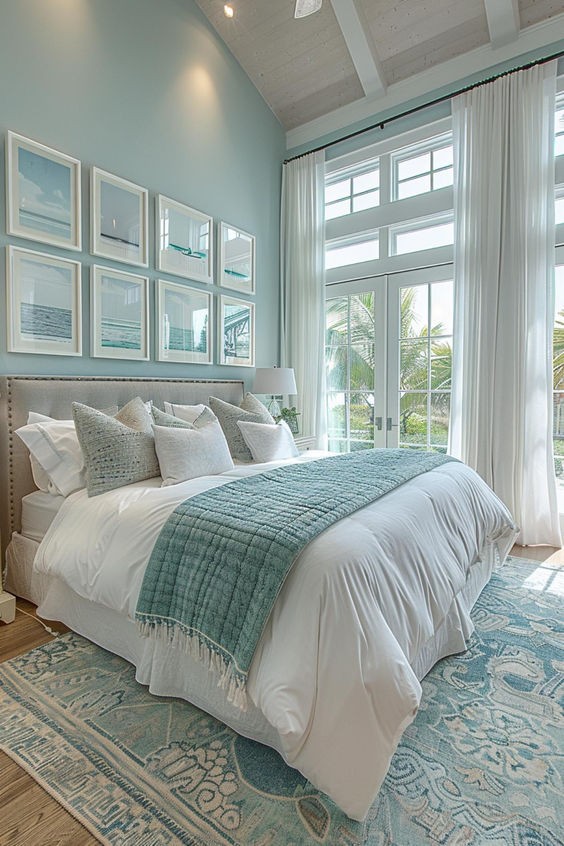
#### 6. **Beach-Inspired Wall Art**

Hang artwork that features coastal scenes, like ocean waves, sandy beaches, or maritime themes. Large canvases or framed prints can become focal points in your room.

#### 7. **Rope Details**

Incorporate rope into your decor for a nautical touch. Consider rope mirrors, curtain tiebacks, or even rope-wrapped planters for a subtle, seafaring vibe.

#### 8. **Coastal-Inspired Lighting**

Choose lighting fixtures that evoke the coast, such as lantern-style pendant lights, driftwood lamps, or fixtures with a weathered metal finish.

#### 9. **Ocean-Inspired Rugs**

Bring the beach underfoot with rugs in ocean-inspired colors or patterns. Think soft blues, sandy hues, or even wave-like designs.

#### 10. **Glass Bottles and Jars**

Decorate with glass bottles and jars, especially in sea glass colors like aqua and teal. They can be used as vases, candle holders, or simply as decorative accents.

#### 11. **Beachy Textiles**

Use light, breezy fabrics like linen or cotton for curtains, upholstery, and throw blankets. These materials are not only comfortable but also enhance the coastal feel.

#### 12. **Nautical Maps**

Framed nautical maps or vintage sea charts make for interesting wall decor and add a touch of history and exploration to your coastal theme.

#### 13. **Seaside-Inspired Bedding**

Transform your bedroom with bedding in coastal colors and patterns. Consider bedding sets that feature sea life, coral prints, or simple stripes in soothing blues and whites.

#### 14. **Driftwood Decor**

Driftwood can be used in various ways, from sculptures and wall hangings to furniture accents. Its natural, weathered appearance adds an authentic coastal feel.

#### 15. **Coastal Greenery**

Bring the outdoors in with coastal plants like succulents, sea grasses, or even small potted palms. These add a fresh, natural element to your decor.

#### 16. **Ocean-Inspired Accessories**

Decorate with accessories that remind you of the sea, like starfish, anchors, or even small model sailboats.

#### 17. **Whitewashed Furniture**

Opt for whitewashed or distressed furniture to create a light, airy atmosphere. This finish gives a nod to the sun-bleached look of coastal homes.

#### 18. **Outdoor Coastal Living**

Extend your coastal decor to outdoor spaces with weather-resistant furniture in natural materials, and add coastal touches like outdoor rugs, lanterns, and beach-inspired pillows.

#### 19. **Blue and White China**

Display blue and white china or ceramics as decor. These classic pieces are reminiscent of the ocean and can add a sophisticated touch to your coastal theme.

#### 20. **Coastal Mirrors**

Mirrors framed in materials like driftwood or rope not only enhance your coastal decor but also help to reflect light, making your space feel bigger and brighter.

#### 21. **Beachy Wall Murals**

Consider a large-scale wall mural depicting a beach scene. This can be a striking way to bring the coast into your home in a bold, beautiful way.

#### 22. **Tropical Prints**

Incorporate tropical prints, such as palm leaves or coral patterns, in your decor. These prints are perfect for accent pillows, wall art, or even upholstered furniture.

#### 23. **Breezy Window Treatments**

Keep window treatments light and airy. Sheer curtains in white or light neutrals allow natural light to filter through, enhancing the beachy vibe.

#### 24. **Coastal-Inspired Storage**

Use woven baskets or trunks for storage. These not only provide practical solutions but also add texture and a coastal touch to your space.

#### 25. **Cottage-Style Furniture**

Incorporate cottage-style furniture with simple lines and light finishes. This style complements the coastal theme with its relaxed, unpretentious charm.

#### 26. **Sea Glass Accents**

Decorate with sea glass-inspired items, such as vases, bowls, or even chandeliers. The frosted, translucent look of sea glass adds a soft, beachy touch.

#### 27. **Shiplap Walls**

Consider adding shiplap to your walls for a classic coastal look. The horizontal wood planks evoke the feel of a beach cottage and add texture to your space.

#### 28. **Marine-Inspired Centerpieces**

Create centerpieces with marine elements like coral, shells, or even sand-filled vases. These can be simple yet elegant additions to your coastal decor.

#### 29. **Wicker Furniture**

Incorporate wicker furniture into your space, whether it's a classic wicker chair, a woven coffee table, or wicker storage baskets. The natural, lightweight material is perfect for a coastal theme.

#### 30. **Seashell Chandeliers**

Consider a chandelier or light fixture made from seashells or capiz shells. These create a stunning focal point and add a touch of elegance to your coastal decor.

#### 31. **Beach-Inspired Table Settings**

Set your table with coastal-themed dishes, placemats, and napkins. Look for ocean-inspired patterns and colors to make every meal feel like a seaside dining experience.

#### 32. **Layered Textures**

Create a cozy, beachy vibe by layering different textures, such as a jute rug, linen pillows, and a chunky knit throw. This adds depth and interest to your decor.

#### 33. **White Slipcovers**

Use white slipcovers on furniture to create a clean, coastal look. Slipcovers are also practical, allowing you to easily refresh your space by changing them out.

#### 34. **Coastal-Themed Art Gallery**

Create a gallery wall with a collection of coastal-themed art. Mix paintings, photographs, and prints that capture the essence of the beach.

#### 35. **Bamboo Blinds**

Install bamboo blinds to add a natural, tropical feel to your windows. They pair beautifully with sheer curtains for a layered, beach-inspired look.

#### 36. **Outdoor Coastal Accents**

Decorate your outdoor spaces with coastal accents like lanterns, outdoor rugs, and throw pillows in beachy colors and patterns.

#### 37. **Vintage Surfboards**

If you have the space, consider displaying a vintage surfboard as decor. It’s a unique and authentic way to bring a touch of the beach into your home.

#### 38. **Relaxing Hammocks**

Add a hammock or hanging chair to your space for a relaxing, laid-back coastal vibe. It’s perfect for indoor or outdoor areas and adds a touch of casual comfort.

#### 39. **Driftwood Shelves**

Install shelves made from driftwood for a rustic, coastal look. Use them to display your beach-inspired decor items or as functional storage.

#### 40. **Coastal-Inspired Wallpaper**

Consider wallpaper with a coastal theme, such as palm leaves, tropical florals, or ocean waves. It can be a bold statement that ties your entire coastal decor together.

### Conclusion

By incorporating these coastal decor ideas, you can transform any space into a tranquil beach retreat. Whether you go all out with a complete room makeover or add subtle seaside touches, the key is to create a space that feels light, airy, and connected to the natural beauty of the coast. With the right decor, you can bring the calming, refreshing vibe of the beach into your home, making every day feel like a vacation.

image
پسندیدن
اظهار نظر
اشتراک گذاری
GA38 Casino
GA38 Casino
1 Y

image
پسندیدن
اظهار نظر
اشتراک گذاری
King88 broken
King88 broken  عکس پروفایلش را تغییر داد
1 Y

image
پسندیدن
اظهار نظر
اشتراک گذاری
King88 broken
King88 broken  جلد پروفایلش را عوض کرد
1 Y

image
پسندیدن
اظهار نظر
اشتراک گذاری
King88 broken
King88 broken
1 Y

image
پسندیدن
اظهار نظر
اشتراک گذاری
Hi88 Forsale
Hi88 Forsale
1 Y

image
پسندیدن
اظهار نظر
اشتراک گذاری
Lyra's Glam Saga
Lyra's Glam Saga
1 Y ·ترجمه کردن

## Effortless Easy Bun Hairstyle: Quick and Stylish Looks for Any Occasion

The easy bun hairstyle is a timeless classic that offers a perfect blend of simplicity and sophistication. Whether you're heading to work, going out for a casual day, or preparing for a special event, an effortless bun can be your go-to hairstyle. This guide will explore various easy bun techniques, tips for achieving the perfect look, and how to adapt the style for different occasions. Say goodbye to complex hairstyles and hello to chic, quick, and stylish buns!

### **Why Choose an Easy Bun Hairstyle?**

**1. **Simplicity* Easy buns are quick to create, making them ideal for busy mornings or last-minute plans.

**2. **Versatility* This hairstyle can be dressed up or down, making it suitable for both casual and formal events.

**3. **Practicality* An easy bun keeps hair neatly secured and is perfect for both everyday wear and special occasions.

**4. **Low Maintenance* Requires minimal products and time, making it an efficient choice for effortless style.

### **Step-by-Step Guide to Creating Different Easy Bun Hairstyles**

#### **1. Classic Low Bun**

**Step 1: Prepare Your Hair**

Start with clean, dry hair. Apply a texturizing spray if your hair is too smooth or slippery. Brush through to remove tangles.

**Step 2: Create a Ponytail**

Gather your hair at the nape of your neck and secure it with an elastic band. The height of the ponytail can be adjusted based on your preference.

**Step 3: Form the Bun**

Twist the ponytail and wrap it around the base to create a bun shape. Secure it with bobby pins, making sure to tuck in any loose ends.

**Step 4: Final Touches**

Smooth out any stray hairs with a little hairspray. For a more polished look, wrap a small section of hair around the base of the bun to hide the elastic band.

#### **2. Messy Bun**

**Step 1: Prepare Your Hair**

Create some volume by teasing the roots or using a volumizing mousse. This will give your bun a fuller appearance.

**Step 2: Create a High Ponytail**

Secure a high ponytail with an elastic band. Don’t worry about making it perfect; a bit of messiness adds to the style.

**Step 3: Form the Bun**

Twist the ponytail loosely and wrap it around the base, securing with bobby pins as you go. Leave some pieces out for a relaxed, tousled look.

**Step 4: Adjust the Style**

Gently pull on the bun to loosen it and create a more effortless appearance. Use your fingers to adjust and perfect the look.

#### **3. Sleek Top Knot**

**Step 1: Prepare Your Hair**

Straighten your hair for a sleek look. Apply a smoothing serum to eliminate frizz and add shine.

**Step 2: Create a High Ponytail**

Gather all your hair into a high ponytail and secure it with an elastic band.

**Step 3: Form the Top Knot**

Twist the ponytail tightly and wrap it around the base, securing with bobby pins. Ensure the knot is neat and smooth.

**Step 4: Final Touches**

Use a comb to smooth out any flyaways and apply a light-hold hairspray to keep the style in place.

#### **4. Double Twist Bun**

**Step 1: Prepare Your Hair**

Create volume by applying a volumizing mousse. Part your hair in the middle or to one side.

**Step 2: Create Two Ponytails**

Divide your hair into two sections and secure each with an elastic band, positioning them at the back of your head.

**Step 3: Form the Buns**

Twist each ponytail and wrap them around their respective bases. Secure each bun with bobby pins.

**Step 4: Adjust the Style**

Adjust the buns to make sure they are even and secure. Add a little hairspray for hold.

### **Tips for Perfecting Your Easy Bun Hairstyle**

**1. **Use the Right Products* Depending on your hair type, use products like texturizing sprays, volumizing mousse, or smoothing serums to achieve the best result.

**2. **Secure with Bobby Pins* Make sure to use enough bobby pins to keep the bun in place, especially if you have thick or long hair.

**3. **Adjust for Volume* For a fuller look, tease the hair at the roots or pull out a few strands around the face to create a softer appearance.

**4. **Customize the Style* Add hair accessories such as decorative clips, ribbons, or pins to personalize your bun and make it suitable for different occasions.

### **Hairstyle Inspiration for Different Occasions**

**1. **Casual Day Out**

For a relaxed day, opt for a messy bun or classic low bun. Pair with a casual outfit like jeans and a t-shirt for an effortless, chic look.

**2. **Work or School**

A sleek top knot or classic low bun is ideal for professional settings. It keeps hair neat and polished while complementing a business or academic attire.

**3. **Special Events**

For formal events, consider a more refined version of the classic bun or a double twist bun. Enhance with hair accessories or decorative pins to elevate the style.

**4. **Fitness and Sports**

A high ponytail styled into a messy bun or a sleek top knot is perfect for keeping hair secure during workouts. Ensure the style is tightly secured and use sweat-resistant products.

### **Conclusion**

The effortless easy bun is a versatile and stylish hairstyle that suits any occasion. With its simplicity and practicality, it’s a perfect choice for anyone looking to achieve a chic look with minimal effort. Whether you’re preparing for a busy day, a special event, or a casual outing, mastering the art of the easy bun will ensure you always look stylish and polished. Use the step-by-step guides, tips, and variations provided to create the perfect bun for any occasion, and enjoy the ease and elegance this hairstyle offers.

image
پسندیدن
اظهار نظر
اشتراک گذاری
Lyra's Glam Saga
Lyra's Glam Saga
1 Y ·ترجمه کردن

## How to Create a Pull-Through Braid: A Step-by-Step Guide to Achieve Gorgeous, Voluminous Hair 💜

Pull-through braids are a fantastic hairstyle choice if you're looking for a chic, voluminous look without the complexity of traditional braiding techniques. This hairstyle is both trendy and versatile, perfect for casual outings, formal events, or even a fun day out. Whether you’re a braiding novice or a seasoned pro, this guide will walk you through the process of creating a pull-through braid, ensuring your hair looks gorgeous and full of life.

### **What Is a Pull-Through Braid?**

A pull-through braid is a modern twist on the classic braid. Instead of weaving three sections of hair together, this style involves creating a series of loops and pulls that give the appearance of a braid with a voluminous, textured finish. The pull-through braid is relatively easy to master and can be customized to suit different hair lengths and types.

### **Step-by-Step Guide to Creating a Pull-Through Braid**

#### **Step 1: Prepare Your Hair**

**1. Start with Clean, Dry Hair* For best results, begin with clean, dry hair. You can use a volumizing mousse or texturizing spray to add some body and texture.

**2. Brush Your Hair* Ensure your hair is free of tangles by brushing it thoroughly. This will make the braiding process smoother and more manageable.

#### **Step 2: Create a Base Ponytail**

**1. Part Your Hair* Decide on the parting of your hair—center or side part works well.

**2. Secure a High Ponytail* Gather all of your hair into a high ponytail at the desired position. Use an elastic band to secure it tightly. Make sure the ponytail is smooth and free of bumps.

#### **Step 3: Begin the Pull-Through Technique**

**1. Divide the Ponytail* Split the ponytail into two equal sections. These sections will create the loops of your braid.

**2. Create the First Loop* Take a small section of hair from the right side of the ponytail and secure it with a small elastic band, creating the first loop. Leave some hair hanging below the elastic band for added volume.

**3. Pull Through* Take the remaining hair from the left side of the ponytail and pull it through the loop you just created. Smooth the hair out and secure it with another elastic band, forming a new loop. Repeat this process, creating a series of loops by pulling hair through each one until you reach the end of the ponytail.

**4. Secure the End* Once you reach the end of the ponytail, secure the final loop with an elastic band. You can use bobby pins to tuck in any loose ends if necessary.

#### **Step 4: Adjust and Style**

**1. Loosen the Braid* Gently pull on each loop to loosen and create a fuller look. This adds a relaxed, voluminous effect to your braid.

**2. Smooth Out Any Strays* Use a small amount of hairspray or styling gel to tame any flyaways and keep the style looking polished.

**3. Add Finishing Touches* You can wrap a small section of hair around the base of the ponytail to hide the elastic band and create a seamless look. Add hair accessories or decorative clips for a personalized touch.

### **Tips for a Perfect Pull-Through Braid**

**1. **Volume and Texture* For a more voluminous braid, apply texturizing products before starting. Tease the hair slightly at the roots to enhance the fullness.

**2. **Hair Length and Type* Pull-through braids work best with medium to long hair. For shorter hair, consider using hair extensions or temporary hair pieces to achieve the desired length and volume.

**3. **Tightness and Neatness* Ensure each loop is securely fastened and adjust the tightness as needed. A well-secured braid will last longer and maintain its shape throughout the day.

**4. **Use of Accessories* Enhance your pull-through braid with hair accessories such as decorative elastics, jeweled clips, or ribbon wraps for added style.

### **Variations of the Pull-Through Braid**

**1. **Double Pull-Through Braid**

For an extra touch of flair, create two separate pull-through braids and secure them with colorful elastics. This adds a playful and eye-catching element to the traditional braid.

**2. **Side Pull-Through Braid**

Instead of a high ponytail, create a side pull-through braid for a more relaxed and casual look. This variation works well for a bohemian vibe or a laid-back day out.

**3. **Half-Up Pull-Through Braid**

Incorporate pull-through braids into the top half of your hair and leave the bottom half loose. This creates a stylish half-up, half-down look that’s perfect for both casual and formal occasions.

**4. **Pull-Through Braid with Hair Accessories**

Add decorative elements like flower crowns, glittery pins, or bow clips to your pull-through braid for a touch of glamour. This is ideal for special occasions such as weddings or parties.

### **Hairstyle Inspiration for Different Occasions**

**1. **Casual Outings**

For a relaxed day out, keep the pull-through braid simple and natural. Pair it with a casual outfit like jeans and a t-shirt for an effortless look.

**2. **Work or School**

Opt for a neater appearance by smoothing out the loops and ensuring the braid is tightly secured. Pair with professional attire for a polished and put-together look.

**3. **Special Events**

Elevate your pull-through braid with intricate braiding techniques and elegant accessories. Consider using hairspray for added shine and to keep your style in place throughout the event.

**4. **Fitness and Sports**

The pull-through braid is great for keeping your hair secure during physical activities. Ensure the braid is tightly secured and use a sweat-resistant product to maintain the style.

### **Conclusion**

The pull-through braid is a versatile and stylish choice that adds a modern twist to traditional braiding. With its ease of creation and stunning visual impact, it’s perfect for any occasion, from casual outings to special events. By following the step-by-step guide and incorporating your own creative touches, you can achieve a gorgeous, voluminous braid that will enhance your hairstyle and boost your confidence. Embrace the beauty of the pull-through braid and enjoy the endless possibilities it offers for elevating your look.

image
پسندیدن
اظهار نظر
اشتراک گذاری
Lyra's Glam Saga
Lyra's Glam Saga
1 Y ·ترجمه کردن

## 4th of July Braid Ponytail: Patriotic and Stylish Hairstyles for Independence Day

Independence Day is the perfect occasion to celebrate with a style that’s as festive as the holiday itself. One standout hairstyle that combines both patriotism and elegance is the 4th of July braid ponytail. This versatile and stylish look offers a unique twist on classic ponytails, incorporating braids and patriotic colors to help you celebrate in style. In this comprehensive guide, we’ll explore everything you need to know about creating a stunning 4th of July braid ponytail, from step-by-step instructions to styling tips and variations.

### **Why Choose a 4th of July Braid Ponytail?**

The 4th of July braid ponytail is a fantastic choice for several reasons:

- **Patriotic Flair* By incorporating red, white, and blue into your braid ponytail, you can proudly display your patriotic spirit.
- **Versatility* This hairstyle works well for various events, whether you’re attending a backyard barbecue, a fireworks display, or a formal Independence Day celebration.
- **Practicality* The braid ponytail keeps your hair neatly secured, making it ideal for outdoor activities and hot summer weather.
- **Stylish and Fun* It’s a chic way to stand out and showcase your creativity with festive hair accessories and braiding techniques.

### **Step-by-Step Guide to Creating a 4th of July Braid Ponytail**

#### **Step 1: Prepare Your Hair**

Start with clean, dry hair. For added texture and volume, you might want to use a volumizing mousse or texturizing spray. Brush your hair thoroughly to remove any tangles and ensure a smooth styling process.

#### **Step 2: Create a Base Ponytail**

1. **Part Your Hair* Decide where you want your ponytail to sit—high, mid, or low. A high ponytail works well for a more dramatic look, while a low ponytail offers a relaxed vibe.
2. **Gather Your Hair* Using a brush or comb, gather all of your hair into a ponytail. Secure it with an elastic band, ensuring it’s tight and smooth.

#### **Step 3: Braid the Ponytail**

1. **Divide the Ponytail* Split the ponytail into three even sections.
2. **Begin Braiding* Start braiding the sections together in a traditional three-strand braid. If you prefer a fishtail or Dutch braid, you can opt for those styles for added texture and visual interest.
3. **Secure the Braid* Once you reach the end of the ponytail, secure the braid with another elastic band.

#### **Step 4: Incorporate Patriotic Colors**

1. **Add Red, White, and Blue Accents* Use colored hair ties or ribbons to incorporate red, white, and blue into the braid. You can also add colored hair extensions or temporary hair chalk for a vibrant effect.
2. **Wrap and Secure* Wrap sections of the braided ponytail with colored ribbons or hair ties. Secure with bobby pins if needed, ensuring they are hidden.

#### **Step 5: Final Touches**

1. **Adjust the Braid* Gently pull on the braid to loosen it slightly and create a fuller look.
2. **Smooth Out Any Strays* Use a small amount of hairspray or styling gel to tame any flyaways and keep the style looking neat.
3. **Add Accessories* Enhance the look with patriotic-themed hair accessories, such as star-shaped clips, red, white, and blue bows, or small American flag pins.

### **Variations of the 4th of July Braid Ponytail**

**1. **French Braid Ponytail**

For a more intricate look, start with a French braid at the top of your head and continue into a ponytail. This style adds elegance and keeps the braid secure, while also incorporating patriotic colors throughout the braid.

**2. **Fishtail Braid Ponytail**

The fishtail braid offers a textured and detailed appearance. Incorporate red, white, and blue ribbons into the fishtail braid for a unique and stylish twist.

**3. **Double Braid Ponytail**

Create two separate braids from the ponytail and secure them with colorful elastics. This style adds a playful and fun element to the traditional braid ponytail.

**4. **High Ponytail with Braided Accents**

For a high ponytail, braid sections of hair from the sides and incorporate them into the ponytail. Add red, white, and blue accents to the braids for a festive touch.

### **Tips for a Perfect 4th of July Braid Ponytail**

- **Volume and Texture* Use volumizing products to add body to your hair before styling. Texturizing sprays can also help create a more defined braid.
- **Secure the Style* Use bobby pins and additional elastics to keep everything in place, especially if you’re planning to be active or outdoors.
- **Color Maintenance* If using temporary hair chalk or colored extensions, ensure they are securely applied and won’t transfer onto clothing or accessories.
- **Personalization* Feel free to customize the braid ponytail with additional decorations or unique braiding techniques to make it truly your own.

### **Hairstyle Inspiration for Different 4th of July Events**

**1. **Casual Gatherings**

For a relaxed backyard barbecue or casual get-together, keep the braid ponytail simple and comfortable. Opt for a low or mid-height ponytail with minimal accessories.

**2. **Fireworks Displays**

For an evening event, enhance the style with sparkly hair accessories and a slightly more polished look. Consider using a shimmer spray for added sparkle.

**3. **Formal Events**

For a more formal Independence Day celebration, elevate the braid ponytail with intricate braiding techniques, elegant accessories, and a polished finish.

**4. **Family and Community Events**

If you’re attending a family or community event, add playful and festive elements to your braid ponytail, such as star-shaped clips or bright, colorful ribbons.

### **Conclusion**

The 4th of July braid ponytail is a fabulous way to celebrate Independence Day with style and flair. Whether you’re attending a casual gathering or a formal event, this hairstyle offers a blend of practicality and elegance. By incorporating red, white, and blue accents, you can showcase your patriotic spirit while keeping your hair looking chic and secure. With the step-by-step guide and styling tips provided, you’re well on your way to creating a stunning 4th of July braid ponytail that will turn heads and make you the star of the celebration.

image
پسندیدن
اظهار نظر
اشتراک گذاری
Lyra's Glam Saga
Lyra's Glam Saga
1 Y ·ترجمه کردن

## Pull-Through Pigtail Braids: Effortlessly Chic and Trendy Hairstyles for Every Occasion

When it comes to hairstyles that blend simplicity with style, pull-through pigtail braids are an absolute game-changer. This chic and trendy hairstyle is perfect for a variety of occasions, from casual outings to more formal events. With their elegant look and easy-to-master technique, pull-through pigtail braids offer a fresh twist on classic pigtails. In this comprehensive guide, we’ll delve into everything you need to know about pull-through pigtail braids, including step-by-step instructions, tips for achieving the perfect look, and styling variations to suit any occasion.

### **What Are Pull-Through Pigtail Braids?**

Pull-through pigtail braids are a modern, sophisticated take on traditional pigtails. Instead of using a conventional braid technique, this style involves creating a series of loops and pulls to achieve a textured, voluminous effect. The result is a stunning, polished look that’s both easy to achieve and maintain. The hairstyle is versatile, suitable for both casual and formal settings, and can be adapted to suit various hair types and lengths.

### **Step-by-Step Tutorial for Pull-Through Pigtail Braids**

**Step 1: Prepare Your Hair**

Start with clean, dry hair. For added volume and texture, you might want to use a texturizing spray or dry shampoo. Brush your hair thoroughly to remove any tangles and ensure a smooth styling process.

**Step 2: Create the Initial Ponytails**

- **Divide Your Hair* Part your hair down the middle to create two equal sections.
- **Secure the Sections* Gather each section into a high ponytail, securing them with elastic bands. Ensure the ponytails are positioned where you want the pigtails to sit.

**Step 3: Begin the Pull-Through Technique**

- **Create the First Loop* Take a small section of hair from the ponytail and secure it with an elastic band, creating a loop. Leave some hair hanging below the elastic band to add volume.
- **Pull Through* Take the remaining hair from the ponytail and pull it through the loop you created. Smooth it out and secure with another elastic band, creating a new loop. Continue this process, creating loops and pulling hair through each one until you reach the end of the ponytail.

**Step 4: Repeat on the Other Side**

Repeat the same process on the other side to create the second pigtail. Ensure both pigtails are even and aligned.

**Step 5: Final Touches**

- **Adjust the Loops* Gently tug on the loops to create a fuller, more voluminous look. Use your fingers or a comb to smooth out any bumps.
- **Secure the Ends* Secure the ends of the pigtails with elastic bands. You can also wrap a small section of hair around the base of each pigtail for a polished finish.
- **Add Finishing Products* Use hairspray or a light-hold styling product to keep your pigtails in place and add shine.

### **Tips for Perfect Pull-Through Pigtail Braids**

- **Volume and Texture* For a fuller look, add a volumizing mousse or spray before styling. You can also tease the hair slightly at the roots to enhance volume.
- **Hair Length and Type* Pull-through pigtail braids work best with medium to long hair. For shorter hair, consider using hair extensions to achieve the desired length and volume.
- **Loosen Up* If you prefer a softer look, gently loosen the loops by pulling them apart. This adds a relaxed, effortless vibe to the braids.
- **Use Accessories* Add decorative hairpins, clips, or ribbons to personalize the style and make it suitable for special occasions.

### **Variations of Pull-Through Pigtail Braids**

**1. **Double Pull-Through Braids**

Create a double pull-through effect by dividing each ponytail into two sections. Secure each section with elastic bands, and follow the pull-through technique to create a braided look with double loops. This adds extra texture and interest to the style.

**2. **Half-Up Pull-Through Braids**

For a more subtle approach, create pull-through braids only in the top half of your hair. Secure the remaining hair in a loose, low ponytail or bun. This variation offers a chic, understated look while still incorporating the pull-through braid technique.

**3. **Messy Pull-Through Pigtail Braids**

Embrace a relaxed, casual look by intentionally creating a messy effect. Allow some strands to fall loose and use a texturizing spray to enhance the tousled appearance. This style is perfect for a laid-back, bohemian vibe.

**4. **Accessorized Pull-Through Pigtail Braids**

Add a touch of glamour by incorporating hair accessories such as jeweled clips, decorative elastics, or floral pins. This variation is ideal for formal events or special occasions where you want to add a bit of sparkle to your look.

### **Pull-Through Pigtail Braids for Different Occasions**

**1. **Casual Outings**

For everyday wear, keep the style simple and relaxed. Pair your pull-through pigtail braids with a casual outfit, such as jeans and a t-shirt, for a chic yet effortless look.

**2. **Work or School**

To keep the style professional, opt for a neater appearance. Smooth out the loops and secure the pigtails tightly. Pair with a tailored outfit for a polished, put-together look.

**3. **Special Events**

For weddings, parties, or other special occasions, elevate the style with accessories and added volume. Use hairspray or a shine serum to enhance the overall look and keep your pigtails looking pristine throughout the event.

**4. **Fitness and Sports**

Pull-through pigtail braids are perfect for keeping your hair secure during physical activities. Ensure the pigtails are tightly secured and use a sweat-resistant product to maintain the style.

### **Conclusion**

Pull-through pigtail braids offer a stylish, modern twist on traditional pigtails, combining ease of styling with a chic, polished look. Whether you’re preparing for a casual day out, a formal event, or just looking for a new way to wear your hair, these braids provide a versatile and trendy option. With the right technique and a few adjustments, you can achieve a stunning look that suits any occasion. Embrace the effortless elegance of pull-through pigtail braids and enjoy the confidence that comes with a perfectly styled hairstyle.

image
پسندیدن
اظهار نظر
اشتراک گذاری
Showing 8786 out of 11866
  • 8782
  • 8783
  • 8784
  • 8785
  • 8786
  • 8787
  • 8788
  • 8789
  • 8790
  • 8791
  • 8792
  • 8793
  • 8794
  • 8795
  • 8796
  • 8797
  • 8798
  • 8799
  • 8800
  • 8801

ویرایش پیشنهاد

افزودن ردیف


یک تصویر را انتخاب کنید
لایه خود را حذف کنید
آیا مطمئن هستید که می خواهید این ردیف را حذف کنید؟

بررسی ها

برای فروش محتوا و پست های خود، با ایجاد چند بسته شروع کنید. کسب درآمد

پرداخت با کیف پول

هشدار پرداخت

شما در حال خرید اقلام هستید، آیا می خواهید ادامه دهید؟

درخواست بازپرداخت